13.4 Cluster-Enabling a Linux POSIX Volume on a Shared Device
After you have created the shared Linux POSIX volume, you cluster-enable it by creating a cluster resource for it. The cluster resource allows the shared disk and its contents to be moved or mounted on different servers in the cluster. The cluster resource provides a way for clients to automatically reconnect to the volume regardless of which server is hosting it.
EVMS containers are the unit of failover for Linux POSIX volumes. Because the EVMS container is the unit of failover, all volumes in a container also fail over, but only the volumes that are mounted through the cluster resource load script are automatically mounted on failover. Any volumes in the container that are not mounted through the resource load script must be mounted manually.
Perform the tasks in this section to create and configure a new cluster resource. You can modify the cluster resource settings afterwards by using the option in iManager.
-
Section 13.4.2, Creating a Cluster Resource for a Linux POSIX Volume
-
Section 13.4.3, Configuring a Load Script for the Linux POSIX Volume Cluster Resource
-
Section 13.4.4, Configuring an Unload Script for a Linux POSIX Volume Cluster Resource
-
Section 13.4.6, Configuring Policies for a Linux POSIX Cluster Resource
13.4.1 Logging in to iManager
When you create a new cluster resource, a Cluster Resource object is added in eDirectory. Log in to iManager as an administrator user with the credentials necessary to extend the schema for this object.
-
Start your Internet browser and enter the URL for iManager.
http://server_ip_address/nps/iManager.htmlReplace server_ip_address with the IP address or DNS name of an OES 2 Linux server in the cluster that has iManager installed or with the IP address for Apache-based services.
-
Specify your user name and password.
-
Specify the tree where the cluster is located, the click .
-
Continue with Creating a Cluster Resource for a Linux POSIX Volume.
13.4.2 Creating a Cluster Resource for a Linux POSIX Volume
-
In iManager, click , then click .
-
Browse and select the Cluster object of the cluster where you want to add a cluster resource.
When the page refreshes, a list of existing cluster resources is displayed.
-
Click .
-
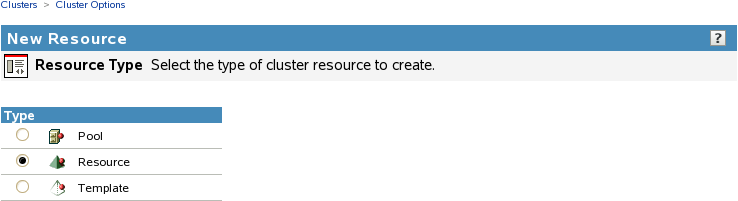
Specify Resource as the resource type you want to create by clicking the radio button, then click .
-
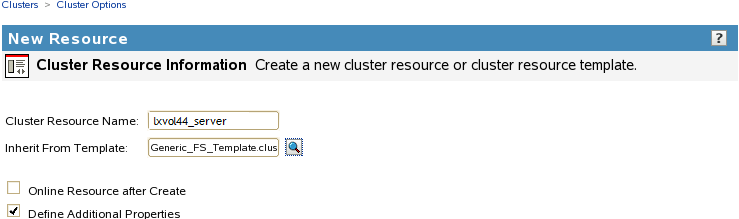
Specify the name of the resource you want to create.
This is the name of the resource for the cluster-enabled Linux POSIX volume. For example, lxvol44_server.
Do not use periods in cluster resource names. Novell clients interpret periods as delimiters. If you use a space in a cluster resource name, that space is converted to an underscore.
-
In the field, browse to the Cluster container object, then locate and select the in that container.
-
Deselect .
This option is deselected by default.
Whenever you modify cluster resource settings, you must offline, then online the resource in order for the changes to take effect.
-
Select the check box, then click .
This takes you through several pages where you can define the load, unload, and monitoring scripts, then configure the cluster resource properties. Each of these are described in later sections as you continue with the cluster resource configuration.
-
Continue with Configuring a Load Script for the Linux POSIX Volume Cluster Resource.
13.4.3 Configuring a Load Script for the Linux POSIX Volume Cluster Resource
The resource load script specifies the commands to start the resource (including mounting the file system) on a server in the cluster.
EVMS containers are the unit of failover for Linux POSIX volumes. Because the EVMS container is the unit of failover, all volumes in a container also fail over, but only the volumes that are mounted through the cluster resource load script are automatically mounted on failover. Any volumes in the container that are not mounted through the resource load script must be mounted manually.
IMPORTANT:When modifying the load script, do not comment out commands that are automatically generated for parameters that define the cluster resource, such as the mount point, IP address, container name, file system type, and device.
If you later need to modify the IP address, administrator credentials, or other attributes of an existing resource, follow the procedure in Section 8.9, Moving a Cluster, or Changing IP Addresses, LDAP Server, or Administrator Credentials for a Cluster.
The generic file system template (selected in Step 6 of Section 13.4.2, Creating a Cluster Resource for a Linux POSIX Volume) contains a load script, and unload script, and a monitoring script that you must customize for your specific configuration.
Gather the following values for each of the scripts. Replace the sample values with actual values. Parameters and values in the script are case sensitive.
|
Resource Definition Information |
Example Value |
|---|---|
|
A unique static IP address that you want to assign to the cluster resource |
10.10.10.44 |
|
The name of the Cluster Segment Manager container that you created in Section 13.3.3, Creating a Cluster Segment Manager Container |
csm44 |
|
The Linux POSIX volume name that you created in Section 13.3.5, Creating an EVMS Volume |
lxvol44 |
|
The file system type you made on the EVMS volume in Section 13.3.6, Making a File System on the EVMS Volume |
ext3 |
|
The Linux path of the mount point where you want to mount the EVMS volume |
/mnt/lxvol44 |
For an example of the customized load script, see Section 13.7.1, Sample Load Script for the Linux POSIX Volume Cluster Resource.
To configure the load script for new cluster resource:
-
On the Load Script page, view the definition section that was pulled from the Generic_FS_Template:
# define the IP address
RESOURCE_IP=a.b.c.d
# define the file system type
MOUNT_FS=reiserfs
#define the container name
container_name=name
# define the device
MOUNT_DEV=/dev/evms/$container_name/volume_name
# define the mount point
MOUNT_POINT=/mnt/mount_point
-
Modify the variable values in the definition lines with the values for your Linux POSIX volume.
For example:
# define the IP address
RESOURCE_IP=10.10.10.44
# define the file system type
MOUNT_FS=ext3
#define the container name
container_name=csm44
# define the device
MOUNT_DEV=/dev/evms/$container_name/lxvol44
# define the mount point
MOUNT_POINT=/mnt/lxvol44
-
(Optional) Modify the mount command to add mount options that are available for the file system.
Check the function mount_fs in the /opt/novell/ncs/lib/ncsfuncs file for additional mount options that are available for the file system you are using.
For example, the Ext3 file system supports mount options for access control lists (ACL) and extended attributes (USER_XATTR). You could add the following to the load script for a shared Ext3 volume to take advantage of those options:
#define mount options
MOUNT_OPTIONS=acl,user_xattr

# mount the file system
exit_on_error mount_fs $MOUNT_DEV $MOUNT_POINT $MOUNT_FS $MOUNT_OPTIONS
-
If the path to the mount point does not exist on other nodes, you can add the following lines in the script before the line to mount the file system:
# create the mount point path when loading on a new node
ignore_error mkdir -p $MOUNT_POINT
-
Below the script editing area, specify the value, then click .
The timeout value determines how much time the script is given to complete. If the script does not complete within the specified time, the resource becomes comatose. Cluster Services marks the process as failed right after the defined timeout expires, but it must wait for the process to conclude before it can start other resource operations.
-
Continue with Section 13.4.4, Configuring an Unload Script for a Linux POSIX Volume Cluster Resource.
13.4.4 Configuring an Unload Script for a Linux POSIX Volume Cluster Resource
The cluster resource unload script specifies the commands to stop the resource (including unmounting the file system) on a server in the cluster.
The generic file system template (selected in Step 6 of Section 13.4.2, Creating a Cluster Resource for a Linux POSIX Volume) contains a load script, and unload script, and a monitoring script that you must customize for your specific configuration. Use the same values for the defined variables that you used in the load script in Section 13.4.3, Configuring a Load Script for the Linux POSIX Volume Cluster Resource.
To configure the unload script for the new cluster resource:
-
On the Unload Script page, view the definition section that was pulled from the Generic_FS_Template:
# define the IP address
RESOURCE_IP=a.b.c.d
# define the file system type
MOUNT_FS=reiserfs
#define the container name
container_name=name
# define the device
MOUNT_DEV=/dev/evms/$container_name/volume_name
# define the mount point
MOUNT_POINT=/mnt/mount_point
-
Modify the variable values in the definition lines with the values for your Linux POSIX volume.
For example:
# define the IP address
RESOURCE_IP=10.10.10.44
# define the file system type
MOUNT_FS=ext3
#define the container name
container_name=csm44
# define the device
MOUNT_DEV=/dev/evms/$container_name/lxvol44
# define the mount point
MOUNT_POINT=/mnt/lxvol44
-
Below the script editing area, specify the value, then click .
The timeout value determines how much time the script is given to complete. If the script does not complete within the specified time, the resource becomes comatose when migrating to another node. Cluster Services marks the process as failed right after the defined timeout expires, but it must wait for the process to conclude before it can start other resource operations.
-
Continue with Section 13.4.5, Enabling Monitoring and Configuring a Monitor Script for a Linux POSIX Volume Cluster Resource.
13.4.5 Enabling Monitoring and Configuring a Monitor Script for a Linux POSIX Volume Cluster Resource
The cluster resource monitor script specifies the commands to monitor the cluster resource.
The generic file system template (selected in Step 6 of Section 13.4.2, Creating a Cluster Resource for a Linux POSIX Volume) contains a load script, and unload script, and a monitoring script that you must customize for your specific configuration. Use the same values for the defined variables that you used in the load script in Section 13.4.3, Configuring a Load Script for the Linux POSIX Volume Cluster Resource.
To configure the monitoring script for the new cluster resource:
-
On the Monitor Scripts page, select the check box to enable resource monitoring for the selected resource.
Resource monitoring is disabled by default.
-
On the Monitoring Script page, view the definition section that was pulled from the Generic_FS_Template:
# define the IP address
RESOURCE_IP=a.b.c.d
# define the file system type
MOUNT_FS=reiserfs
#define the container name
container_name=name
# define the device
MOUNT_DEV=/dev/evms/$container_name/volume_name
# define the mount point
MOUNT_POINT=/mnt/mount_point
-
Modify the variable values in the definition lines with the values for your Linux POSIX volume.
For example:
# define the IP address
RESOURCE_IP=10.10.10.44
# define the file system type
MOUNT_FS=ext3
#define the container name
container_name=csm44
# define the device
MOUNT_DEV=/dev/evms/$container_name/lxvol44
# define the mount point
MOUNT_POINT=/mnt/lxvol44
-
Below the script editing area, specify the value, then click .
The timeout value determines how much time the script is given to complete. If the script does not complete within the specified time, the resource becomes comatose. Cluster Services marks the process as failed right after the defined timeout expires, but it must wait for the process to conclude before it can start other resource operations.
-
Continue with Configuring Policies for a Linux POSIX Cluster Resource to configure the cluster resource behavior for the Linux POSIX volume cluster resource.
13.4.6 Configuring Policies for a Linux POSIX Cluster Resource
You can configure the start, failover, and failback of a cluster resource to happen manually or automatically.
With the resource mode set to AUTO, the resource automatically starts on a server when the cluster is first brought up. If the resource mode is set to MANUAL, you can manually start the resource on a server when you want, instead of having it automatically start when servers in the cluster are brought up.
With the resource mode set to AUTO, the resource automatically starts on the next server in the list in the event of a hardware or software failure. If the resource mode is set to MANUAL, you can intervene after a failure occurs and before the resource is moved to another node.
With the resource mode set to DISABLE, the resource does not fail back to its most preferred node when the most preferred node rejoins the cluster. If the resource mode is set to AUTO, the resource automatically fails back to its most preferred node when the most preferred node rejoins the cluster. Set the resource mode to MANUAL to prevent the resource from moving back to its preferred node when that node is brought back online, until you are ready to allow it to happen.
The preferred node is the first server in the list for the resource.
IMPORTANT:Resources fail back only to the first node in their list. So if a resource has failed over to three servers since it originally ran on its preferred node, and the second server the resource was running on comes back up, the resource will not failback to that second server.
Resources do not automatically move from node to node just because a node higher in the list rejoins the cluster, unless the mode is set to AUTO and the first node in the list rejoins the cluster.
To configure cluster policies for the new cluster resource:
-
(Optional) Select the check box if you want to ensure that the resource runs only on the master node in the cluster.
If the master node in the cluster fails, the resource fails over to whichever node becomes the master.
-
(Optional) Select the check box if you don't want the cluster-wide timeout period and node number limit enforced.
The quorum default values were set when you installed Novell Cluster Services. You can change the quorum default values by accessing the properties page for the Cluster object.
Selecting this box ensures that the resource is launched immediately on any server in the Assigned Nodes list as soon as any server in the list is brought online.
-
Specify the , , and modes for this resource.
The default for both and modes is AUTO, and the default for mode is DISABLE.
-
Click .
-
Assign nodes to the resource as described in Section 10.8, Configuring Preferred Nodes for a Resource, then click .
-
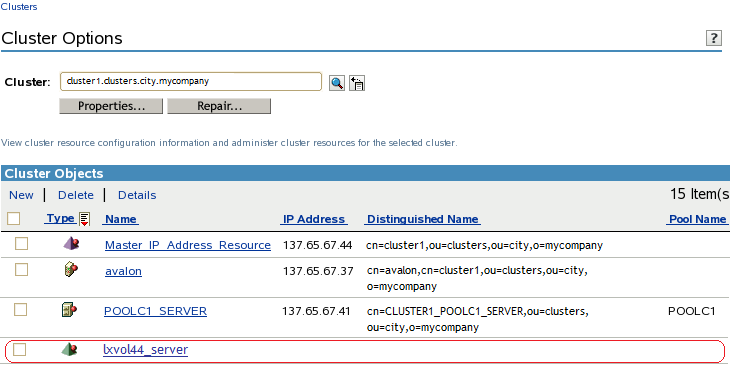
When you are done, verify that the resource was created by viewing its entry in the list on the Cluster Options page.
-
Configure resource priorities for load order as described in Section 10.9, Configuring Resource Priorities for Load Order.
-
(Optional) Assign the resource to a Resource Mutual Exclusion Group as described in Section 10.10, Configuring Resource Mutual Exclusion Groups.
-
Continue with Section 13.5, Verifying the Load and Unload Scripts.