24.2 Migrating iFolder 3.2
You can move iFolders and the user data from an iFolder 3.2 domain to an iFolder 3.8 domain. In the following sections, the iFolder 3.2 server is referred to as the source server and the iFolder 3.8 server as the target server.
24.2.1 Supported Platforms
Table 24-3 Supported Platforms
|
Source Platform |
Target Platform |
|---|---|
|
OES 1.x Linux |
OES 2 Linux SP3 |
24.2.2 Prerequisites
Before proceeding to migrate, see Prerequisites.
24.2.3 Planning
-
Novell iFolder Server: Novell iFolder 3.8 has the capacity to manage 1000 connected users simultaneously in a single server. This can vary based on the server hardware and network capabilities. If there are more than 1000 users, you can use a multi-server setup. For details, see Deploying iFolder Server in the Novell iFolder 3.8 Administration Guide.
-
Web Access Server: The Novell iFolder 3.8 Web Access console for end users is running on the target server.
-
Web Admin Server: The Novell iFolder 3.8 Web Admin console is running on the target server. You must ensure that the policies for disk quota, iFolder limit, and file filter are set at system level, because these policies affect the storage availability in the server. For details on policies, see Configuring System Policies in the Novell iFolder 3.8 Administration Guide.
-
Multi-Server Setup: If you have a predefined choice of servers for a set of users or LDAP Groups, you must provision them, and set the policies by using the iFolder 3.8 Web Admin console. If the users are not provisioned and no policies are set, the iFolder 3.8 server uses the round-robin provisioning method to provision the users. Novell iFolder 3.8 has its own LDAP attribute for provisioning users and it does not use the iFolder 3.x LDAP attribute for provisioning. You can use iFolder 3.8 LDAP attribute for selective provisioning and use the Web Admin console for manual provisioning of users and groups.
24.2.4 Migration Scenarios
The following scenarios are supported for migrating Novell iFolder Services:
-
Transfer ID: In this scenario, the target server is installed into the same eDirectory tree as the Source server, with a temporary hostname and IP address.The iFolder 3.2 data is copied to the target machine to perform the basic operations, while the original copy is operational in the source machine until the movecompletes and all of the iFolder 3.2 data on the source server is available on the target server. The target server functions with the same credentials (such as IP address and hostname) as the source server and the source server node is no longer available in the eDirectory tree.
-
Consolidate: In this scenario, you can copy the iFolder data from any number of existing source servers to a target server. The source server must be running OES 1 SP2 Linux version. The target server must be running on OES 2 SP3 on either 32-bit or 64-bit hardware.
In the Transfer ID scenario, only the Same Tree migration is applicable. In the Consolidate scenario, both the Same Tree and Different Tree migration are possible.
-
Same Tree: In this scenario, the source server and target server are on the same eDirectory tree. The source server must be running OES 1 SP2 Linux version. The target server must be running on OES 2 SP3 on either 32-bit or 64-bit hardware.
-
Different Tree: In this scenario, the source server and the target server are on different eDirectory trees. The source server must be running OES 1 SP2 Linux version. The target server must be running on OES 2 SP3 either on 32-bit or on 64-bit hardware.
24.2.5 iFolder Migration Process
You can perform the migration through either the Migration Tool GUI or through the command line.
Using the Migration Tool GUI
-
Install, configure, and run iFolder 3.8 on the target server.
-
Copy the simias.config file from the source server to the location /var/lib/wwwrun/.local/share/simias in the target server.
-
Open the Migration Tool GUI.
Desktop: Select .
Terminal: Log in as the root user and at a terminal prompt, enter miggui
-
Authenticate to the source and target servers. All the associated services are listed in the Services panel.
-
You must configure the file system before configuring the iFolder 3.2 service. To configure NSS or NCP volumes, select , then click Configure. For any other file system, perform migration using Command Line Utilities. For more information on configuring file system, refer to Section 16.5, Migrating File System Using Command Line Utilities
-
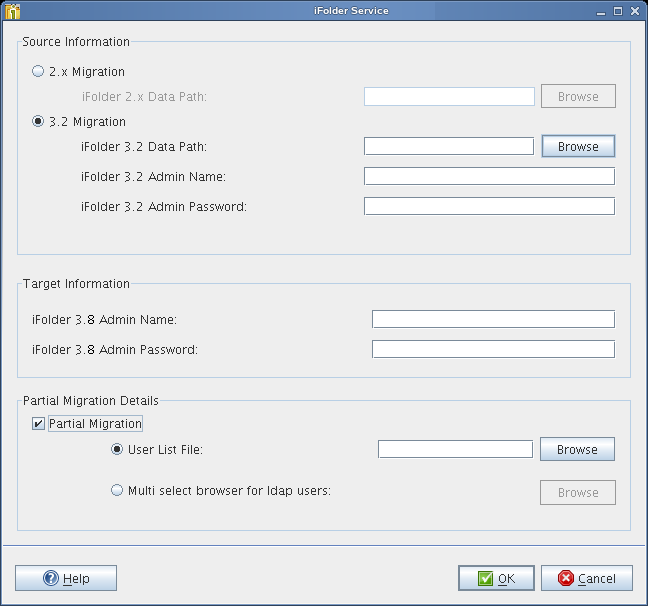
Select , then click . The iFolder configuration window displays as follows.
IMPORTANT:Ensure that you migrate the iFolder 3.2 file system data by using the file system migration tools. For more information, refer to Section 16.4, Migrating File System Using GUI.
The default data path for iFolder is /var/lib/wwwrun/simias for Linux.
-
Fill in the following fields:
Parameter
Description
3.2 Migration
Select this option if you want to migrate the iFolder 3.2 application to iFolder 3.8.4 on OES 2 SP3.
iFolder 3.2 Data Path: Specify the path where the iFolder 3.2 system data is migrated to on the target server. This is the location on the iFolder target server to which iFolder application files and the users' iFolders and files are migrated. The path is case-sensitive.
iFolder 3.2 Admin Name
Specify the username of the iFolder 3.2 administrator. This is the fully distinguished name of the iFolder admin user. For example: cn=admin,o=acme.
iFolder 3.2 Admin Password
Specify the iFolder 3.2 admin password.
iFolder 3.8 Admin Name
Specify the username of the iFolder 3.8 administrator. For example: admin.
iFolder 3.8 Admin Password
Specify the iFolder 3.8 admin password.
Partial Migration
Select this option if you want to perform a partial migration, which allows you to select a set of users and migrate them to an iFolder 3.8 domain.
User List File: Specify the location of the user list file. This file is a text file that contains the list of user DNs for all the users selected for migration. Ensure that each user DN starts in a new line.
Select LDAP Users: Browse the eDirectory tree and select the users for migration.
-
Click to configure iFolder for migration.
-
In the main window, you can either configure other services, or click to start the migration process.
The Migration Tool takes care of the order in which each service migrates. Therefore, the iFolder migration initiates only after file system migration is completed.
Using Command Line Utilities
To run the Novell iFolder migration utility through command line, run /opt/novell/migration/sbin/migif3 --option=value with the following details:
|
Option |
Description |
|---|---|
|
--precheck |
(Optional) Checks whether migration is possible with the given parameters. |
|
--oldadminname |
Specifies the username of the iFolder 3.2 administrator. |
|
--newadminname |
Specifies the username of the iFolder 3.8 administrator. |
|
--oldadminpassword |
Specifies the iFolder 3.2 admin password. |
|
--previousserverurl |
Specifies the IP address of the iFolder 3.2 server. |
|
--newserverurl |
Specifies the IP address of the iFolder 3.8 server. |
|
--workarea |
(Optional) Specifies the location for the temporary migration files. |
|
--userlist |
(Optional) Specifies a text file that contains the list of users for migration. If you don’t specify this, a complete migration is performed. |
|
--sync |
(Optional) Performs the sync operation during migration for any changes made on the source server. |
24.2.6 What to Expect
-
The user data (iFolders) is migrated.
-
If the user list is provided, only those users specified in the user list are migrated.
-
In the Transfer ID scenario, the iFolder 3.8 updates the configuration files with the new server IP address after the migration is completed.