7.2 Configuring Default Settings
As the name implies, Default Settings lets you specify the default settings for all new virtual search servers. For example, if you set the default query encoding from the General Settings page to Unicode (UTF-8), any new virtual search server you create after making this change defaults to the new setting. After you create a new virtual search server, you can then change its default settings.
For more information, see Section 7.2.1, Configuring Default General Settings and Section 8.0, Creating and Managing Virtual Search Servers.
Default settings are meant to make the creation of new virtual search servers easier. By letting you specify common settings for use by all new virtual search servers, you don’t need to waste time making the same configuration changes each time you create a new virtual search server.
Before you begin making changes, start by exploring QuickFinder so that you can decide what the most common configuration settings should be for your situation. You might start by planning your search solution to get ideas about the purpose for it, who will be using it, what languages it must support, and so on. For additional information about planning your search solution before you begin creating it, see Section 3.3, Designing Your Search Solution.
Existing virtual search servers are not affected by these changes.
7.2.1 Configuring Default General Settings
General Settings lets you modify general query, response, error log, and e-mail settings.
Modifying Query Settings
-
On the QuickFinder Server Manager’s Global Settings page, click under .
-
From the drop-down list, select an encoding that represents the character set encoding that the users of your search services are most likely to use.
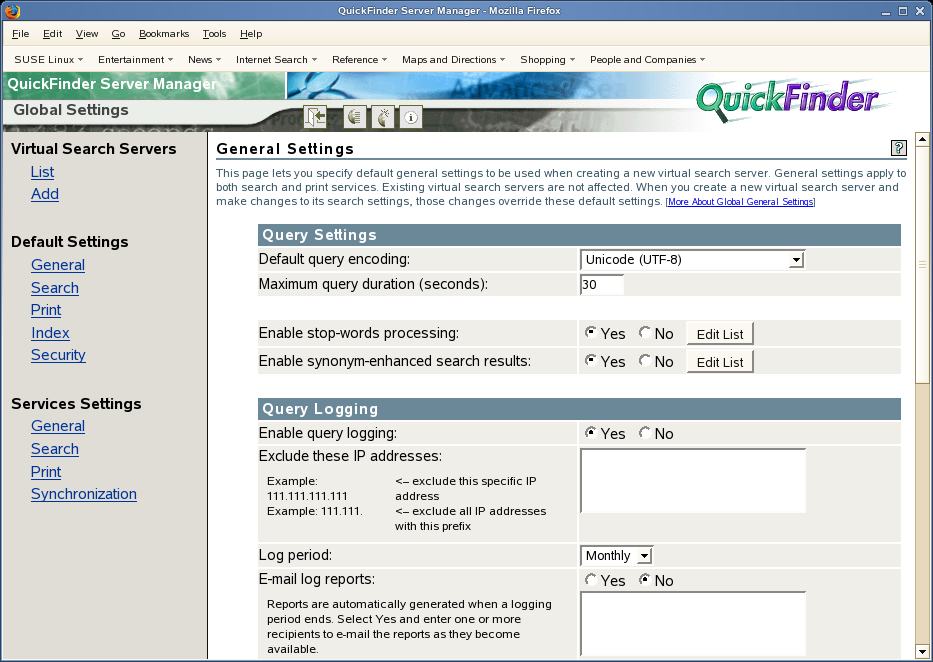
UTF-8 is a good choice for most situations because it works for all languages. However, there might be times you need to select an encoding other than UTF-8. For example, if you are hosting a Japanese Web site for a Japanese-only audience, you don’t want to choose UTF-8 because it needs 3 bytes for most Japanese characters. In this case, a better choice might be Shift_JIS or ISO-2022-JP. For more information about character sets, see Section B.0, Combined Character Sets for Use with QuickFinder.
-
In the field, specify the maximum number of seconds before QuickFinder should end a query, regardless of whether a search has been completed.
This option is one of several methods that enable you to protect your server’s resources from processing rogue searches, which are sometimes intended to harm your service by consuming server resources. For more information, see Section 15.0, Security Considerations for QuickFinder Server.
-
(Optional) Click next to if you want QuickFinder to ignore insignificant words, such as adverbs, conjunctions, or prepositions, in a user’s search query.
For information about stop words and how to edit the default list of stop words, see Using Stop Words Processing to Improve Search Speed.
-
(Optional) Click next to if you want QuickFinder to expand search queries by looking for synonyms of the original search terms.
Synonym enhancement is not performed within the FileFilter section of a search. For more information about synonym enhanced searches, see Using Synonyms to Broaden Search Results.
-
Click .
Modifying Default Query Logging Settings
When query logging is enabled (it is enabled by default), it captures many details about user queries, including total number of searches performed (for the current logging period), top 100 search terms, load statistics, most popular indexes, and the number of print jobs and highlights performed. It also provides information about queries that resulted in a not found
error message. This information can be used to improve the performance of your search services, or to identify areas of your site that could be improved.
-
On the QuickFinder Server Manager’s Global Settings page, click under .
-
Click next to .
To disable query logging, click next to .
-
In the field, specify one or more IP addresses of the computers that you want excluded from the query log, separating each additional address by a space or hard return.
This feature enables you to eliminate query logging for searches originating within your organization. Keeping query log information gathered from customer queries separate from log information related to employees of your own company can help you identify issues that directly affect your customers.
-
From the drop-down list, select a log period of either or .
QuickFinder records search requests in the current log file until the end of the specified period. When QuickFinder switches to a new log file, a report for the old log file is automatically generated.
-
In the field, specify one or more e-mail addresses where you want copies of each new log report sent, separating each additional address by a space or hard return.
If this field does not appear, it is because you have disabled e-mail services on your QuickFinder Server. To enable e-mail services, go to the QuickFinder Global Settings page and click .
-
To view an existing log report, select one from the field, then click View .
If there are no logs listed, you have not yet generated a log report. Click to create a report of the current (not yet completed) log period. Depending on the amount of information in the logs, this process can take anywhere from a few seconds up to several hours to complete. After a new report is generated, it appears in this field.
-
(Optional) If you want to specify a different logging template, specify the name of the template in the field.
QuickFinder provides the following templates at install time:
-
ReportTemplate.html: Produces an HTML summary report of the query log data.
-
ExportTemplate.xml: Exports the raw query log data into an XML file format that can be easily consumed by other reporting tools such as Crystal Reports, databases, and executive information systems.
The templates are located in the virtual search server directory (for example /qfsearch/sites/default), and the logs and reports are located in /qfsearch/sites/default/logs. See Section 12.11, Query Report Template Variables for more information on editing or creating you own query report templates.
-
-
Click .
Modifying Response Settings
-
On the QuickFinder Server Manager’s Global Settings page, click under .
-
Under , select an output encoding from the drop-down list.
This setting specifies the encoding QuickFinder should use when responding to user queries by using the search and print results templates, and the error and response messages templates.
-
Specify the maximum number of potential search results (hits) in the field that QuickFinder allows before cancelling the search.
A potential hit refers to all initial occurrences of a user’s search terms in an index. After all matches between search terms and their related documents are found in the index, filters are applied to narrow the list of search results. Determining a user’s access rights to individual files when performing a rights-based search is an example of a filter.
If a search term is too vague, it can produce an excessively large list of potential hits, which can place an unnecessary burden on your server. By limiting the number of potential hits allowed, you can reduce the processing overhead that is otherwise placed on your server. If a user’s search query produces a number of potential hits that exceed the number you specify, a message is returned to them suggesting that they be more specific in their search query.
Although a hit might be found in the index, it might not yet be authorized by Novell eDirectory and the file system to determine access rights. The number you specify here is critical in situations where a user might have access to only a few documents in an index that contains thousands of files.
-
Click .
Modifying Error Log Settings
-
On the QuickFinder Server Manager’s Global Settings page, click under .
-
In the field, specify the maximum size (in bytes) that QuickFinder should allow the log file to grow to.
Depending on the number of visitors that your virtual search servers hosts, log files can become large. This setting protects your system’s hard drive resources.
The number you specify here is divided evenly between two log files. For example, if you specify 30000, each log file allows up to 15000 bytes of logged data. This ensures that you always have at least 15000 bytes of logged synchronization data.
-
Click .
Modifying E-Mail Settings
-
On the QuickFinder Server Manager’s Global Settings page, click under .
-
(Optional) Click next to if you want QuickFinder to generate an e-mail message when errors occur during the generation (or regeneration) of your virtual search server’s indexes, or when your indexes are being synchronized with other QuickFinder servers.
IMPORTANT:If the E-mail Settings feature is not visible, you must enable it from the page. See Configuring General Services Settings.
-
(Optional) If you enabled e-mail services, type one or more e-mail addresses indicating where error messages should be sent.
The addresses you specify here become default addresses for each virtual search server. They can be removed from within each virtual search server, or more addresses can be added. Separate each address with a space, comma, semicolon, or return.
-
Click .
7.2.2 Configuring Default Search Settings
Default Search Settings lets you modify default search query, response, and template settings for all new virtual search servers.
Modifying Search Query Settings
-
On the QuickFinder Server Manager’s Global Settings page, click under .
-
(Optional) Under , click next to if you want to redirect specific queries to specific URLs.
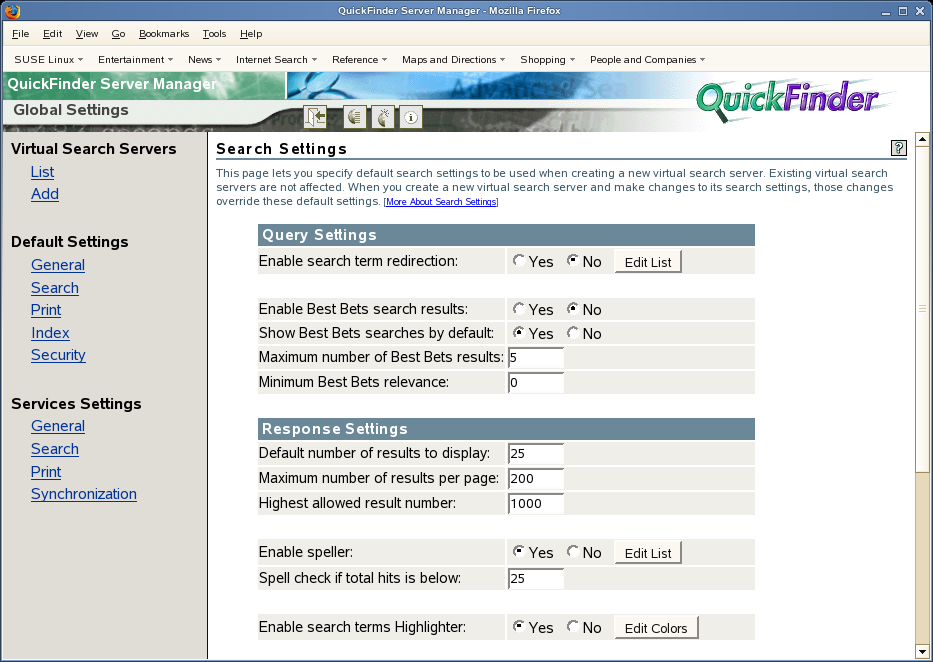
For example, searching for one net on www.novell.com redirects your browser to a special page designed to emphasize the Novell One Net strategy, rather than returning the search results page.
For more information about other QuickFinder features you can use to improve the search service experience for your users, see Section 10.0, Optimizing Search Results.
-
(Optional) Click next to if you want a specialized set of search results added to the top of the search results list.
Best bets is another method of helping users find what they are looking for more quickly. For more information, see Using Best Bets to Help Users Find the Right Information.
-
If you enabled best bets, click next to if you want the best bets results list to always appear on the search results page.
Click if you want users to request the best bets results list at the time of their search request.
-
In the field, type the maximum number of best bets results to be included per search results page.
Consider keeping the list relatively short because the purpose of best bets is to narrow the search for users.
-
In the field, type the number of low relevance documents you want removed from the best bets display.
-
Click .
Modifying Search Response Settings
-
On the QuickFinder Server Manager’s Global Settings page, click under .
-
Under , specify the number of search results in the field that you want included on search results pages.
For example, if you set this to 25 (the default setting) and the number of hits in a return was 200, QuickFinder only returns 25 hits per search results page.
-
Set a limit on the number of results allowed at one time on the results page by specifying a number in the field.
Use this setting (and the setting) to protect your server from users who might attempt to set the number of results excessively high in order to intentionally abuse your computer. This can be done using available query parameters such as &NumHits=number and &StartHit=number. This setting blocks the use of such parameters.
-
Specify the highest number of search results that can be returned to a user query in the field.
-
(Optional) Click next to to have QuickFinder provide alternate spelling suggestions for search terms.
Use the option to have QuickFinder spell-check search terms if the number of search results is lower than the number specified.
-
(Optional) Click next to if you want users’ search terms to be highlighted in the documents returned in a search.
When the highlighter is enabled, a special icon appears on the search results page that users can click to show highlighted words in context. For instructions about how to customize the colors used by the highlighter, see Customizing or Deleting Highlighter Color Schemes.
-
Click .
Customizing or Deleting Highlighter Color Schemes
-
On the QuickFinder Server Manager’s Global Settings page, click under .
-
Click to save any changes you have made.
Clicking causes any unsaved changes to be lost
-
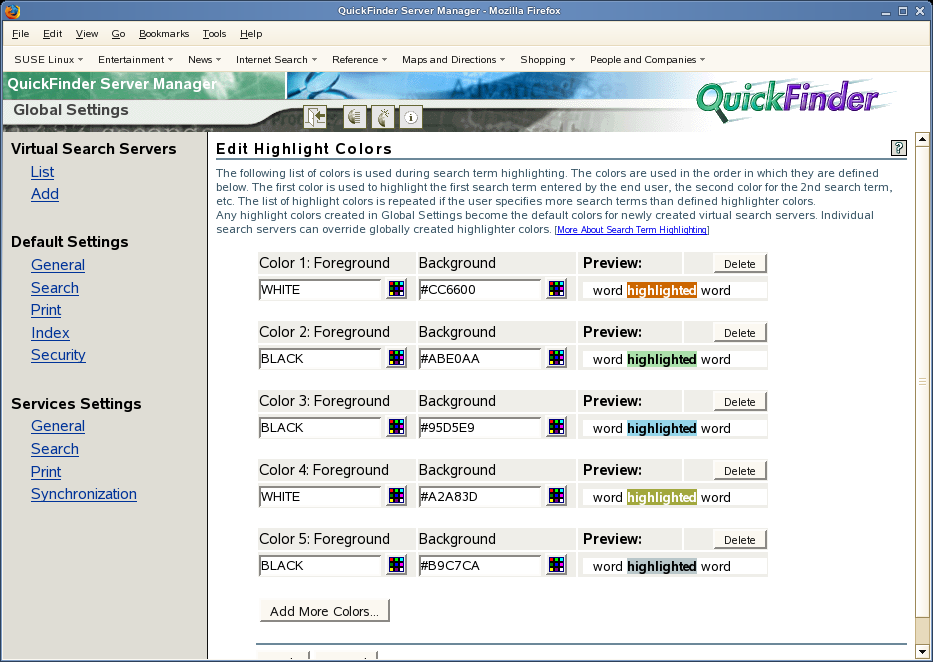
Under , click next to .
-
Click the button in the and columns to select a color.
or
Type the color value (such as #RRGGBB) or color names. You can review your selections in the column.
-
If you want to define additional colors, click .
Because a user can search for more than one search term at a time, you can define multiple colors so that each search term appears in a different color. For example, if a user searched for “HTTP AND Apache”, the terms appear highlighted in the documents where they originated. The colors are used in the order in which they are defined here.
-
To remove a defined color set, click in the row of the color set you want removed.
-
Click .
Modifying Search Template Settings
-
On the QuickFinder Server Manager’s Global Settings page, click under .
-
Under , specify a path to where your QuickFinder templates are stored in the field.
The default path is /var/lib/qfsearch/Templates. If you have created custom templates, or you want to keep your templates elsewhere, specify the path here so that QuickFinder knows where the templates are.
-
From the drop-down list, select the character set that your templates are written in.
This value is used with templates that do not specify an encoding. Encodings found in templates that do not match the encoding you specify here override this encoding.
-
In the field, specify the filename of the search page template you want to use.
If you have created a custom template and want QuickFinder to use it as your search page, specify its name in this field.
-
In the field, specify the filename of the search results template you want to use.
As with the default search page template, if you have created a custom search results template and want QuickFinder to use it as your default search results page, specify its name in this field.
-
In the field, specify the filename of the highlighter template you want to use.
As with the default search and results page templates, if you have created a custom highlighter template and want QuickFinder to use it as your default highlighter page, specify its name in this field.
-
In the field, specify the filename of the template that QuickFinder should return if no results are found.
-
In the field, specify the filename of the template that QuickFinder should return if there are errors while processing a user’s query.
-
Click .
For more information about QuickFinder templates, see Section 11.0, Understanding Templates.
7.2.3 Configuring Default Print Settings
Default Print Settings lets you modify default print results and print template settings for all new virtual search servers.
Modifying Default Print Result Settings
-
On the QuickFinder Server Manager’s Global Settings page, click under .
-
Under , specify the number of print results in the field that you want displayed on each print results page.
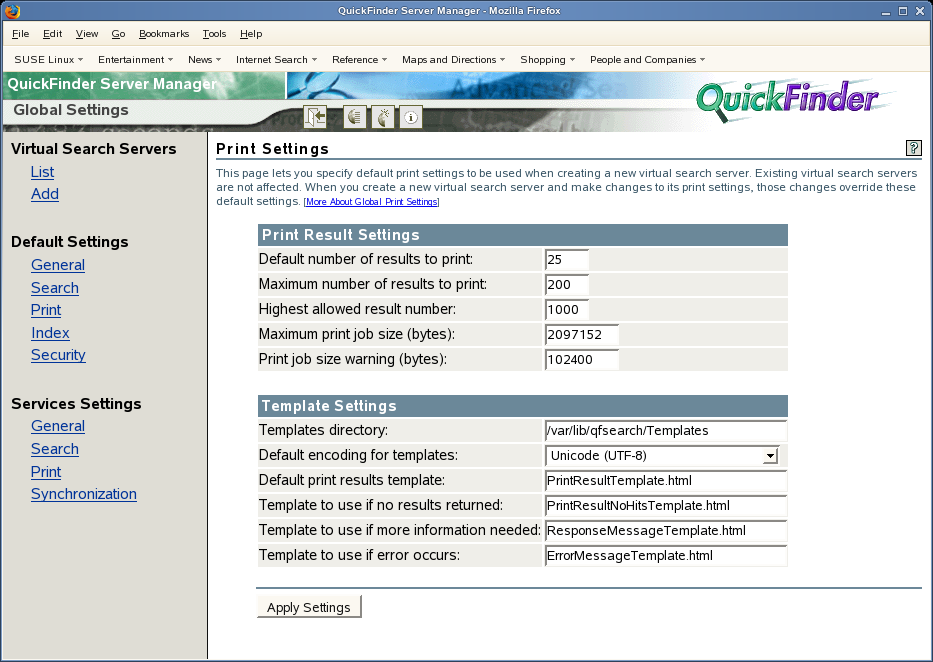
For example, if you set this to 25 (which is the default setting) and the number of hits in a return was 200, QuickFinder only returns 25 hits per print results page at a time.
-
Set a limit on the number of results allowed at one time on the results page by specifying a number in the field.
-
Specify the highest number of search results that can be returned to a user query in the field.
-
To limit the size of a print job, specify the largest print job size that QuickFinder should allow in the field.
Any users requesting a print job larger than this value receive a message informing them that the request was too large.
This is a useful feature for administrators who want to keep down the size of print jobs in their own companies, departments, or organizations.
-
To have users notified when a print job exceeds a certain size, specify the print job size in the field.
By default, this message is sent by using the ResponseMessageTemplate.html file and is intended as a warning to users that they are exceeding the allowed print job size. It then prompts the user to confirm the print job before continuing.
-
Click .
Modifying Default Print Template Settings
-
On the QuickFinder Server Manager’s Global Settings page, click under .
-
Under , specify a path in the field to where your QuickFinder templates are stored.
The default path is /var/lib/qfsearch/Templates. If you have created custom templates, or if you want to keep your templates elsewhere, specify the path here so that QuickFinder knows where the templates are.
-
From the drop-down list, select the character set that your templates are written in.
This value is used with templates that do not specify an encoding. Encodings found in templates that do not match the encoding you specify here override this encoding.
-
In the field, specify the filename of the print results template you want to use.
If you have created a custom print results template and want QuickFinder to use it when returning print results, specify its name in this field.
-
In the field, specify the filename of the template that QuickFinder should return if no print results match a user’s query.
-
In the field, specify the filename of the template to be sent back to users whose print jobs exceed the size you specify in the field. (See Step 6 in Modifying Default Print Result Settings.)
-
In the field, specify the filename of the template that QuickFinder should return if there are errors while processing a user’s print query.
-
Click .
7.2.4 Configuring Default Index Settings
These settings are intended to make the process of creating indexes even easier by letting you configure common settings as default settings. This saves you time because you don’t need to make the same selections each time you create a new index.
Modifying Default Index Settings
-
On the QuickFinder Server Manager’s Global Settings page, click under .
-
Select the type of index that you want as the default index type on the Indexing Management page.
Each time you create a new index, the index type you select here is automatically selected. You can change the default index type when you create an index.
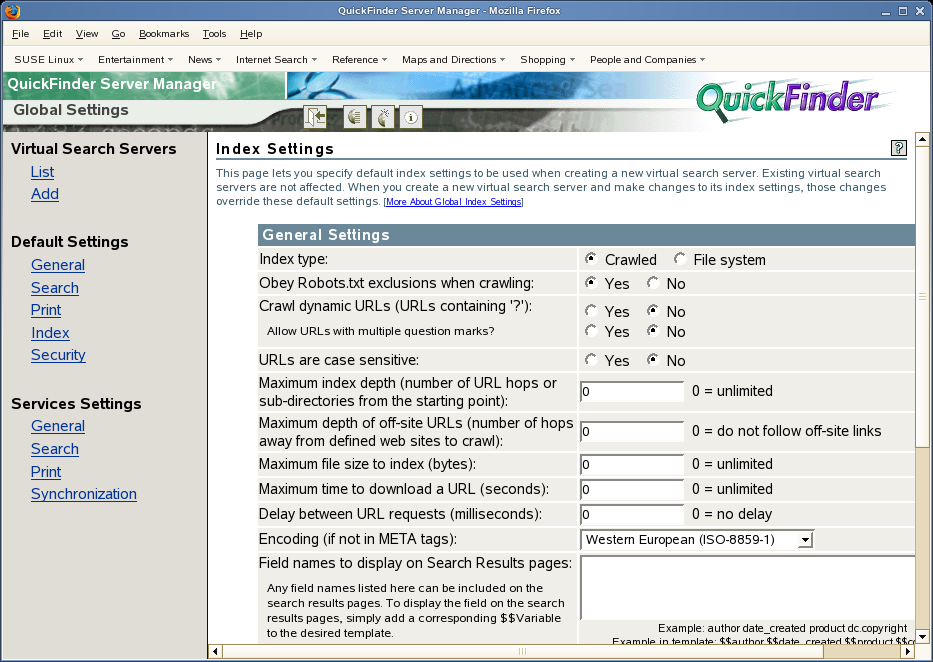
-
Click next to to instruct QuickFinder to obey the instructions in the Robots.txt file as it indexes Web sites.
For more information about Robots.txt, see Using the Robots Meta Tag.
-
Click next to if you want QuickFinder to index dynamic content, in addition to static content.
Some search engines do not crawl Web pages that are created dynamically, such as pages generated from forms submitted by a Web browser. The URLs of dynamic content typically contain a question mark (?) followed by additional parameters. (See Section 8.7, Indexing Dynamic Web Content.)
Because dynamic content can change at any time, you might want to schedule more frequent regeneration events for your indexes when enabling this feature. For information about scheduling automatic updates to your indexes, see Section 8.9, Automating Index and Server Maintenance.
-
Click next to if you want QuickFinder to crawl URLs with multiple query strings (parameters).
-
Select the option if you want QuickFinder to recognize URLs that are different only in character case, but are otherwise identical. For example, www.digitalairlines.com versus www.DigitalAirlines.com.
IMPORTANT:Setting this option to can help QuickFinder avoid indexing duplicate information, which can come from indexing URLs that are presented in different cases but actually point to the same information. However, if a Web server being indexed is configured to differentiate between cases, QuickFinder might leave out content that you want indexed.
-
In the field, specify the maximum number of hypertext links from the starting URL that QuickFinder should follow before it stops indexing.
-
In the field, specify the maximum number of hypertext links off-site from the starting URL that QuickFinder should follow before it stops indexing.
-
Specify a number (in bytes) in the field to keep QuickFinder from indexing files larger than the number you specify.
-
In the field, specify a number (in seconds) before QuickFinder automatically skips the indexing of the specified URL.
-
Type a number (in milliseconds) in the field that QuickFinder should pause between requests for URLs that it is trying to index.
-
From the drop-down list, select the encoding to be used when indexing files that do not contain an encoding specification.
For example, HTML files can specify their encoding with a Content-Type meta tag.
-
In the field, list any field names that you want to be included on the search results page (for example, author date_created product dc.copyright).
To display the field on the search results pages, add the corresponding $$Variable to the template (for example, $$author $$date_created $$product $$copyright).
The field data is stored in the index and causes the index size to increase.
-
Click .
Allowing Indexes to Be Used with QuickFinder Synchronization
-
On the QuickFinder Server Manager’s Global Settings page, click under .
-
Under , click next to .
For more information about QuickFinder Synchronization, see Section 9.0, Synchronizing Data Across Multiple QuickFinder Servers.
-
Click .
Enabling or Disabling User Authentication When Accessing Indexes
-
On the QuickFinder Server Manager’s Global Settings page, click under .
-
(Optional) Under , click to allow anyone to access the indexes.
No user authentication is required to search the indexes of the current virtual search server.
-
(Optional) Under , click to restrict access to the indexes only to those who have access rights to the filename you specify in the field.
-
In the field, specify the full path to a file on your server that already has rights protection assigned to it.
For example, if Apache 2 is your Web server, you might type /usr/local/Apache2/htdocs/index.html.
-
Select either or from the drop-down list to specify how QuickFinder should handle attempts to access indexes without authorization.
-
Select if you don’t want any search results displayed when users attempt to search the index without first logging in. A No Results Found message is returned instead.
-
Select to have QuickFinder return search results to users who have not logged in. When they attempt to click a search result, they are then prompted for a username and password.
HINT:You can use the $$BeginUnAuthorized and $$EndUnAuthorized template variables to control how the template should display unauthorized hits. For more information about template variables, see Section 12.0, Working with Template Variables and Search Parameters.
-
-
Click .
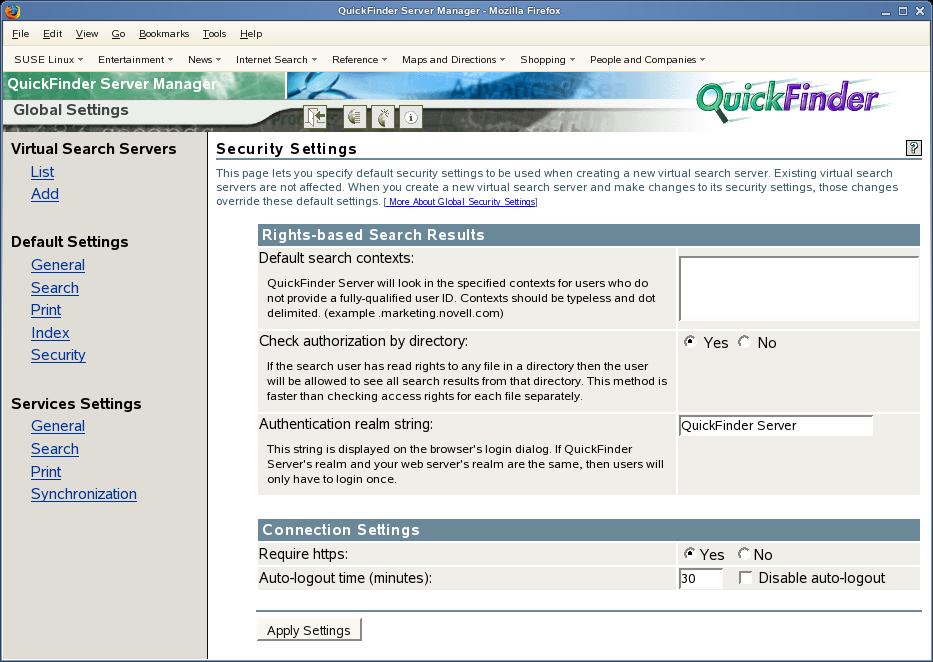
7.2.5 Configuring Default Security Settings
Security settings let you manage access to indexed content by requiring users to authenticate to a server before seeing rights-protected search results. The Security Settings page lets you configure rights-based search results and specify secure connection settings, including enabling the HTTPS protocol for securing usernames and passwords as they are sent over the network.
Modifying Default Rights-Based Search Results
-
On the QuickFinder Server Manager’s Global Settings page, click under .
-
In the field, type the eDirectory context where user objects are stored.
If you provide a context here, users won’t need to supply their fully qualified user IDs when logging in to QuickFinder. For example, if your user objects are all kept in a container named employees, type employees in the field so that QuickFinder knows where to look when a user attempts to log in. A user whose fully qualified name is sjones.employees.marketing.digitalairlines would only need to enter sjones.
-
Click next to if you want QuickFinder to validate user rights to files in a directory (search results) based on whether or not users have rights to any one file in the same directory.
-
In the field, specify the correct authentication realm string, which is typically shown in your Web browser’s login dialog box.
Specifying the Apache Web server’s authentication realm string in this field means that after users authenticate to the Web server, they won’t need to authenticate again when using QuickFinder to search and access protected information.
If Apache is your Web server, refer to http://httpd.apache.org/docs-2.0/howto/auth.html for more information about authentication.
-
Click .
Modifying Default Connection Settings
-
On the QuickFinder Server Manager’s Global Settings page, click under .
-
Under , click next to if you want to protect usernames and passwords as they are sent across the network or Internet.
-
Specify a number (in minutes) in the field to direct QuickFinder to log users out who have been idle for the specified period of time.
-
Click .