9.12 Removing the Shadow Relationship for a Non-Clustered DST Shadow Volume
Removing a DST shadow volume simply removes the relationship between the primary and secondary storage area. It does not remove the underlying volumes themselves. The files remain on whichever storage area they are on at the time when you remove the shadow relationship.
IMPORTANT:If you are using clustered shadow volumes or remote volumes, use the procedures in the following sections:
9.12.1 Preparing to Remove a Shadow Volume
Before you remove a shadow volume relationship, ensure that you shift data between the two volumes that make up the shadow volume, according to where you want the data to reside after the DST shadow volume relationship is removed.
-
In Novell Remote Manager for Linux, log in as the root user.
-
Select , locate the volume in the list, then click the link next to it.
View the volume inventory for the shadow volume to determine the space in use and the available space for both the primary and the secondary areas of the shadow volume. Ensure that there is sufficient fee space available in either location for the data that you plan to move to that location.
-
Use any combination of the following techniques to shift data between the two areas:
-
Shadow Volume Policies: Run an existing shadow volume policy by using the option in the area of the policy. You can also create a new shadow volume policy that moves specific data, and run the policy by using the and options in the area of the policy.
For information about configuring policies to move data between the primary and secondary areas, see Section 10.0, Creating and Managing Policies for Shadow Volumes.
-
Inventories: Use the detailed inventory reports or customized inventories to move specific files to either area.
For information about using the volume customized inventory options to move data between the primary and secondary areas, see Section 11.5, Generating a Custom Inventory Report.
-
9.12.2 Removing the Shadow Volume Relationship by Using Novell Remote Manager
-
In Novell Remote Manager for Linux, log in as the root user.
-
Select to go to the NCP Shares page.
-
Ensure that you know which NSS volume is being used as the secondary volume so that you can manage it independently later.
-
On the NCP Shares page, locate the primary NSS volume in the list, then click the icon next to the share name.
-
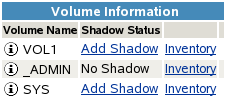
On the primary volume’s Share Information page, view the volume information in the .
In the following example, ARCVOL is an NSS volume that is the secondary storage area in the shadow volume.

-
-
On the NCP Shares page, locate the primary NSS volume in the list, then click the button next to the share name.

-
On the Manage Shares page, click the (i) icon next to the volume name of the NSS volume to access the .

-
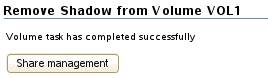
On the volume’s Share Information page under > , click .
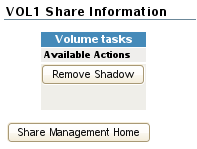
After the shadow volume is removed, the page refreshes to report a successful removal.
-
Select to go to the NCP Shares page, locate the volume that was the primary volume in the list, then click the button next to it.
-
Verify that the shadow volume was removed by using one of the following methods:
-
Select to go to the Dynamic Storage Options page. The former primary volume now has an link next to it instead of a link.
-
Select , then click the icon next to the former primary volume’s name. The field displays n/a (not applicable).

-
-
Enable the NCP/NSS Bindings on the volume that was used as the secondary volume (for example, ARCVOL) in order to mount the volume for NCP.
For information, see Section 9.4.2, Enabling the NCP/NSS Bindings for an NSS Volume.
9.12.3 Removing a Shadow Volume by Editing Configuration Files
-
Open a terminal console, then log in as the root user.
-
Edit the /etc/opt/novell/ncpserv.conf file to remove the following entry for your volume, then save your changes.
SHADOW_VOLUME primary_volumename secondary_volume_path
For example:
SHADOW_VOLUME VOL1 /media/nss/ARCVOL
-
Stop and restart the eDirectory ndsd daemon for the changes to take effect by entering
/etc/init.d/ndsd stop
/etc/init.d/ndsd start
-
Make the secondary NSS volume available for mounting in NCP by removing the EXCLUDE_VOLUME entry for the volume in the /etc/opt/novell/ncp2nss.conf file.
If necessary, edit the /etc/opt/novell/ncp2nss.conf file to remove the following entry for it:
EXCLUDE_VOLUME nss_volumenameAn entry is automatically removed from the /etc/opt/novell/ncp2nss.conf file by using Novell Remote Manager for Linux to set the > > > option to Yes for the NSS volume. For instructions, see Section 9.4.2, Enabling the NCP/NSS Bindings for an NSS Volume.
-
Stop and restart the eDirectory ndsd daemon for the changes to take effect by entering
/etc/init.d/ndsd stop
/etc/init.d/ndsd start
-
Restart the NCP/NSS IPC daemon to synchronize the changes you made to the /etc/opt/novell/ncp2nss.conf file.
-
At the terminal console prompt, enter
/etc/init.d/ncp2nss restart
-
If ncp2nss restarts successfully, the following messages are displayed in the terminal console:
Shutting down Novell NCP/NSS IPC daemon...
Exited
Starting the Novell NCP/NSS IPC daemon.
-