21.1 Migrating DHCP from Netware to OES 2015 SP1
In these sections, the NetWare server is referred to as the source server and the OES 2015 SP1 server as the target server.
21.1.2 Migrating DHCP
To migrate the DHCP Services, you can use the Migration Tool or the command line interface.
Understanding the Migration Process
Make sure that you install the OES 2015 SP1 server as the target server for the DHCP Services. For more information on installing Novell DHCP Services, refer to Installing and Configuring DHCP
in the OES 2015 SP1: DNS/DHCP Services for Linux Administration Guide.
During migration, the NetWare DHCP configuration objects are read and mapped to the corresponding configuration objects on Linux DHCP. This helps in retaining the same functionality after the migration process.
-
Subnets: All the subnets associated with the NetWare DHCP server are migrated to the new platform. If there is at least one address range associated with the NetWare DHCP server inside the subnet, the subnet is migrated with all the associated address ranges. The subnet object is created inside the dhcpService object on Linux. After migration, the subnet is identified by its IP address.
-
DHCP Server: You can specify the name of the DHCP server in the field under the tab.
-
DHCP Service: During a server-level or tree-level migration, a dhcpService object is created on the target server corresponding to each source NetWare DHCP server. This is the container object that contains all the DHCP configuration data associated with DHCP server. The dhcpService object is created inside the context specified in the field during migration. The dhcpService object name can be specified in the field under tab.
For a subnet-level Migration, the subnets are created inside an existing dhcpService object on target server. Specify the existing dhcpService object in the field.
-
Address Range: After the migration process, all the address range objects are mapped to pool objects on Linux.
-
Zone: After the migration, all the zone objects retain the same name as they had on the NetWare platform. Zone objects are also created inside the dhcpService object.
-
Subnet Pool: On the Linux platform, subnet pools on NetWare are mapped to the Shared Network objects.
-
IP Address (manual): All manually defined IP addresses are migrated as hosts inside the subnet object. The hosts are identified by their IP addresses. For example, if the address of an IP address object on NetWare is 1.1.1.1, on Linux it is identified as 1_1_1_1.
-
IP Address (dynamic): Information on all the dynamically leased IP addresses is maintained at the /var/lib/dhcp/db location. This lease file contains details for every IP address leased.
-
Comments: Any comments that exist on the NetWare platform are not migrated to the Linux platform.
-
Excluded Hardware Addresses: Excluded hardware addresses on NetWare after migration are mapped to class-excluded_hosts on Linux.
-
Included Hardware Addresses: Included hardware addresses on NetWare after migration are mapped to class-included_hosts on Linux.
NOTE:If the name of any object contains a space, the space is replace by an underscore “_” during migration.
Using the Migration Tool to Migrate Servers
-
Open the Migration Tool GUI using the Launch the Migration Tool Utility.
-
Follow the Migration Process to start the process.
-
Click in the panel, then select the .
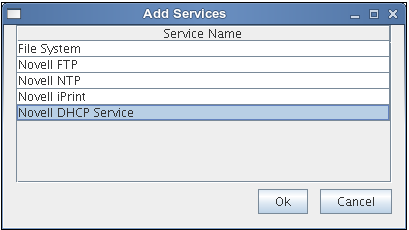
-
Click , then click . The DHCP configuration window displays.
-
DHCP provides migration at the following three levels:
Configuring DHCP Options
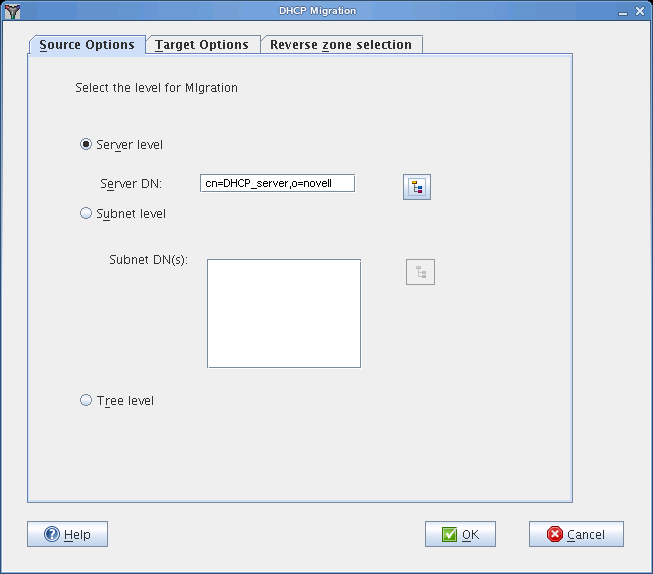
The DHCP configuration window consists of three tabs:
Source Options
This tab lets you choose the level of migration that you want to use.
-
Server Level
-
Subnet Level
-
Tree Level
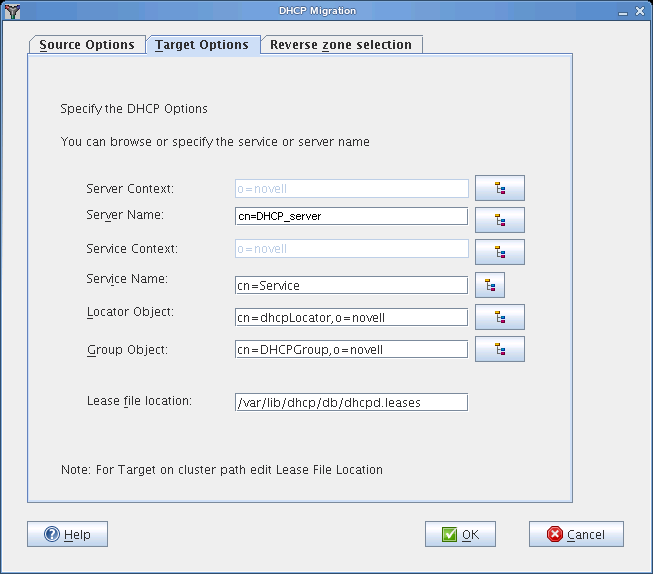
Target Options
This tab lets you choose the DHCP options for each level of migration. The following table lists the fields in the target options tab:
Table 21-1 DHCP Configuration fields
|
Field |
Description |
|---|---|
|
|
Context of the target DHCP server object. |
|
|
Name of the target DHCP server object. |
|
Service Context |
Context of the target DHCP service object. |
|
|
Name of the target DHCP service object. |
|
|
Distinguished name of the dhcpLocator object in the target tree. |
|
|
Distinguished name of the DHCPGroup object in the target tree. |
|
|
Lease file name with absolute file path where the NetWare DHCP dynamic leases are migrated. |
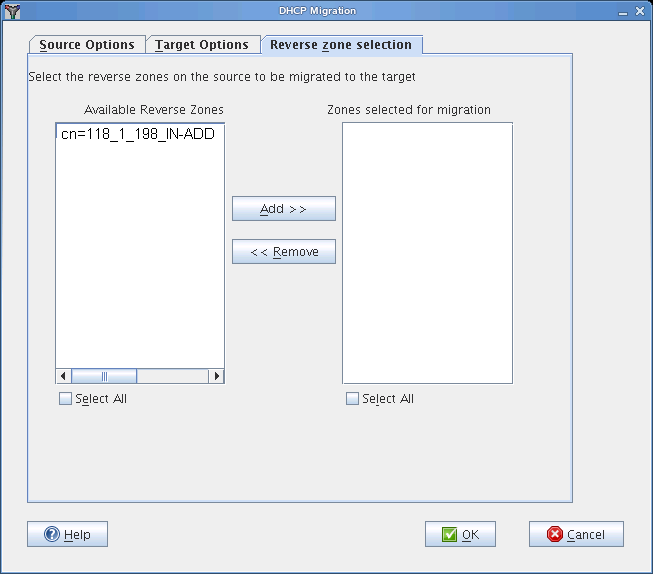
Reverse Zone Selection
Reverse zones are used for reverse lookups. It finds the DNS name associated with the IP address. Use this tab to select the available reverse zones on the source to be migrated to the target.
NOTE:The forward zones associated with a subnet in a DDNS setup are automatically migrated. The forward zones are not required to be selected exclusively in this scenario.
The following table lists the fields in the DHCP configuration window:
Table 21-2 DHCP Configuration fields
|
Field |
Description |
|---|---|
|
|
The distinguished name of the DHCP server to be migrated. |
|
|
The distinguished name of the subnet to be migrated. |
|
|
The distinguished name of the container on the target tree where the configuration is to be migrated. NOTE:For tree-level and server-level migration, Base DN is a container such as Organization, Organization Unit, or Domain. For subnet-level migration, Base DN is a DHCP Service object only. When you browse for the Base DN, it appropriately displays all the available service objects. |
|
|
The distinguished name of the dhcpLocator object in the target tree. NOTE:Not applicable for a subnet-level migration. |
|
|
The distinguished name of the DHCPGroup object in the Target tree. NOTE:Not applicable for a subnet-level migration. |
|
Lease file |
The path and filename for the leases to be migrated. All the dynamic IP addresses on NetWare are mapped to a lease file entry in this file. NOTE:Not applicable for tree-level and server-level migration. |
Migration Methods
You can choose to migrate DHCP services by any one of the following three methods:
Server Level
In the Server Level migration, the selected NetWare DHCP server is migrated to the OES 2015 SP1 server. You can choose to migrate only one server at a time.
NOTE:Refer to Table 21-2 for DHCP configuration field descriptions.
-
In the tab of DHCP migration window, select the option.
-
Click to select the .
Server DN: The Server DN is the distinguished name of the server to be migrated.You can browse to the Source tree (only containers and server objects are displayed) to locate the server to be migrated. Select the server object and click . If the selected object is not a DHCP server, then a warning is displayed.
-
In the tab, click to select the .
-
Click to select the existing or add the new server name that you want to migrate. For more information on adding a new server, refer to
Server Management
in the OES 2015 SP1: DNS/DHCP Services for Linux Administration Guide. -
Click to select the .
-
Click Browse to select the existing or add the new service name that you want to migrate.
-
Click to select the .
-
Click to select the .
-
Specify the .
-
In the tab, select the reverse zones in . Click to add all the selected zones. Use the Ctrl key to select multiple zones.
-
Click OK to complete the configuration.
Subnet Level
In the Subnet Level migration, the selected subnets associated with the NetWare DHCP server are migrated to the OES 2015 SP1 server. The subnet objects are created inside the dhcpService object on the Linux server. After migration, the subnet is identified by its IP address. You can choose to migrate multiple subnets at a time.
NOTE:Refer to Table 21-2 for DHCP configuration field descriptions.
-
In the tab of the DHCP migration window, select the option.
-
Click Browse to select the . Use the Ctrl key to select multiple subnets.
Subnet DN(s): The Subnet DN is the distinguished name of the subnets to be migrated.You can browse to select one or more subnets. The selected subnets are displayed in the list box. If an incorrect container is selected, then a warning is displayed.
-
In the tab, click to select the .
-
Click to select the existing that you want to migrate. The , , , and options are not applicable for subnet level migration.
-
Specify the .
-
In the tab, select the reverse zones in . Click to add all the selected zones. Use the Ctrl key to select multiple zones.
-
Click to complete the configuration.
Tree Level
In the Tree Level migration, all the NetWare DHCP servers in the tree are migrated to the OES 2015 SP1 server.
NOTE:Refer to Table 21-2 for DHCP configuration field descriptions.
-
In the tab of the DHCP migration window, select the option.
-
In the tab, click to select the .
-
Click to select the .The and options are displayed by default, but they are disabled.
-
Click to select the .
-
Click to select the .
-
Specify the .
-
Click to complete the configuration.
Using the Command Line to Migrate Servers
-
To run the DHCP migration utility through the command line, run /opt/novell/migration/bin/migdhcp with the following parameters:
Option
Description
-h
Print this summary.
-k
Level of migration (subnet|tree|server).
-i
Verbose mode - on or off.
-d
Debug mode - on or off.
-s
IP address of the source LDAP server.
-p
Port number of the source LDAP server.
-a
DN of the admin user in the source tree.
-t
IP address of the target LDAP server.
-q
Port number for the target LDAP server.
-b
DN of the admin user in the destination tree.
-l
DN of the dhcpLocator object in the destination tree (Required only for server-level or tree-level migration).
-g
DN of the DHCPGroup object in the destination tree (Required only for server-level or tree-level migration).
-e
DN of the server to be migrated (Required only for server-level migration).
-n
Base DN for server on the destination tree.
-m
Base DN for service on the destination tree.
-r
1 for source SSL bind, 0 for source non-SSL bind.
-u
1 for destination SSL bind, 0 for destination non-SSL bind.
-f
Absolute path of the file containing the DNs of the subnets that you want to migrate. (Required only for subnet-level migration). Enter the subnet DNs in the following format:cn=subnet1,o=novell
cn=subnet2,ou=novel1,o=novell
cn=subnet3,ou=novell2,o=novell
-c
Absolute path of the file where you want to store the lease file information
-E
DHCP server object name on the Target server (Required only for server-level migration).
-S
DHCP service object name on Target server (Required only for server-level migration).
-z
Full path of the file containing the Reverse Zone DNs.
Examples for Command Line Migration
Tree Level: /opt/novell/migration/bin/migdhcp.sh -k tree -i on -d on -s 192.168.13.1 -p 636 -a cn=admin,o=novell -t 182.155.13.8 -q 636 -b cn=admin,o=novell -l cn=dhcpLocator,o=novell -g cn=DHCPGroup,o=novell -n o=novell -r 1 -u 1
Server Level: /opt/novell/migration/bin/migdhcp.sh -k server -i on -d on -s 192.168.13.1 -p 636 -a cn=admin,o=novell -t 182.155.13.8 -q 636 -b cn=admin,o=novell -l cn=dhcpLocator,o=novell -g cn=DHCPGroup,o=novell -e cn=DHCP_SERVER,o=novell -n o=novell -r 1 -u 1
Subnet Level: /opt/novell/migration/bin/migdhcp.sh -k subnet -i on -d on -s 192.168.13.1 -p 636 -a cn=admin,o=novell -t 182.155.13.8 -q 636 -b cn=admin,o=novell -n cn=DHCPService,o=novell -r 1 -u 1 -f /somelocation/filewithsubnetdns -c /somelocation/filename