10.2 NSS Management Utility (NSSMU) Quick Reference
The OES Storage Services Management Utility (NSSMU) is a console-based utility for managing NSS storage media on a server. You can use NSSMU at any time as an alternative to the browser-based iManager Storage plug-in.
NSSMU is installed when you install NSS. The Linux install creates symlinks in the /opt/novell/nss/sbin folder for common NSS utilities, including NSSMU. Symlinks allow the path to NSSMU to become part of the root user’s path, which allows you to run nssmu from a terminal console as the root user.
Table 10-11 identifies key functions available in NSSMU. This quick reference is also available in the nssmu(8) man page. To access the man page, enter the following at a terminal console prompt:
man 8 nssmu
Table 10-11 Summary of Management Options in NSSMU
|
Management Options |
Description |
|---|---|
|
|
Use this option to initialize and maintain physical storage devices and software RAID devices available to this server. Use the Software RAID Devices option to create, repair, or delete RAIDs. Initialize the selected device by erasing its partition table, effectively destroying all of its data. If devices are present but not showing up for creating pools and volumes, you should initialize the disk. When you initialize a device, you can select the DOS or the GUID Partition Table (GPT) partitioning scheme for a given device. The DOS partitioning scheme supports devices up to 2 TB in size. It allows up to four partitions on a device. The GPT partitioning scheme supports device sizes up to 2E64 sectors (that is, up to 8388608 petabytes (PB) based on the 512-byte sector size). It allows up to 128 partitions per disk. Each of its disks partitions is a logical device that is identified by a unique 128-bit (16-byte) GUID. IMPORTANT:It is recommended that you do not take a snapshot on a VMware ESXi, which includes both thick and thin-provisioned devices. If a snapshot is taken, all the thick-provisioned devices are randomly converted to thin-provisioned devices and vice versa. |
|
|
Use this option to display details about partitions. All types of partitions are displayed, including those for Linux file systems. The Create option is disabled. NSS partitions are automatically created for you as you define NSS pools or software RAIDs. You can delete a single partition at a time when repairing a failed software RAID partition. To delete all partitions for a software RAID, you should delete the RAID itself from the Software RAIDs page; otherwise, the RAID is not cleanly deleted. The Mirror option lets you specify 1 to 3 partitions to mirror an existing partition that contains an NSS pool. Effectively, you are creating a RAID1 mirror device for the pool. Each segment of the defined RAID is a complete mirror of the original pool and is the same size as the original partition. After you mirror the partition, manage the RAID from the Software RAIDs page. If you widen the NSSMU display screen, it widens the Partitions list panel and allows you to see the partitions' full names. |
|
|
Use this option to create, delete, rename, and expand NSS storage pools to efficiently use all free space in the available devices. NOTE:
After you create a pool, you can expand it by adding free space from the same or different device to increase its size. Select from the available free space to allocate it to the pool. Each device can contribute a different amount of space to the pool. Devices that allocate space must be of the same logical sector size and it must be in the same share state as the pool, that is, or . You can increase the size of a pool, but you cannot reduce it. You can also media upgrade the pool to support AD users, and this is a one-time activity that cannot be reverted. |
|
The join cluster pool option joins a cluster pool to the AD domain. When you join, you can choose to specify the container under which the pool object will be created or you could choose to use an existing pre-created object. You can choose to perform kinit before the launch of nssmu or during AD join process. kinit during the join process is valid for only one pool join as the kdestroy is performed for every join operation. For more information, see Section 10.2.1, Joining Cluster Pools to the AD Domain. The move pool option moves an NSS pool from one location to another on the same system. The pool remains active during this process. All the segments in the pool are consolidated and moved to the specified device(s). If the specified device is larger than the original device, the pool is automatically expanded on the completion of move job. If a clustered pool is moved, on performing cluster resource migration the Move pool job is resumed on other node. In the cluster setup, the exact status of the pool move can be seen only on the node where the pool move job is in progress. For more information, see Section 16.13, Moving a Pool. You can use the fstrim option to trim the unused blocks on the selected NSS pool. When you execute this option, the fstrim process runs in the background. Go to pool information page to view the fstrim state, last executed time, and last trimmed size on the selected pool. For more information on fstrim, see /var/log/messages. The fstrim option is supported only on thin-provisioned SCSi devices with the Vmware ESXi. NOTE: The fstrim option is not supported in the following cases:
|
|
|
Use this option to create, delete, rename, activate/deactivate, and mount/dismount NSS volumes and to set their attributes. You can also AD-enable a volume to support AD users. These volumes must be active and must be part of an AD media upgraded pool. AD-enabling a volume is a one-time activity and cannot be reverted. If the pool is AD media enabled and NSSMU validates the OES server that is currently joined to the AD domain, then "AD Enable the volume?" pop-up is displayed. If you click "Yes" the volume is AD-enabled. If the switch /(No)EnableNewVolumeToAD is enabled through nsscon, then this option takes preference. So even if you select "No" for the "AD Enable the volume?" pop-up, the volumes are AD-enabled. To store data in encrypted format, select the encryption key type, and then specify a password when you create the volume. This enables the Encryption attribute. The encryption setting persists for the life of the volume. The encryption password can be 2 to 16 standard ASCII characters, with a suggested minimum of 6. The password generates a 128 or 256-bit NICI key based on the key type selected for encryption. On system reboot, specify the password when you activate the volume for the first time. NOTE:The AES256 encryption key type should be used only on the NSS64 pool type with the pool media upgraded to AES. You can mount encrypted volumes only from NSSMU on the first time after a system reboot. Provide the password when needed. Until you provide a password for encrypted volumes, you cannot mount multiple encrypted volumes at a time. |
|
|
Use this option to create and manage the Linux volumes. For more information, see |
|
|
Use this option to create and manage NSS software RAID devices. A software RAID device emulates a hardware RAID device. RAID devices combine partitioned space on multiple physical devices into a single virtual device that you manage like any device. Each member device contributes an equal amount of space and only a single partition to the RAID. Pressing F6 would either restripe or remirror based on the chosen RAID device. NOTE:If the RAID 1 is already synchronized, pressing F6 will not show any remirroring progress. |
|
|
Use this option to create, delete, mount, and dismount pool snapshots for NSS pools. Snapshots are stored on a separate partition that you specify, not another pool. After it is created, the partition for the snapshot pool cannot be expanded. |
The default unit for setting and displaying the volume quota or pool size is Gigabyte (GB). However, the following units will also be displayed relative to the storage size:
|
Pool / Volume Quota Size |
Displayed Unit |
|---|---|
|
<= 1023 KB |
KB |
|
>= 1024 KB and <= 1023 MB |
MB |
|
>= 1024 MB and <= 1023 GB |
GB |
|
>= 1024 GB |
TB |
NOTE:
-
The pool size is not displayed in KB as the minimum allowed pool size should be at least 12 MB.
-
When the volume quota is entered without specifying any units, the volume quota size is assumed to be in GB. For example, specifying a value of 1 will be considered as 1 GB, 2 as 2 GB and 0.5 as 512 MB. Specifying the value of 'ALL' will create a pool consuming the entire disk space or LUN size.
10.2.1 Joining Cluster Pools to the AD Domain
This section describes the procedures to join cluster NSS resources to an AD domain so that they are accessible to AD users. Joining a cluster resource to the AD domain does not enable the pools and volumes for AD user access. NSS AD Media upgrade for pools and AD-enabling at volume must be done separately following the instructions at Section A.13.1, NSS Media Upgrade Commands and Volume AD-enabling.
You could also use the novell-ad-util CLI tool for the domain join. For more information, see novell-ad-util Command Line Utility
in the OES 2018 SP2: NSS AD Administration Guide.
-
Ensure that your cluster node is joined to the AD domain. You should find an entry for the cluster node object created in the screen of the AD server. Also ensure that the shared pool has at least one active volume for a successful domain join operation.
-
Launch NSSMU, select the shared pool that you want to join to the AD domain, then press .
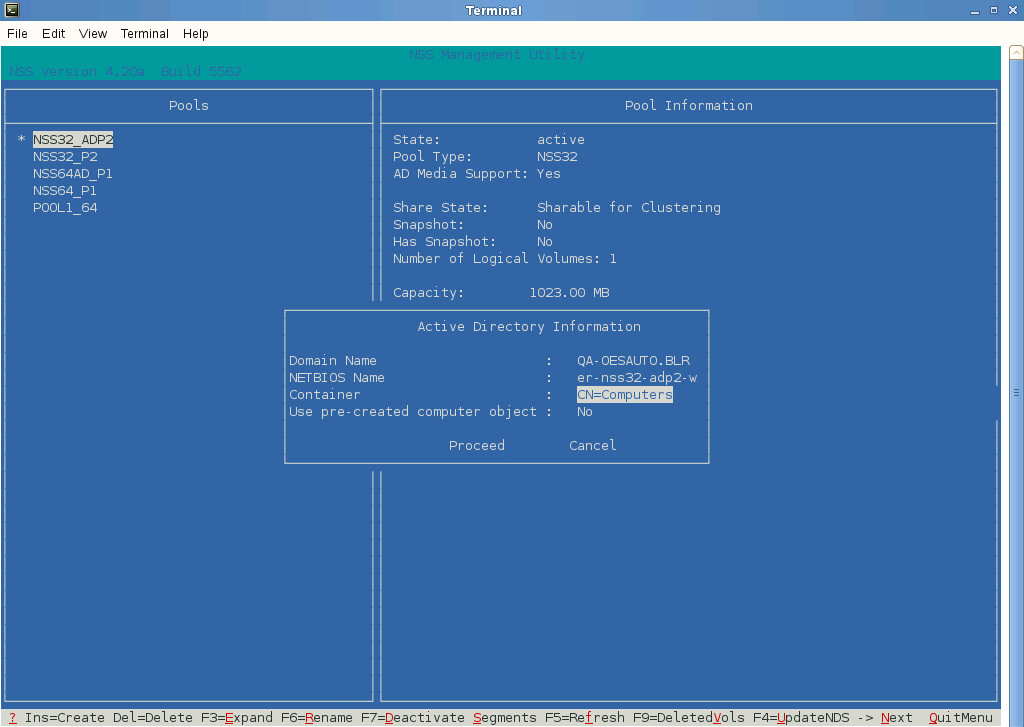
-
Specify the AD container where the computer object will be created. If you already have a pre-created computer object, select Yes, then specify the container where the pre-created computer object exist.
-
Select .
-
Perform kinit if not done already, then specify the appropriate AD user credentials for the domain join operation to complete. This user should have the following rights on the AD server: create computer objects, change password and reset password.
-
After a successful domain join operation, you should find your cluster pool computer object in the screen of the AD server.