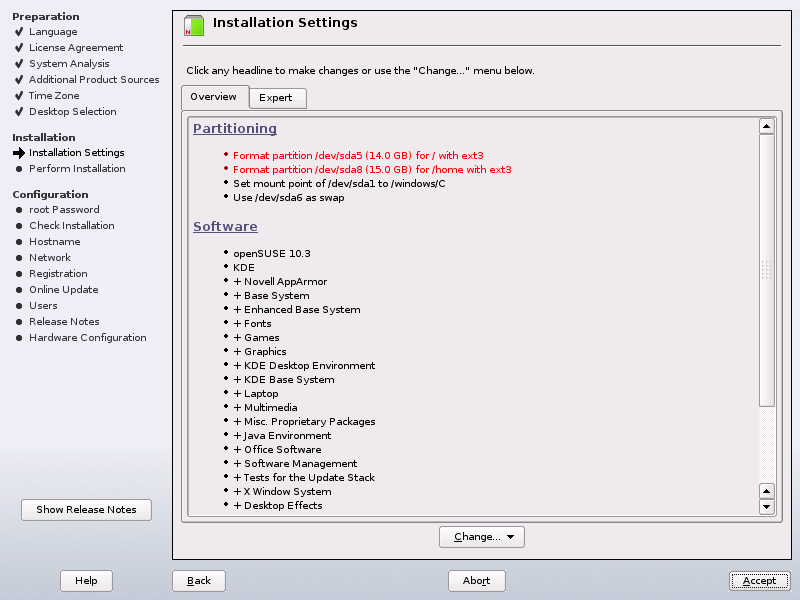
1.12 Installation Settings
After a thorough system analysis, YaST presents reasonable suggestions for all installation settings. Basic settings can be changed in the tab, advanced options are available on the tab. To modify the suggestions, either click and select the category to change or click on one of the headlines. After configuring any of the items presented in these dialogs, you are always returned to the summary window, which is updated accordingly.
Figure 1-5 Installation Settings
HINT: Resetting the Installation Summary to the Default
You can reset all changes to the defaults by clicking . YaST then shows the original proposal again.
1.12.1 Overview
The options that sometimes need manual intervention in common installation situations are presented in the tab. Modify Partitioning, Software selection and Locale settings here.
Partitioning
In most cases, YaST proposes a reasonable partitioning scheme that can be accepted without change. YaST can also be used to customize the partitioning, but only experienced users should change partitioning.
When you select the partitioning item in the suggestion window for the first time, the YaST partitioning dialog displays the proposed partition settings. To accept these settings, click .
To make small changes in the proposal, select and adjust partitioning in the next
dialog. For a completely different partitioning, select . In the next dialog, choose a specific
disk to partition or if you want
to have access to all disks. For more information about custom
partitioning, refer to Section 2.1, Using the YaST Partitioner,
(↑ Reference ). The
YaST partitioner also provides a tool for LVM creation. To create an
LVM proposal, select . See
Section 2.2, LVM Configuration,
(↑ Reference ) for more information on
LVM.
Figure 1-6 Partitioning
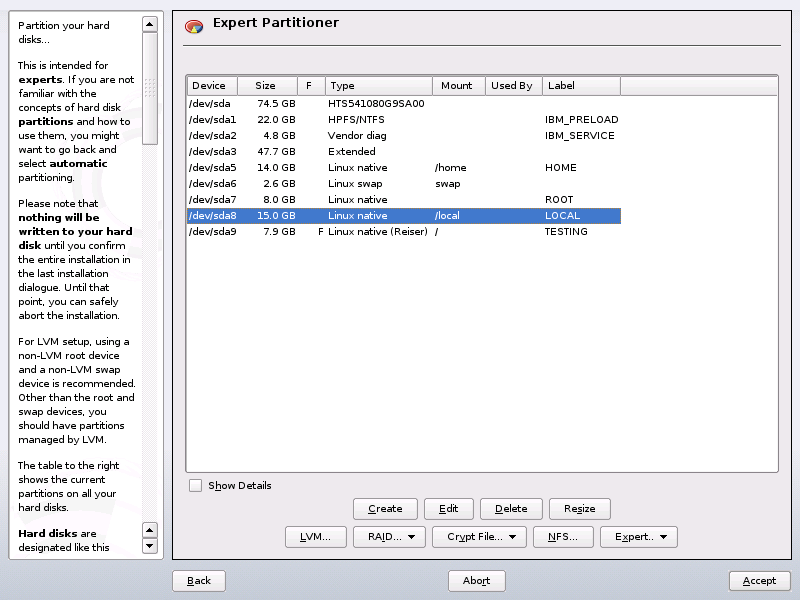
The partitioning scheme proposed should have sufficient disk space. When implementing your own partitioning scheme, consider the following recommendations concerning the requirements for different system types.
Table 1-2 Space Requirements
|
Installation Type |
Minimum Space Required |
|---|---|
|
GNOME Desktop |
4 GB |
|
KDE Desktop |
4 GB |
|
Minimal Graphical System |
2 GB |
|
Text Mode |
1 GB |
The requirements in Table 1-2 cover only the disk space needed for the system itself. Personal data, such as documents, music files, and images, require additional space.
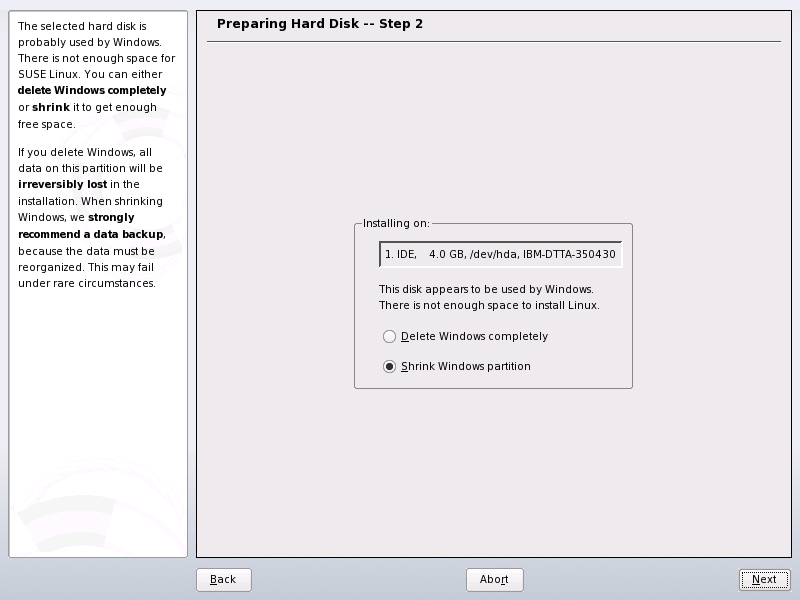
Resizing a Windows Partition
If a hard disk containing a Windows FAT or NTFS partition is selected as the installation target, YaST offers to delete or shrink this partition. This functionality is especially useful if the selected hard disk contains only one Windows partition that covers the entire hard disk (see Figure 1-7.)
If you select , the Windows partition is marked for deletion and the space is used for the installation of openSUSE.
WARNING: Deleting Windows
If you delete Windows, all data will be lost beyond recovery as soon as the formatting starts.
Figure 1-7 Possible Options for Windows Partitions
To , you need to interrupt the installation and boot Windows to prepare before shrinking it. For all Windows file systems, proceed as follows:
-
Deactivate a Virtual Memory file, if there is one.
-
Run scandisk.
-
Run defrag.
After these preparations, restart the openSUSE installation. When you turn to the Linux partitioning setup, select . After a quick check of the partition, YaST opens a dialog with a suggestion for resizing the Windows partition.
The first bar graph shows how much disk space is currently occupied by Windows and how much space is still available. The second bar graph shows how the space would be distributed after the resizing, according to YaST's current proposal. See Figure 1-8. To change the proposed settings use the slider or the input fields to change the partition sizing.
Figure 1-8 Resizing the Windows Partition
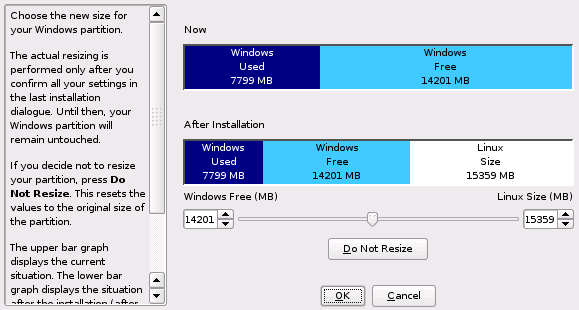
If you leave this dialog by selecting , the settings are stored and you are returned to the previous dialog. The actual resizing takes place later, before the hard disk is formatted.
IMPORTANT: Writing on NTFS Partitions
By default, the Windows versions NT, 2000, and XP use the NTFS file system. openSUSE includes read and write access the NTFS file system, but this feature has a few limitations. This means that you cannot read or write encrypted or compressed files. Furthermore the Windows file permissions are not honored at the moment. See http://en.opensuse.org/NTFS for more information.
Software
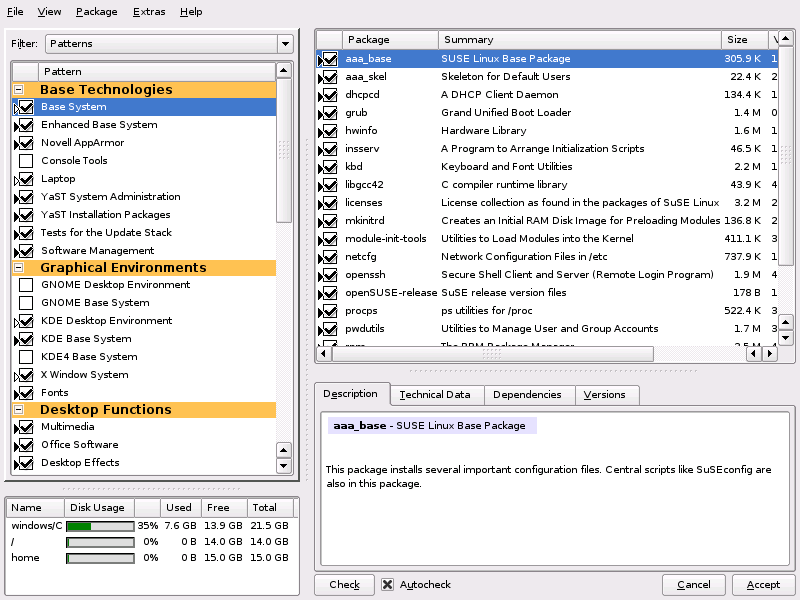
openSUSE contains a number of software packages for various application purposes. Click in the suggestion window to start the software selection and modify the installation scope according to your needs. Select your pattern from the list in the middle and see the description in the right part of the window. Each pattern contains a number of software packages needed for specific functions (e.g. Multimedia or Office software). For a more detailed selection based on software packages to install, select to switch to the YaST Software Manager. See Figure 1-9.
Figure 1-9 Installing and Removing Software with the YaST Software Manager
You can also install additional software packages or remove software packages from your system at any time later with the YaST Software Manager. For more information, refer to Section 3.0, Installing or Removing Software.
Locale Settings
Here you can change the system and . To change the system language or to configure support for secondary languages, select . Select the language from the list. The primary language is used as the system language. You can also adapt keyboard layout and time zone to the primary language if the current settings differ. lets you tune language settings for the user root, set UTF-8 support, or further specify the language (e.g. select South African English).
Choose secondary languages to be able to switch to one of these languages at any time without having to install additional packages. For more information, see Section 6.0, Changing Language and Country Settings with YaST.
To change the keyboard layout, select . By default, the layout corresponds to the language chosen for installation. Select the keyboard layout from the list. Use the field at the bottom of the dialog to check if you can enter special characters of that layout correctly. Find more information about changing the keyboard layout in Section 2.3, Setting Up Keyboard and Mouse. When finished, click to return to the installation summary.
1.12.2 Expert
If you are an advanced user and want to configure booting, change the time zone, or default runlevel, select the tab. It shows the following additional entries not part of the tab:
-
This dialog presents all the hardware information YaST could obtain about your computer. Select any item in the list and click to see detailed information about the selected item. Advanced users can also change the PCI ID setup and Kernel Settings by choosing .
-
YaST proposes a boot configuration for your system. Normally, you can leave these settings unchanged. However, if you need a custom setup, modify the proposal for your system. For information, see Section 13.3,
Configuring the Boot Loader with YaST,
(↑ Reference ). The boot method should only be changed by experienced users. -
This is the same configuration as shown earlier in Section 1.10, Clock and Time Zone.
-
openSUSE can boot to different runlevels. Normally there should be no need to change anything here, but if necessary set the default runlevel with this dialog. Refer to Section 12.2.3,
Configuring System Services (Runlevel) with YaST,
(↑ Reference ) for more information about runlevel configuration.