2.8 Upgrading a ZENworks Orchestrator 1.3 High Availability Configuration
This section provides an example of upgrading a ZENworks Orchestrator 1.3 high availability configuration to a PlateSpin Orchestrate 2.0 high availability configuration with the following details:
-
Two ZENworks Orchestrator Servers
- c114
- c115
-
One additional server (c122) with the following Orchestrator components installed
- Monitoring Server
- VM Warehouse
- Orchestrator Agent
- Orchestrator Clients
- Linux High Availability Clients
Upgrade to PlateSpin Orchestrate by following these sections and their subordinate steps in this order:
-
Section 2.8.1, Snapshotting the ZENworks Orchestrator Environment
-
Section 2.8.2, Enabling Rollback and Backing Up the Server Instance
-
Section 2.8.4, Removing Obsolete ZENworks Orchestrator Patterns
-
Section 2.8.5, Configuring Upgraded Orchestrate Servers in the High Availability Environment
-
Section 2.8.6, Installing and Configuring Monitoring in the High Availability Environment
2.8.1 Snapshotting the ZENworks Orchestrator Environment
To prepare the environment for an upgrade to a PlateSpin Orchestrate environment, snapshot the old environment.
-
From the machine where the VM Warehouse is installed (c122), stop all VMs, then move them out of the warehouse to another repository on a VM host in the grid.
-
Use the high availability client (Heartbeat2) to stop the Orchestrate Server. This prevents the high availability cluster from re-starting the Orchestrate Server.
-
Use the following command to restart the Orchestrate Server on the host where it was last running.
/etc/init.d/novell-zosserver start
-
Use the following command to stop and snapshot the Orchestrate Server.
/etc/init.d/novell-zosserver stop --snapshot
2.8.2 Enabling Rollback and Backing Up the Server Instance
When the old environment is snapshotted, you need to further prepare the Orchestrate Server for the upgrade.
-
From the command line of both Orchestrate Servers (c114 and c115), use the rug command to enable the rollback for the server.
rug set rollback true
-
From the command line of both Orchestrate Servers (c114 and c115) use the following command to back up your server instance before you upgrade.
cp -rH /var/opt/novell/zenworks/zos/server ~/server.bkp
You can use the rpm -qa | grep zenwo | sort command to list the rpms that are currently in the cluster:
c114: This is one of the ZENworks Orchestrator Servers. Its RPM packages include:
- novell-zenworks-orch-config-1.3.0-41
- novell-zenworks-orch-config-gui-1.3.0-33604
- novell-zenworks-zos-clients-1.3.0-33604
- novell-zenworks-zos-java-1.5.0_sun_update17-0
- novell-zenworks-zos-server-1.3.0-33604
- novell-zenworks-zos-server-data-agent-1.3.0-33604
- novell-zenworks-zos-server-data-clients-1.3.0-33604
- novell-zenworks-zos-server-data-jre-1.3.9-33604
c115: This is another ZENworks Orchestrator Server. Its RPM packages include:
- novell-zenworks-orch-config-1.3.0-41
- novell-zenworks-orch-config-gui-1.3.0-33604
- novell-zenworks-zos-clients-1.3.0-33604
- novell-zenworks-zos-java-1.5.0_sun_update17-0
- novell-zenworks-zos-server-1.3.0-33604
- novell-zenworks-zos-server-data-agent-1.3.0-33604
- novell-zenworks-zos-server-data-clients-1.3.0-33604
- novell-zenworks-zos-server-data-jre-1.3.9-33604
c122: This is the server with Monitoring (Agent and Server), the VM Warehouse, the Orchestrator Agent, the Orchestrator Clients, and the Heartbeat Client for high availability. Its RPM packages include:
- novell-zenworks-monitor-gmetad-3.0.4-44
- novell-zenworks-monitor-gmond-3.0.4.44
- novell-zenworks-monitor-web-3.0.4.44
- novell-zenworks-orch-config-1.3.0-41
- novell-zenworks-orch-config-gui-1.3.0-33604
- novell-zenworks-vmbuilder-cimproviders-1.3.0-33604
- novell-zenworks-vmbuilder-cli-1.3.0-4
- novell-zenworks-vmbuilder-zosjob-1.3.0-3
- novell-zenworks-vmwarehouse-base-1.3.0-46
- novell-zenworks-vmwarehouse-comproviders-1.3.0-27
- novell-zenworks-zos-server-agent-1.3.0-33604
- novell-zenworks-zos-server-clients-1.3.0-33604
- novell-zenworks-zos-java-1.5.0_sun_update17-0
2.8.3 Upgrading the ZENworks Orchestrator Server
To upgrade the ZENworks Orchestrator Server in a high availability environment, use the ZENworks Linux Management rug command.
The steps for upgrading the Orchestrator Server patterns in a high availability environment are the same as for a normal upgrade. The procedure is detailed in the section entitled Upgrading ZENworks Orchestrator Server Packages at the Command Line. Remember to perform the upgrade on each ZENworks Orchestrator Server in the environment.
2.8.4 Removing Obsolete ZENworks Orchestrator Patterns
After you upgrade ZENworks Orchestrator 1.3 packages to PlateSpin Orchestrate 2.0 packages, you need to remove the obsolete ZENworks Orchestrator 1.3 patterns that are not used in PlateSpin Orchestrate.
In this example, you need to remove the VM Warehouse and the Monitoring Service from c122. The Monitoring Service and the Orchestrate Server must be installed on the same machine, so install the Monitoring Service on c114 and c115.
For more information see Removing Obsolete and Unneeded ZENworks Orchestrator Patterns.
2.8.5 Configuring Upgraded Orchestrate Servers in the High Availability Environment
In a high availability environment, it is necessary to configure only one of the newly upgraded PlateSpin Orchestrate Servers in the cluster. You should upgrade the machine that was last running for the purpose upgrading patterns (in this scenario, it will be c114).
-
From the command line of the machine where you last ran commands to upgrade patterns (c114) run the following command to begin the upgrade configuration:
/opt/novell/zenworks/orch/bin/config
The upgrade script introduction is displayed:
Welcome to PlateSpin Orchestrate.

This program will configure PlateSpin Orchestrate 2.0


Select whether this is a new install or an upgrade

i) install
u) upgrade
- - - - - -

Selection [install]:
-
Enter u to begin the upgrade.
The product selection section of the script is displayed:
Select products to upgrade # selected Item 1) no PlateSpin Orchestrate Monitoring Service 2) yes PlateSpin Orchestrate Server 3) no PlateSpin Orchestrate Agent 4) no PlateSpin Orchestrate VM Builder (not installed) Select from the following: 1 - 4) toggle selection status a) all n) none f) finished making selections q) quit -- exit the program Selection [finish]: -
Deselect the PlateSpin Orchestrate Monitoring Service, make sure that the PlateSpin Orchestrate Server is the only component selected, then enter f to finish the selection. and display the high availability section of the script:
Gathering information for upgrading PlateSpin Orchestrate Server . . .

Select whether this is a standard or high-availability server

s) standard
h) ha
- - - - - -

Selection [standard]:
-
Enter h to indicate that this is a high availability server, then enter the fully qualified cluster hostname or IP address that is to be used for configuring this server instance.
-
Continue with the upgrade configuration script, providing the information required.
Make sure you select port 8080 for the User Portal; port 80 is to be used for the Monitoring Server.
-
When the script presents the question of whether to use the existing license file, enter n (no). Because this is an upgrade the existing license does not work for the upgraded server. You need to provide a new license file. Enter the path to the new license file.
-
At the configuration summary section of the script, confirm the data you have supplied, then enter yes to proceed with the upgrade of the server.
-
On other machines in the cluster where the Orchestrate Server was upgraded, copy the new license key (key.txt) in /opt/novell/zenworks/zos/server/license.
2.8.6 Installing and Configuring Monitoring in the High Availability Environment
When you have completed configuring the Orchestrate Servers for the high availability environment, you need to install PlateSpin Orchestrate Monitoring (both the Monitoring Server and the Monitoring Agent) and then restart the Orchestrate Server instance in the clustering tools.
IMPORTANT:Before you install and configure the Orchestrate Monitoring Service, make sure that the Orchestrate Servers are not bound to port 80.
You should following the steps in the following sections in the following order to install and configure Orchestrate Monitoring after you upgrade to PlateSpin Orchestrate 2.0:
Installing the Monitoring Components
You need to install PlateSpin Orchestrate Monitoring (both the Server and the Agent) on both Orchestrate Servers (c114 and c115) after they have been initially upgraded.
-
Log in to the target SLES 10 SP2 server as root, then open YaST2.
-
In the YaST Control Center, click > , then click to display the Add-on Product Media dialog box.
-
In the Add-on Product Media dialog box, select the ISO media ( or ) to install.
-
(Conditional) Select , click , insert the DVD, then click .
-
(Conditional) Select , click, select the check box, browse to ISO on the file system, then click .
-
-
Read and accept the license agreement, then click to display YaST2.
-
In YaST2, click the drop-down menu, then select to display the install patterns available on the PlateSpin Orchestrate ISO.
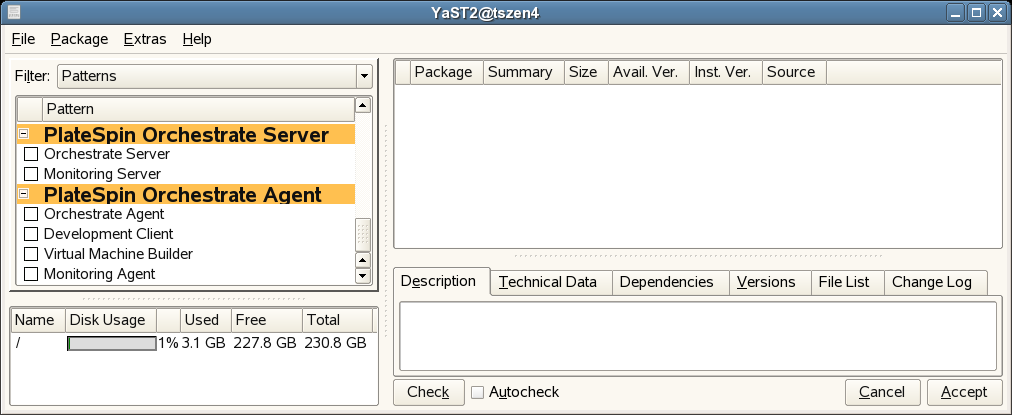
-
Select the PlateSpin Orchestrate Monitoring patterns:
-
Monitoring Server: Uses open source Ganglia monitoring of the performance of certain data on network resources in a user-defined time period.
-
Monitoring Agent: This pattern is installed with any installation of the Orchestrate Server. It installs the Ganglia Agent on each monitored node, which collects performance metrics and sends the data to the Orchestrate Monitoring Server.
-
-
Click to install the packages.
-
Repeat Steps 1-7 on the Orchestrate Servers that are part of the high availability environment.
Configuring the Monitoring Service
For this section, the configuration procedure is shown using the text-based configuration tool only. You can also perform it using the GUI Configuration Wizard. You need to configure the Monitoring components one Orchestrate Server only. For this example, it is configured on c114.
-
From the Orchestrate Server machine, make sure you are logged in as root to run the configuration script.
-
Run the script, as follows:
/opt/novell/zenworks/orch/bin/config
When the script runs, the following information is initially displayed:
Welcome to PlateSpin Orchestrate.

This program will configure PlateSpin Orchestrate 2.0

Select whether this is a new install or an upgrade

i) install
u) upgrade
- - - - - -

Selection [install]:
-
Press Enter to select the default (install).
When you make the selection, the following information is displayed:
Select products to configure # selected Item 1) yes PlateSpin Orchestrate Monitoring Service 2) no PlateSpin Orchestrate Server (not installed) 3) no PlateSpin Orchestrate Agent (not installed) 4) no PlateSpin Orchestrate VM Builder (not installed) Select from the following: 1 - 4) toggle selection status a) all n) none f) finished making selections q) quit -- exit the program Selection [finish]: -
Press Enter to finish the selection of the Monitoring Service.
The following question is displayed:
You can configure this host to be the Monitoring Server or a monitored node Configure this host as the Monitoring Server? (y/n) [y]: -
Press Enter to accept the default (yes) and indicate that you want to use this machine as a Monitoring Server.
The following information is displayed:
Enter a name describing this monitored computer's location. This name appears in the Monitoring interface as the location of the device. Location [c114]: -
Press Enter to accept the default name or specify a name that you want to describe the monitored computer’s location.
-
View the configuration summary information to confirm that it is correct, then if you do not want to make changes, press enter to configure Orchestrate Monitoring Services.
-
Open the configuration log file (/var/opt/novell/novell_zenworks_orch_install.log) to make sure that the monitoring components were correctly configured.
Preparing the Orchestrate Primary Monitoring Server
The machine where you installed PlateSpin Orchestrate Monitoring Services and where you performed the configuration using the config or guiconfig scripts is considered the primary monitoring server. In this example (see Installing the Monitoring Components and Configuring the Monitoring Service) this would be c114.
To configure the primary monitoring server, you need to run a script that does the following:
-
creates monitoring directories on shared storage
-
copies monitoring files to the shared storage
-
creates backups of the original monitoring files
-
links files from shared storage to the local places
-
turns off Apache2, gmond, and gmetad services
You can use the example script below as a template for this script. Paste it into an .sh file and run it on the primary monitoring server.
NOTE:This script assumes that /zos is the name of the shared storage area.
mkdir -p /zos/monitor
cp -av /etc/apache2 /zos/monitor
ln -sf /etc/mime.types /zos/monitor/apache2/mime.types
mv /etc/apache2/ /etc/apache2.orig
ln -sf /zos/monitor/apache2 /etc


cp -av /etc/opt/novell/zenworks/monitor /zos/monitor
mv /etc/opt/novell/zenworks/monitor /etc/opt/novell/zenworks/monitor.orig
ln -sf /zos/monitor/monitor /etc/opt/novell/zenworks/monitor

cp -av /var/opt/novell/zenworks/monitor/rrds /zos/monitor
mv /var/opt/novell/zenworks/monitor/rrds
/var/opt/novell/zenworks/monitor/rrd.orig
ln -sf /zos/monitor/rrds /var/opt/novell/zenworks/monitor

chkconfig apache2 off
chkconfig gmond off
chkconfig gmetad off

rcapache2 stop
rcnovell-gmetad stop
rcnovell-gmond stop
Preparing the Orchestrate Secondary Monitoring Server(s)
The machine where you installed PlateSpin Orchestrate Monitoring Services but did not configure the monitoring services are considered the secondary monitoring server(s). In this example (see Installing the Monitoring Components) this would be c115.
To configure a secondary monitoring server, you need to run a script that does the following:
-
creates backups of the original monitoring files
-
links files from shared storage to the local places
-
turns off Apache2, gmond, and gmetad services
You can use the example script below as a template for this script. Paste it into an .sh file and run it on a secondary monitoring server.
mv /etc/apache2/ /etc/apache2.orig
ln -sf /zos/monitor/apache2 /etc

mv /etc/opt/novell/zenworks/monitor /etc/opt/novell/zenworks/monitor.orig
ln -sf /zos/monitor/monitor /etc/opt/novell/zenworks/monitor

mv /var/opt/novell/zenworks/monitor/rrds
/var/opt/novell/zenworks/monitor/rrd.orig
ln -sf /zos/monitor/rrds /var/opt/novell/zenworks/monitor

chkconfig apache2 off
chkconfig gmond off
chkconfig gmetad off

rcapache2 stop
rcnovell-gmetad stop
rcnovell-gmond stop
Configuring the Heartbeat2 High Availability Client
The final step in preparing to upgrade your ZENworks Orchestrate 1.3 high availability environment to a PlateSpin Orchestrate 2.0 high availability environment is to configure the Heartbeat2 client for the changes made in previous steps. You can either do this manually, using the Heartbeat2 interface to add the appropriate information and parameters, or you can run a script to accomplish the same thing.
The lines of sample code below are excerpted from the /opt/novell/zenworks/orch/bin/ha/cluster_zos_server.xml file on the Orchestrate Server.
<primitive id="Apache2" class="lsb" type="apache2" provider="heartbeat">
        <instance_attributes id="apache_attr">
            <attributes>
                <nvpair id="apache2_target_role" name="target_role"
value="started"/>
            </attributes>
        </instance_attributes>
        <operations>
            <op id="Apache2_Status" name="status" description="Monitor
the status of Apache2" interval="120" timeout="15" start_delay="15"
role="Started" on_fail="restart"/>
        </operations>
    </primitive>
    <primitive id="Gmetad" class="lsb" type="novell-gmetad"
provider="heartbeat">
        <instance_attributes id="gmetad_attr">
            <attributes>
                <nvpair id="gmetad_target_role" name="target_role"
value="started"/>
            </attributes>
        </instance_attributes>
        <operations>
            <op id="Gmetad_Status" name="status" description="Monitor
the status of Gmetad" interval="300" timeout="15" start_delay="15"
role="Started" on_fail="restart"/>
        </operations>
    </primitive>
    <primitive id="Gmond" class="lsb" type="novell-gmond"
provider="heartbeat">
        <instance_attributes id="gmond_attr">
            <attributes>
                <nvpair id="gmond_target_role" name="target_role"
value="started"/>
            </attributes>
        </instance_attributes>
        <operations>
            <op id="Gmond_Status" name="status" description="Monitor the
status of Gmetad" interval="300" timeout="15" start_delay="15"
role="Started" on_fail="restart"/>
        </operations>
    </primitive>
These lines need to be put into an .xml text file. For this example, the file is named sample.xml.
When the file is ready, run the following command for this file:
/usr/sbin/cibadmin -o resources -U -x sample.xml