2.3 Users
2.3.1 Users
The User menu allows an Administrator to create accounts for other Users. The tab gives Administrators and Supervisors control over all User accounts in the system. User accounts can be created, modified and deleted.
Users can have one of the following Roles:
and one or more of:
It is possible for any User to have multiple Roles. (For example, a Technician may also be assigned a Customer Role so they can log requests related to their own equipment. When a User has more than one Role, they can switch between interfaces easily.) See: Changing Roles
User Accounts can be created within the application or imported from one or more authentication servers.
If using User Custom fields, we recommend these be configured prior to creating Users. See: Custom Fields.
2.3.2 Creating a User Account (Internal Authentication)
Users within the system that are to be assigned to support Teams must be allocated one of the following Roles:
The above User Roles can work on requests. The About Roles section of the User Guide provides more information regarding specific User Roles in the system.
Creating a User Account
When creating a new User, the following four tabs are available:
-
Information
-
Schedule
-
Aliases
-
Team
-
Skills
-
Types.
Information Tab
Within the User Information tab, User details can be created, viewed and edited. User Roles, Process assignment and default logins can all be customized within this tab.
To create a new User:
-
Select User>Users
-
Click New
The User Information screen appears.
-
User Information Fields
Title
Select a title from the drop-down menu options. (This field is displayed if the Enable Titles option is set to Yes in the Admin>Setup>Setup>Privileges>Customer tab.)
First Name*
Enter the User's First Name.
Last Name*
Enter the User's Last Name.
User Name*
Enter a LiveTime User Name (unique).
Password*
Enter a User Password. Note: Passwords can be changed under the Users Tab or reset by the User under their My Account tab.
Roles*
Assign a Role for the User. Each Role has associated permissions. See Roles.
Every Technician Role assigned also needs a Supervisor assigned.
NOTE:Note: More than one Role can be assigned but only one of Supervisor, Partner or Technician can be allocated per User.
Default Portal*
The Default Portal is the User Interface accessed by default when a User with multiple Roles logs into the system.
NOTE:If the Users Default Portal is set to Customer, the User details will not be accessible in the Users list, but included in the list within the User>Customer tab.
Assignment Template
This option is visible in a new User Information screen if Job Assignment Templates are configured in the User> Assignments tab.
Select a template to assign the new User to multiple Teams, Escalation layers and Processes.
Operations Processes
Assign the licensed access for Request Fulfilment, Incident and Problem Management.
Assigning Processes to the User gives them access to support those Processes and enables them to be assigned as Team members for those Processes' Teams.
See User Processes.
Change Processes
Assign the licensed access for Change, Release and Deployment Management. Note, Users assigned Release are automatically assigned Deployment.
Internal Processes
Enable the Users privilege to maintain Service Level, Configuration and Knowledge Management.
Selecting the Configuration and Knowledge options displays the relevant fields that enable granular controls to be set for those processes.
NOTE:The Finance Role is limited to the processes of Configuration and Service Level Management.
Knowledge
If the User is assigned the Knowledge Management process, their privilege to create, edit, delete and/or publish KBAs can be configured.
Configuration
If the User is assigned the Configuration Management process, their privilege to create, edit and/or delete Items within the CMDB can be configured on a per task basis.
Customer Org Unit
If the User is also allocated a Customer Role within the system, this field is displayed. Enter Company or Department details that apply to the User in their Customer Role.
Line Manager
(This field is visible if the User is also assign a Customer Role within the system. The information can not be edited if the line manager details are set by the LDAP synch.)
If relevant, assign a system user with the Customer Role who can approve/reject requests made by this Customer.
Primary Email*
Enter the User's email address. System messages are sent to this address.
Send To
This field becomes available for Users that have the Customer Role and have alternate email addresses entered on the Aliases tab.
Select the most appropriate email address to be set as the default address applied to Customer correspondence. When the Send To field is set to an alias address the Primary Email address is not included in the cc list, unless specified in the request Information tab cc list.
Phone
Enter telephone details.
Mobile
A mobile number can be entered as a contact number or for use with SMS (Short Mail Service message). An SMS can be sent to notify the assigned Technician when a Service Request is raised.
SMS Messaging options:
-
From the drop down list, select the SMS service provider.
-
Override SMS Address. If your service provider does not appear in the list, click this checkbox and enter an alternate Service Provider.
SMS Override
Enter SMS Gateway override details for the User, if a number other than the one entered in the Mobile field is to be used to send/receive updates via SMS. Enter the complete SMS details in email address format, i.e., 000777891@smsgateway.provider.com.
Fax
Enter known fax details.
Pager
Enter pager details.
Salary
An annual salary can be entered. This value is used for reporting.
Forum Moderator
Select this checkbox to designate this User as a forum moderator. See Forums.
Survey Manager
Select this checkbox to enable this User to create and manage surveys in the system.
Supervisor*
Select a Supervisor, if the User has a technician role. Users with the Technician Role must be allocated a Supervisor.
Partner For
When a User is assigned the Partner Role, their associated Partner Organization must be assigned within this field.
Partner
If the User is also assigned a Customer Role, this field allows the Customer to be associated with a Partner Organization who will handle their requests when they are logged in the system.
Available
Shows if the User is available for requests to be assigned to them. This is based on work hours configured in the Schedule tab of the User and their Vacation Status. If no hours are set within the Schedule tab when the "Define Works Hours" is enabled within Admin>Setup>Privileges>User screen and the User is not on vacation, the system will consider them to be unavailable.
Assignment
**Visible when the Assignment Control is enabled in Admin>Setup>Privileges>User.
Set to Off if the User is not to be assigned new requests, irrespective of their Availability status.
On Vacation
Placing a Technician on vacation excludes them from being assigned new requests automatically. When On Vacation is activated a Technician's existing requests are not reassigned.
Training
This option is only visible for Technician Users, and when enabled allows the User to be included in Teams to view requests but does not allow them to put the request in edit mode or add Notes.
Email Locale
Adjust the default language for email correspondence, if required.
Country
The User automatically adopts the default Country set for the system. However, the Country can be manually adjusted here for the specific User.
State
Set the State information based on the Country selected, if required.
Timezone
The User automatically adopts the default Timezone set for the system. However, the Timezone can be manually adjusted for the specific User.
GPS
The GPS coordinates of the last known address.
-
* Denotes Mandatory Fields
-
Complete the User detail information
-
Click Done.
Emailing User Details

To email a User regarding their system log in credentials, click the Email button within the User Information screen. If Random Passwords is enabled, selecting Email will reset the Password and forward the details to the User. If Password Questions is enabled in Setup>Privileges>System, selecting Email will send a link to the User directing them to a page that includes the security questions set for their account and reset the password based on the answers provided. Customers must complete this process within an hour of the email being sent.
vCard Button

Select this option to download and open the User's information in an electronic business card format, to email or save outside the system.
Schedule Tab
By default the Schedule tab includes the On Vacation option, which can be set to Yes when the User takes leave. The system will automatically reassign the User's active requests, if the Vacation Reassign option has been enabled in the Admin>Setup>Privileges>User tab. If this option has not been enabled, a Supervisor User will need to manually reassign the requests, if required.
If the system Setup has been configured to Define Work Hours and Schedule Vacations, this additional functionality is available within the Schedule tab.
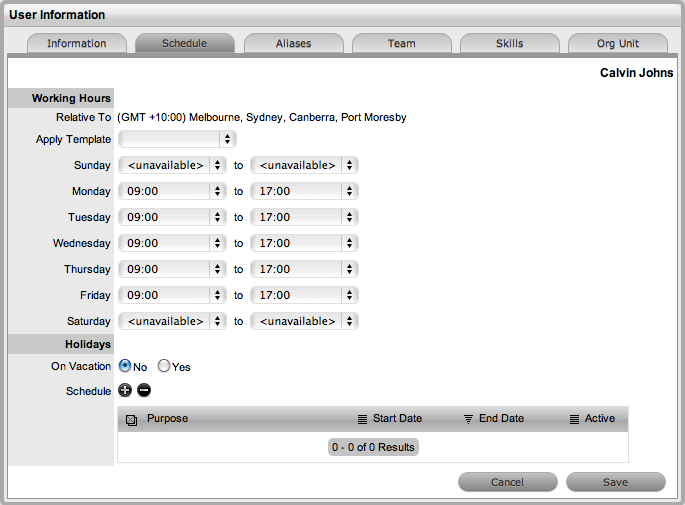
Define Work Hours
Use the drop-down lists to set the hours of work when the User is available for the week. Based on what is set here, the system will assign requests to the User during their available hours. However, if no other Technician is available for requests based on their defined work hours, the system will assign the User new requests outside of their set work hours.
NOTE:If the Technician Define Work Hours option has been enabled, the hours of work MUST be defined, otherwise the system will ignore the Technician Assignment logic and automatically allocate new requests to the Team Lead.
Schedule Holidays
The Schedule Holidays functionality allows the Supervisor to pre-book leave in the system for Users. There are no restrictions on the number of days that can be set, and based on the configuration, when a leave period is activated, the system will automatically reassign active requests to other available Users applying the Technician Assignment logic. If the request was initially drawn from an Incident Queue, it will not return to the Queue but be reassigned to the most relevant Technician based on the Technician Assignment logic.
As a Supervisor User, to schedule User leave:
-
Go to the Users>User option
-
Select the hyperlink name of the User
-
Move to the Schedule tab
-
Click Edit
-
Select

The Vacation Details window is expanded.
-
Enter the reason for leave in the Purpose box
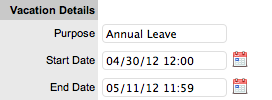
-
Complete the Start and End date details
-
Click Save
The details are recorded in the database and when the Start Date is reached, new requests will not be assigned to the User. After the scheduled End Date, the User account will be automatically re-activated.

-
NOTE:It should be noted that if the User on vacation is a Team Lead for any Teams where there are no Technicians available for new request assignment, the system will allocate new requests to the Team Lead, regardless of their vacation status.
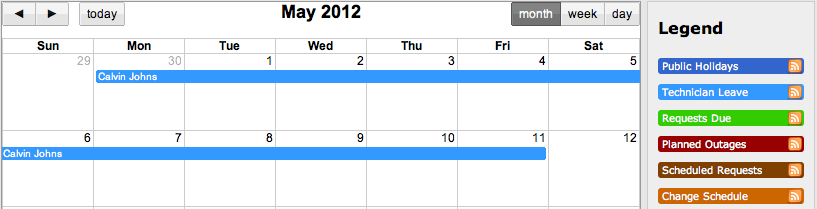
The Supervisor Events calendar in the Home Tab shows when Users on vacation:
Aliases Tab
NOTE:This is only applicable if the User has the Customer Role.
Use the Aliases tab to enter additional email addresses. Email addresses in the Aliases tab allow the User to send emails to the System or Team support addresses from more than one address. The system creates requests from these emails. Notifications for requests created using an address in the Aliases tab, are sent to the main email address and cc'd to the alias address that was used to create the request.
When one or more alias email addresses have been created for a Customer, a Send To field is displayed on the Customer Information screen, which allows the most appropriate email address to be set as the default address applied to Customer correspondence. When the Send To field is set to an alias address the Primary Email address is not included in the cc list, unless specified in the request Information tab cc list.
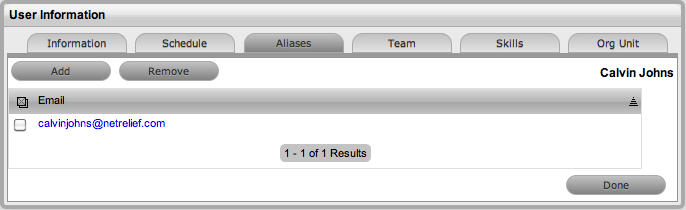
To add an alias email address:
-
Select User>Users
-
Click on the User name
The User Information screen appears.
-
In the Information tab, click Edit
-
Select the Aliases tab
-
Enter an alias email address
-
Click Save.
When an alias email address has been created for a Customer, a Send To field is displayed on the Customer Information screen, which allows the alias email address to be set as the default address applied to Customer correspondence.
-
NOTE:An alias will only be used if the User has a Customer Role.
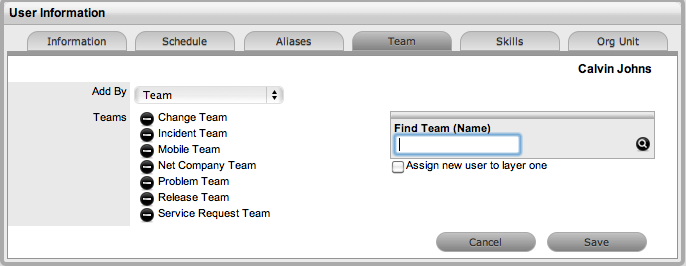
Team Tab
The User Team tab lists Teams associated with the selected User. Use this section to assign the User to one or more support Teams, making the additions by Team or job Assignment templates that have been configured in the system. Processes selected in the Information Tab for the User determine the Teams available in the Team tab.
Once a User is assigned to the Team, the Supervisor must configure the escalation layers for the Team to include the new User. However, the User can easily be added to Layer One of escalation when associated with a new Team by ticking the "Assign new users to layer one option" when assigning the Team within this tab. Also, if Assignment templates are created in the system, by selecting the Team template, the User will automatically be added to Teams,Escalation Layers and Work Groups configured within the selected template.
NOTE:The User must be assigned the relevant Processes for Support Teams to be shown in Team search results. If an Assignment template is selected and includes Teams for Processes the current User is not allocated, those Teams will not be included on the template.
To add a User to a Team within the Team tab:
-
Click Edit
-
Using Add By Team, enter a Team Name in the Find Team field and click

Or, leave the field empty and click
. The Teams for Processes that the User is assigned are displayed in the search results.
-
Tick "Assign new user to layer one", if relevant
-
Select a Support Team link
The User is assigned to the Team and layer one of escalation if appropriate.
-
Click Save.
To add a User to a Team within the Team tab using Assignment templates:
-
Click Edit
-
Within the Add By field, select Team Template
Job Assignment Templates that have been configured in the User>Assignments tab are displayed, but only including Teams consistent with the Processes assigned to the User.
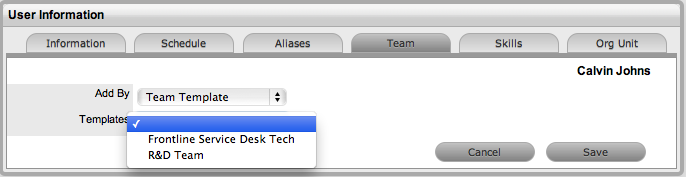
-
Select one or more Template options
-
Click Save.
The User is automatically included in the Teams, Escalation Layers and Work Groups configured in the Template.

To remove a User from a Team:
-
Select User>Users
The User Information screen appears.
-
Click on the name of the User
-
Select the Team Tab
-
Click Edit
-
Select
 to remove a Team assignment
-
Click Save
-
Click Done.
-
NOTE:If a User is the Team Lead or the only person assigned to an escalation layer they cannot be removed from a Team under this tab.
Skills Tab
Use this section to assign any specific Classifications that are to be handled by a Supervisor, Technician or Partner. This assignment assumes areas of expertise for Users assigned to these Classifications. This allows the system to automatically route requests logged against these Classifications to the most appropriate User.
NOTE:Prior to using the Skills tab, the Supervisor should configure Items and Classifications.
Assigning a Classification
To assign a Classification:
-
Select User>Users>Skills
-
Click Edit to display the Add button
-
Click Add
-
Select the Item Category
The Item Type and Classification Type drop-down list is displayed.

-
Choose an Item Type, if relevant
-
Select * to assign all Classifications as Skills or choose a specific Classification
The list displayed will include all Classifications configured for the Item Category and the Item Type, if an Item Type is selected.

-
Click Save
-
Click Done.
NOTE:The Classification assigned to the User is either based on the Classifications of an Item Category or Item Type, hence displaying two columns. However, the Item Type column will only include information when the Classification selected is specific to that Item Type, and not directly related to the Item Category.
To remove a Classification:
-
Select User>Users
The User Information screen appears.
-
Click on the name of the User
-
In the Skills tab, click Edit
The Delete button appears at the bottom right.
-
Click the checkbox next to the Classification. Multiple Classifications can be checked
-
Click Remove
-
Click Done.
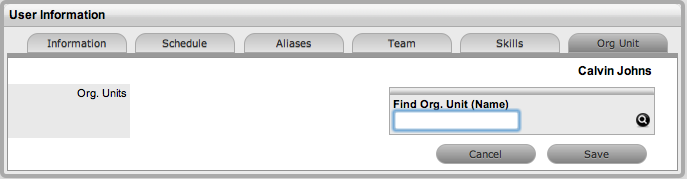
Org Unit Tab
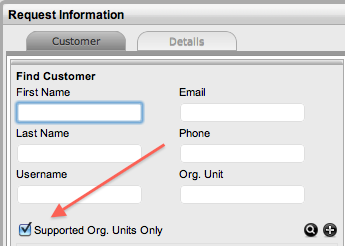
Use this section to assign one or more Org Units to a Supervisor, Technician or Partner, which will result in requests that are logged by these Org Units being routed to the assigned Users. When Users are assigned to support Organizational Units, the Find Customer option during the request creation process displays the "Supported Org. Units Only" option. This limits the Customer search results to those Customers who belong to the Org. Units the logged in Technician is assigned to support.
Assigning an Org Unit
To assign an Org Unit:
-
Select User>Users>Org Units
-
Click Edit to display the Find Org. Unit search field
-
Enter any known Org. Unit details or leave the field blank to return the full list of Org. Units recorded in the system
-
Click
-
Click on the Org. Unit name hyperlink to associate it with the User
Multiple selections may be made, if required.
-
Click Save.
Removing an Org Unit
To remove the association between a User and an Org Unit:
-
Select User>Users
The User Information screen appears.
-
Click on the name of the User
-
In the Org Units tab, click Edit
-
Select
next to the relevant Org Unit/s
The Org Unit/s details are removed from the tab
-
Click Save
-
Click Done.
Re-enabling Deleted Accounts
Administrators have the ability to reactivate deleted User accounts.
To enable a deleted account:
-
Within the User>Users tab, select the Search button
-
Select Deleted as the Account Status search option
-
Click Search
A list of deleted Users is displayed.
-
Select a User to re-enable
The User information page appears.
-
Click the Enable button, to reactivate the account.
The User account becomes active and is available within the application.
2.3.3 Importing Users using LDAP/Active Directory Server (External Authentication)
Administrators can connect the system to a Directory Server for User authentication purposes. This removes the need to create User accounts as it allows the application to synchronize User accounts and access levels with an existing Directory Server. It has the added benefit of allowing the Administrator to work with existing infrastructure.
As part of the mapping process, if no values exist on the authentication server for a mapped field, no drop-down menu will appear and Users cannot edit the field.
When the authentication server is used, the User’s password is not visible through the service management application, regardless of whether the User is new or existing in the system. This is due to the User’s account being validated against an authentication server account rather than a system account. The password is stored in the authentication server’s database and it is not accessible through the application.
Also, Users using LDAP or Active Directory authentication are not able to edit their first name, last name, LDAP/ADS username or email address. These fields are stored on the authentication server and cannot be modified within the service management tool.
To import Users using a directory server, see Authentication.