5.9 LDAP
5.9.1 LDAP Authentication
There are several ways to authenticate users of the service management application. By default the system uses its internal authentication mechanism but there is also the option to authenticate against one or more Directory Servers or use OpenID Providers.
Internal Authentication
Using internal authentication requires the Administrator or Supervisor to create accounts for all User types by entering the contact information, access levels and password. This information is then saved to the system database. The typical case for using Internal Authentication is where there are few Users, or in an environment that has no pre-existing directory server. Usually, the Administrator would configure the User accounts prior to announcing the system is operational, and from that point on, maintain the accounts as necessary. (See: Create Customers or Create Users.)
OpenID Providers
OpenID is a decentralized process to verify a Customer's or User's online identity. It addresses the single sign-on issue by not relying on a centralized website to confirm a User's identity. The system can be enabled to be an OpenID consumer, which provides seamless authentication between third party authentication utilities and the service management system. OpenID Providers are configured within the Social tab, and Customers or Users that have accounts with the configured OpenID Providers can log into the system by selecting the relevant icon on the Login page.
Directory Server Authentication
The system allows the Administrator to connect to one or more Directory Servers for User authentication purposes. This removes the need to create User accounts as it allows the application to synchronize User accounts and access levels with the existing Directory Server. It has the added benefit of allowing the Administrator to work with existing infrastructure. (See: AD Authentication or LDAP Authentication.)
Directory Server Groups (External Authentication)
Roles are used to grant access within the application. Users must be assigned to Groups on the directory server that correspond to the Roles within the support system. Group members are assigned Roles and access levels within the service management tool.
The default group names the system expects to find on the directory server are:
-
Administrators
-
Supervisors
-
Technicians
-
Partners
-
Managers
-
Finance
-
Customers.
The Group names can be customized in the LDAP/Active Directory Advanced tab. Users can belong to more than one group, for example if a User holds the Roles of Technician and Manager, they would belong to the Technicians and Managers groups.
NOTE:Users can have only one of the Partner, Supervisor and Technician Roles. Therefore, they can belong to only one of these groups. However, they may also belong to any other group, or combination of groups.
The following fields may or may not be mapped, depending on the options set by the system Administrator:
-
First Name
-
Last Name
-
Email
-
Phone
-
Mobile
-
Pager
-
Address
-
City
-
Zip
-
Country.
Email Address
All User accounts must include an email address to be successfully imported into the system. If additional fields have been mapped from the authentication server to corresponding fields in the application, a drop-down menu containing all the optional values for the field will be available beside the mapped field. Choose the correct value from each list.
Mixed Mode Authentication
The application can use a combination of internal and external authentication. This means, the service management tool can be synchronized with a Directory Server to import User and Customer details as well as allowing Customer Accounts to be created directly within the system. Such a feature is useful, if the service and support solution is being used for internal and external customer support.
To enable Mixed Mode authentication, after the system has connected to the Directory Server, move to the Setup>Privileges>Customer tab and enable the Include Customers option to display the Mixed Mode field. Set the Mixed Mode option to Yes.
NOTE:If authenticating against a Directory Server, all User accounts will validate against the server except for the application default Administrator User. The default Administrator User account details can be modified within the My Account tab of the application.
5.9.2 Active Directory Integration
Active Directory is a unique implementation of the LDAP standard, as the requirements for communication need to conform to the Microsoft™ Windows Authentication protocols. To meet this need, it is necessary to enter all domains from which Users will authenticate. Multiple sources of Active Directory can be synchronized with the system, if required.
Configuring the Active Directory Integration
To configure the Active Directory integration:
-
Select Setup>LDAP
-
Click New
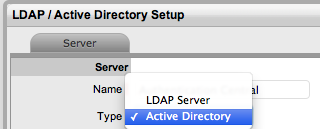
The LDAP/Active Directory Server screen tab is displayed.
-
Enter the Server Name
-
Select Active Directory within the Type drop down list
-
Define all the Domains from which Users will be authenticated
Domains will need to be entered in both NT and Windows 2000 domain naming systems formats. This is because Active Directory conforms to Microsoft™, Windows NT and Windows 2000 authentication protocols.
Make entries with care, as they are not validated against the Directory Server by the system Domain Editor.
NOTE:Verify the Active Directory setup before you provide the Windows NT domain and Windows 2000 domain credentials.
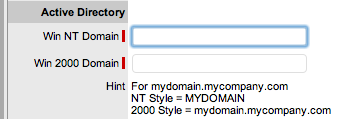
NOTE:Here is an example of both the naming conventions for the domain:
mydomain.mycompany.com
NT Style = MYDOMAIN
2K Style = mydomain.mycompany.com
-
Click New and enter domain information
-
Click Save
-
Using the drop-down arrow, select the Default Domain, which is used in the following three ways:
-
on the login page
-
to authenticate against, when synchronizing with the Directory Server
-
where the system expects to find the User Groups.
-
-
Enter all other required fields to configure the Directory Server
-
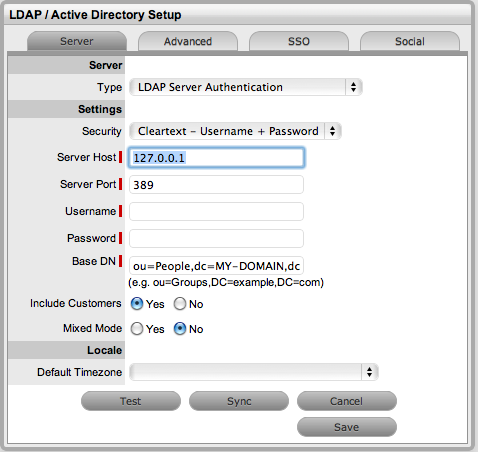
Settings
Description
Security
Determines how the integration layer will authenticate. For Active Directory this should be set to Cleartext– Username + Password. Anonymous connections to Active Directory are rarely enabled.
Server Host
Enter the hostname or IP address of the Active Directory Server. On a Windows NT domain this will be the primary domain controller.
Server Port
The default Active Directory Server Port is 389. This is rarely changed.
Username
Used by the system to authenticate against the Active Directory Server when reading account information. The domain prefix/suffix will be appended, based on the default domain, when connecting to the Server.
Password
Enter the Password for the Username account.
Users Node
The component of the base domain name that refers to the location of the User Groups .For example, if the location of the User Groups is the following:
ou=UserGroups, ou=MIS, dc=myoffice, dc=mycompany, dc=com (SeeLDAP/Active Directory Advanced Settings for information on Group configuration.)
Groups must be in the default domain, in this case myoffice.mycompany.com. The Users Node only needs the location of the Groups within the default domain, so the Users Node in this example will be: ou=UserGroups, ou=MIS.
Locale
Default Timezone
Select the default Timezone to be applied to all User accounts imported via Active Directory.
-
Click Save.
Repeat the above process to add more than one authentication server for authorizing User access.
Test Button

The Test button creates a connection to the Active Directory Server, applying the configuration settings. If successful, it will attempt to determine how many Users are in each group and display a Results Screen.
NOTE:If the test fails, an error message will display the cause.
Sync Button

The Sync button runs the synchronization process to import all Users from the Server Directory. If new Active Directory Accounts have been created and those Users require immediate access to the system, a manual synchronization would be used.
Only one synchronization can run at a time. When multiple Users need access, create the accounts, then run a single manual synchronization.
A manual synchronization may take some time as it depends on the connection speed with the external service. The manual synchronization works best for small directories. Larger Active Directory implementations can take some time to propagate the changes, so account information may not be immediately available.
Importing Customers
Customer details can be imported using Active Directory by enabling the option, if required. When the system is setup to synchronize with Active Directory, move to the Setup>Privileges>Customer tab and enable the Include Customers option.
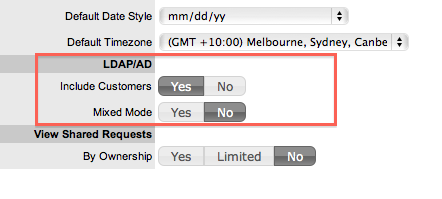
If there is a need to create Customers using Active Directory and the system's internal authentication capability, Mixed Mode authentication can also be enabled. After the option to Include Customers is set to Yes in the Customer Privilege tab, the Mixed Mode field is displayed. Set this option to Yes to allow Customers to be created directly in the system and using Active Directory.
Imported Account Usernames
Accounts imported from Active Directory use the UPN as the Username, as opposed to the NT style login. The domain component of the UPN is derived from the selected domain in the popup on the login page, which means Users need to enter their login name only to connect to the support application.
Login details are passed directly to the directory server for authentication and are not retained within the service management system.
5.9.3 LDAP Server Integration
Multiple types and sources of directory servers can be synchronized with the system at any one time. Among the several LDAP servers supported by the system, and which this section discusses, are the following:
-
Open LDAP
-
Netscape Directory Server
-
Novell eDirectory.
It should, however, be noted that LDAP does follow a standard and as such the settings detailed herein should also apply to other implementations.
Configuring LDAP Server Integration
To configure LDAP Server integration:
-
Select Setup>LDAP
-
Click New
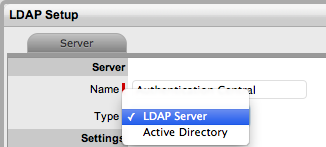
The LDAP /Active Directory Server tab is displayed.
-
Enter the Server Name
(If the system is to synch with Zenworks, ensure the Server Name matches the User Source Name used by Zenworks.)
-
Select LDAP within the Type drop down list
-
Complete the Settings fields
-
Fields
Description
Security
Secure Socket Layering (SSL) encryption is provided for Active Directory and LDAP server integration. Details entered here determines how the integration layer authenticates.
User authentication can be with Secure Socket Layering (SSL) or Clear Text. Select Anonymous or User name and Password.
If Anonymous is selected, ensure anonymous access to the directory is available.
Server Host
Enter the host name or IP Address of the LDAP Server.
Server Port
This is the LDAP Server Port. The default is 389.
User name
The system authenticates the user name against the LDAP Server. Leave this blank for anonymous connections.
Where a user name is provided, Netscape allows the internal users to connect as the account name, so using ‘cn=Directory Manager’ is acceptable.
Open LDAP expects the fully qualified Domain Name for the user, regardless of access level, so at the very least ‘cn=Manager,dc=example,dc=com’.
For other accounts the user BaseDN is required. Users logging in need only enter their login name, it is assumed the login name will be unique across the entire directory.
Password
If a User account is specified in the User name field, enter the account password.
BaseDN
The Base Domain Name refers to the domain location of the User Groups. For example, assume that the location of the User Groups is the following:
ou=UserGroups,ou=MIS,dc=myoffice,dc=mycompany,dc=com
The above String would be the BaseDN.
Locale
Default Timezone
Select the default Timezone to be applied to all User accounts imported using the authentication server.
-
Enter all required fields to configure the Directory Server
Test Button
The Test button will create a connection to the LDAP Server using the configuration settings. If successful, it will attempt to determine how many Users are in the top level of each group and display a Results screen.
NOTE:If the test fails, an error message will display the cause.
Synch Button
The Synchronization button runs the synchronization process manually. It is most useful for the initial deployment, and when new directory server accounts have been created for Users who require immediate access to the system.
If using Certificates ensure the certificate details are entered in the Certificates tab before synchronizing.
Only one synchronization can run at a time. For multiple users needing access, create the accounts on the LDAP server then run a single manual synchronization.
A manual synchronization may take some time as it depends on the connection speed with the external service. The manual synchronization works best for small directories, as larger directories take more time to propagate changes.
Importing Customer Details
Customer details can be imported using LDAP by enabling the option, if required. When the system is setup to synchronize with LDAP, move to the Setup>Privileges>Customer tab and enable the Include Customers option.
If there is a need to create Customers using LDAP and the system's internal authentication capability, Mixed Mode authentication can also be enabled. After the option to Include Customers is set to Yes in the Customer Privilege tab, the Mixed Mode field is displayed. Set this option to Yes to allow Customers to be created directly in the system and using LDAP.
5.9.4 LDAP/Active Directory Advanced Settings
Before setting up the LDAP/ADS configuration within the system, the Advanced settings should be revised. The default setup assumes that the User Groups that the system uses to authenticate match what is on the server, and that the User information imported matches the attributes available on the server.
LDAP/Active Directory Advanced Options Set-up
To configure the Advanced options within the LDAP/Active Directoy Setup window:
-
Select Setup>Authentication
The LDAP /Active Directory Setup screen appears.
-
Click Edit
-
Move to the Advanced tab of the selected Authentication Server
-
Enter the relevant details for the fields, as required
-
Field
Description
Revert to Defaults
Resets the installation defaults.
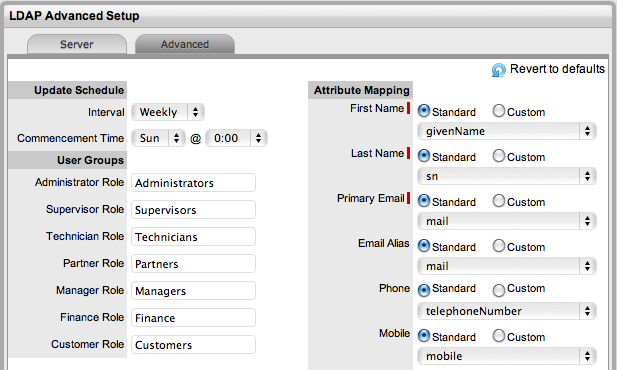
Update Schedule
Sets a routine synchronization to update the system with current AD/LDAP accounts. Select the required Daily, Weekly or Monthly intervals and Commencement details.
Commencement Time
Set the day of the week and time the system is to start automatically synchronizing with the directory server.
User Groups
Provides imported Users Roles. (The system will look for these groups by default)
The User Group names can be customized, only requiring a unique name for each group. The group names on the Directory Server must be identical to the User Group names entered here. Customize or use the default User Group names as necessary.
Members of each group will be assigned the appropriate Role within the system. To assign multiple Roles to a User, make sure they are members of each of the required groups.
Users can have only one of the Supervisor, Technician or Partner Roles but they can also have any other Role or combination of Roles.
Attribute Mapping
Maps attributes from the directory server to corresponding fields in the system. Native system fields are First Name, Last Name, Email (A unique Email Address must be included for a User account to be created), Phone, Mobile, Pager, Address, City, Zip and Country.
NOTE:Mandatory User information for new and existing User accounts include the First Name, Last Name and Email address. If these details are not available, the application will not validate an existing User account and automatically reassign any open or active requests to another valid User.
Standard:Next to each field is a drop-down menu containing the list of default fields specific to either LDAP or ActiveDirectory server type. For each native name, the default fields are selected. Use the default mapping or select the mapping attribute as required.
Custom: Select the Custom option to manually enter an Attribute Field.
GUID
Global Unique Identifier
For ADS select objectGUID
For OpenLDAP select entryUUID
For eDirectory select GUID.
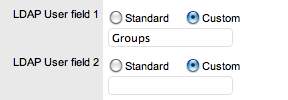
LDAP User fields/ Mixed Mode User Fields
The LDAP User field headings will be replaced with any custom LDAP/ADS Accounts fields created by the Administrator in Setup>Custom Fields ( See Custom Fields.), or Mixed Mode User Fields if the Mixed Mode option is enabled in the Server tab.
Use the drop-down list to select the appropriate mapping to the matching directory server field or select Custom to manually enter a Field.
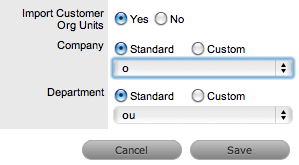
Customer Orgs
Organizational Unit relationships can also be mapped from the authentication server. By default this is not enabled. To activate Customer Organizational Unit mapping, select Yes for the Import Customer Organizational Units option and define where the Company and Department information is to be derived.
Line Managers
LDAP attribute that defines a Customer's line manager, which is used for processing approvals on Service and Change Requests. Only system users with the Customer Role can be assigned as Line Managers.
-
Click Save.
Mapping Fields to the Matching Directory Server Field
The LDAP User field headings will be replaced with any custom LDAP/ADS fields created by the Administrator in Setup>Custom Fields. See Custom Fields. Use the drop-down list to select the appropriate mapping to the matching directory server field or select Custom to manually enter a Field.
User details are imported when synchronization with the Active Directory/LDAP server takes place. Imported fields cannot be modified through the service management tool directly, the appropriate authentication server console must be used.
Import Customer Org Units
Organizational Unit relationships can also be mapped from the authentication server. By default this is not enabled. To activate Customer Organizational Unit mapping, select Yes for the Import Customer Organizational Units option.
NOTE:The details of the Org. Units are not populated upon this synch, only the Org. Unit names.
For the Org. Unit details to be assigned to Customer or User Information, create the Org. Unit in the Supervisor>User>Organizational Units tab and ensure the Org. Unit name is identical to what is stored in the authentication server. If the details are not identical, the system will create another Org. Unit.