| SUSE LINUX – Administration Guide Part I. Installation / Chapter 2. Updating the System and Package Management | ||||
|---|---|---|---|---|
 | 1.9. Soft RAID | 2.2. Software Changes from Version to Version |  | |
| SUSE LINUX – Administration Guide Part I. Installation / Chapter 2. Updating the System and Package Management | ||||
|---|---|---|---|---|
| 1.9. Soft RAID | 2.2. Software Changes from Version to Version | | |
Table of Contents
Abstract
SUSE LINUX provides the option of updating an existing system without completely reinstalling it. There are two types of updates: updating individual software packages and updating the entire system. Packages can also be installed by hand using the package manager RPM.
Software tends to grow from version to version. Therefore, we recommend first taking a look at the available partition space with df before updating. If you suspect you are running short of disk space, secure your data before updating and repartition your system. There is no general rule of thumb regarding how much space each partition should have. Space requirements depend on your particular partitioning profile, the software selected, and the version numbers of SUSE LINUX.
![[Important]](admon/important.png) | Important |
|---|---|
It is recommended to read README and, in DOS and Windows, README.DOS on your CD. Find notes there regarding any additional changes made after this manual went to print. | |
Before you begin your update, copy the old configuration files to a separate medium just to be on the safe side. Such media can include streamers, removable hard disks, or ZIP drives. This primarily applies to files stored in /etc. Also, review the configuration files in /var/lib. Furthermore, you may want to write the user data in /home (the HOME directories) to a backup medium. Back up this data as root. Only root has read permission for all local files.
Before starting your update, make note of the root partition. The command df / lists the device name of the root partition. In the example shown in Output 2.1. “List with df -h”, the root partition to write down is /dev/hda2 (mounted as /).
Example 2.1. List with df -h
Filesystem  Size  Used  Avail Use% Mounted on
/dev/hda1   1,9G  189M  1.7G  10%  /dos
/dev/hda2   8,9G  7,1G  1,4G  84%  /
/dev/hda5   9,5G  8,3G  829M  92%  /home
Before updating PostgreSQL™ (postgres), it is usually best to dump the databases. See the manual page of pg_dump. This is, of course, only necessary if you actually used PostgreSQL prior to your update.
The hard disk controller manufactured by Promise is currently found on high-end motherboards in numerous computer models, either as a pure IDE controller (for UDMA 100) or as an IDE-RAID controller. As of SUSE LINUX 8.0, these controllers are directly supported by the kernel and treated as a standard controller for IDE hard disks. The additional kernel module pdcraid is required before you can aquire RAID functionality.
For some updates, hard disks on the Promise controller may be detected before disks on the standard IDE controller. If so, the system will no longer boot following a kernel update and usually exit with Kernel panic: VFS: unable to mount root fs. In this case, the kernel parameter ide=reverse must be passed when booting to reverse this disk detection process. See Section 1.1.1. “The Start Screen”. To apply this parameter universally when using YaST, enter it in the boot configuration. See the User Guide.
![[Warning]](admon/warning.png) | Warning |
|---|---|
Only the controllers activated in the BIOS are detectable. In particular, subsequently activating or deactivating the controllers in the BIOS has a direct effect on the device names. Use caution or risk being unable to boot the system. | |
Technical Explanation
The controller sequence depends on the motherboard. Each manufacturer wires its supplementary controllers differently. The lspci shows this sequence. If the Promise controller is listed before the standard IDE controller, the kernel parameter ide=reverse is required after updating. With the previous kernel (without direct Promise support), the controller was ignored so the standard IDE controller was detected first. The first disk was then /dev/hda. With the new kernel, the Promise controller is detected immediately and its (up to four) disks are registered as /dev/hda, /dev/hdb, /dev/hdc, and /dev/hdd. The previous /dev/hda disk becomes /dev/hde so is no longer detectable in the boot process.
Following the preparation procedure outlined in Section 2.1.1. “Preparations”, you can now boot:
Boot the system for the installation (see User Guide). In YaST, choose a language then select . Do not select .
YaST will determine whether there are several root partitions. If there is only one, continue with the next step. If there are several, select the right partition and confirm with (/dev/hda7 was selected in the example in Section 2.1.1. “Preparations”). YaST reads the old fstab on this partition to analyze and mount the file systems listed there.
Then you have the possibility to make a backup copy of the system files during the update. This option slows down the update process. Use this option if you do not have a recent system backup.
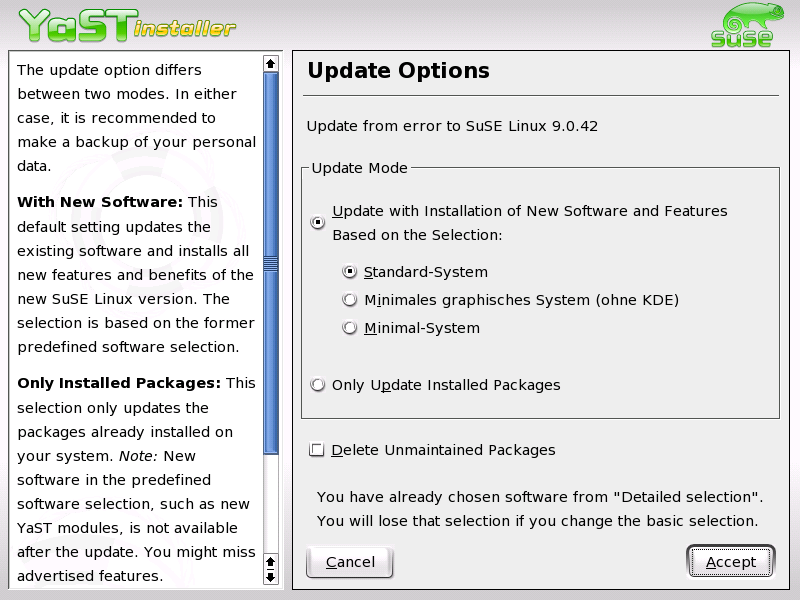
In the following dialog, either choose to update only the software that is already installed or to add important new software components to the system (upgrade mode). It is advisable to accept the suggested composition (e.g., ). Adjustments can be made later with YaST.
Because basic system components, such as libraries, must be exchanged when updating a base system, an update cannot be run from within a currently running Linux system. First, set up the update environment. This is normally done using the CD or DVD or with a custom boot disk. If you are carrying out manual modifications during the update or prefer to perform the entire update with YaST in text mode, follow the steps already described in detail in Section 1.1. “Text-Based Installation with YaST”. Below is a summary of this procedure.
Immediately after booting the kernel from the boot disk or from the CD or DVD, linuxrc automatically starts.
In linuxrc, specify the language and keyboard settings under and click to confirm each setting.
You might need to load the required hardware and software drivers via . See Section 1.1.2. “The Basis: linuxrc” for more details of how to proceed and Section 12.4.4. “Loading Modules” for a description of linuxrc.
Go to -> to select the source medium (see 12.4.6. “Start Installation / System”).
The installation environment is loaded from linuxrc then YaST starts.
Following the selection of a language and the hardware detection by YaST, select in the YaST opening screen.
Next, YaST attempts to determine the root partition and displays the result for selection or confirmation. Select your root partition from the list (example: /dev/hda2). In this way, prompt YaST to read the old fstab from this partition. YaST will analyze and mount the file systems listed there.
Then you have the possibility to make a backup copy of the system files during the update. In the following dialog, either choose to update only the software already installed or to add important new software components to the system (upgrade mode). It is advisable to accept the suggested composition (e.g., ). Adjustments can be made later with YaST.
In the warning dialog, select to start the installation of the new software from the source medium to the system hard disk. First, the RPM database is checked, then the main system components are updated. YaST automatically creates backups of files modified in the running system since the last installation. In addition, old configuration files are backed up with the endings .rpmorig and .rpmsave. The installation or update procedure is logged in /var/adm/inst-log/installation-* and can be viewed later at any time.
After the base system is updated, you will be switched to YaST's update mode. This mode allows you to tailor the rest of the system update to your needs. Complete the procedure as you would a new installation. Among other things, select a new kernel. The available options are presented by YaST.
Regardless of your overall updated environment, you can always update individual packages. From this point on, however, it is your responsibility to ensure that your system remains consistent. Update advice can be found at http://www.suse.de/en/support/download/updates/.
Select components from the YaST package selection list according to your needs. If you select a package essential for the overall operation of the system, YaST issues a warning. Such packages should be updated only in the update mode. For instance, numerous packages contain shared libraries. If you update these programs and applications in the running system, things might malfunction.