2.3 Configuring Your Contacts and Buddies
This section contains the following topics:
2.3.1 Adding and Removing Buddies
To add a Registered User from your community to your Personal Buddy list:
-
Select the menu item.
-
Select one or more contacts from any group under the Community Address Book in the Contact Window (use the Ctrl or Shift key to select multiple contacts).
If you do not see the Community Address Book, your administrator did not give you permission to view it. Instead, use Search to locate potential buddies.
-
Right-click one of the selected contacts and select the menu item.
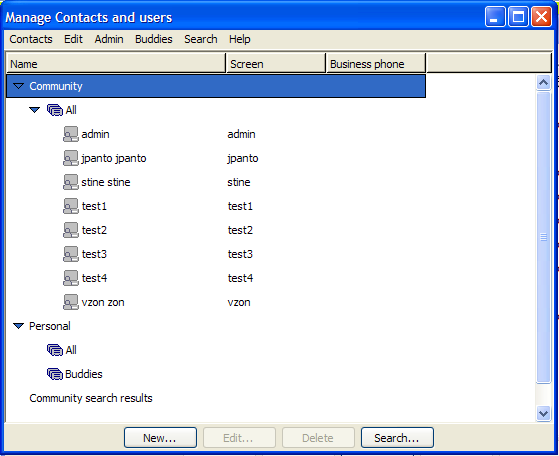
You can view all your Personal Buddies under the Personal Address Book. You can only have a limited number of Personal Buddies. The number is controlled by your personal policy setting. To find the maximum number of Personal Buddies you can add consult your system administrator or service provider.
Adding a Non-Community User to Your Personal Buddy List
To add a Registered User that is not a member of your community to your Personal Buddy list:
-
Select the menu item.
-
Right-click the and select the menu item.
-
Type the contacts screen name into the dialog, then click .
You can use this same technique to add a Community Address Book contact to your Personal Buddy List.
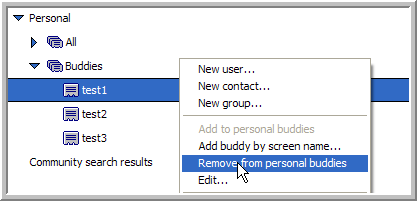
To Remove a Contact From Your Personal Buddy List:
-
Find the buddy you want to remove under your Personal Buddy List.
-
Right-click the buddy and select the menu item.
2.3.2 Searching the Community Address Book
Conferencing allows you to search the Community Address Book for contacts. This feature is particularly helpful when your organization is large (which results in a large Community Address Book) or when your administrator has set a policy that prohibits the downloading of the Community Address Book.
To Search the Community Address Book For a Name:
-
Select the menu item.
-
At the bottom of the window, click
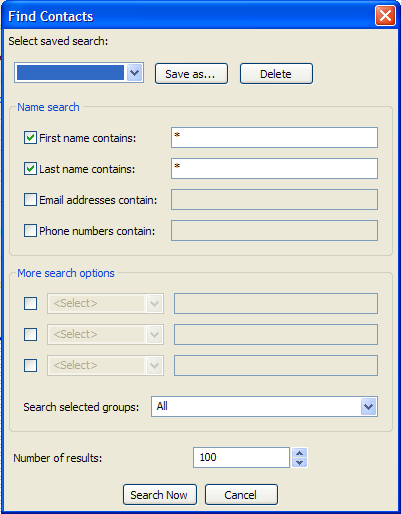
The Find Contacts window appears.
-
In either the or fields, type a few characters of the contact’s first or last name depending on which field you use.
Use the asterisk (*) as a wildcard before or after the text string.
For example, if you type da* into the field, Conferencing returns contact listings for names like David and Darren. If you type *da, Conferencing returns contact listings for names like Brenda and Linda.
-
Deselect the name field you are not using.
Using both name fields does not narrow your search down (each search option you use finds the matching contacts for that option and adds them to the final search results. See “Additional Search Options” below.
-
Click .
Under the Community Search Results Address Book, Conferencing adds a group for this search containing the contacts that match your search criteria.
If the entire search criteria does not display in the group’s name, mouse over the group name and a pop-up displays the entire search criteria.
To Delete a Search Results Group:
Right-click a search results group and select the menu item.
To Edit a Search Results Group:
-
Right-click a search results group and select the menu item.
-
Make your changes to the search criteria in the window, then click .
Additional Search Options
Conferencing returns the contacts that match any of the search options you use.
The Find Contacts window includes the following search options. Use the asterisk (*) as a wild card for all options:
-
Email addresses contain: Enter a few characters of an e-mail address.
-
Phone numbers contain: Enter a few characters of a phone number.
-
More search options:
-
Select one of the sections.
-
In the field, select the contact information field you want to use. For more information, see Editing a Contact’s Information.
-
Type a few characters of the contact information you are using.
-
Deselect any search options you are not using.
-
Click .
-
-
Search Selected Groups: Use this option to search a specific address book. All is the default value.
-
Number of results: Use this option to specify the number of contacts to display under the search results group for this search. To display additional contacts for the group, right-click the group and select the menu item.
2.3.3 Managing Contacts and Buddies
Before you begin configuring contact and buddy lists, you might want to become familiar with the types of contacts. For more information, see Contacts and Buddies Definitions.
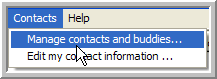
To open the window, select the menu item.
What Can You Manage?
-
You can only add or edit contacts in your Personal Address Book.
-
Only administrators can add and edit contacts in the Community Address Book.
-
You can create new groups under you Personal Address Book. For more information, see Managing Address Book Groups.
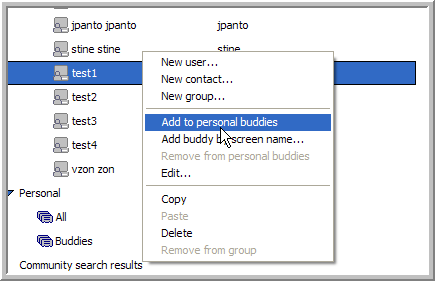
To Add a Personal Buddy From the Community Address Book:
-
Select one or more registered users (designated by the computer icon
 ).
).
You cannot add non-registered contacts (designated by the Rolodex icon
 ) as Personal Buddies.
If your Community Address Book is not visible in your Contacts window, your administrator has not given you the rights to download this address book. Use the tool, instead.
-
Select the menu item.
The registered users you select are added to your group.
If you try to add a non-registered contact, he or she is not added to your group.
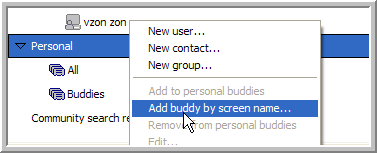
To Add a Personal Buddy by Name:
-
Select the menu item.
-
Type in the screen name and click .
Your new personal buddy appears in your group under the Address Book.
To Add a Contact to the Community Address Book (Administrator Only):
-
Select the Community Address Book, or a group under it.
If you select the Community Address Group, the contact goes into the group, otherwise the contact goes into the group you select.
If your Community Address Book is not visible in your Contacts window, your administrator has not given you the rights to download this address book. Use the tool, instead.
-
Click and select the menu item.
-
In the contact information window that appears, fill out the contact’s information, then click .
For information on field definitions, see Editing a Contact’s Information.
To Add a Contact to Your Personal Address Book:
-
Select the Personal address book or any group beneath it (with the exception of the group marked Buddies).
If you select the , the contact goes into the group; otherwise, the contact goes into the group you select.
-
Click and select the menu item.
-
In the contact information window that appears, fill out the contact’s information, then click .
For information on field definitions, see Editing a Contact’s Information.
To Copy Contacts:
-
Select one or more contacts from any group.
-
Select the menu item.
-
Select the group into which you want to copy the contacts.
-
Select the menu item.
Only administrators can make changes to the Community Address Book.
To Delete Contacts:
-
Select one or more contacts.
-
Click .
-
In the confirmation dialog that appears, click to delete the contacts.
2.3.4 Managing Address Book Groups
To open the window, select the menu item.
To add a group to your Personal Address Book:
-
Select the Personal Address Book.
-
Click and select the menu item.
-
When the new screen appears, type the group name and click .
To add a group to the Community Address Book (administrators only):
-
Select the Community Address Book.
-
Click and select the menu item.
-
When the new screen appears, type the group name, then click .
To delete a group:
-
Select the group you want to delete.
-
Click .
-
In the confirmation dialog box that appears, click to delete the group.
Only administrators can add or delete groups in the Community Address Book.
2.3.5 Editing a Contact’s Information
It is a good idea to edit your contacts’ information and add any additional information you want to save.
To Edit Contact Information:
-
Select the menu item.
-
In the Manage Contacts window, select the contact you want to edit.
-
Click .
The Edit User window appears.
-
Edit the contacts information. See Informational Fields.
-
Click .
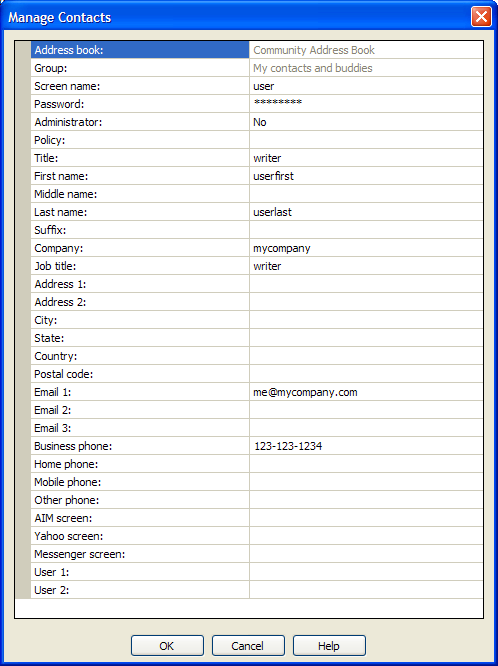
Read-Only Fields
The following fields present information about your configuration. You cannot modify these fields.
-
Address Book (Read only): Lets you know whether your administrative policy allows you to use the Community Address Book, which is your global company-wide book.
-
Group (Read only): Lists the group for this contact.
Informational Fields
The following fields allow you to enter information about your contact. It is not necessary to complete each field:
-
Title: Use this field to set up a salutation title, such as Mr., Ms., or Dr.
-
First Name: Contact’s first name.
-
Middle Name: Contact’s middle name.
-
Last Name: Contact’s last name.
-
Suffix: Use this field to identify a suffix, such as PhD, MD, Sr., or III.
-
Company: Contact’s company name.
-
Job Title: A job title or job description.
-
Address1: A field used to identify an address.
-
Address2: A field used to identify an address.
-
State: Contact’s state.
-
Country: Contact’s country.
-
Postal Code: Contact’s postal or ZIP code.
-
Business Phone: Contact’s business phone number.
-
Home Phone: Contact’s home phone number.
-
Mobile Phone: Contact’s mobile or cell phone number.
-
Other Phone: Use this field to enter another phone number, such as a pager or second mobile phone number.
See Using Correct Phone Number Formatting for information on entering phone numbers.
-
Extension: If your contact’s company uses telephone extensions, enter the contact’s extension. This extension is not used when dialing their business phone number.
-
Email: Contact’s primary e-mail address.
-
Email2: Contact’s secondary e-mail address.
-
Email3: An additional e-mail address.
-
User1: Field that is available to store additional information.
-
User2: Field that is available to store additional information.
Admin Only Fields
The following fields are available only to the Administrator:
-
Screen Name: Name of user. This is the name used to sign on to the system. The Screen Name is case sensitive, cannot contain any spaces, and must be alphanumeric.
-
Password: Password of the user.
-
Administrator: Use Yes or No to indicate whether the user is an administrator.
-
Policy: Settings and limits assigned to a user.
To see which settings are affected, see Administration Policies.