2.2 Understanding Conferencing Concepts
This section describes the following topics:
2.2.1 Window Definitions
The following list describes the primary windows in Conferencing:
-
: The main console window that is open when you log in to Conferencing. It contains a list of all your meetings.
The meeting list has the following categories of meetings:
-
: Public, Private and unlisted meetings in your community (for administrators only).
-
: Public meetings in your community.
Your administrator determines if you have the right to view public meetings or if you must use to locate public meetings.
-
: Your Instant Meeting.
-
: Your Scheduled Meetings.
-
: Meetings to which you are currently invited.
-
: A list of all your community meeting searches.
-
-
: Use the this window to set up a new meeting, start a scheduled meeting, or edit a scheduled meeting.
-
: Use this window to search through the community meetings.
-
: Use this window to view details for a specific meeting.
-
: Use this window when running or joining a meeting. This window contains information about participants and their in-meeting status and allows you to chat and share data during a meeting.
-
: Use this window to add contacts to a meeting from the window.
-
: Use this window to configure your Conferencing preferences. See Configuring Your Preferences for details on using this window.
-
: Use this window to manage your contacts and personal buddies. See Managing Contacts and Buddies for details on using this window.
-
: Use this window to edit a contact’s information. See Editing a Contact’s Information for details on using this window.
2.2.2 Meeting PINs and Meeting IDs
You can use either a Meeting PIN or a Meeting ID to enter a meeting for public and unlisted meetings. However, an attendee must have a Meeting PIN in order to access a private meeting.
-
: A personal identifier that the meeting server uses to represent a specific attendee in a specific meeting.
-
- A generic identifier that represents a specific meeting only (does not identify a specific attendee).
NOTE:Use the Meeting PIN to join meetings whenever possible so that the meeting server can identify you. You need to use the Meeting PIN to join any meeting where you plan to act as a moderator. If you join a meeting via phone using the Meeting ID, your name is listed as anonymous in the Meeting window.
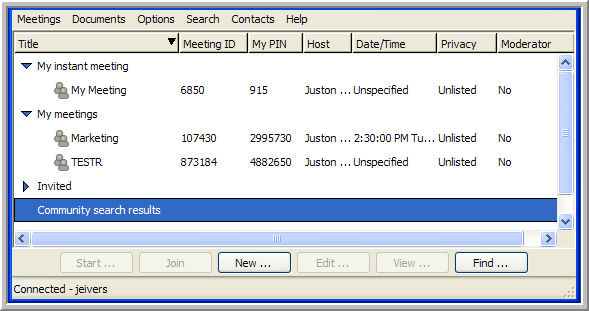
2.2.3 Main Window
The Main Window is the place where you can find, create, start, join, and edit public meetings, your Scheduled Meetings, Invited Meetings, and your Instant Meeting.
Figure 2-6 Meeting Main Window
This section contains the following topics:
Meeting List Groups
Each meeting type is represented by its own group in the meeting list:
-
: Meetings that are marked as public indicate that they are available to anyone in the community. Public meetings are set by configuring the meeting type option when you schedule a meeting.
-
: Each user has one Instant Meeting available by default.
-
: The list of your Scheduled Meetings.
-
: Every Instant or Scheduled Meeting to which you are invited, including the following:
-
Scheduled Meetings where you are a persistent invitee.
-
Any in-progress Instant or Scheduled Meeting where you are an invitee (but not a persistent invitee).
If the meeting is in-progress, the people icon on the left are green (this is referred to as meeting presence).
-
-
(for administrators only): Lists all public, unlisted, and private meetings in your community.
Meeting List Column Headings
The Main Window displays the following information (columns) for your meetings:
-
: A generic identifier that represents a specific meeting, but does not identify a specific attendee.
-
: Your personal identifier for a specific meeting.
-
: The host's screen name (the user who created the meeting).
-
: The scheduled time of the meeting (You can start a meeting at any time, regardless of the scheduled start time).
-
: Indicates if a meeting is public, private, or unlisted.
-
: Indicates if there is a moderator present for this meeting.
Meeting List Options
The following options are available for your meetings:
-
Start - To start a meeting for which you are a moderator or the host, select the meeting, and then click (also available as a menu item under or by right-clicking). You must exit any meeting in which you are currently participating before starting another meeting.
-
Join - To join a meeting, highlight the meeting, and then click (also available as a menu item under or by right-clicking). If the meeting is not yet started, you get a waiting for meeting to start message. You are automatically brought into the meeting after a host or moderator starts it. You can also join a meeting by clicking on the invitation URL for that meeting.
-
New - To create a new meeting, click to open the window, so you can schedule a new meeting.
-
Edit - To edit a meeting, select the meeting, then click (also available as a menu item under or by right-clicking). This opens the Meeting Setup window, so you can edit a scheduled meeting. Only a host can edit a meeting (persistent moderators cannot edit meetings).
-
View - To view the Meeting Information window for a meeting, select the meeting, then click (also available as a menu item under Meetings or by right-clicking).
-
Find - To find a meeting, click to open the Meeting Search window.
-
Copy - To copy an existing Scheduled Meeting as a template for creating a new Scheduled Meeting, right-click the scheduled meeting, and then select the menu item (also available as a menu item under ).
-
Delete - To delete a Scheduled Meeting (you cannot delete your Instant Meeting), right-click the scheduled meeting, and then select the menu item (also available as a menu item under ).
-
Refresh - To get an up-to-date meeting list, select the menu item. This checks the server for any meeting changes on your list.
-
Join by Meeting ID or PIN - To join a meeting using your Meeting ID or PIN, select the menu item. If you do not have a Meeting PIN (which you receive in your e-mail or IM invitation), you can use the Meeting ID.
Use the Meeting PIN to join meetings whenever possible so that the meeting server can identify you. You need to use the Meeting PIN to join any meeting where you plan to act as a moderator. If you join a meeting via phone using the Meeting ID, your name is listed as in the Meeting window.
2.2.4 Contacts and Buddies Definitions
The following are definitions for Contact and Buddy lists:
-
Contact: Anyone who appears in one of your Contact Windows is a contact. Each Contact has information that you use to set up meetings or make phone calls.
-
A Community Contact is any contact that is visible in the Community Address Book.
Your administrator determines whether you have the right to view the Community Address Book or whether you must use to locate contacts.
-
A Community Contact is available to the entire community and is a Registered User (Community User) or just a Contact.
-
Use Manage Contacts and Buddies to identify Contacts and Community Users.
-
A Contact has a Rolodex* card icon
 , and a Registered User has a light gray computer icon
  .
.
-
If a Registered User is also a Personal Buddy, the computer icon is dark gray
 .
.
-
You can modify your community contact information by configuring your personal contact information.
-
Only administrators can create and modify community contacts.
-
-
: Registered Users are contacts who have a registered screen name in your community or in another community. You can make a Registered User a Personal Buddy and view his or her presence information.
-
: Registered Users in the Community Address Book are Community Users. You can add Community Users to your personal buddy list and view their presence information.
-
: Personal Contacts are contacts that are available in your Personal Address Book and are visible only to you. A Personal Contact can be either a contact or a contact that is also a Registered User. Personal Contacts show up in the Manage Contacts and Users window in the group indented beneath the Personal Address Book.
-
: You can only add registered users to your personal Buddies group, which is listed under your Personal Address Book in the Manage Contacts and Users window. Making a Registered User a Personal Buddy allows you to view his or her presence information.
-
: You can use different groups to organize your contacts:
-
: The Community Address Book by default contains one group (All) that contains all contacts and users in your community.
-
: These are your Personal contacts, consisting of two groups (All and Buddies):
-
: This group contains all users and contacts that exist in your Personal Address Book.
-
: This group contains just those registered users you add as Personal Buddies. When you add users as Personal Buddies, they still show up in the All group.
-
-
: Adds a group for each search you perform on the Community Address Book.
-
2.2.5 Communities
A community is a group of users, usually within the same company. All contact information for community members automatically shows up in the Community Address Book in your Manage Contacts and Users windows.
Contacts within a community are not automatically your buddies and therefore do not automatically broadcast presence. You must make a contact a Personal Buddy in order to view presence for that contact.
NOTE:A contact must be a Registered User to be added as a personal buddy.
The Community Address Book by default contains one group () that contains all contacts and users in your community. If a community administrator has created any other groups, they are also visible. If a user or contact belongs to a specific group under the Community Address Book (for example, co-workers), they are still visible in the All group.
NOTE:Your administrator determines whether you have the right to view the Community Address Book. Preventing the download of this Address Book can enhance performance for users in very large organizations.
2.2.6 Presence
Presence is information that is distributed to other users indicating if you are available. The most common example is Instant Messaging (IM) presence or computer presence. When you are actively using your computer, the IM system can send out information to let others know that you are at your computer. This information is typically conveyed via an icon next to your name. The icon would indicate if you are online, offline, or busy.
Computer Presence
Conferencing collects computer presence from the IM system and displays it in a computer-shaped IM icon next to each contact. If you are getting presence for a contact from the IM or Conferencing system for a particular contact, the icon is green ( ).
).
There are three distinct presence states (OFFLINE, AWAY, and AVAILABLE):
-
If a contact is signed on and available in the IM system, he or she appears as AVAILABLE.
-
If a contact is signed off in the IM system, he or she appears as OFFLINE.
-
If a contact is set to AWAY in the IM system, he or she appears as AWAY.
NOTE:When a buddy is away, busy, or idle, you see a yellow notepad on top of the green computer icon (busy, away, idle). A dark gray computer icon indicates that you are not getting presence from the IM system for that contact. A light gray computer icon indicates that the contact is not a personal buddy (you only receive presence information for your Personal Buddies).
Meeting Presence
In the Meeting window, if the presence icon next to a contact is green ( ), the contact is in the meeting. If the icon is gray (light or dark) the contact is not in the meeting.
Phone Presence
In the Meeting window, if the middle icon is green ( ), the contact is on the phone in a meeting. If the icon is gray (light or dark) the contact is not on the phone in the meeting.
The phone icon has the following additional states:
-
To indicate that the contact is dialing a “!” precedes the phone icon.
-
A red line through the phone icon indicates that the contact has muted the phone.
-
A white “talk bubble” displaying instead of the green phone indicates the meeting participant is actively speaking.
NOTE: In the Meeting window, you see phone presence for all meeting participants. In the Manage Contacts and Users window, you only see phone presence for a Personal Buddy.
Enabling Presence
You must make a contact who is a Registered User a Personal Buddy in order to see any presence from the Conferencing system.
2.2.7 Meeting Roles
Participant
Any person participating within a meeting.
Host
The user who creates a meeting.
Moderator
-
A moderator is a participant who can control all aspects of a meeting.
-
The host can make any meeting participant a moderator on a persistent or temporary basis.
-
You can view a moderator’s status in brackets, , following the participant’s name in the Meeting window.
NOTE:An administrator can join any meeting and always has persistent moderator privileges.
Persistent Moderators
-
To make a participant a persistent moderator, assign them moderator privileges to the participant in the Meeting Setup window when you schedule the meeting. You can also edit the meeting, but you must save your changes before starting the meeting.
-
You can temporarily remove a participant’s moderator privilege during any meeting.
-
A persistent moderator for a scheduled meeting can start the meeting from the Main window. The host does not need to be present.
-
A persistent moderator for a scheduled meeting cannot edit the scheduled meeting.
Temporary Moderators
You can assign a temporary moderator when starting a meeting or during a meeting. The next time the meeting is run, the temporary moderator privilege does not persist.
Administrator
-
An administrator can join any meeting and always has persistent moderator privileges.
-
Administrators can add, edit, and delete users from the Managing Contacts and Users window.
-
Administrators can view the list of meetings and join any public, private, or unlisted meeting.
-
To prevent an administrator from attending a specific meeting you must lock the meeting.
Presenter
-
The participant who currently has the ability to share data is the presenter.
Administrators determine who has the right to share various types of data (Documents, the Whiteboard, Applications, etc.).
-
The presenter is the only participant to have the available (
 ).
).
-
The text displays next to the presenter’s name in the window.
-
You can only assign one presenter at any given moment.
Remote Control Privilege (Remote Controller)
-
Grants a participant the ability to control the presenter’s computer share session from a remote mouse and keyboard.
-
You can grant multiple users Remote Control Privileges.
Administrators determine who has the right to control a presenter’s desktop or application.
-
After a participant is granted control, he or she needs to click on their screen to begin controlling the presenter’s share session.
-
The presenter always has Control privileges.
-
A round cursor indicates the remote controller’s cursor. The presenter’s cursor follows the remote cursor as it moves.
-
The presenter must be careful to minimize all non-shared windows when allowing remote controllers, because a remote controller might click or type in a window that he or she cannot see.
Conferencing attempts to minimize all non-shared windows when a remote controller clicks them, but cannot minimize windows with open dialogs or certain specialized windows. If this occurs, the window in question flashes in the notification area at the bottom of the desktop.
-
The text displays next to the remote controller’s name in the Meeting window.
2.2.8 Phone Keypad User Interface
The following table describes features of the phone keypad user interface.
Table 2-1 Phone Keypad User Interface Features
NOTE:None of these options make persistent changes to the meeting. To make persistent changes, you must edit the meeting in the Meeting Setup window.