2.5 Mail Setup
Novell Teaming e-mail integration is divided into two primary functions:
-
Notification: E-mail messages generated by Novell Teaming to inform people of events (such as new entries or changes) occurring within a Novell Teaming folder.
-
Posting: The processing of e-mail messages sent to Novell Teamingso that the e-mail content is added to a particular folder as a new entry or reply.
NOTE:E-mail notification and postings only work with Novell Teaming folders. You cannot associate e-mail settings for Novell Teaming workspaces.
IMPORTANT:If you are installing Novell Teaming for use with GroupWise, see Configuring GroupWise to Support Your Teaming Installation
in Novell Teaming and Conferencing
in the GroupWise 7 Interoperability Guide for more information.
2.5.1 System E-Mail Configuration
As part of installing and configuring Novell Teaming, the system administrator must supply information so that Novell Teaming can access the mail system (e-mail integration is not required). You can configure the level of Novell Teaming e-mail integration.
When you run the installer, there are pages for both outbound and inbound e-mail communication. Outbound configuration requires the basic information for generating SMTP mail messages: server, port, and optional authentication information.
The field for the Outbound configuration is the address used for any e-mail notifications generated by the system. This name is also used for authenticated access to the SMTP server. To support e-mail sent by users, either the Novell Teaming server or the authenticated user must be authorized to use different addresses.
Novell Teaming posting uses real accounts or alias e-mail addresses in your folders, according to how you configure your inbound e-mail settings in the installer. To use alias e-mail addresses, select theoption in the page of the installer.
2.5.2 Using Alias E-Mail Addresses for Posting
When you use alias e-mail addresses for posting, the system accesses a single e-mail account (sometimes referred to as the “posting account”). You must enter an account name, which might not resemble an e-mail address, and a password in the and fields in the installer’s Inbound Email Configuration page. Multiple alias e-mail addresses can be mapped to this account and Novell Teaming periodically reads e-mail sent to this account and forwards the messages to individual folders according to the alias e-mail addresses assigned to the folders. Each folder needs a unique alias for the Novell Teaming posting feature to work correctly.
Create the posting account by using your normal e-mail system management tools. You can configure the posting account to use either POP3 or IMAP. Novell Teaming needs a host, port, e-mail account ID, and password configured in the installer for the posting feature to work.
2.5.3 Using Real E-Mail Accounts for Posting
When you use real accounts for each folder you want to post in, you need to create multiple posting accounts by using your normal e-mail system management tools. You can leave the and fields in the installer’s Inbound Email Configuration page blank (they are not used if you enter any information in these fields when not using alias e-mail addresses). You can configure the posting accounts to use either POP3 or IMAP. Novell Teaming needs a host, and port configured in the installer for the posting feature to work. An e-mail account ID and password are added to each folder’s configuration for posting with real e-mail accounts. You must use a unique posting e-mail account for each folder if you want the Novell Teaming posting feature to work correctly.
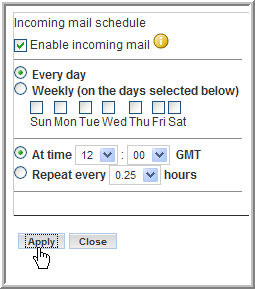
2.5.4 Setting Up a Schedule for Incoming Mail
-
In the Teaming Administration portlet, click the link.
-
Select the option.
-
Select the type of schedule you want to use for checking the posting e-mail accounts. You can configure the schedule for a specific time of the day or a regular frequency.
-
Click to save your changes.
The right side of the setup page lists the folders and their e-mail addresses or accounts. You set up the e-mail address-to-folder mapping within the folders themselves (see Setting Up a Folder for Posting).
2.5.5 Setting Up a Folder for Posting
If you want to enable posting for a particular folder, you need to map a particular alias e-mail address or account to the folder. When this is done, e-mail sent to the mapped address or account is “read” by the folder and turned into entries or replies.
-
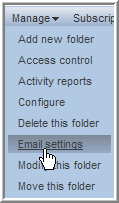
In Novell Teaming, navigate to the folder where you want to post e-mail and select the menu item.
-
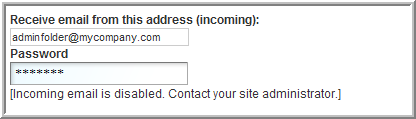
In thefield, specify the alias e-mail address if you are using aliases, or specify the e-mail account name (it might not resemble an e-mail address) if you are using real accounts for each folder.
See Using Alias E-Mail Addresses for Posting and Using Real E-Mail Accounts for Posting.
-
If you are using real e-mail accounts, specify the password for this e-mail account in the field. If you are using alias e-mail addresses, leave this field blank.
-
Click to save the e-mail account or alias address.
You can optionally set up the notification schedule for this folder at the same time (see Establishing a Notification Schedule for a Folder).
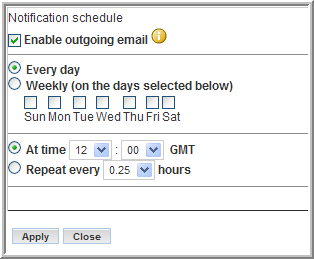
2.5.6 Establishing a Notification Schedule for a Folder
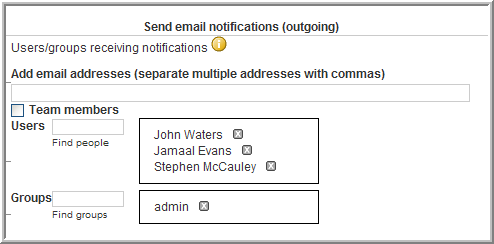
You can configure each folder to send e-mail messages indicating activity within the folder.
-
In Novell Teaming, navigate to the folder where you want to post e-mail and select the Manage > menu item.
-
Select the option.
-
Select the type of schedule you want for notification. You can configure the schedule for a specific time of the day or a regular frequency.
-
Specify who is to receive the e-mail. This can be a combination of users, groups, and arbitrary e-mail addresses.
-
Click to save the schedule.