8.6 Setting Up Login Profiles
Login profiles let you save the information from a user's individual login. When the user selects this profile during login, the profile automatically sets up the login information you specify, such as the user's name, server, tree, context, login script, and other applicable information so that the user does not need to enter this information.
Login profiles are especially useful for users who log in from multiple places. Users can have separate profiles for the office, home, laptop, or any other workstation they use. This simplifies the login process so that users don’t need to remember their login information for each workstation. Using multiple login profiles also gives you control over what users can access from each workstation.
On a single workstation, you can create login profiles that are customized for a particular user. The Novell Client for Windows also allows different users on the same machine to have their own login profiles. You can also use the Novell Client Install Manager (nciman.exe) to create login profiles that are more general in nature and deliver them during the installation of the Novell Client. And as an administrator, you can define a set of system login profile templates that contain the information most commonly needed for your environment. These profiles form the basis for individualized profiles for your users.
Users can add, edit, or delete their own login profiles as needed without affecting other users or modifying the system templates (see Managing Your Login Profiles
in the Novell Client for Windows User Guide for more information). An application can invoke login with some parameters and allow others to be supplied from the login profile.
System Login Profiles and User Login Profiles
All login profiles that don't belong to a specific user belong to the system and are available to all users on that system. A system can have a default profile, and each user on the system can have a default profile. System default profiles names have angle brackets around them (for example, <Default>), while user profile names do not (for example, Default).
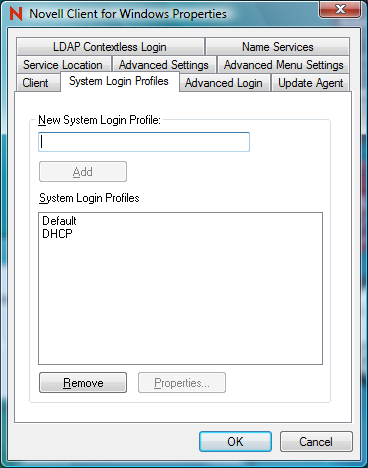
You can edit system profiles (and only system profiles) on the tab in the Novell Client for Windows Properties dialog box (right-click the Red N icon in the notification area of the taskbar, click , then click the tab). The system profiles in this list appear without angle brackets.
Figure 8-1 System Login Profiles
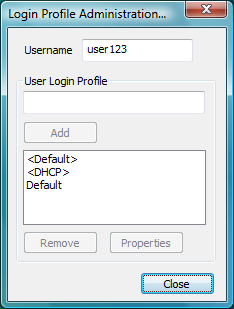
When you edit user profiles (right-click the Red N icon in the notification area of the taskbar, click , then click ), you will see both system profiles (with angle brackets) and user profiles (without angle brackets) in the list of profiles. Only the user profiles are directly editable. You can select a system profile in the Login Profile Administration dialog box to edit, but when you save the profile, it is saved as a user profile with the same name as the system profile, but without the brackets.
Figure 8-2 User Login Profiles
The system login profiles provide a template for users to create custom profiles. You cannot modify a system template from the Login Profile Administration dialog box on the submenu. For example, if both a <Default> and a Default profile appear in the list, you can only edit the Default profile. If, however, you want to use the values in the <Default> system profile to replace the values in the Default user profile, you can delete Default, select <Default> to edit in the Login Profile Administration dialog box, then save the profile, which then creates a new user profile named Default. Users can then modify Default as desired.
Using Login Profiles During Login
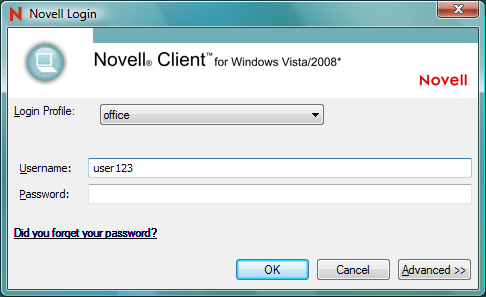
When users log in using the Novell Login dialog box, they can select the login profile they want to use from the drop-down list. You can use the tab in the Novell Client for Windows Properties dialog box to specify if the Login Profile drop-down list is available or not.
Figure 8-3 Novell Login Dialog Box with the “office” Login Profile Selected
If a system profile (for example, <Default>) is the only profile with that name on the drop-down list, and if it is a complete profile, users can select that profile and log in with it. But if, for example, both a <Default> system profile and a Default user profile appear on the list, selecting <Default> causes the Default user profile to be used instead because user profiles always supercede system profiles if they both have the same name.
For information on creating and editing user login profiles, see Managing Your Login Profiles
in the Novell Client for Windows User Guide.
8.6.1 Creating a System Login Profile
-
Right-click the Red N icon (
 ) in the notification area of the taskbar.
-
Click , then click the tab.

-
Type the name of the profile you want to add in the text box, then click .
The name you specify here will appear with angle brackets (to indicate that it is a system login profile) in the Novell Login dialog box and the Login Profile Administration dialog box.
You can give a system login profile the same name as a user login profile (the system login profile will show up with angle brackets around it), but be aware that during login if a user selects a system login profile that has the same name as a user login profile, the user login profile will be used because user profiles always supersede system profiles when they have the same name.
-
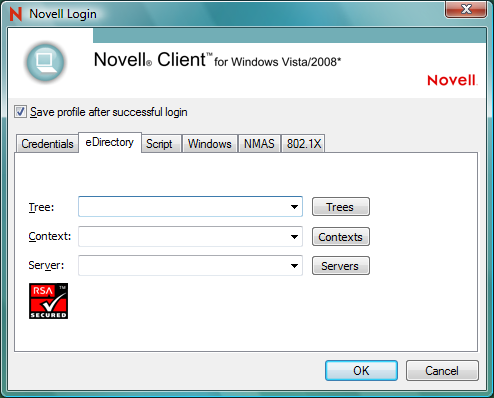
In the Novell Login dialog box, specify the login information you want for this profile, such as a tree, context, and server.

-
Click to close the Novell Login dialog box, then click to close the Novell Client Properties dialog box.
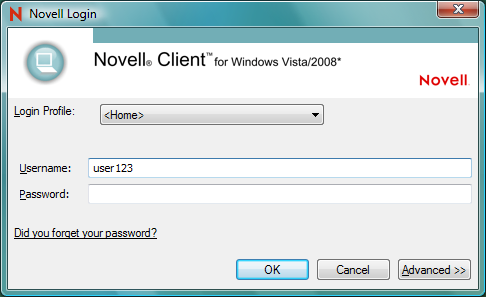
When a user logs in using the Novell Login dialog box, he or she can select the system login profile from the drop-down list.
Figure 8-4 Novell Login Dialog Box with a System Login Profile Selected
8.6.2 Creating a System Login Profile for Use on Multiple Workstations
Login Profiles are one of many settings that can be predefined by using a Novell Client properties file that is applied during installation of the Novell Client. For more information, see Creating the Novell Client Properties File.
To create a system login profile that can be distributed by the Novell Client Install Manager:
-
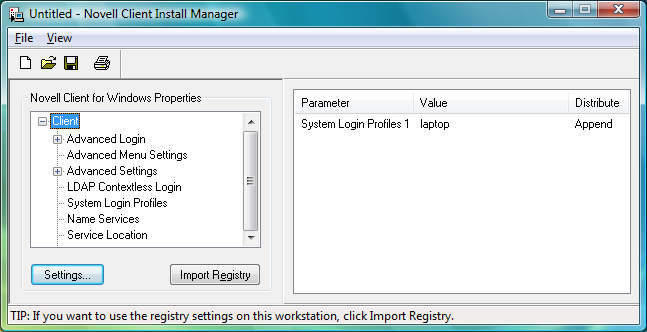
Start the Novell Client Install Manager (nciman.exe), located in the C:\Novell\Novell Client for Windows-2008\Admin folder.
-
In the box, double-click to open the Novell Client for Windows Properties dialog box, then click the tabbed page.
-
Type the name of the profile you want to add in the text box, then click .
To create the Default system profile, enter Default as the new profile name.
-
In the Novell Login dialog box, specify the login information you want for this profile, such as the tree, context, and server.
-
Click to close the Novell Login dialog box, then click to close the Novell Client for Windows Properties dialog box.
A parameter for the login profile you just created appears in the list in the Novell Client Install Manager.
-
Right-click the system login profile parameter, then click .
-
Select whether to append or replace any existing login profiles already on the workstations.
Appending an existing login profile merges the settings in this file with the settings that exist in the login profile already on a workstation. Replacing overwrites any existing login profile with this one.
By default, the new login profile item is automatically appended to any login profile that might exist on a workstation.
WARNING:If you right-click the login profile parameter and select , the login profile you just created is deleted.
-
Modify any other Client properties as needed.
For more information, see Creating the Novell Client Properties File.
-
Click , then specify a name for the Novell Client properties file.
You can use any filename (for example, workstation_properties.txt).
-
Copy this file to the root directory of the Client build (C:\Novell\Novell Client for Windows-2008 ).
This file can be specified as input to ACU, the Update Agent, or setup.exe during the next Client installation/upgrade. For more information on distribution methods, see Section 2.0, Advanced Installation Options.
8.6.3 Viewing or Editing a System Login Profile's Properties
-
Right-click the
icon in the notification area of the taskbar.
-
Click , then click the tabbed page.
-
I n the list, select the name of a profile.
-
Click .
-
In the Novell Login dialog box, view or modify the login information you want for this profile, such as the user's name, server, and context.
-
Click to close the Novell Login dialog box, then click to close the Novell Client Properties dialog box.
8.6.4 Removing a System Login Profile
-
Right-click the
icon in the notification area of the taskbar.
-
Click , then click the tabbed page.
-
In the list, select the name of the profile you want to remove.
-
Click .
-
Click to close the Novell Client Properties dialog box.
8.6.5 Enabling the Use of DHCP In a System Login Profile
If a DHCP server is set up on your network, the DHCP server can inform the Novell Client of network-specific configuration information.
You can easily configure Novell DHCP servers (NetWare 5 and later) to distribute this information to the clients. For more information, see the Novell DNS/DHCP Administration Guide for Linux or the Novell DNS/DHCP Administration Guide for NetWare.
Clients obtain configuration information from DHCP even when you statically configure the clients' IP addresses or when the DHCP server used to supply the information is different from the DHCP server supplying an IP address to the clients.
Unlike the Novell Client for Windows XP/2003, the use of information from DHCP options 85, 86, and 87 is not enabled through a tab in the Novell Client Properties dialog box. Using information from DHCP in the Novell Client for Windows is enabled directly from the , , and fields in the login profile. You can enable use of DHCP information when creating a new profile or when editing an existing profile.
-
Right-click the
icon in the notification area of the taskbar.
-
Click , then click the tabbed page.
NOTE:Users can create their own DHCP profiles by using the option on the Red N menu. See
Enabling the Use of DHCP In a Personal Login Profile
in the Novell Client for Windows User Guide for more information. -
Type the name of the profile you want to add (for example, Corporate) in the text box, then click .
-
In the fields you want to be filled by DHCP, select from the drop-down menu.

-
Click twice.
The next time a user opens the Novell Login dialog box, the DHCP-enabled profile is available as an option on the drop-down menu.
Select the DHCP-enabled profile from the drop-down menu to automatically populate the fields that were given the <DHCP> option in Step 4 with whatever the DHCP server sends.

NOTE:When using the login profile to perform a Novell login, users can overwrite the values displayed by DHCP, but the changes are in effect only for that specific login. If is chosen as an option in a login profile for Tree, Context, or Server, it cannot be removed by simply editing the field when logging in or by saving the profile on successful login. Any values entered in these fields during login are not saved when is enabled for that field. If users want to permanently change the values in that field, they must edit the login profile using either the System Profile Manager ( tab on the Novell Client Properties dialog box) or the User Profile Manager ( option on the Red N menu).