Add-on images are a powerful but little-understood tool within the ZENworks Imaging arsenal. Add-on images do not re-create the partitions on your workstation, but they add data to existing partitions.
To further their potency, add-on images can also change registry settings on an existing workstation operating system.
Add-on images are a powerful pre-boot alternative to using traditional ZENworks Application Launcher (NAL) methods for making workstation changes.
In this section, you will create an add-on image file for adding ConsoleOne to a local workstation. Because there is a Windows Registry setting to indicate the local path to the ConsoleOne executable, you will also export and manually edit a registry file to accompany the ConsoleOne application data.
The following steps will help you to get the Registry files in order.
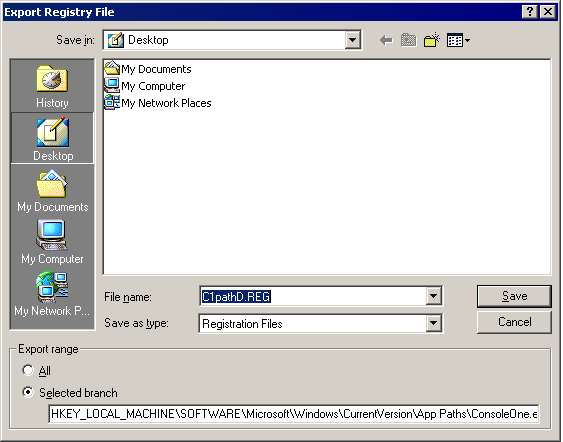
Start REGEDIT.EXE.
Select the following Registry Key: HKEY_LOCAL_MACHINE\SOFTWARE\MICROSOFT\WINDOWS\CURRENTVERSION\APP PATHS\CONSOLEONE.EXE.
Click the Registry menu > click Export Registry File.
Save the file to your Desktop as C1PATHD.REG.
Close the REGEDIT utility.
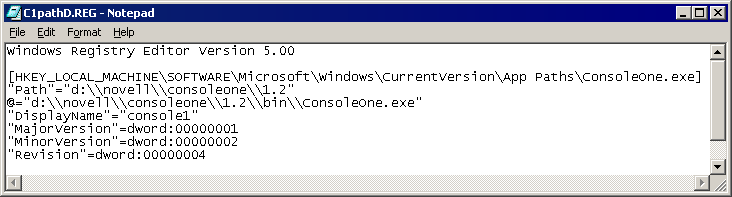
NOTE: You now have a registry file from a workstation that had ConsoleOne installed to the D drive. This means that the registry will specify that ConsoleOne is on drive D.
You will now edit the file to specify drive C instead, and save the file with a new name.
On your Windows desktop, right-click the C1PATHD.REG file > click Edit.
In the C1PATHD.REG - Notepad window, change all D:\ references to C:\. There should be two such references.
Save the file to the Desktop as C1PATHC.REG > close the C1PATHC.REG file > close Notepad.
You now have two .REG files on the desktop. The C1PATHC.REG file references the C drive as the path to ConsoleOne. The C1PATHD.REG file references the D drive as the path to ConsoleOne. Keep both files on the desktop as you build the add-on images.
Building an Add-On Image for the C Drive
Use the following steps to build add-on images:
On the ZENworks for Desktops 3.2 Windows 2000 server, start ConsoleOne > click the Tools menu > ZENworks Utilities > Imaging > Image Explorer.
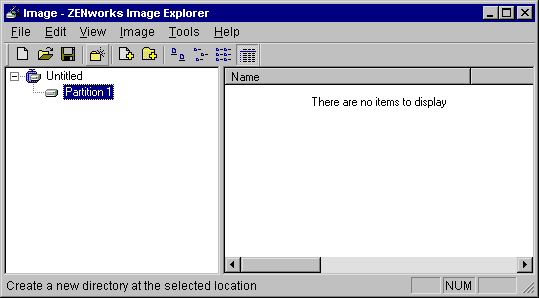
From the Image Explorer, click to open the Untitled object > click the Partition 1 object > click the Create Folder button.
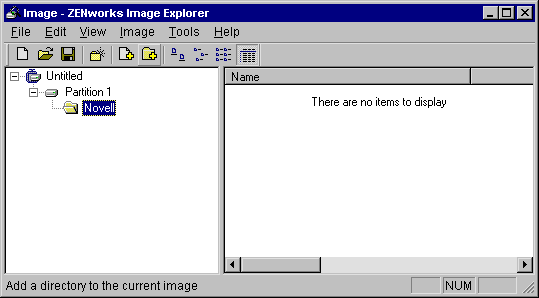
In the Create Directory dialog box, type Novell > click OK.
Select the new Novell folder > click the Add Folder button.
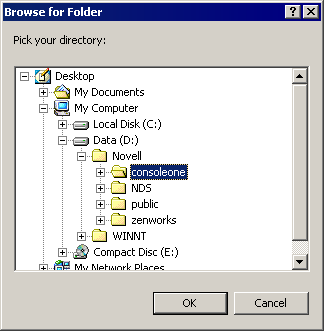
In the Browse for Folder dialog box, browse to and select D:\NOVELL\CONSOLEONE > click OK.
NOTE: You now have the ConsoleOne files in the add-on image. You will now add a registry file to make ConsoleOne work on drive C when pushed from this add-on image.
From the ZENworks Image Explorer Image menu, click Add Registry File.
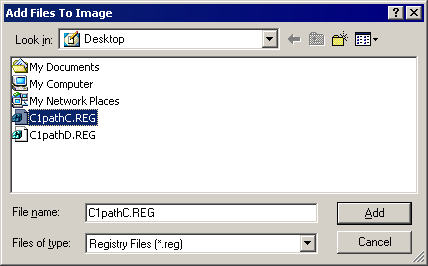
Browse to the desktop > select the C1PATHC.REG files > click Add.
NOTE: Now that the image is ready to be pushed to a workstation's C drive, you are ready to make one other change to the image for further flexibility. If you push this image to a workstation's D drive (instead of C) the registry file would be incorrect. Therefore, this file should be excluded when pushing the add-on to the D drive.
ZENworks Imaging makes this an easy task by using "file sets." File sets give you the ability to push an image file using a file set number, and exclude specific files based on that file set number. In the next step, you will exclude the registry file from file set 2. Subsequently, if you were to push this add-on image to any partition other than the C drive, you would use file set 2, which excludes the registry file.
From the ZENworks Image Explorer, select the \PROGRAM FILES\ZENWORKS\IMAGING folder > right-click the C1PATHC.REG file > select File Sets > Exclude from Set 2.
NOTE: This exclusion could also be performed at the specific file level. However, in the case at hand, excluding the whole folder structure where the registry file has been placed makes more sense. You will leverage this exclusion from file set 2 in Scripted Imaging .
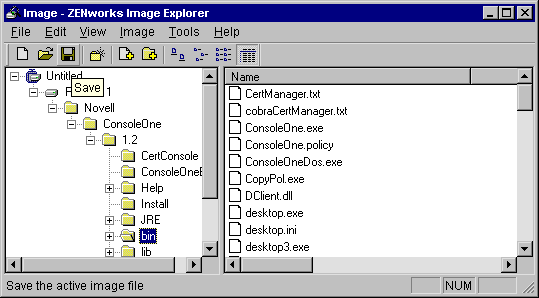
In the Image - ZENworks Image Explorer window, click the Save button > save the Image as D:\IMAGES\C1TEMP.ZMG.
NOTE: Add-on images are not compressed by default. Depending on your bandwidth and CPU speed, compression may give a significant performance boost. Low-powered CPUs may be slow with high compression and compression becomes much less important with greater bandwidth.
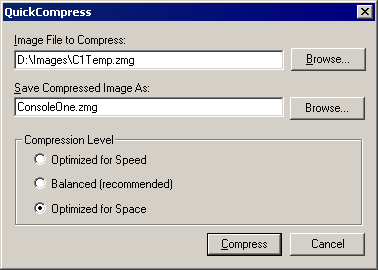
From the Tools menu, click QuickCompress > browse to specify C1TEMP.ZMG as your Image File to Compress > type ConsoleOne.zmg in the Save Compressed Image As field > enable the Optimize for Space option > click Compress.
In the Save Compressed Image As field, type consoleone.zmg.
Click Optimized for Space > click Compress.
When the image finishes compressing, close the ZENworks Image Explorer.
Delete the C1TEMP.ZMG file. (Do not delete the CONSOLEONE.ZMG image file.)
Creating an eDirectory Object for the C Drive Add-on Image
Use the following steps to create a Novell eDirectoryTM object for the add-on image:
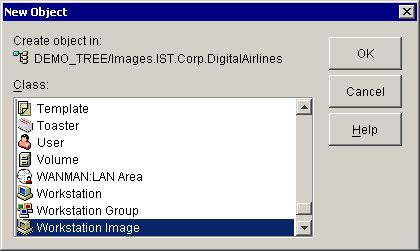
From ConsoleOne, browse to the .Images.IST.Corp.DA container.
Right-click the .Images.IST.Corp.DA container > click New > Object > Workstation Image > OK.
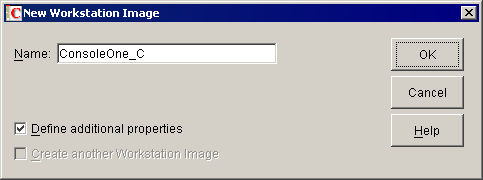
In the New Workstation Image dialog box Name field, type ConsoleOne_C > select Define Additional Properties > click OK.
In the Properties of ConsoleOne_C dialog box, click the Add button.
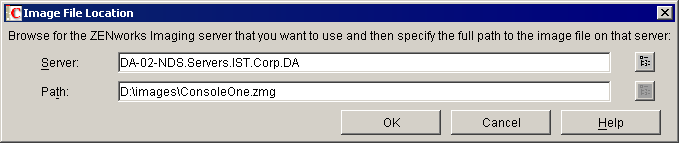
In the Image File Location dialog box, browse to select the DA-02 server for the Server field.
In the Path field, type D:\images\ConsoleOne.zmg > click OK.
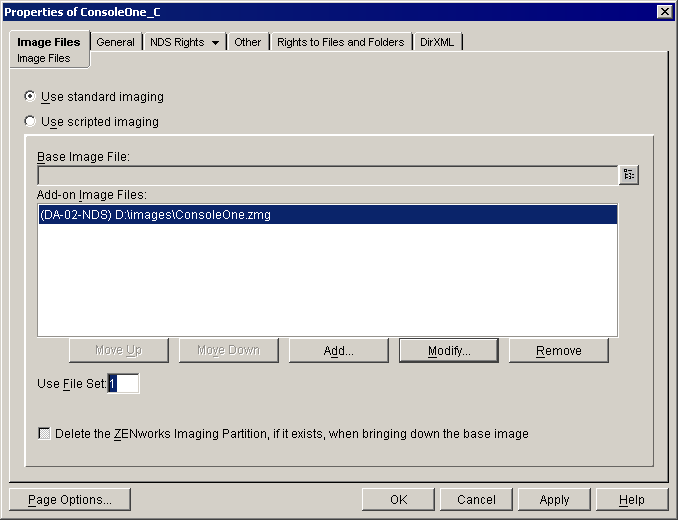
NOTE: The image object specifies which file set to use with the add-on image. This feature allows you to represent a single image file as several different image objects using different file sets. In the case of the image you are using, the C1PATHC.REG registry file is flagged to be excluded from File Set 2. You will leave this image object set to use File Set 1, so the .REG file will be included.
Click OK to close the Properties of ConsoleOne_C image object.
Building an Add-On Image for the D Drive
So far, you have created an add-on image file for putting ConsoleOne on a workstation's C drive and updated a relevant registry key. You also created an image object in the directory. As part of your tasks, you prepared the ConsoleOne image file for use on any partition by excluding the registry file changes from File Set 2.
However, if you were to put the ConsoleOne image into a partition other than the C drive, you would not get the appropriate registry changes integrated so that the target workstation recognizes where its local installation of ConsoleOne can be found.
The following steps are to create an add-on image file for handling the registry when you put the CONSOLEONE.ZMG image into a D drive.
Imaging registry changes are integrated by the ZENworks Imaging Service, a ZENworks agent installed with the Novell Client (Client32TM). The ZENworks Imaging Service only integrates registry changes found on the Windows system drive (usually C:\), so you need to create a separate add-on image from the main CONSOLEONE.ZMG file. You will then script the images as explained in Scripted Imaging .
Start the ZENworks Image Explorer again. (ConsoleOne > Tools > ZENworks Utilities > Imaging > Image Explorer.)
This will provide you with a new, empty image to work on.
In the Image - ZENworks Image Explorer window, click the Image menu > Add Registry File.
In the Add Files To Image window, browse to the desktop and select the C1PATHD.REG file > click OK.
Click the File menu > Save As > enter D:\IMAGES\C1PATHD.ZMG for the filename > click Save.
Close the ZENworks Image Explorer.
NOTE: Because you will use this image file with scripted imaging, you do not need to create a Workstation Image object to represent it in the directory.
Delete the two .REG files from the server desktop.