Imaging Boot Disk Creator (Zimgboot.exe)
With the release of ZENworks 6.5 SP2, there are now two versions of zimgboot.exe:
Zimgboot.exe for ZENworks 6.5 SP1 and Earlier
Use the Imaging Boot Disk Creator at a Windows workstation to create or update imaging boot diskettes (SP1 only), so you can boot workstations to perform imaging tasks. Also use this utility to create a PXE boot disk to be used with a workstation that cannot be PXE enabled, and to create a diskette that contains Linux utilities.
IMPORTANT: You can update imaging boot diskettes only in the sense that the same physical diskettes can be reused. When updating the second, third, fourth, and fifth diskettes or the optional language diskette, you must reformat the diskette before updating it. The first diskette can be reused without reformatting.
Zimgboot.exe is located in the sys:public\zenworks\imaging folder in your ZENworks Desktop Management installation (on the Imaging server). It is also accessible from the Tools menu of ConsoleOne.
This section includes the following information:
- Starting the Imaging Boot Disk Creator
- Using Zimgboot.exe to Add Linux Drivers
- Using Zimgboot.exe to Create a Language Disk
- Using Zimgboot.exe to Create a Utility Disk
- Using Zimgboot.exe to Create a PXE Disk
Starting the Imaging Boot Disk Creator
-
To start the boot disk creator as a standalone Windows utility, double-click the zimgboot.exe file (sys:public\zenworks\imaging\zimgboot.exe on the Imaging server). There are no command line parameters.
or
To start the utility from ConsoleOne from the server, click Tools > ZENworks Utilities > Imaging > Create or Modify Boot Diskette.
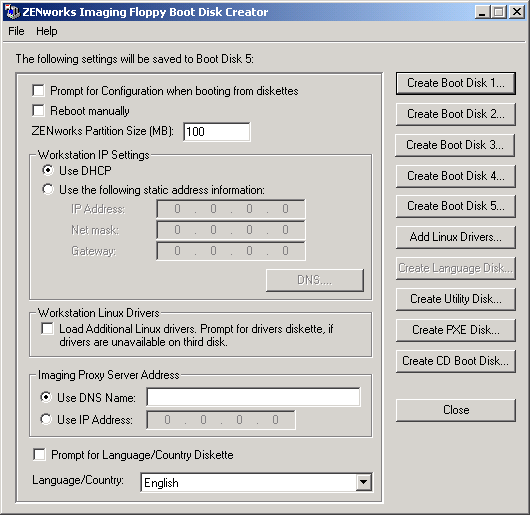
HINT: If the Imaging Boot Disk Creator fills up too much of your screen, change your screen resolution to a setting greater than 800 X 600.
For the process to create imaging boot diskettes, see Using the ZENworks Imaging Floppy Boot Disk Creator Utility. When creating the diskettes, you can configure various aspects of the imaging bootup process, including:
- How to communicate on the IP network, if necessary
- How automated the imaging bootup process should be
- Which Imaging server to contact during automated operations
- How large the imaging Desktop Management Workstation Imaging (Linux) partition on the hard disk should be, if one will be created
- Which language support (English or otherwise) to load for the keyboard
For details on these and other configuration options, see the online help (click the Help menu or press F1) in the utility. The configuration settings you make in the utility are saved to the settings.txt file on the fifth imaging boot diskette. You can edit this file after creating the diskettes if needed. For details on the format of this file, see Imaging Configuration Parameters (Settings.txt).
If you need to create imaging boot diskettes to boot with a non-English keyboard but the language you need isn't listed in the utility, see Imaging Bootup Languages (Zimglang.ini).
Using Zimgboot.exe to Add Linux Drivers
IMPORTANT: For information on adding Linux drivers in ZENworks 6.5 SP2, see Adding Linux Drivers in ZENworks 6.5 SP2.
Use the Add Linux Drivers function to specify the Linux drivers you want to place on the fourth boot diskette (if space allows) or on an additional Linux drivers diskette.
Using this function, you can search for and add the network path to Linux driver files that you have created or downloaded. The dialog box helps you to build a drivers list and categorize it by driver type (SCSI, Block, Network, PCMCIA, and Miscellaneous). You can also remove unwanted drivers from the list. This master list of driver files can be added to a diskette that you can specify later.
The Add Linux Drivers function also lets you specify the drivers you want to load by default. You do this by selecting the name of a driver on the master list and then clicking the Load button. This moves the driver name to the default load list, where you can change the load order of the default drivers and further specify their individual loading parameters.
When your load list is ready, you can use a function in zimgboot.exe to copy the additional Linux drivers to a diskette. All of the driver files are stored in different subdirectories of the \drivers directory on the diskette:
- Network drivers are stored in \drivers\net
- PCMCIA drivers are stored in \drivers\pcmcia
- Block drivers are stored in \drivers\block
- SCSI drivers are stored in \drivers\scsi
- Miscellaneous drivers are stored in \drivers\misc
These drivers can also be added to an imaging boot CD or DVD, hard-disk partition, or for use with Preboot Services. For more information, see Preparing an Imaging Boot Method and Adding Linux Drivers to Your Boot Method.
Obtaining Linux Drivers
To obtain a Linux driver for your particular hardware, visit the Web site of the hardware vendor and check for a download location.
There are also some other Web sites where you can obtain drivers:
- Network drivers can be downloaded from the Scyld Computing Corporation.
- PCMCIA drivers can be downloaded from the Linux PCMCIA Information Page.
You can also get additional Linux drivers at the Novell ZENworks Cool Solutions Web Community.
To learn more about drivers, including the loading parameters you need to specify, see the Linux Documentation Project and visit the following HOWTO sites:
- Hardware
- PCMCIA
- SCSI
- Ethernet
Using Zimgboot.exe to Create a Language Disk
If you use the Boot Disk Creator to create boot diskettes, and if you choose a non-English keyboard in the Language/Country field of the Boot Disk Creator dialog box, you can click Create Language Disk to create a language diskette that will be used to boot the workstation with the imaging diskettes in the non-English language you chose. The diskette you use must be an empty, formatted, high-density diskette. Do not reuse an old imaging diskette unless you reformat it first.
Using Zimgboot.exe to Create a Utility Disk
You can use the Boot Disk Creator to create a diskette that contains Linux utilities such as df (shows disk usage), fdisk, less, more, host (performs DNS lookups in order to convert DNS names to IP addresses), ldd (shows shared library dependencies), pico (text editor), sed (stream file editor), and touch (changes file time stamps). These utilities are not needed to perform imaging, but they might be useful to you for debugging purposes when imaging is booted to manual or maintenance mode.
For more information, see Create A Utility Disk.
Using Zimgboot.exe to Create a PXE Disk
You can use the Boot Disk Creator to create a PXE boot diskette that allows you to use PXE on a workstation that is not PXE-enabled. Click Create PXE Disk to launch PXE-on-Disk. You need one empty, formatted, high-density diskette.
For more information, see Using the Desktop Management Preboot Services PXE-on-Disk Utility.
Zimgboot.exe for ZENworks 6.5 SP2 and Later
For information, see Using zimgboot.exe in ZENworks 6.5 SP2 and Later.