Installing ZENworks Handheld Management Server Components
After you have performed the steps in Performing Pre-installation Tasks, you are ready to install the ZENworks Handheld Management software.
The following sections provide detailed information about installing ZENworks Handheld Management:
- Installing the ZENworks Handheld Management Server
- Installing the Access Point on Additional Computers
- Installing ConsoleOne Snap-Ins on an Existing ConsoleOne Installation
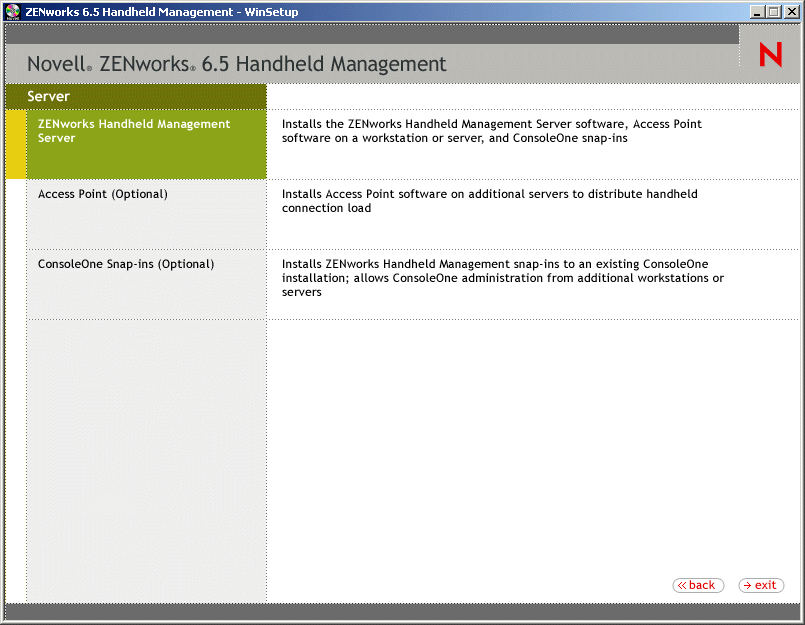
Installing the ZENworks Handheld Management Server
-
Insert the ZENworks Handheld Management Product CD in the CD drive on a Windows NT/2000/XP machine where you want to install the ZENworks Handheld Management Server.
The installation program will autorun. If it does not, run winsetup.exe from the root of the CD.
-
Click Handheld Management.
-
Click English.
-
Click Handheld Management Services.
-
Click ZENworks Handheld Management Server.
-
Click Next.
-
Read the License agreement, then click Yes if you agree with the terms of the License Agreement.
If you do not agree with the terms of the license agreement, do not install the software.
-
Review the destination location where the installation program will install the ZENworks Handheld Management Server software (browse to a different location, if desired), then click Next.
-
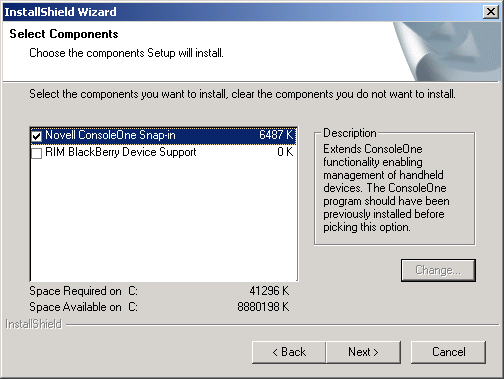
In the Select Components page, select the components you want to install:
Novell ConsoleOne Snap-In: Extends ConsoleOne functionality to allow you to manage handheld devices. This option is enabled by default. You should have previously installed ConsoleOne 1.3.6 or later on at least one workstation or server before you install the ZENworks Handheld Management Server. For more information, see Installing ConsoleOne Snap-Ins on an Existing ConsoleOne Installation.
RIM BlackBerry Device Support: Adds support for managing RIM BlackBerry devices. If you select this option, you must have set up a MAPI profile for e-mail access. For more information, see Creating a MAPI Profile (BlackBerry Device Support Only).
-
Click Next.
-
In the Start Copying Files page, review the settings, then click Next.
-
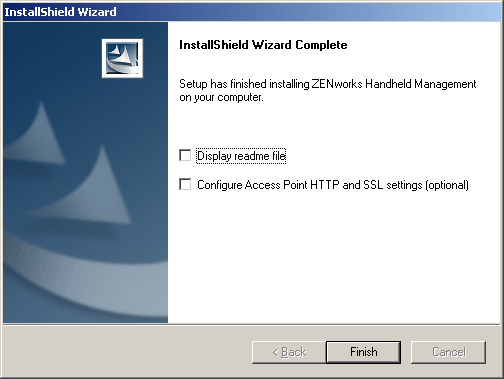
(Optional) Select Display Readme File to review the Readme file for installation notes and product issues that you need to know as you install and use ZENworks Handheld Management.
-
(Optional) Select the Configure Access Point HTTP and SSL Settings check box if you want to enable HTTP encapsulation, configure secure sockets layer (SSL), or change the default port settings.
NOTE: If the ZENworks Handheld Management Server is running on the same machine as Novell eDirectory, the ZENworks Handheld Management Server will fail to start when enabling HTTP unless the HTTP port is changed. By default, eDirectory uses port 80, which is the same default port the ZENworks Handheld Management Server uses. Both services cannot listen on the same port.
-
Click Finish.
-
(Conditional) If you select the Configure Access Point HTTP and SSL Settings check box in Step 13, see Configuring SSL and HTTP Settings for step-by-step instructions on configuring SSL, enabling HTTP encapsulation, and changing the default port settings, then continue with Step 16.
-
Click Next.
-
Select Internal ODBC-Compatible Database if you want ZENworks Handheld Management to create a database for you.
or
Select Microsoft SQL Server, specify the machine name, then specify the database name.
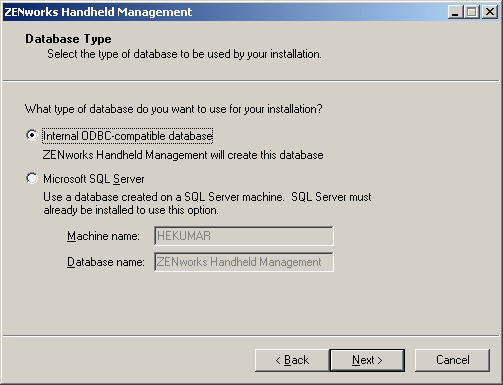
In order to use an SQL database, SQL Server must already be installed.
NOTE: If you are currently using ZENworks Desktop Management, you cannot extend the ZENworks Desktop Management database to include the handheld inventory information; the inventory databases for ZENworks Handheld Management and ZENworks Desktop Management are currently separate.
-
Click Next.
-
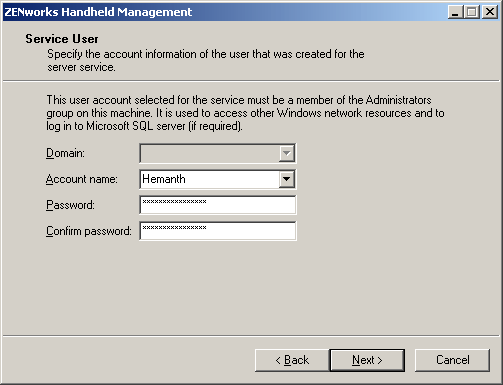
In the Service User dialog box, specify the domain name, account name, and password for the account that you created in Creating the ZENworks Handheld Management Server's Windows User Account , then click Next.
-
In the Directory User Information dialog box, specify the server name where eDirectory is installed, the username, and password for the account that you created in Creating the Service Object's User Account, then click Next.
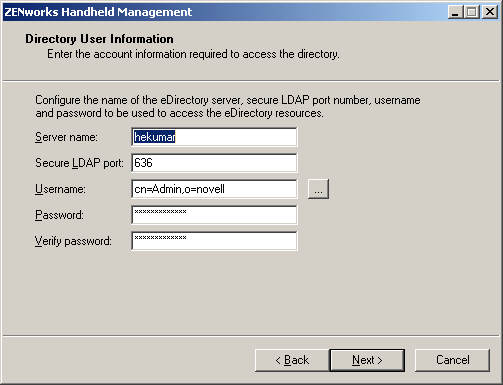
NOTE: The user needs rights to create the service object in the container you specify and rights to create handheld objects and to access application and policy objects in the tree. Browse to the user in the tree and specify the full context name.
-
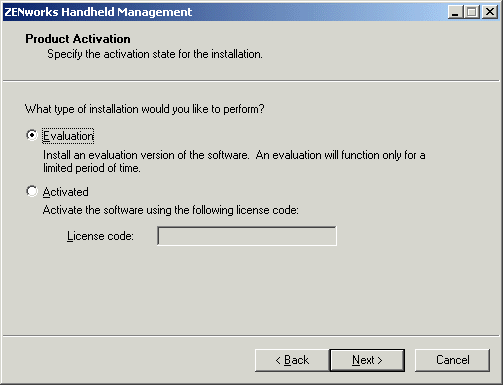
(Conditional) In the Product Activation dialog box, select the Activated option and provide a license code for the product.
or
If you want to use the evaluation version of the product for 90 days, select Evaluation.
-
Click Next.
-
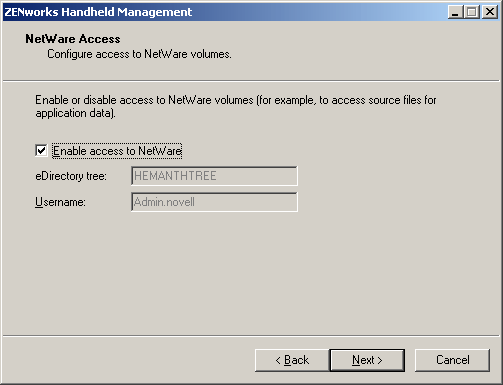
If you want to access objects or store retrieved files on a NetWare volume in the specified tree, select the Enable Access to NetWare check box.
-
Click Next.
-
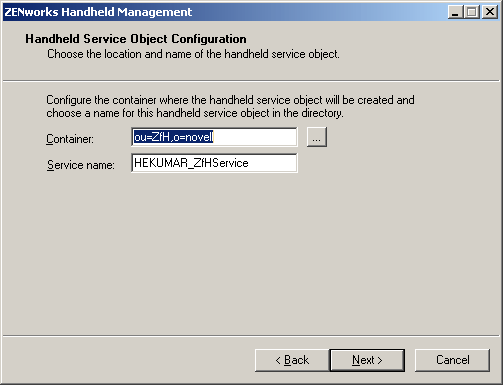
Select the container where you want the Service object created, then click Next.
To browse to a container you must have a valid LDAP user configured.
-
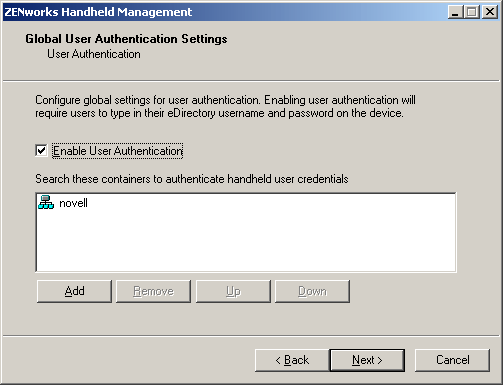
(Optional) In the Global User Authentication Settings page, select the Enable User Authentication check box to require that users type in their eDirectory usernames and passwords on the handheld device, click Add, specify the container to add to the container list, then click OK.
Select the Enable User Authentication check box if you want to use user-based management rather than just using device-base management.
-
Click Next.
-
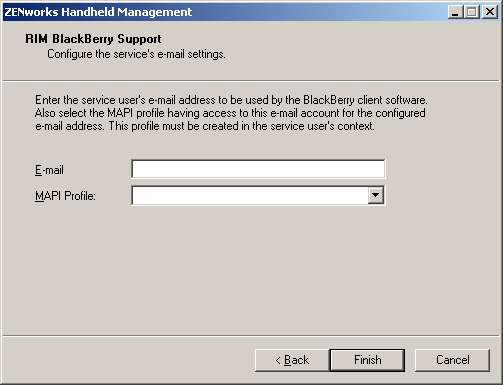
(Conditional) If you chose to enable RIM BlackBerry support, type the service user's e-mail address to be used by the BlackBerry client software, then select the MAPI profile that you created in Creating a MAPI Profile (BlackBerry Device Support Only), then click Finish.
-
Click Finish.
-
On the computer where you installed the ZENworks Handheld Management Server software, create a share to the installation directory.
The default location is c:\program files\novell\zfh.
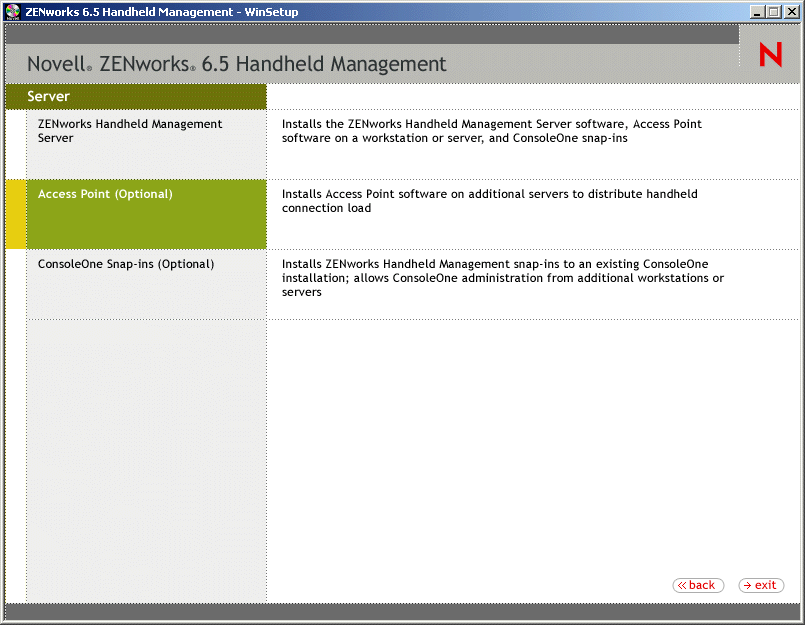
Installing the Access Point on Additional Computers
When you install the ZENworks Handheld Management Server using the installation program, the ZENworks Handheld Management Access Point is installed on the same computer.
You can install the Access Point on additional computers to distribute the communication load and provide better support for WAN environments. These machines must be able to communicate to the ZENworks Handheld Management Server through TCP/IP.
You can also install the Access Point on the laptops or desktops that are usually not connected to the network but are used by Windows CE devices for synchronization. If you install the Access Point on these computers, the synchronizing Windows CE devices will be able to communicate to the Access Point even when the ZENworks Handheld Management server is not connected to the network. The communication between the Access Point and the ZENworks Handheld Management Server happens when you connect these laptops or desktops to the network.
NOTE: If computers that are disconnected from the network do not have an IP address, the Windows CE devices must be configured to use PPP_PEER as the Access Point name so that connections to the Access Point are successful.
If you are installing the Access Point, you must log in as a member of the Administrators group.
To install the Access Point on additional computers:
-
Insert the ZENworks Handheld Management CD in the CD drive.
The installation program will autorun. If it does not, run winsetup.exe from the root of the CD.
-
Click Handheld Management.
-
Click English.
-
Click Handheld Management Services.
-
Click Access Point (Optional).
-
In the Welcome page, click Next.
-
Read the License agreement, then click Yes if you agree with the terms of the License Agreement.
If you do not agree with the terms of the license agreement, do not install the software.
-
Review the destination location where the installation program will install the Access Point (browse to a different location, if desired), then click Next.
-
In the Customer Information page, specify your name and your company name.
-
In the Server Configuration page, specify the name or the IP address of the machine where the ZENworks Handheld Management Server is installed.
-
(Optional) If you are using user-based management of handheld devices, on the eDirectory Server Information page, specify the server and secure LDAP port number that ZENworks Handheld Management should use when validating users' credentials, then click Next.
-
In the Start Copying Files page, review the information, then click Next.
-
Ensure that the Start Access Point check box is selected.
-
(Optional) Select the Configure Access Point HTTP and SSL Settings check box.
-
(Conditional) If you select the Configure Access Point HTTP and SSL Settings check box, see Configuring SSL and HTTP Settings, then proceed to Step 16.
-
Click Finish.
NOTE: You can install the Access Point on users' desktop or laptop machines using ZENworks Desktop Management. For more information, see Installing the Access Point and Desktop Synchronization Integration Software Using a Silent Install.
Installing ConsoleOne Snap-Ins on an Existing ConsoleOne Installation
ConsoleOne and the ZENworks Handheld Management ConsoleOne snap-ins can be installed on any number of computers so that you can give other administrators or help desk staff access to ZENworks Handheld Management from multiple locations on your network.
To install the ConsoleOne snap-ins on an existing ConsoleOne installation:
-
On a machine where ConsoleOne is installed, insert the ZENworks Handheld Management CD in the CD drive.
The installation program will autorun. If it does not, run winsetup.exe from the root of the CD.
-
Click Handheld Management.
-
Click English.
-
Click Handheld Management Services
-
Click ConsoleOne Snap-ins (Optional), then follow the instructions in the wizard.