73.2 Setting Up the Inventory Database
This section provides information on the following topics:
If you want to replace the Inventory database, always stop the Inventory services before replacing the database. Replace the database and restart the Inventory services. For more information, see Section 73.1.5, Starting and Stopping the Inventory Service.
73.2.1 Setting Up the Sybase Inventory Database
This section provides information on the following topics:
Adding Non-English Enumerated Values for Inventory Attributes into the Inventory Database
You need to add the non-English enumerated values so the Inventory report can display the enum value for the inventory attributes in internationalized versions. The non-English enum values must be available in English version of the product so that the rolled-up inventory information from non-English sites can be properly captured at the high-level servers where only English versions are installed.
For more information about the list of attributes that contains enumerated values, see Section P.0, Enumeration Values.
To add the non-English enum values:
-
Specify the JDBC connection settings in the connection.prop to connect to the Sybase database. The file is located in the following directory:
-
On NetWare or Windows: zenworks_directory\inv\server\wminv\ properties
-
On Linux: /etc/opt/novell/zenworks/inv
You can do this by copying the template property settings for Sybase specified in the comments section in the connection.prop file. Specify the IP address, port number, and Database SID in the JDBC URL string that matches your Sybase server configuration.
-
-
At the server prompt, enter AddEnums directory_name_containing_connection.prop
On the Inventory server, run the above command from the following directory:
-
On NetWare or Windows: zenworks_directory\inv\server\wminv\bin
-
On Linux: /opt/novell/bin
After executing the command, the a message indicating that the non-English enums have been successfully inserted is displayed on the console prompt.
-
Manually Creating the Sybase Inventory Database Object
-
In ConsoleOne, right-click in the eDirectory tree where you want to create the database object, click , click , click , then click .
-
Enter a name for the database object, then click .
-
Configure the Database server options of the Database object.
-
In ConsoleOne, right-click the database object, click , then click the tab.
-
Select the database server object using any of the following methods:
-
If eDirectory is installed on the database server, in the field, browse for and select the Server object for the server where the database is physically installed and running.
The server’s IP address is automatically populated to the drop-down list. If the selected server object has more than one IP address, select the appropriate IP address.
To clear the value set in the field, type the IP address of another database server or browse and select another server object.
-
If eDirectory is not installed on the database server, enter the server’s IP address or the DNS name in the field.
-
-
Type the values for the following options:
-
Database (Read-Write) User Name: MW_DBA
-
Database (Read-Write) Password: novell
-
Database (Read Only) User Name: MW_READER
-
Database (Read Only) Password: novell
-
Database (Write Only) User Name: MW_UPDATER
-
Database (Write Only) Password: novell
IMPORTANT:All Inventory components use the username and password the configured in the database object. By default, “novell” is the password for all options. But you can change it in the database, and update the same here.
-
-
Click .
-
To configure the JDBC Driver properties, click the tab.
-
Select , then click .
This populates the fields with default JDBC driver information.
The database settings for Sybase are:
-
Driver: com.sybase.jdbc.SybDriver
-
Protocol: jdbc:
-
SubProtocol: sybase:
-
SubName: Tds:
-
Port: 2638
-
Flags: ?ServiceName=mgmtdb&JCONNECT_VERSION=4
-
Database Service Name: the database name specified against the -n Sybase startup parameter while invoking Sybase.
By default, the value of the -n switch is the IP address of the database server. If you retain this switch value, you must enter the same IP address as the database service name.
-
-
Click , then click .
-
Organizing the Sybase Database Spaces on NetWare, Windows, or Linux Servers (AlterDBSpace Tool)
If there are more volumes or drives on the multiple physical disks of the database server, placing the Sybase database spaces files on separate volumes or drives improves the performance while accessing the database.
If you install the Sybase database component of ZENworks 7 Desktop Management, the system database file and the database spaces files are installed in the location on the database server you specify. On loading the Inventory database server, the system database file (mgmtdb.db) is loaded. this mgmtdb.db file references the inventory information in the database spaces files. the database spaces files (mgmtdb1.db, mgmtdb2.db, mgmtdb3.db, mgmtdb4.db, mgmtdb5.db, mgmtdb6.db, mgmtdb7.db, mgmtdb8.db, mgmtdb9.db, mgmtdb10.db, and mgmtdb11.db) contain the inventory information.
The alterdb.props file is installed on the database server in the following location:
-
On Windows: inventory_server_installation_directory\wminv\ properties
-
On Linux: /etc/opt/novell/zenworks/inv
You can modify the sections in the file to specify the location of the database spaces on the volumes or drives.
The contents of the alterdb.props file are as follows:
#Database Space Properties
count=11
mgmtdb1=location_of_mgmtdb1
mgmtdb2=location_of_mgmtdb2
mgmtdb3=location_of_mgmtdb3
mgmtdb4=location_of_mgmtdb4
mgmtdb5=location_of_mgmtdb5
mgmtdb6=location_of_mgmtdb6
mgmtdb7=location_of_mgmtdb7
mgmtdb8=location_of_mgmtdb8
mgmtdb9=location_of_mgmtdb9
mgmtdb10=location_of_mgmtdb10
mgmtdb11=location_of_mgmtdb11
To organize the database spaces:
-
Stop the Inventory database.
-
Stop the Inventory Service Manager that is running on the Inventory server.
-
Manually move the database spaces files on the Inventory server.
Arrange the database space files in the following way for better performance:
-
mgmtdb1 and mgmtdb2 in the same location
-
mgmtdb3 and mgmtdb6 in the same location
-
mgmtdb5 and mgmtdb7 in the same location
-
mgmtdb8 and mgmtdb4 in the same location
-
mgmtdb9 and mgmtdb10 in the same location
-
mgmtdb11 in a location
IMPORTANT:If you want to move mgmtdb.db to another directory or volume on a netware server, update the sys:\system\mgmtdbs.ncf file with the new location of the mgmtdb.db.
If you want to move mgmtdb.db to another directory or volume on a Windows server, run the ntdbconfig.exe located in the zenworks\database\dbengine directory. In the NTDBCONFIG dialog box, enter the new path of mgmtdb.db.
-
-
Modify the location of the eleven database space files in the alterdb.props file.
For example,
-
On NetWare, enter mgmtdb3=SYS:\\ZENWORKS\\INV\\DB
-
On Windows, enter mgmtdb3=C:\\ZENWORKS\\INV\\DB
-
On Linux, enter mgmtdb3=/opt/sybase/zenworks/inv/db
-
-
Load the database.
-
On NetWare, enter mgmtdbs.
-
On Windows, run the database service.
-
On Linux, enter /etc/init.d/novell-zdm-sybase start.
Ignore the error messages displayed on the console. These messages are displayed because the database spaces files are not loaded.
-
-
Make sure that the Database Location policy has been configured.
-
Start the Inventory Service Manager. For more information, see List of Services.
-
Stop the Storer service. For more information, see List of Services.
-
On the Inventory server console, run the AlterDBSpace service by entering the following command at the server prompt:
-
On NetWare or Windows: Enter StartSer AlterDBSpace.
-
On Linux: Go to /opt/novell/bin, then enter StartSer AlterDBSpace.
On the Inventory server, the AlterDBSpace tool runs as a service.
You will see a message that the database is adjusted.
-
-
Stop the Inventory Service Manager.
-
Exit the database and then load the database.
Make sure that while loading the database there are no errors. Errors indicate that the specified location of the database space files is incorrect or does not exist. Make sure that the path of the database spaces is correct in the alterdb.props file and repeat the procedure to organize the database spaces.
IMPORTANT:If you place the database spaces in different volumes or drives, the log file should be placed in the same volume or drive as the System database file (mgmtdb.db).
Understanding the Sybase Database Startup Parameters
The startup parameters of the Sybase database are as follows:
-
-c: Sets the initial memory reserves for caching database pages and other server information. For example, -c 32M reserves 32 MB cache size.
-
-gc: Sets the maximum length of time in minutes that the database server runs without doing a checkpoint on each database. The default value is 60 minutes. For example, -gc 120 sets the checkpoint time as 120 minutes.
-
-gn: Sets the number of execution threads to be used in the database server.
-
-m: Deletes the transaction log when a checkpoint is done, either at shutdown or as a result of a checkpoint scheduled by the server.
-
-n: Specifies the host name of the database server. For example, -n IP_address.
-
-ti: Disconnects the connections that have not submitted a request for a certain number of minutes. The default is 240 (4 hours). A client machine in the middle of the database transaction locks until the transaction ends or the connection terminates. The -ti option is provided to disconnect inactive connections and to free their locks. For example, specify -ti 400.
-
-x: Specifies a communication link. For example, -x tcpip indicates a TCP/IP link.
-
-ct: Enables character set translation by converting strings between character sets that represent the same characters but at different values. This is useful when the client machine and the database use different character sets.
-
-gss: Sets the stack size per internal execution thread in the server.
-
database_installation_path: Specifies the installation path of the Inventory database. For example, c:\zenworks\inv\db\mgmtdb.db.
Backing Up the Sybase Inventory Database
Workstation Inventory provides a utility, Database Backup, to back up the Sybase Inventory database from the server. We recommend that you back up the database on a weekly basis. However, if you are tracking the inventory of workstations frequently, increase the frequency of backup.
You can back up the database files and the transaction log to the location relative to the SCANDIR path.
You can run Database Backup either from the server console or ConsoleOne.
This section provides information on the following topics:
Running Database Backup from the Server Console
Before running Database Backup from the server console, fulfill the following prerequisites:
-
You can run Database Backup only on an Inventory server to which you have associated a database server. If you deployed more than one database server, you must run Database Backup for each database server.
-
Ensure that the database you have to back up is configured in the Database Location policy. For more information on how to access the Database Location policy, see Section 73.5, Configuring the Database Location Policy.
-
The backup files are relative to the SCANDIR path. For example, if the SCANDIR path is sys:\zenworks\inv\scandir, the database will be backed up in sys:\zenworks\inv\scandir\Backup directory by default. To backup in another directory, in the [DBBackup Service] section of the server property file, you must modify the location of the backup destination in the ARGUMENTS parameter. For example, if the value of the ARGUMENTS parameter is changed to ""Backup\\day1"", the database will be backed up in sys:\zenworks\inv\scandir\backup\day1.
NOTE:If the directory path is multi-level, enclose the value for ARGUMENTS in two double quotes and use \\ instead of \ as path separator.
You must modify the server property file located on the server on which you are running Database Backup. Modify the server property file corresponding to the role of the server. For example, if you are running Database Backup on the Leaf Server with Database, modify the server property file, leaf_db_wks.properties.
IMPORTANT:When the properties file is modified, stop and start the inventory service for the modified property file to be loaded.
-
Ensure that the Service Manager is loaded when you run Database Backup.
To run Database Backup from the server console:
-
At the Inventory server console, enter StartSer DBBACKUP
-
View the status of the backup in the backup log file. The database will be copied to zenworks_installation_path\zenworks\inv\scandir\directory_you_specify.
Database Backup creates a log file, bacstatus.txt, located in the zenworks\inv\scandir directory on NetWare and Windows 2000 servers. The log records the status of the backup operation. Open this text file to view the status of the backup. This file increases in size for every backup operation. Remove the existing contents of the file if you do not require the details.
Running Database Backup from ConsoleOne
-
In ConsoleOne, click , click , then click .
If you want to back up the latest information in the Inventory database, right-click the database object, click , then click .
-
Enter the path to the directory where the database backup will be saved
WARNING:Do not use double-byte characters in the directory name. If you do so, Sybase interprets the double-byte characters as a different name, and backs up the database in the directory with the interpreted name.
If the Inventory database is running on a NetWare server, you can either enter the path or click Browse to browse for and select a directory. If you enter the database backup directory name without specifying the complete path, the backup directory will be created in the sys: directory.
If the Inventory database is running on a Windows or Linux machine, you must manually enter the backup directory path. If you enter the database backup directory name without specifying the complete path, the backup directory is created in the \winnt\system32 directory on Windows, and in the root directory on Linux.
NOTE:If you want to back up the database to a non-existent directory, only one level of the new directory will be created. To back up the database to a subdirectory, ensure that the primary directory already exists. For example, if you want to back up the database to a new c:\backup directory, the \backup directory will be created and the database will be backed up. But if you want to back up the database to a new \database directory, located under c:\backup, the \backup directory must already exist.
-
Click .
This backs up the database to the specified directory on the server running the database and overwrites any existing files without prompting about the overwrite.
Database Backup creates a log file, Backupst.txt, located in the ConsoleOne_installation_directory\1.2\bin directory. The log records the status of the backup operation. Open this text file to view the status of the backup. This file increases in size for every backup operation. Remove the existing contents of the file if you do not require the details.
Restoring the Inventory Database
-
If the Inventory database server is up, stop the Storer service. At the database server console, enter StopSer Storer.
-
Exit the Sybase database.
-
On NetWare servers: At the database server prompt, enter q to stop the Sybase database.
-
On Windows 2000: In the Windows Control Panel, double-click , double-click , select , then click .
-
-
Copy the backup files, overwriting the working database files.
-
Restart the database server.
73.2.2 Setting Up the Oracle Inventory Database
The following sections explain how to set up the Inventory database for Oracle9i and Oracle10g:.
IMPORTANT:In this setup, the Inventory database is not mounted with any other version or instances of Oracle databases.
Creating the Oracle9i Inventory Database on a Windows Server
Make sure that the following prerequisites are met:
-
Oracle 9.2.0.6 must be installed on the server before configuring the Inventory database.
-
To maintain the Inventory database on Oracle, Workstation Inventory requires that you have a minimum of 25 user licenses.
You must manually create the Inventory database for Oracle on Windows servers by following the procedure below:
-
Create a directory c:\schema and copy all the files in the following directories from the ZENworks 7 Companion 2 CD to the schema directory:
- database\oracle9i\common
- database\oracle9i\winntspecific
-
By default, _create.sql, init.ora, _start.sql are Read-only files. Make the files writable.
-
Create the user_specified_path\zenworks\inventory\oracle\database\trace directory structure.
-
In c:\schema\_create.sql, replace all instances of d: with user_specified_path.
-
In c:\schema\init.ora, replace all instances of d: with user_specified_path.
-
In c:\schema\_start.sql, replace all instances of d: with user_specified_path.
If d: is not found, check and correct the path of init.ora in the database directory.
-
Copy c:\schema\init.ora to user_specified_path\zenworks\inventory\oracle\ database.
-
Copy c:\schema\_start.sql to user_specified_path\zenworks.
-
Make sure that Oracle services are loaded correctly and the database is not mounted.
-
At the command prompt, enter sqlplus /nolog to load the Oracle server manager.
-
At the Oracle Server Manager prompt (sqlplus prompt), enter @c:\schema\schema.sql.
Review the c:\schema\inv.log file to make sure that the database has been created successfully. If the database has not been successfully created, inv.log contains the following error messages: Oracle not available, Out of space, Compilation error.
-
Add non-English enumerated (enum) values for certain Inventory attributes into the Inventory database.
IMPORTANT:You must perform this step on the English version of the product also.
You need to add the non-English enumerated values so the Inventory ConsoleOne utilities such as Inventory Report can display the enum value for the inventory attributes in internationalized versions. The non-English enum values must be available in English version of the product so that the rolled-up inventory information from non-English sites can be properly captured at the high-level servers where only English versions are installed.
For more information about the list of attributes that contains enumerated values, see Section P.0, Enumeration Values.
To add the non-English enum values:
-
On the Inventory Server machine, Specify the JDBC connection settings in the zenworks_directory\inv\server\wminv\properties\ connection.prop file to connect to the Oracle database.
You can do this by copying the template property settings for Oracle specified in the comments section in the connection.prop file. Specify the IP address, port number, and Database SID in the JDBC URL string that matches your Oracle server configuration.
-
At the server prompt, enter AddEnums directory_name_containing_connection.prop.
If your Inventory server is running on a Windows machine, run the above command from zenworks_directory\inv\server\wminv\bin.
-
Execute the following SQL statement at the sqlplus prompt to make sure that the localized enumerated values are added correctly:
-
To display the enumerated values in French: connect mw_dba/passwordand SELECT * FROM cim.ostype_fr
-
To display the enumerated values in Spanish: connect mw_dba/passwordand SELECT * FROM cim.ostype_es;
-
To display the enumerated values in German: connect mw_dba/password and SELECT * FROM cim.ostype_de;
-
To display the enumerated values in Brazilian-Portuguese: connect mw_dba/password and SELECT * FROM cim.ostype_pt_BR;
-
-
-
At the sqlplus prompt, enter @c:\schema\schema1.sql.
Review the c:\schema\inv1.log file to make sure that the database has been created successfully. If the database has not been successfully created, inv1.log contains the following error messages: Oracle not available, Out of space, Compilation error.
-
At the sqlplus prompt, enter connect / as sysdba to login as DBA.
-
At the sqlplus prompt, enter shutdown immediate.
-
At the sqlplus prompt, enter @path\zenworks\_start.sql to start the Inventory database.
-
Continue with Manually Creating the Oracle Inventory Database Object.
Creating the Oracle9i Inventory Database on a UNIX Server
Make sure that the following prerequisites are met:
-
Oracle 9.2.0.6 must be installed must be installed on Linux or Solaris versions supported by Oracle9i.
-
Hard disk free space: 4 GB or above.
-
Primary memory: 1 GB or above.
-
To maintain the Inventory database on Oracle, Workstation Inventory requires that you have a minimum of 25 user licenses.
You must manually create the Inventory database for Oracle on UNIX servers by following the procedure below:
-
Log in as an Oracle user.
-
Create a /schema directory in the Oracle installation directory (by default, Oracle is installed in the /opt/oracle directory), and copy all the files in the following directories from the ZENworks 7 Companion 2 CD to the schema directory:
- database\oracle9i\common
- database\oracle9i\unixspecific
-
By default, _create.sql, init.ora, _start.sql are Read-only files. Make the files writable.
-
Create the user_specified_directory_path/zenworks/inventory/oracle/database/trace directory structure in /opt/oracle.
-
In schema/init.ora, replace all instances of $HOME with user_specified_directory_path.
-
In schema/_start.sql, replace all instances of $HOME with user_specified_directory_path.
-
In schema/_create.sql, replace all instances of $HOME with user_specified_directory_path.
-
In schema/schema.sql, replace all instances of $HOME with the schema directory created in Step 2.
-
In schema/schema1.sql, replace all instances of $HOME with the schema directory created in Step 2.
-
Copy schema/init.ora to user_specified_directory_path/zenworks/inventory/oracle/database.
-
Copy schema/_start.sql to user_specified_directory_path.
-
Make sure the Oracle services are up and running and no database is mounted.
-
At the command prompt, enter sqlplus /nolog to load the Oracle Server Manager.
-
At the Oracle Server Manager prompt, enter @$HOME/schema/schema.sql, where $HOME is the schema directory created in Step 2.
-
Review the schema/inv.log file to make sure that the database has been created successfully. If the database has not been successfully created, inv.log will contain the following error messages: Oracle not available, Out of space, Compilation error.
-
Add non-English enumerated (enum) values for certain Inventory attributes into the Inventory database.
IMPORTANT:You must perform this step on the English version of the product also.
You need to add the non-English enumerated values so the Inventory ConsoleOne utilities such as Inventory Report can display the enum value for the inventory attributes in internationalized versions. The non-English enum values must be available in English version of the product so that the rolled-up inventory information from non-English sites can be properly captured at the high-level servers where only English versions are installed.
To add the non-English enum values:
-
On the Inventory Server machine, Specify the JDBC connection settings in the zenworks_directory\inv\server\wminv\properties\ connection.prop file to connect to the Oracle database.
On a Linux Inventory Server machine, Specify the JDBC connection settings in the /etc/opt/novell/zenworks/inv/Connection.prop file to connect to the Oracle database.
You can do this by copying the template property settings for Oracle specified in the comments section in the connection.prop file. Specify the IP address, port number, and Database SID in the JDBC URL string that matches your Oracle server configuration.
-
At the server prompt, enter AddEnums directory_name_containing_connection.prop.
If your Inventory server is running on a Windows machine, run the above command from zenworks_directory\inv\server\wminv\bin.
If your Inventory server is running on a Linux machine, run the above command from /opt/novell/bin
-
Execute the following SQL statement at the sqlplus prompt to make sure that the localized enumerated values are added correctly:
-
To display the enumerated values in French: connect mw_dba/passwordand SELECT * FROM cim.ostype_fr
-
To display the enumerated values in Spanish: connect mw_dba/password and SELECT * FROM cim.ostype_es;
-
To display the enumerated values in German: connect mw_dba/passwordand SELECT * FROM cim.ostype_de;
-
To display the enumerated values in Brazilian-Portuguese: connect mw_dba/passwordand SELECT * FROM cim.ostype_pt_BR;
-
To display the enumerated values in Japanese: connect mw_dba/password and SELECT * FROM cim.ostype_ja;
-
-
-
At the sqlplus prompt, enter @$HOME/schema/schema1.sql, where $HOME is schema directory created in Step 2.
Review the schema/inv1.log file to make sure that the database has been created successfully. If the database has not been successfully created, inv1.log contains the following error messages: Oracle not available, Out of space, Compilation error.
-
At the sqlplus prompt, enter connect / as sysdba to login as DBA.
-
At the sqlplus prompt, enter shutdown immediate.
-
At the Oracle Server Manager prompt, enter @user_specified_directory_path/zenworks/_start.sql to start the Inventory database.
Creating the Oracle10g Inventory Database on a Windows Server
Make sure that the following prerequisites are met:
-
Oracle10g R1 or Oracle10g R2 must be installed on the server before configuring the Inventory database.
-
To maintain the Inventory database on Oracle, Server Inventory requires that you have a minimum of 25 user licenses.
You must manually create the Inventory database for Oracle on Windows servers by following the procedure below:
-
Create a directory c:\schema.
-
(Conditional) To create the Oracle10g R1 Inventory database, copy all the files in the following directories from the ZENworks 7 Companion 2 CD to the c:\schema directory:
- database\oracle10gR1\common
- database\oracle10gR1\winntspecific
-
(Conditional) To create the Oracle10g R2 Inventory database, copy all the files in the following directories from the ZENworks 7 Companion 2 CD to the c:\schema directory:
- database\oracle10gR2\common
- database\oracle10gR2\winntspecific
-
By default, _create.sql, init.ora, _start.sql are Read-only files. Make the files writable.
-
Create the user_specified_path\zenworks\inventory\oracle\database\ trace directory structure.
-
In c:\schema\_create.sql, replace all instances of d: with user_specified_path.
-
In c:\schema\init.ora, replace all instances of d: with user_specified_path.
-
In c:\schema\_start.sql, replace all instances of d: with user_specified_path.
If d: is not found, check and correct the path of init.ora in the database directory.
-
Copy c:\schema\init.ora to user_specified_path\zenworks\inventory\oracle\database.
-
Copy c:\schema\_start.sql to user_specified_path\zenworks.
-
Make sure that Oracle services are loaded correctly and the database is not mounted.
-
At the command prompt, enter sqlplus /nolog to load the Oracle server manager.
-
At the Oracle Server Manager prompt (sqlplus prompt), enter @c:\schema\schema.sql.
Review the c:\schema\inv.log file to make sure that the database has been created successfully. If the database has not been successfully created, inv.log contains the following error messages: Oracle not available, Out of space, Compilation error.
-
Add non-English enumerated (enum) values for certain Inventory attributes into the Inventory database.
IMPORTANT:You must perform this step on the English version of the product also.
You need to add the non-English enumerated values so the Inventory ConsoleOne utilities such as Inventory Report can display the enum value for the inventory attributes in internationalized versions. The non-English enum values must be available in English version of the product so that the rolled-up inventory information from non-English sites can be properly captured at the high-level servers where only English versions are installed.
For more information about the list of attributes that contains enumerated values, see Section P.0, Enumeration Values .
To add the non-English enum values:
-
On the Inventory Server machine, Specify the JDBC connection settings in the connection.prop file to connect to the Oracle database. The file is located in zenworks_directory\inv\server\wminv\properties\on Windows and in /etc/opt/novell/zenworks/inv on Linux.
You can do this by copying the template property settings for Oracle specified in the comments section in the connection.prop file. Specify the IP address, port number, and Database SID in the JDBC URL string that matches your Oracle server configuration.
-
If your inventory server is running on a Windows machine, at the server prompt change to zenworks_directory\inv\server\wminv\bin and enter AddEnums zenworks_directory\inv\server\wminv\properties.
If your Inventory server is running on a Linux machine, at the server prompt change to /opt/novell/bin/ and enter AddEnums /etc/opt/novell/zenworks/inv.
-
Execute the following SQL statement at the sqlplus prompt to make sure that the localized enumerated values are added correctly:
-
To display the enumerated values in French: connect mw_dba/passwordand SELECT * FROM cim.ostype_fr
-
To display the enumerated values in Spanish: connect mw_dba/passwordand SELECT * FROM cim.ostype_es;
-
To display the enumerated values in German: connect mw_dba/password and SELECT * FROM cim.ostype_de;
-
To display the enumerated values in Brazilian-Portuguese: connect mw_dba/password and SELECT * FROM cim.ostype_pt_BR;
-
-
-
At the sqlplus prompt, enter @c:\schema\schema1.sql.
Review the c:\schema\inv1.log file to make sure that the database has been created successfully. If the database has not been successfully created, inv1.log contains the following error messages: Oracle not available, Out of space, Compilation error.
-
At the sqlplus prompt, enter connect / as sysdba to login as DBA.
-
At the sqlplus prompt, enter shutdown immediate;.
-
At the sqlplus prompt, enter @path\zenworks\_start.sql to start the Inventory database.
-
Continue with Manually Creating the Oracle Inventory Database Object.
Creating the Oracle10g Inventory Database on a UNIX Server
NOTE:Information about Oracle 10g R2 is applicable only for ZENworks 7 with Support Pack 1
Make sure that the following prerequisites are met:
-
Oracle10g R1 must be installed must be installed on Linux or Solaris versions supported by Oracle10g.
-
Hard disk free space: 4 GB or above.
-
Primary memory: 1 GB or above.
-
To maintain the Inventory database on Oracle, Workstation Inventory requires that you have a minimum of 25 user licenses.
You must manually create the Inventory database for Oracle on UNIX servers by following the procedure below:
-
Log in as an Oracle user.
-
Create a /schema directory in the Oracle installation directory (by default, Oracle is installed in the /opt/oracle directory).
-
(Conditional) To create the Oracle10g R1 Inventory database, copy all the files in the following directories from the ZENworks 7 Companion 2 CD to the schema directory:
- Database\Oracle10gR1\Common
- Database\Oracle10gR1\unixSpecific
-
(Conditional) To create the Oracle10g R2 Inventory database, copy all the files in the following directories from the ZENworks 7 Companion 2 CD to the schema directory:
- Database\Oracle10gR2\Common
- Database\Oracle10gR2\unixSpecific
-
By default, _create.sql, init.ora, _start.sql are Read-only files. Make the files writable.
-
Create the user_specified_directory_path/zenworks/inventory/oracle/database/trace directory structure in /opt/oracle.
-
In schema/init.ora, replace all instances of $HOME with user_specified_directory_path.
-
In schema/_start.sql, replace all instances of $HOME with user_specified_directory_path.
-
In schema/_create.sql, replace all instances of $HOME with user_specified_directory_path.
-
In schema/schema.sql, replace all instances of $HOME with the schema directory created in Step 2.
-
In schema/schema1.sql, replace all instances of $HOME with the schema directory created in Step 2.
-
Copy schema/init.ora to user_specified_directory_path/zenworks/inventory/oracle/database.
-
Copy schema/_start.sql to user_specified_directory_path.
-
Make sure the Oracle services are up and running and no database is mounted.
-
At the command prompt, enter sqlplus /nolog to load the Oracle Server Manager.
-
At the Oracle Server Manager prompt, enter @$HOME/schema/schema.sql, where $HOME is the schema directory created in Step 2.
-
Review the schema/inv.log file to make sure that the database has been created successfully. If the database has not been successfully created, inv.log contains the following error messages: Oracle not available, Out of space, Compilation error.
-
Add non-English enumerated (enum) values for certain Inventory attributes into the Inventory database.
IMPORTANT:You must perform this step on the English version of the product also.
You need to add the non-English enumerated values so the Inventory ConsoleOne utilities such as Inventory Report can display the enum value for the inventory attributes in internationalized versions. The non-English enum values must be available in English version of the product so that the rolled-up inventory information from non-English sites can be properly captured at the high-level servers where only English versions are installed.
To add the non-English enum values:
-
Specify the JDBC connection settings in the connection.prop file to connect to the Oracle database. The file is located in the following directory:
-
On NetWare or Windows: zenworks_directory\inv\server\wminv\ properties
-
On Linux: /etc/opt/novell/zenworks/inv
You can do this by copying the template property settings for Oracle specified in the comments section in the connection.prop file. Specify the IP address, port number, and Database SID in the JDBC URL string that matches your Oracle server configuration.
-
-
If your inventory server is running on a Windows machine, at the server prompt change to zenworks_directory\inv\server\wminv\bin and enter AddEnums zenworks_directory\inv\server\wminv\properties.
If your inventory server is running on a Netware machine, at the server prompt change to Sys:\System and enter AddEnums zenworks_directory\inv\server\wminv\properties.
If your Inventory server is running on a Linux machine, at the server prompt change to /opt/novell/bin/ and enter AddEnums /etc/opt/novell/zenworks/inv.
-
Execute the following SQL statement at the sqlplus prompt to make sure that the localized enumerated values are added correctly:
-
To display the enumerated values in French: connect mw_dba/passwordand SELECT * FROM cim.ostype_fr
-
To display the enumerated values in Spanish: connect mw_dba/password and SELECT * FROM cim.ostype_es;
-
To display the enumerated values in German: connect mw_dba/passwordand SELECT * FROM cim.ostype_de;
-
To display the enumerated values in Brazilian-Portuguese: connect mw_dba/passwordand SELECT * FROM cim.ostype_pt_BR;
-
To display the enumerated values in Japanese: connect mw_dba/password and SELECT * FROM cim.ostype_ja;
-
-
-
At the sqlplus prompt, enter @$HOME/schema/schema1.sql, where $HOME is schema directory created in Step 2.
Review the schema/inv1.log file to make sure that the database has been created successfully. If the database has not been successfully created, inv1.log contains the following error messages: Oracle not available, Out of space, Compilation error.
-
At the sqlplus prompt, enter connect / as sysdba to login as DBA.
-
At the sqlplus prompt, enter shutdown immediate;.
-
At the Oracle Server Manager prompt, enter @user_specified_directory_path/zenworks/_start.sql to start the Inventory database.
Manually Creating the Oracle Inventory Database Object
-
In ConsoleOne, right-click a location in the Novell eDirectory tree for the database object, then click , click , click , then click .
-
Type a name for the database object, then click .
-
Configure the database server options of the database object.
-
In ConsoleOne, right-click the database object (Inventory database_server_name), then click , then click the tab.
-
Select the database server object by using either of the following methods:
-
If eDirectory is installed on the database server, then in the field, browse for and select the Server object of the server where the database is physically installed and running.
The server’s IP address is automatically populated to the drop-down list. If the selected server object has more than one IP address, select the appropriate IP address.
IMPORTANT:Make sure that the DNS name of the database server configured for the database object is valid. If the DNS name is invalid, you must select an appropriate database server IP address in the Database object property page.
To clear the value set in the field, type the IP address of another database server or browse and select another server object.
-
If eDirectory is not installed on the database server, then specify the server IP address or the DNS name in the field.
-
-
Specify the following values:
-
Database (Read-Write) User Name: MW_DBA
-
Database (Read-Write) Password: novell
-
Database (Read Only) User Name: MWO_READER
-
Database (Read Only) Password: novell
-
Database (Write Only) User Name: MWO_UPDATER
-
Database (Write Only) Password: novell
IMPORTANT:All Inventory components use the username and password the configured in the database object. By default, “novell” is the password for all options. But you can change it in the database, and update the same here.
-
-
Click .
-
To configure the JDBC Driver properties, click the tab.
-
Select , then click the button.
This populates the fields with default JDBC driver information.
The database settings for Oracle are:
-
Driver: oracle.jdbc.driver.OracleDriver
-
Protocol: jdbc:
-
SubProtocol: oracle:
-
SubName: thin:@
-
Port: 1521
-
Flags: This field is not applicable for Oracle
-
Database Service Name: orcl (The value for the SID is the same as assigned for the database instance.)
-
-
Click , then click .
-
Configuring and Running Multiple Oracle Database Instances on a Windows Server
Make sure that the following prerequisites are met:
-
The ZENworks supported Oracle version must be installed on the Windows Inventory server.
-
To maintain the Inventory database in Oracle, Workstation Inventory requires that you have a minimum of 25 user licenses.
-
You have already set up the Inventory database.
To configure and run Oracle instances:
-
At the database server, from the desktop menu, click , click , click , then click .
-
Click , click , click, click , click , then click .
-
Enter the following details:
-
Global Database Alias: mgmtdb . your_windows_nt/2000_name
-
SID: By default, the value is mgmtdb.
-
-
Click .
This process takes a significant amount of time and creates the Oracle database.
Make sure that the OracleServiceMGMTDB service is created and started.
-
Load the Inventory database.
From the desktop menu, click , then click to run the Oracle Server Manager.
Enter the following commands:
set instance mgmtdb
connect internal/password_for_administrator
73.2.3 Setting Up the MS SQL Server 2000 or MS SQL Server 2005 Inventory Database
This section provides information on the following topics:
Configuring the MS SQL Server 2000 Inventory Database
Prerequisites for configuring the database include the following:
-
Microsoft SQL Server 2000 installed on the Windows server.
-
Minimum free disk space of 50 MB to extract the p1mssqlinvdb.zip file.
-
Make sure that you have sufficient disk space to store the inventory information on the server that has the Inventory database.
To configure the Inventory database for MS SQL Server 2000:
-
Copy the p1mssqlinvdb.zip file from the ZENworks 7 Companion 2 CD\database\mssql directory to path_of_inventory_database_directory_on_the_database_server.
-
Extract p1mssqlinvdb.zip.
-
From the MS SQL server desktop menu, click , click , then click .
-
In the SQL Server Enterprise Manager, browse to Console Root/Microsoft SQL Servers/SQL Server Group/machine_name_running_Inventory_database.
-
Right -click machine_name_running_Inventory_database, then click .
-
In the SQL Server Properties dialog box, click the tab and make sure that the authentication is set to SQL Server and Windows.

-
Click.
-
Browse to machine_name_running_Inventory_database/Databases and right-click Databases, click , then double-click .
-
In the Attach Database dialog box, do the following:
-
Click the button to browse to and select mgmtdb.mdf as the .mdf database file to be attached.
-
Make sure that the value of the field is mgmtdb.
-
Select from the drop-down list.
-
Click .
The ZENworks Inventory database (mgmtdb) is attached to the Databases server group.

-
-
Select , then click the menu, then click .
-
In the SQL Query Analyzer, do the following:
-
Make sure that is selected in the drop-down list.
-
Click , then click .
-
Select the createloginnames.sql query file from ZENworks 7 Companion 2 CD\database\mssql directory.
-
Click , then click .
On successful execution, the following message is displayed in the Message pane:
New Login Created
-
Log in as MW_DBA in the SQL Query Analyzer and execute the following drop trigger sqls:
drop trigger cim.x$cim$component
go
drop trigger cim.x$cim$dependency
go
drop trigger managewise.x$managewise$designates
go
drop trigger managewise.x$managewise$currentloginuser
go
drop trigger managewise.x$managewise$lastloginuser
go
drop trigger cim.x$cim$installedsoftwareelement
go
During the execution of the drop trigger sqls, the following error message might be displayed on the console, “Cannot drop the trigger 'trigger_name', because it does not exist or you do not have permission”. Ignore the error message.
-
-
(Optional) Add non-English enumerated (enum) values for certain Inventory attributes into the Inventory database.
You need to add the non-English enumerated values so the Inventory ConsoleOne utilities such as Inventory Report can display the enum value for the inventory attributes in internationalized versions. The non-English enum values must be available in English version of the product so that the rolled-up inventory information from non-English sites can be properly captured at the high-level servers where only English versions are installed.
For more information about the list of attributes that contains enumerated values, see Section P.0, Enumeration Values.
To add the non-English enum values:
-
Specify the JDBC connection settings in the zenworks_directory\inv\server\wminv\properties\ connection.prop file to connect to the MS SQL database.
You can do this by copying the template property settings for MS SQL specified in the comments section in the connection.prop file. Specify the IP address, port number, and Database SID in the JDBC URL string that matches your MS SQL server configuration.
-
At the server prompt, enter AddEnums directory_name_containing_connection.prop
If your Inventory server is running on a Windows machine, run the above command from zenworks_directory\inv\server\wminv\bin.
After executing the command, the a message indicating that the non-English enums have been successfully inserted is displayed on the console prompt.
-
-
Continue with Manually Creating the Inventory Database Object for MS SQL 2000 or MS SQL 2005.
WARNING:Do not rename the mgmtdb database because it is set as the default database for the user account at login.
Configuring the MS SQL Server 2005 Inventory Database
NOTE:Information about MS SQL 2005 is applicable only for ZENworks 7 with Support Pack 1.
Prerequisites for configuring the database include the following:
-
Microsoft SQL Server 2005 installed on the Windows server.
-
Minimum free disk space of 50 MB to extract the p1mssqlinvdb.zip file.
-
Make sure that you have sufficient disk space to store the inventory information on the server that has the Inventory database.
To configure the Inventory database for MS SQL Server 2005:
-
Copy the p1mssqlinvdb.zip file from the ZENworks 7 Companion 2 CD\database\mssql directory to path_of_inventory_database_directory_on_the_database_server.
-
Extract p1mssqlinvdb.zip.
-
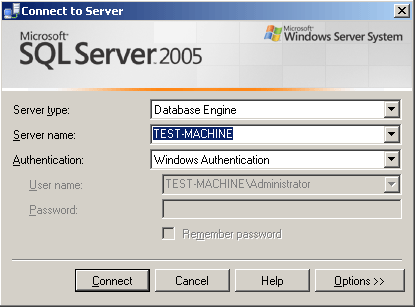
From the MS SQL server desktop menu, click , click 2005, then click .
-
In the SQL Server Management Studio, connect to the Database Engine of the MSSQL Server by clicking on File->Connect Object Explorer and setting the properties.
-
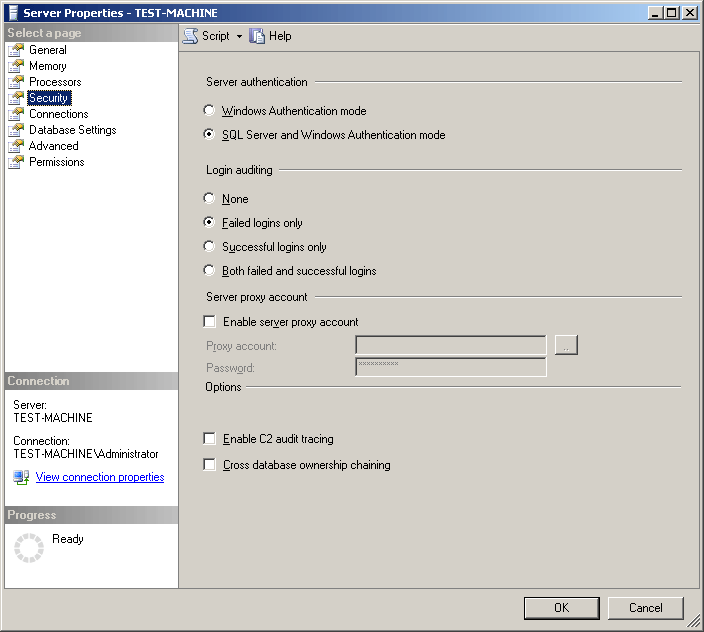
Browse to machine_name_running_Inventory_database in the Object Explorer, and right-click machine_name_running_Inventory_database, then click Properties.
-
In the SQL Server Properties dialog box, click the Security tab and make sure that the authentication is set to SQL Server and Windows.
-
Click OK.
-
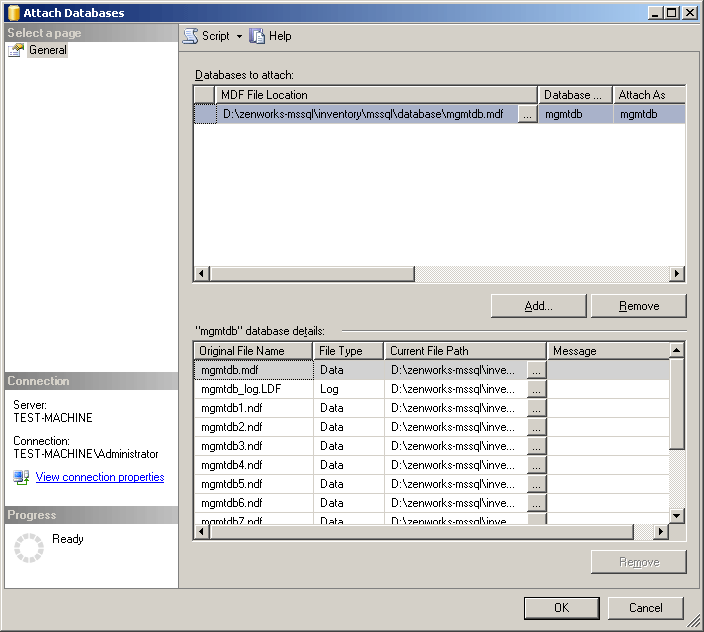
Browse to machine_name_running_Inventory_database/Database, and right-click Databases,click All Tasks, then double-click Attach Database.
-
In the Attach Database dialog box, do the following:
-
Click the button to browse to and select mgmtdb.mdf as the .mdf database file to be attached.
-
Make sure that the value of the field is mgmtdb.
-
Click .
The ZENworks Inventory database (mgmtdb) is attached to the Databases server group.
-
Right-click , then select .
-
In the SQL Query Analyzer, do the following:
-
Select the createloginnames.sql query file from ZENworks 7 Companion 2 CD\database\mssql directory. Either drag and drop it on the opened query window or copy the contents of the sql file to the query window.
-
Click .
On successful execution, the following message is displayed in the Message pane:
New Login Created
-
Login as MW_DBA in the SQL Query Analyzer and execute the following drop trigger sqls:
drop trigger cim.x$cim$component
go
drop trigger cim.x$cim$dependency
go
drop trigger managewise.x$managewise$designates
go
drop trigger managewise.x$managewise$currentloginuser
go
drop trigger managewise.x$managewise$lastloginuser
go
drop trigger cim.x$cim$installedsoftwareelement
go
During the execution of the drop trigger sqls, the following error message might be displayed on the console, “Cannot drop the trigger 'trigger_name', because it does not exist or you do not have permission”. Ignore the error message.
-
Continue with Manually Creating the Inventory Database Object for MS SQL 2000 or MS SQL 2005
-
-
WARNING:Do not rename the mgmtdb database because it is set as the default database for the user account at login.
Manually Creating the Inventory Database Object for MS SQL 2000 or MS SQL 2005
NOTE:Information about MS SQL 2005 is applicable only for ZENworks 7 with Support Pack 1.
-
In ConsoleOne, right-click a location in the Novell eDirectory tree for the database object, then click , click , click , then click .
-
Type a name for the database object, then click .
-
Configure the database server options of the database object.
-
In ConsoleOne, right-click the database object (Inventory database_server_name), then click , then click the tab.
-
Select the database server object by using either of the following methods:
-
If eDirectory is installed on the database server, then in the field, browse for and select the Server object of the server where the database is physically installed and running.
The server’s IP address is automatically populated to the drop-down list. If the selected server object has more than one IP address, select the appropriate IP address.
IMPORTANT:Make sure that the DNS name of the database server configured for the database object is valid. If the DNS name is invalid, you must select an appropriate database server IP address in the Database object property page.
To clear the value set in the field, type the IP address of another database server or browse and select another server object.
-
If eDirectory is not installed on the database server, then specify the server IP address or the DNS name in the field.
-
-
Specify the following values:
-
Database (Read-Write) User Name: MW_DBA
-
Database (Read-Write) Password: novell
-
Database (Read Only) User Name: MWM_READER
-
Database (Read Only) Password: novell
-
Database (Write Only) User Name: MWM_UPDATER
-
Database (Write Only) Password: novell
IMPORTANT:All Inventory components use the username and password the configured in the database object. By default, “novell” is the password for all options. But you can change it in the database, and update the same here.
-
-
Click .
-
To configure the JDBC Driver properties, click the tab.
-
If you have installed ZENworks 7 Desktop Management, select MSSQL, then click the button.
This populates the fields with default JDBC driver information.
The database settings for MS SQL 2000 are:
-
Driver: com.microsoft.jdbc.sqlserver.SQLServerDriver
-
Protocol: jdbc:
-
SubProtocol: microsoft:
-
SubName: sqlserver://
-
Port: 1433
-
Flags: This field is not applicable for MS SQL 2000.
-
Database Service Name: This field is not applicable for MS SQL 2000.
-
-
If you have installed ZENworks 7 Desktop Management and MS SQL 2000, select , then click the button.
This populates the fields with default JDBC driver information.
The database settings for MS SQL 2000 are:
-
Driver: com.microsoft.jdbc.sqlserver.SQLServerDriver
-
Protocol: jdbc:
-
SubProtocol: microsoft:
-
SubName: sqlserver://
-
Port: 1433
-
Flags: This field is not applicable for MS SQL 2000.
-
Database Service Name: This field is not applicable for MS SQL 2000.
-
-
If you have installed ZENworks 7 Desktop Management with Support Pack 1 and MS SQL 2005, select , then click the button.
This populates the fields with default JDBC driver information.
The database settings for MS SQL 2005 are:
-
Driver: com.microsoft.jdbc.sqlserver.SQLServerDriver
-
Protocol: jdbc:
-
SubProtocol: This field is not applicable for MS SQL 2005.
-
SubName: sqlserver://
-
Port: 1433
-
Flags: This field is not applicable for MS SQL 2005.
-
Database Service Name: This field is not applicable for MS SQL 2005.
-
-
Click , then click .
-
-
Continue with Connecting the Inventory Server and ConsoleOne to the MS SQL 2000 or MS SQL 2005 Inventory Database.
Connecting the Inventory Server and ConsoleOne to the MS SQL 2000 or MS SQL 2005 Inventory Database
The Inventory server components and the ConsoleOne use Microsoft JDBC driver to connect to the Inventory database on MS SQL 2000. You must install and configure Microsoft SQL Server 2000 driver for JDBC driver with the Inventory system.
To configure the Microsoft SQL Server 2000 driver for JDBC to access the Inventory database running on MS SQL 2000:
-
Download the Windows English version of Microsoft JDBC driver from the Microsoft SQL Server Web site.
NOTE:Skip to Step 5, if you have MS SQL 2005 as the database.
-
On a Windows Inventory server, do the following and then skip to Step 4:
-
Install the driver.
-
Copy the msbase.jar, msutil.jar, and mssqlserver.jar files to inventory_server_installation_directory\inv\server\lib directory.
-
-
On a Linux Inventory server, do the following and continue with Step 4:
-
Extract msbase.jar, msutil.jar, and mssqlserver.jar from the downloaded Microsoft JDBC driver.
-
Copy the msbase.jar, msutil.jar, and mssqlserver.jar files to the /opt/novell/zenworks/java/lib/common directory.
-
-
On the machine, running ConsoleOne with ZENworks 7 Inventory snap-ins, copy the msbase.jar, msutil.jar, and mssqlserver.jar files to the consoleone_installation_directory\lib\zen directory.
-
In ConsoleOne, create a database object in the same container where Inventory server is installed.
-
Right-click the container.
-
Click , click , select from the list of objects, then click .
-
Enter a name for the database object, then click .
-
-
Configure the Database server options of the Database object.
-
In ConsoleOne, right-click the database object, click , then click the tab.
-
Select the database server object using any of the following methods:
-
If eDirectory is installed on the database server, in the field, browse for and select the Server object for the server where the database is physically installed and running.
The server’s IP address is automatically populated to the drop-down list. If the selected server object has more than one IP address, select the appropriate IP address.
IMPORTANT:Make sure that the DNS name of the database server configured for the database object is valid. If the DNS name is invalid, you must select an appropriate database server IP address in the Database object property page.
To clear the value set in the field, type the IP address of another database server or browse and select another server object.
-
If eDirectory is not installed on the database server, then enter the server’s IP address or the DNS name in the field.
-
-
Type the values for the following options:
-
Database (Read-Write) User Name: MW_DBA
-
Database (Read-Write) Password: novell
-
Database (Read Only) User Name: MWM_READER
-
Database (Read Only) Password: novell
-
Database (Write Only) User Name: MWM_UPDATER
-
Database (Write Only) Password: novell
-
-
Click .
-
To configure the JDBC Driver properties, click the tab.
-
Select , then click .
This populates the fields with default JDBC driver information.
Modify the database settings based on the configuration of your MS SQL Server. The database settings for MS SQL are:
-
Driver: com.microsoft.jdbc.sqlserver.SQLServerDriver
-
Protocol: jdbc:
-
SubProtocol: microsoft:
-
SubName: sqlserver://
-
Port: 1433
-
Flags: Not applicable for MS SQL
-
Database Service Name: Not applicable for MS SQL
-
-
For MS SQL 2005, select , then click .
This populates the fields with default JDBC driver information.
Modify the database settings based on the configuration of your MS SQL Server. The database settings for MS SQL are:
-
Driver: com.microsoft.jdbc.sqlserver.SQLServerDriver
-
Protocol: jdbc:
-
SubProtocol: Not applicable for MS SQL 20005
-
SubName: sqlserver://
-
Port: 1433
-
Flags: Not applicable for MS SQL 2005
-
Database Service Name: Not applicable for MS SQL 2005
-
-
Click , then click .
-
For more information on Performance tips, see Section M.1, Database Parameter Tuning Tips.