29.2 Setting Up the Preboot Services Methods
The Novell ZENworks Imaging Engine that performs the actual imaging of a device is a Linux application. Unless you use automated Preboot Services with PXE-enabled devices, you need to prepare a boot medium that has the Linux kernel, ZENworks Imaging Engine, and network drivers installed.
The following sections contain additional information:
29.2.1 Using Preboot Services (PXE)
Preboot Execution Environment (PXE) is an Intel specification that allows a device to boot from the network, instead of its hard drive or other local media. ZENworks Linux Management can use PXE to launch Preboot Services.
In ZENworks Linux Management, Preboot Services uses PXE to find out if there is imaging work specified for a device and to provide the device with the files necessary to boot to the ZENworks Linux Management imaging environment.
Before you can use Preboot Services with automated Preboot bundles, you need to do the following:
-
Install the ZENworks Linux Management Imaging and Preboot Services (PXE Support) components on your imaging server.
-
Enable PXE on the device.
-
Have a standard DHCP server, either on your imaging server or on another network server.
Automated Preboot Services functions can also be performed using a ZENworks partition. For more information, see Creating a ZENworks Partition.
Manual Preboot Services functions can be performed using CDs or DVDs. For more information, see Section 29.2.2, Preparing Imaging Boot CDs or DVDs.
29.2.2 Preparing Imaging Boot CDs or DVDs
If you have software for burning CDs or DVDs, you can create an imaging boot CD or DVD for imaging operations. You have two options:
For information on how to use the CD or DVD to perform disconnected imaging operations, see Section 30.1.3, Setting Up Disconnected Imaging Operations.
Creating a Boot CD or DVD with Additional Files
This section describes how to create an imaging CD or DVD that contains more than the files provided in the bootcd.iso image.
This method allows you to include the settings.txt file on the boot CD or DVD to provide the required imaging parameters. For more information on the settings.txt file, see Section D.5, Imaging Configuration Parameters (settings.txt).
This method also allows you to add other files and drivers that you need to do the imaging.
To create an imaging boot CD or DVD that includes settings.txt and other files:
-
Copy the bootcd.iso file to a temporary location.
The bootcd.iso file is located in the /opt/novell/zenworks/zdm/winutils directory on the imaging server where ZENworks Linux Management is installed.
-
In an ISO editor, open the temporary copy of the bootcd.iso file.
If you experience ISO corruption after adding files into the ISO, such as a checksum error, use a more reliable ISO editor. Also, some ISO editors do not work very well with DVDs.
-
Using the temporary bootcd.iso file, copy the settings.txt file to the root of the bootcd.iso image.
The settings.txt file is located in the /opt/novell/zenworks/zdm/winutils directory on the imaging server where ZENworks Linux Management is installed.
-
Copy any other files or drivers that you want included on the CD or DVD to the /addfiles directory in the temporary bootcd.iso image.
Any files or subdirectories that you add under the /addfiles directory are placed at the root of the client when booting the CD or DVD.
IMPORTANT:When booting from the CD or DVD, the imaging engine is read into RAM. Because the imaging engine uses some of the RAM that exists on the client device, the combined size of any files that you add under the /addfiles directory cannot exceed amount of remaining RAM.
-
Save the updated bootcd.iso image file to its temporary location.
-
Use your software for burning CDs or DVDs to burn the updated bootcd.iso image onto the CD or DVD.
-
Boot the device to be imaged from your newly created imaging boot CD or DVD.
Booting from a SCSI CD-ROM device is currently not supported.
Creating a Boot CD or DVD without Additional Files
If you do not want to include the settings.txt file or any other files or drivers in the imaging boot CD or DVD, you can simply create the imaging boot CD or DVD from the bootcd.iso image provided with ZENworks.
However, you will need to provide the settings.txt file on a floppy diskette to provide the required imaging parameters. For more information on the settings.txt file, see Section D.5, Imaging Configuration Parameters (settings.txt).
To create an imaging boot CD or DVD that contains only the bootcd.iso image:
-
Copy the settings.txt file containing the settings you want for the imaging boot process onto a floppy diskette.
This file is located in the /opt/novell/zenworks/zdm/winutils directory on the imaging server where ZENworks Linux Management is installed.
-
Use your software for burning CDs or DVDs to burn the bootcd.iso image onto the CD or DVD.
The bootcd.iso file is located in the /opt/novell/zenworks/zdm/winutils directory on the imaging server where ZENworks Linux Management is installed
-
Boot the device to be imaged from your newly created imaging boot CD or DVD.
You will be prompted for the diskette that contains the settings.txt file.
Booting from a SCSI CD-ROM device is currently not supported.
29.2.3 Using the ZENworks Imaging Media Creator
This utility allows you to do the following:
IMPORTANT:This utility is a .NET application, and therefore requires the .NET framework to be installed on the Windows device being used to run it.
Managing the Settings.txt File
There two settings.txt files shipped with ZENworks Linux Management:
-
/srv/tftp/boot/settings.txt: PXE devices use this version of the file for automated preboot work. This file exists on the imaging server and usually does not need to be modified. During the boot process, this settings.txt file is read and the necessary settings information is discovered and used.
-
/opt/novell/zenworks/zdm/winutils/settings.txt: The imaging server copy of this file needs to be modified for your network environment and a working copy of it should be maintained at the root of the imaging boot device (imaging CD or DVD, or a blank floppy diskette). When burning the imaging CD or DVD, be sure to include the edited copy of this settings.txt file.
You can manage the content of this copy of the settings.txt file with the ZENworks Imaging Media Creator utility, as outlined in the following steps.
To manually edit the settings.txt file, see Section D.5, Imaging Configuration Parameters (settings.txt).
For more information, see Section D.5, Imaging Configuration Parameters (settings.txt).
To manage the settings.txt file using the ZENworks Imaging Media Creator utility:
-
On a Windows device, browse to the opt/novell/zenworks/zdm/winutils directory on your Linux imaging server and run zmediacreator.exe.
You might need to configure Samba on the Linux server in order for the Windows device to have access to this directory.
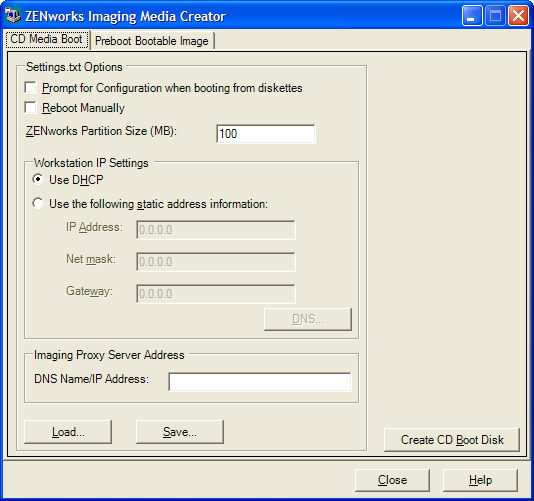
The following dialog box is displayed:
-
Click , browse for the settings.txt file, then click .
The default location is A:\. Browse to the /opt/novell/zenworks/zdm/winutils/ directory for the copy to be modified.
When the file is loaded, the fields in this dialog box are populated from the information contained in the settings.txt file.
-
(Optional) In the section on the CD Media Boot page, fill in the fields:
Prompt for Configuration When Booting from Diskette: Specifies whether to prompt for these configuration settings when you boot a device with the bootable diskette and CD or DVD. If you leave this option deselected, the device boots using the configuration settings that you make here and you are not able to override the settings during bootup. If you select this option, you are given the chance to change each setting during bootup.
Reboot Manually: Specifies whether you must reboot a device manually after it was booted with the bootable diskette in automatic mode. (If the device was booted with the bootable diskette in manual mode, you must always reboot the device manually.)
If you boot a device with the bootable diskette and you let the bootup process proceed in automatic mode, the imaging engine starts and checks the Preboot server to see if an automatic imaging operation should be performed. If so, it performs the imaging operation on the device and quits. If not, it quits without doing anything. What happens next depends on whether you select this option.
If you leave this option deselected, you are prompted to remove the bootable diskette and press any key to reboot the device automatically to its native operating system. If you select this option, the device doesn’t reboot automatically, but instead displays the Linux bash prompt, allowing you to perform additional imaging-related tasks at the command line. This is helpful if you want to do things like check the current partition information or the image-safe data before rebooting to the native operating system.
ZENworks Partition Size (MB): Specifies the number of megabytes to allocate to the ZENworks partition if you choose to create one locally on a device when you boot the device with the bootable diskette. The default size is 150 MB, which is the smallest you should make the partition. The maximum size allowed is 2048 MB (2 GB).
-
(Optional) In the section on the CD Media Boot page, fill in the fields:
Use DHCP: Specifies to obtain an IP address dynamically through DHCP. Use this option only if DHCP is configured on your network.
For Red Hat Enterprise Linux, using the DHCP option causes a “Could not look up Internet address...” message to be displayed during bootup. This is because zislnx does not know the IP address when DHCP is being used, so the /etc/hosts file contained in the image does not have the new IP address and host name. Simply select the option to continue. Then to prevent this message from displaying each time the device boots, edit the /etc/hosts file on the device and add in its IP address.
Use the Following Static Address Information: Specifies to use a static IP address. If you select this option, fill in the IP address, subnet mask, and gateway to be used.
DNS button: This option is active only if a static IP address for the device is specified.
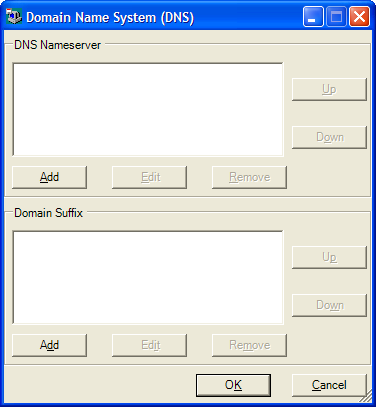
-
DNS Nameserver: You must specify a nameserver if you want to use DNS to connect to servers.
You can specify the addresses of as many DNS nameservers as you want. You can edit or remove the nameserver addresses, or you can move the addresses up and down in the list to specify the order used for contacting them.
-
Domain Suffix: You can also specify as many DNS domain suffixes as you want. The editing, moving, and removal functions are also available for the suffixes.
-
-
(Required) In the section on the CD Media Boot page, specify either the fixed IP address or the full DNS name of Preboot server (where novell-pbserv is running).
This specifies which Preboot server to connect to when you boot a device with the bootable diskette.
Use a DNS name only if it is working on your network and the imaging server has an entry in your DNS server’s name resolution table.
-
Click , browse for where you want to save the settings.txt file, then click .
Saves the configurations made in the section to the settings.txt file in the specified location. The default location is A:\, such as for a bootable diskette (see Creating a Bootable Diskette).
You can save to a different location for use in burning to an imaging CD or DVD.
-
When you are finished using this utility, click .
IMPORTANT:If you manually edit the settings.txt file to provide paths to executables, make sure that you provide the full path, or the executable might not run.
Creating a Bootable Diskette
If you have devices that cannot normally boot a CD or DVD, but has the CD or DVD hardware installed, you can use the ZENworks Imaging Media Creator utility to create a diskette that enables the device to boot from a CD or DVD.
To create a bootable diskette:
-
On a Windows device, browse to the opt/novell/zenworks/zdm/winutils directory on your Linux imaging server and run zmediacreator.exe.
You might need to configure Samba on the Linux server in order for the Windows device to have access to this directory.
The following dialog box is displayed:
-
If you want to modify a settings.txt file that is to be included on this diskette, follow Step 2 through Step 4 in Managing the Settings.txt File, then continue with Step 3 in this section.
-
(Required) In the section on the CD Media Boot tab, specify either the fixed IP address or the full DNS name of Preboot server (where novell-pbserv is running).
This specifies which Preboot server to connect to when you boot a device with the bootable diskette.
Use a DNS name only if it is working on your network and the imaging server has an entry in your DNS server’s name resolution table.
-
Format one high-density diskette, or insert a preformatted blank diskette in the diskette drive of the Windows device.
-
Click .
This creates a bootable diskette that enables a device that cannot otherwise boot from a CD or DVD to boot from the imaging CD or DVD. Any settings.txt configurations made here are included in the copy written to the bootable diskette.
-
After the diskette is created, click .
-
Insert both this diskette and the imaging CD or DVD on the device to be imaged, then boot the device.
The diskette enables the imaging CD or DVD to be booted by the device.
Creating a Preboot Bootable Image
You can create a PXE Linux configuration file that points to a Preboot Bootable Image (PBI) file, which is a raw image of a bootable diskette. This enables you to use PXE to utilize the bootable diskette information from a .pbi file on a TFTP server, instead of booting from the diskette for that Preboot information.
To create a PBI configuration file and then the PBI file:
-
On a Windows device, browse to the opt/novell/zenworks/zdm/winutils directory on your Linux imaging server and run zmediacreator.exe.
You might need to configure Samba on the Linux server in order for the Windows device to have access to this directory.
The following dialog box is displayed after you click the tab:

-
In the section on the Preboot Bootable Image page, fill in the fields:
Kernel Parameters: To use the kernel parameters in the keeppxe option, select the option.
PBI Filename: Specify a filename for the PBI file, including the .pbi filename extension. Do not specify a path here.
TFTP Relative Path: Enter the path for the PBI file, relative to the TFTP server’s default path. This is where the PBI file will be accessed by the device booting with PXE.
Load: Load a previously defined PBI configuration file, which populates the fields on this page with its information. You can edit those settings.
Save: Save the PBI configuration file to a location where you can access it again from this dialog box.
-
To create the PBI file, click and fill in the fields:
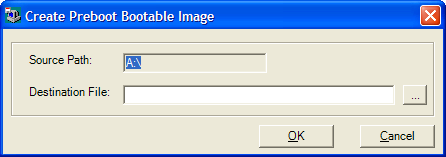
Source Path: Source of the information to be imaged to a PBI file. This is normally a bootable diskette that was created on the tab of this dialog box.
Destination File: Where the PBI file should be written. Browse for the location and type the PBI filename. The .pbi filename extension is automatically added.
-
After the BPI is created, click .
This PBI file can now be used by a PXE-enabled device when booting so you can access Preboot Services functionality as if you were booting the device with the bootable diskette.
29.2.4 Managing ZENworks Partitions
A ZENworks partition is used by a device when booting for automated Preboot Services work when the device does not have PXE available. The following sections explain how to manage ZENworks partitions:
Creating a ZENworks Partition
If you want to set up a device for unattended imaging operations and are unable to use Preboot Services (PXE), you can create a ZENworks partition on the hard disk. If you make the partition large enough, you can even store an image of the device’s hard disk, which can be useful if the device becomes misconfigured or corrupted when the network connection is lost.
WARNING:Installing the ZENworks partition destroys all data on that hard drive. Use this only on devices where you plan to reinstall the operating system and software programs.
To create a ZENworks partition, you must first create an imaging CD or DVD to boot the device from. (If the device cannot boot from a CD or DVD, see Section 29.2.3, Using the ZENworks Imaging Media Creator.) Then, do the following:
-
Boot the device with the imaging CD or DVD, then select from the menu.
This starts the process of creating the ZENworks partition in the first partition slot. It destroys all existing partitions, except an existing ZENworks partition or the Dell or Compaq configuration partitions. By default, the ZENworks partition size is 150 MB.
If the ZENworks partition already exists, it is upgraded, and your existing partitions are left intact.
-
After the ZENworks partition is installed or updated, remove the CD or DVD and press any key to continue.
-
After removing the CD or DVD and reboot the device, install the operating system on the device.
IMPORTANT:During installation of the operating system, you must install the boot loader where the root (/) partition is being installed. In other words, the active partition must be the root partition. You can use fdisk to verify that the active partition is root.
-
To take an image of the device using the ZENworks partition, see Creating an Image Using the Bash Prompt.
-
When the bash prompt is displayed, reboot the device.
The device should boot to Linux. If the bash prompt is displayed again, enter lilo.s and reboot a second time.
Disabling a ZENworks Partition
If you decide to enable PXE on a device, but have previously installed a ZENworks partition on it, you can disable or delete the partition, because it is no longer necessary. For information on deleting the partition, see Removing a ZENworks Partition.
When you boot to Linux using any imaging boot device or method other than booting from the ZENworks partition, you can disable (or enable) the ZENworks partition. Just select the menu option to do so when the Preboot Services Menu is presented.
Removing a ZENworks Partition
Because you should not delete the ZENworks partition if you booted using the partition, you should boot the device from an imaging boot method other than the ZENworks partition.
WARNING:After you have deleted the ZENworks partition, you need to make sure that the image you put on the device was made on a device without a ZENworks partition. Otherwise, the wrong MBR (Master Boot Record) is restored, and the device fails to boot. You should only remove the ZENworks partition if you are going to restore an image that does not have the partition to the device.
The following are ways you can remove a ZENworks partition from a device:
Using an Imaging CD or DVD
If you cannot perform a full restoration at this time, you should consider disabling the ZENworks partition.
To remove a ZENworks partition:
-
Boot the device using the ZENworks 7.2 Linux Management imaging CD or DVD.
-
Select the option.
-
At the bash prompt, enter:
img zenPart remove
-
After the removal is complete, eject the CD or DVD (if you are not going to use it to re-image the device).
-
If you want to restore an image before rebooting, enter the following at the bash prompt:
unset ZENDEVICE
Otherwise, reboot the device when ready.
-
Restore an image or install an operating system.
When the device boots, its ZENworks partition is removed, then the device can be imaged from the CD or DVD without a ZENworks partition.
If the device is assigned to a Preboot Services bundle, it is imaged according to that bundle.
Using a ZENworks Script Bundle
If you are using Preboot Services, but formerly booted from the ZENworks partition on the device, you can delete the ZENworks partition at the same time you put down an image. However, the new image should not contain a ZENworks partition.
For example, you can do the following:
-
In the ZENworks Control Center, create a ZENworks Script bundle.
-
In the field in the Create New Preboot Bundle wizard, enter:
img zenPart remove
-
In the field (after the above command), enter the other commands necessary for the imaging work you want for this device.
For more information, see Section E.0, ZENworks Imaging Engine Commands.
-
On the Summary page of the wizard, click (not ).
-
Reboot the device.
Using Fdisk
You can remove a ZENworks partition by simply using fdisk to reconfigure the device’s hard drive. Then, you can either image the device using a ZENworks imaging CD or DVD, or enable PXE on the device and assign a Preboot bundle to it, then reboot it to use that bundle.