Setting Up Windows Applications
The Novell Single Sign-on system enables you to simplify the user's environment for the following Windows* application types:
- v-GO Predefined Windows Application
This option enables you to use predefined applications as well as to apply administrative options.
- Windows Application
This is the customary application type for Windows applications. Single Sign-on enables you to click-and-drop information into fields.
- Windows Application (Manual Entry)
For some applications, the information that v-GO must use to recognize an application is unusual. This option enables you to manually enter unusual or non-standard settings (for example, multiple logon dialogs, multiple dialogs to change passwords, and unusual dialogs that require special settings).
The following are examples of required unusual information:
- Special keywords, such as UseSendKeys for Windows applications.
- Value pairs to define the application to v-GO.
- When several dialogs might occur for the same event within the application.
Using v-GO Predefined Windows Applications
Importing v-GO Predefined Windows Applications
v-GO for Novell Single Sign-on supports a predefined list of applications (for example, Lotus* Notes*) to save you the effort of defining their recognition characteristics in ConsoleOneTM. If you have licensed the full v-GO for Novell Single Sign-on product and wish to apply Enhanced Protection or other policy settings to these applications, use the Importing v-GO Predefined Windows Application option to create appropriate nssoApplication objects.
Importing the APPLIST.INI file creates an nssoApplication object for each application defined in the file. To import these applications into an existing nssoSingleSignon container, complete the following steps:
-
In ConsoleOne, right-click the nssoSingleSignon object > select Properties.
To create an nssoSingleSignon object, see Creating an NSSO Container Object.
-
Click the v-GO tab > General.
-
At the Import v-GO Application List box, click the Browse button.
-
Navigate to and select the APPLIST.INI file.
APPLIST.INI is in the installation directory (for example, C:\NOVELL\SSO\PASSLOGIX).
-
Import the applications.
To import the applications and exit, click OK. To import and continue to make changes, click Apply.
Only import APPLIST.INI once per nssoSingleSignon object and only if you want to apply Enhanced Protection or other options.
By default, these imported nssoApplication objects are created with the following options enabled:
- Enhanced Protection
- Allow User to Reveal Password
The following figure illustrates a new nssoSingleSignon object that you are creating.
To import the predefined applications while creating a new nssoSingleSignon object, complete Step 3 through Step 5.
Defining New Windows Applications
You can centrally configure applications for v-GO to support. You do this by creating an nssoApplication object within ConsoleOne. The NSSO system then automatically pushes data to all users affected by the object.
v-GO automatically recognizes applications that
- Are defined in the APPLIST file
- You pre-define
When a user encounters a recognized application, v-GO asks the user whether to add this logon. If the user clicks Yes, v-Go opens a one-page interface that asks the user for a username and password. The user enters this information once, and v-GO logs the user in each subsequent time.
If a user wants to add an application that is not pre-defined, v-GO has a full wizard that enables the user to configure the application for subsequent logins.
Creating an nssoApplication Object
-
On your administrative workstation, run v-GO for Novell Single Sign-on and the application that you want to add.
-
With ConsoleOne and the nssoApplication object's property page open, launch the Windows application that you want to add so that its logon dialog box is displayed.
If v-GO prompts you to add the logon, press Cancel before proceeding.
-
Right-click the nssoSingleSignon object.
-
Click New > Object > nssoApplication > OK.
-
Name the object (for example, v-GO Test).
-
(Conditional) Check the Define Additional Properties check box > click OK.
If you check this check box, you go to the nssoApplication object's General page. This page displays settings (for example, the Enhanced Protection option) that are common to all application types.
The following figure illustrates a General page for an nssoApplication object:
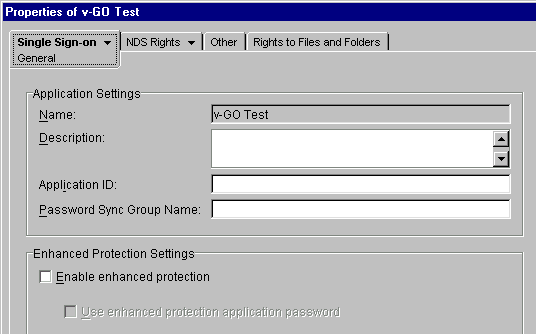
You can complete the following tasks from this General page:
- Describe the application.
- View the ID for Windows applications.
If the Application Type is Windows Application, NSSO automatically provides the ID. Otherwise, the field remains blank.
- Enter a group name that will automatically synchronize passwords to applications in that group.
- Prevent administrators from changing a user's password and then viewing the user's secrets.
- Point to an nssoPasswordPolicy object that can enforce password rules when a user changes a password.
- Allow users to reveal (in v-GO) the password for this application.
- For supported applications, have v-GO generate a password when a password change event is detected.
For details, refer to the help system.
-
(Conditional) Check the Create Another nssoApplication check box.
If you check the Define Additional Properties check box, you cannot create another nssoApplication object until you configure the just-named object.
-
(Optional) Assign an application type.
See Assigning an Application Type.
-
Save the settings.
To save the settings and exit, click OK. To save the settings but continue to make changes, click Apply.
When you save settings, NSSO saves the data to an NSSO object. v-GO later reads this data and saves it to ENTLIST.INI, a text file. For each application that you configure, ENTLIST.INI contains all the information necessary for v-GO to uniquely identify and respond to logon and password change events.
ENTLIST.INI organizes logons hierarchically in sections and subsections.
[*Other Apps]
Section1=GlobalApp
Section2=SMApp |
v-GO declares a specific section for each application type ("Other Apps" for Windows, and Mainframe). When you create and save an nssoApplication object, v-GO also declares a section for that application |
[GlobalApp]
NovEnhancedProtection=0 NovellEnhancedPassword=0
AllowReveal=1
QuietGenerator=0 |
v-GO lists the application and its configuration. When you save settings for an nssoApplication object, v-GO saves that data to ENTLIST.I |
[*Mainframe]
Section1=Sparkz |
|
The default location for ENTLIST.INI is in the WINDOWS directory (for example, C:\WINDOWS\ENTLIST.INI). You can change the location by editing the Windows registry:
HKEY_LOCAL_MACHINE\SOFTWARE\PASSLOGIX\ EXTENSIONS\ACCESSMANAGER\ ENTLIST
If you are unable to view the newly created object, click the nssoSingleSignon object.
Assigning an Application Type
-
In ConsoleOne, right-click the nssoApplication object > select Properties.
-
Click the Single Sign-on tab > Application Type.
In the following figure, note that the Application Type page also has an Application Type field. The Application Type setting changes the data that the ConsoleOne snap-in gathers.

-
At the Application Type drop-down list, click the drop-down list > Windows Application.

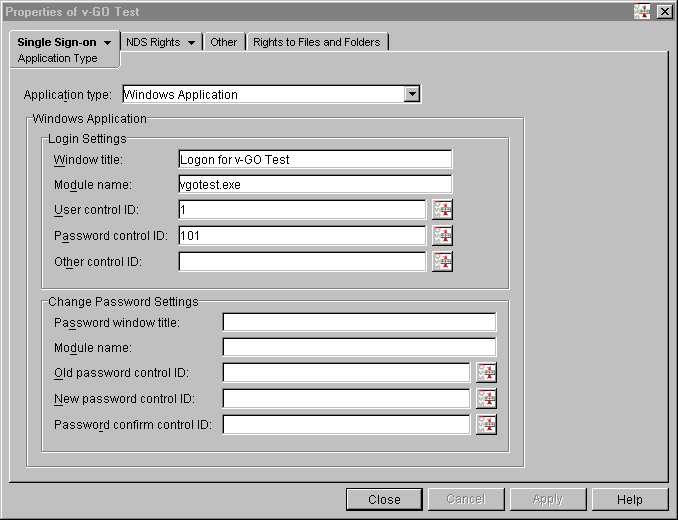
Entering Logon Settings
The following figure illustrates the Logon Settings fields.

If v-GO and the application are running, you can use auto-detection support.
-
Enter a name in the Window Title field.
-
Enter the executable name in the Module Name field.
-
Click the icon next to the User Control ID field > drag that icon to the appropriate input field on the application's logon dialog box.
For example, after clicking the User Control ID icon on the Windows Application screen, drag the icon to the Username field illustrated in the following figure:

-
Repeat this procedure for the Password Control ID and Password fields.
Click one pair of fields at a time. The control ID fields are then filled in for you.
If the application doesn't use the third text box (for Other Control ID), skip that icon.
Some applications do not allow auto-detection. However, if you know the information to enter, you can enter it manually. The following table provides information about the Value fields. For additional details, see Key-Value Pairs for Windows Logons.
Window Title |
Enter the title from the logon window. You can get this information from the title bar in the upper-left corner of the application's window or dialog box. |
Module Name |
Enter the application executable file. |
User Control ID |
Enter a unique decimal number that identifies a user ID field control. |
Password Control ID |
Enter a unique decimal number that identifies a password field control. |
Other Control ID |
(Optional) Enter a unique decimal number that identifies a field control. |
v-GO searches for a specific event. If that event doesn't match information that you enter, v-GO cannot recognize the application. Therefore, if you do not know the information to enter for any field, you must not enter information arbitrarily.
However, you can get needed information by using a Windows spy tool such as Spy++. This tool ships in the Microsoft* Visual Studio development suite. If this tool reports the control IDs in hexadecimal, convert them to decimal values. Enter decimal values in the NSSO ID fields.
If control IDs are unavailable or unnecessary, you can assign the following special values:
An ID or password is not required |
-1 |
An ID or password is required but no control ID is available |
1 |
Entering Password Settings
(Optional) Complete the Change Password Settings fields.
The following figure illustrates settings for the Change Password Settings values.

This step only applies to applications that present change password dialog boxes to the user. To set up this feature, launch the application and start the password change dialog box. As in the previous step, use the auto-detection icons to complete each field that has a match in the application's password change dialog box.
If control IDs are unavailable or unnecessary, you can assign the following special values:
An ID or password is not required |
-1 |
An ID or password is required but no control ID is available |
1 |
For additional details, see Key-Value Pairs for Password Changes.
Saving the Settings
To save the settings and continue making changes, click Apply. To save the settings and exit, click OK.
When you save the settings, the NSSO system regenerates the v-GO configuration data attribute. (This attribute contains data that v-GO needs from the individual application and password policy objects within the nssoSingleSignon container.)
Adding to the Predefined Applications
For applications that aren't widely used, it might be appropriate to let this small number of users rely on v-GO's full Add Logon Wizard. This wizard can both define the application characteristics and collect authentication information.
However, it is usually more efficient for you to define applications once for all users in NDS®. After you define applications, the user just adds a username and password while using the Add Logon Wizard.
You and users can add save logon data for an application by completing the following steps:
-
Run Single Sign-on from the desktop.
-
Click My Logons > Add.
You are now using the Add Logon Wizard.
-
Follow the onscreen prompts and use the help system.
For recognized applications (those in APPLIST.INI and ENTLIST.INI), use the Add Logon Wizard. The first page in the wizard collects the name of the logon and an optional description. The second page collects your username and password. (For information about ENTLIST.INI, see Step 9.)
For unrecognized applications, additional pages collect the application type and identification data.
The Add Logon Wizard saves data to the v-GO store. This saved data is automatically synchronized with SecretStore.
Defining Windows (Manual Entry) Applications
For some applications, the information that v-GO must use to recognize an application is unusual. This Manual Entry option enables you to enter unusual or non-standard settings.
The following are examples of required unusual information:
- Special keywords, such as UseSendKeys for Windows applications
- Value pairs to define the application to v-GO
- When several dialogs might occur for the same event within the application
This section assumes that you have already created an nssoApplication object for the application that you will define.
Assigning a Manual Entry Application Type
-
In ConsoleOne, right-click the nssoApplication object > select Properties.
-
Select the Single Sign-on Application Type property page.
-
Click the Application Type drop-down list >select Windows Application (Manual Entry).
Manually Enter Logon Settings
Basic Logon Information
Each nssoApplication object must contain basic logon information.
[Application Name] |
A unique section name in brackets. You don't enter this heading because the object automatically creates it. |
WindowTitle1= |
The title of the logon window. |
Description |
A label describing this application logon. |
IDCtrl= |
n; a unique number identifying the user ID control; enter -1 if the field is not present. |
PassKeyCtrl= |
A unique number identifying the password field control; enter -1 if the field is not present. |
ModuleName1= |
The application executable file that contains the logon. |
You declare a data element by using a key-value pair. The key is the name of the configuration option and is either a reserved word such as IDField or a reserved word plus an integer, such as Field1 or Field2, when there can be more than one value for an option. The integers must be consecutive. You cannot skip or repeat numbers.
The value is the specific setting of a key for a particular logon configuration. The syntax for section names, key-value pairs, and other INI file settings are generally case-sensitive.
Uniquely Identifying the Logon Window
For v-GO to successfully automate a Windows logon, v-GO must be able to uniquely identify the logon window. v-GO does this by identifying the window title in combination with the name of the running application module or the application name field specified in the Windows registry.
Therefore, each Windows application logon section must contain one of the following key-value pairs:
WindowTitle1=Title of logon window |
WindowTitle1=Title of logon window |
ModuleName1=Application executable file that contains the logon |
AppPathKey1=Application executable file identified in the Windows registry |
-
(Optional) Use v-GO to fill in some information.
v-GO can save you time by entering some information for you in a Windows Application (Manual Entry) screen.
At the Application Type drop-down list, click Windows Application > Apply > Windows Application (Manual Entry).
-
Enter unique information to identify the logon window.
For example, enter the following:
[*v-GO Test]
WindowTitle1=v-GO Test
ModuleName1=vgotest.exe
For additional details concerning key-value pairs, see Key-Value Pairs for Windows Logons.
Entering ID and Password Information
After v-GO identifies the appropriate logon window, v-GO must identify text boxes within that window. These text boxes require the user to input a user ID and password. v-GO uses the internal ID of the relevant text boxes.
Therefore, each Manual Entry text box must contain the following key-value pairs:
- IDCtrl=N; a unique number that identifies the user ID field control
- PassKeyCtrl=N; a unique number that identifies the password field control
For example, enter the following:
[*v-GO Test]
WindowTitle1=v-GO Test
ModuleName1=vgotest.exe
IDCtrl=1001
PassKeyCtrl=1002
If control IDs are unavailable or unnecessary, you can assign the following special values:
An ID or password is not required. |
-1 |
An ID or password is required, but no control ID is available. |
1 |
The user must employ the v-GO Find Control mechanism during the application setup. |
0 |
Using the UseSendKeys Alternative
If no control ID is available, v-GO can use the alternative UseSendKeys mechanism to automate the logon. To enable v-GO SSO to logon using UseSendKeys, include the following line in the text box:
UseSendKeys=1
NOTE: UseSendKeys is applied to all logon and password change controls. Therefore, if UseSendKeys is selected, set IDCtrl, PassKeyCtrl, ChgCtrl2, and ChgCtrl3 to a value of 1.
Manually Entering Password Settings
v-GO uses control IDs to automate password change requests similarly to simple logon requests. To automate password change requests, include the following lines in the Manual Entry text box.
ChangeTitle1=the title of the first password change window
ChgCtrl1=N;a unique number identifying the old password field control
ChgCtrl2=N;a unique number identifying the new password field control
ChgCtrl3=N;a unique number identifying the new password confirm control |
NOTE: You must also include a standard window title key-value pair that identifies each Password Change window. The number of the window title key does not need to match the change title key.
The following illustrates these key-value pairs.
WindowTitle2=the title of the first password change window
ChangeTitle1=the title of the first password change window |
To capture all password change requests, you can include as many titles for password change windows as are necessary.
ChangeTitle1=the title of the first password change window
ChangeTitle<n>=Nth title of the password change window |
If control IDs are unavailable or unnecessary, you can assign the following special values:
An ID or password is not required. |
-1 |
An ID or password is required, but no control ID is available. |
1 |
The user must employ the v-GO Find Control mechanism during application setup. |
0 |
If no control ID is available, see Using the UseSendKeys Alternative.
Saving the Settings
To save the settings, click Apply.
Example: Manual Entry for a Windows Application
v-GO allows you to configure a single logon for multiple applications or multiple versions of an application. You might want to do this, for example, if your organization operates a client-server application with a unique logon where users are accessing the application through multiple clients or multiple versions of a client.
You can support multiple clients by creating parent-child sections. The parent section represents the single logon, whereas the child sections represent the individual logon requests from the varying applications and application windows.
The left column in the following illustrates a text window configured for multiple versions:
[Entrust]
Description=Logon to Entrust
Section1=~Entrust 4.0
Section2=~Entrust 5.0 |
This is a parent section. You don't enter [Entrust] because the object automatically generates it. |
[~Entrust 4.0]
WindowTitle1=Entrust Login -Entrust/Entelligence(TM)
IDCtrl=-1
PassKeyCtrl=7003
ModuleName1=etli40.exe
ParentKey1=Entrust |
This is a parent section. You don't enter [Entrust] because the object automatically generates it. |
~Entrust 4.0]
WindowTitle1=Entrust Login -Entrust/Entelligence(TM)
IDCtrl=-1
PassKeyCtrl=7003
ModuleName1=etli40.exe
ParentKey1=Entrust |
|
[~Entrust 5.0]
WindowTitle1=Entrust Login
IDCtrl=1001
PassKeyCtrl=7003
ModuleName1=etlisrv.exe
ParentKey1=Entrust |
|
Previous | Next