

The following sections outline the procedures that you should follow to provide the greatest opportunity for success in a dual ZfD 3.x and ZfD 4.x network environment. To ensure a successful upgrade, you should perform them in the following order:
Ensure that the workstations and servers on your network meet the necessary prerequisites.
For more information, see Platform Support for the ZfD Infrastructure and User Workstation Requirements in the ZENworks for Desktops 4 Installation Guide.
The following table lists the recommended hardware configuration required for installation.
The following table includes the software required to be installed on the various ZfD 4.x machines.
The following list details other things you need to know regarding the required software for managed workstations.
For more information about these requirements, see User Workstation Requirements in the ZENworks for Desktops 4 Installation Guide.
You need to check the health of your eDirectory tree both before and after you install ZfD 4.x and extend the directory schema with ZfD 4.x attributes. The following resources provide the information required to perform the health check:
The ZfD 4 installation program does not overwrite ZfD 3.2 SP1/SP2/SP3 files because the ZfD 3.2 SP1/SP2/SP3 file dates are later the ZfD 4 file dates. If you want to upgrade from ZfD 3.2 SP1/SP2/SP3 to ZfD 4, you must apply TID 10076066.
The ZfD 4.0.1 installation program does not overwrite ZfD 3.2 SP3 files because the ZfD 3.2 SP3 file dates are later than ZfD 4.0.1 file dates. If you want to upgrade from ZfD 3.2 SP3 to ZfD 4.0.1, you must apply TID 10076066.
The ZfD 4.x installation program extends the eDirectory schema to allow the creation of new types of directory objects. Schema extension is not a reversible process.
The ZfD 4.x installation must be performed from a workstation running a supported version of Windows and the Novell Client. Use the following steps to extend the directory schema in preparation for the ZfD 4.x upgrade from ZfD 3.x:
From the installing workstation, log in to the network, authenticating to eDirectory as a user with administrative rights to the eDirectory tree.
Insert the ZENworks for Desktops Program CD or the ZENworks 6 Desktop Management Program CD into the CD drive of the workstation to autorun the winsetup.exe installation program.
If the CD does not autorun, you can launch winsetup.exe from the root of the CD.
From the installation menu, select Schema Extensions to start the schema extension routine.
In the Select Tree dialog box, select the authenticated tree where you want to extend the schema > click OK.
In the Schema Extensions confirmation dialog box, click Yes to confirm your selection and begin the schema extension.
(Optional) In the ZENworks Schema Extension confirmation dialog box, click View Log File to open the log file.
Perform the eDirectory health check.
ZfD 4.x requires ConsoleOne version 1.3.3 or later. If you have been using an earlier version of ConsoleOne, you need to upgrade. We recommend, however, that before you upgrade to version 1.3.3, you back up the current copy of ConsoleOne with ZfD 3.x snap-ins. You should always have a usable copy of ConsoleOne and ZfD snap-ins available to you.
Use the following steps to perform a ConsoleOne upgrade:
Create a holding directory for a copy of the current installation of ConsoleOne and ZfD 3.x snap-ins. Copy all of the files and subdirectories from the source ConsoleOne location to the holding directory.
Install ConsoleOne 1.3.3 (or later) from the ZENworks for Desktops Companion CD or the ZENworks 6 Companion 1 CD to the path where the existing ConsoleOne resides.
This will result in an upgraded ConsoleOne with functioning ZfD 3.x snap-ins.
Copy the upgraded ConsoleOne and ZfD 3.x snap-ins you created in Step 2 to another location.
Do not copy over ConsoleOne backup you created in Step 1; you might need to have this original version of ConsoleOne available.
Examine eDirectory to see if there are any Search policies in the tree. Search policies---part of the Container Package---are very important because they keep ZfD agents from walking to the root to find policies and configuration information.
If the tree does not have a Search policy, you need to create a new ZfD 4.x Search policy to ensure optimal performance of the ZfD agents. There are some policy behaviors that you need to consider:
Unlike ZfD 3.x agents, ZfD 4.x agents do not recognize the partition boundary of a container. Consequently, if you have any existing Search policies that are based on the partition boundary, the ZfD 4.x agents will search to the container where the Container Package is associated, regardless of whether the agents cross any partition boundaries in search of policies.
For example, assume that you have the following tree:
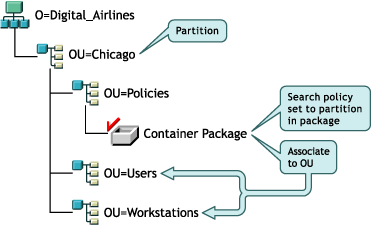
With ZENworks for Desktops 3.x, the agents for the users or workstations would first walk to their parent container and find the associated Search policy that states that the agents should look only to the partition boundary for their policies. When the agents look for policies, they walk the tree only to the Chicago container (partition boundary).
With ZfD 4, the Partition option is not available in the Search Policy. It has been replaced with the Associated Container option. This means that any earlier Search Policies that were upgraded to ZfD 4.x the Partition option is now replaced with the Associated Container option. If you do not plan for this change, a different policy retrieval could result.
If you want to continue receive the same search results as when you used the Partition option as the search boundary, you need to associate the container package (that is, the policy package where the configured Search policy resides) to the eDirectory container that represents the partition boundary where you want user and workstation objects to end their search for policies.
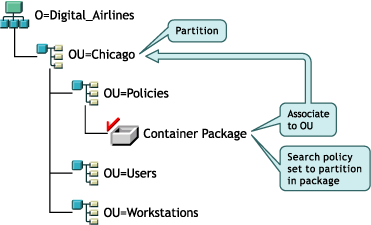
When the ZfD 4.x agents search the tree now, they will find the Container Package with the Search Policy at Chicago, and then will search for policies up to Chicago, because it is the associated container.
NOTE: The container that is associated with the package determines where the agents will stop walking the tree. It is not based on where the package is actually stored in the directory. The search level in the Search policy will now apply to the associated container rather than the partition boundary.
If the Inventory server is running ZENworks for Desktops 3.0 (ZfD 3), you must install ZENworks for Desktops 3 Support Pack 1 (SP1) or ZfD 3.2, and start the Inventory service and the database at least once prior to upgrading the server to ZfD 4.x. For more information on how to install ZfD 3 SP1, see the Novell Support Web site.
Before you upgrade ZfD 3 SP1 or ZfD 3.2 Inventory components, review the following facts:
To upgrade from ZfD 3 SP1 or ZfD 3.2 to ZfD 4.x, perform the following tasks in this sequence:
For a sample upgrade scenario, see Upgrading the Inventory Servers in a Roll-Up Scenario .
Before you upgrade from ZfD 3.x to ZfD 4.x, you need to perform the following tasks:
During the ZfD 4.x Server installation, if you choose to install Sybase and you do not choose to overwrite the database files, the server installation program automatically upgrades the existing ZfD 3 SP1 or ZfD 3.2 database engine and database objects and migrates the data only,
However, if you have a ZfD 3 SP1 or ZfD 3.2 Oracle database object, or if you have manually created Sybase database objects, you must manually migrate the database object using the Inventory Migration tool. For more information, see Manually Migrating the Database Objects .
If you have a ZfD 3 SP1 or a ZfD 3.2 database running Oracle, you must perform the following tasks after the migration:
Shut down the migrated Inventory database.
In inventory_database_installation_path\init.ora_path\init.ora, set the value of db_block_buffers.
The minimum value must be 16384. This allocates 64 MB of database cache for the Inventory database.
If the existing value of db_block_buffers is greater than 16384, do not change the value.
(Optional) If you want to improve the performance of the Inventory database, in the inventory_database_installation_path\_start.sql file, delete the existing entries and add the following entries:
SET ECHO ON
CONNECT INTERNAL
SET ECHO OFF
STARTUP PFILE=inventory_database_installation_path\ path_to_init.ora\init.ora
SET NUMWIDTH 20
SET CHARWIDTH 40
SET ECHO ON
connect mw_dba;
SET ECHO OFF
alter table cim.t$product cache;
SET ECHO ON
connect internal
SET ECHO OFF
@<path to oracle home directory>/rdbms/admin/dbmspool
call sys.dbms_shared_pool.keep('zenworks.zenpin','P');
EXIT
Mount the Inventory database.
For more information on how to improve the performance of the Inventory database, see Performance Tips in the ZENworks for Desktops 4 Administration Guide.
After upgrading the database server, you must upgrade the Inventory server where the database is attached and start the Inventory service. For more information on how to upgrade the ZfD 3 SP1 or ZfD 3.2 Inventory server, see Upgrading the ZfD 3. x Inventory Server to ZfD 4. x .
IMPORTANT: You can upgrade multiple Inventory servers and database servers at the same time by running the ZfD 4.x Server installation program.
However, you must manually migrate the existing ZfD 3 SP1 or ZfD 3.2 Workstation Inventory policy, Database Location policy, and Roll-up policy. If you have manually created the database object, you must also migrate the database object. For more information on how to manually migrate the policies, see Manually Migrating the Database Objects .
When you start the ZfD 4.x Inventory service, the Upgrade Service automatically migrates the ZfD 3 SP1 or ZfD 3.2 database schema and the inventory data to a ZfD 4.x database. The data migration process might take a significant amount of time.
In ConsoleOne with ZfD 4.x Workstation Inventory snap-ins installed, click Tools > ZENworks Inventory > Inventory Migration.
Click Browse to browse for and select the database object to be migrated or the container that has the database object.
If you selected a container in Step 2, do the following:
If you want to search for the database object in all the subcontainers within the selected container, select the Search SubContainers check box.
The Search SubContainers check box is available only if you select a container in Search Context.
Select the Search for Database Objects check box to search for the database objects within the selected container to be migrated.
This option is available only if you select a container in Search Context. By default, this option is selected.
Click Find.
All the ZfD 3 SP1 or ZfD 3.2 database objects that are found within the specified context are displayed in the Report panel.
Click Migrate.
Click Close.
Before you upgrade a ZfD 3.x Inventory server, you need to perform the following tasks:
You can upgrade the ZfD 3 SP1 or ZfD 3.2 Inventory server by installing ZfD 4.x Inventory server if the server where you want to install the ZfD 4.x Inventory server meets the installation requirements. For more information on how to install the ZfD 4.x Inventory server, see Installing the ZfD Server Software in the ZENworks for Desktops 4 Installation Guide. The ZfD 4.x Inventory server supports the same set of roles as ZfD 3 SP1 or ZfD 3.2. Therefore, when you upgrade from ZfD 3 SP1 or ZfD 3.2 to ZfD 4.x, the role of the Inventory server is retained.
IMPORTANT: If you have a ZfD 3 SP1 or ZfD 3.2 Inventory server attached to a ZfD 3 SP1 or ZfD 3.2 database and if you upgrade either the Inventory server or the database to ZfD 4.x, you must upgrade the associated component to ZfD 4.x (the ZfD 3 Inventory services should not interact with ZfD 4.x compliant database and vice versa).
If you have multiple ZfD 3 SP1 or ZfD 3.2 Inventory servers connected to a ZfD 3 SP1 or ZfD 3.2 database server and if you upgrade the database server to ZfD 4.x, you must also upgrade all the associated ZfD 3 SP1 or ZfD 3.2 Inventory servers.
The ZfD 4.x installation program automatically migrates only the ZfD 3 SP1 or ZfD 3.2 Inventory Service object to ZfD 4.x. Before starting the Inventory service, you must manually migrate the existing ZfD 3 SP1 or ZfD 3.2 policies to ZfD 4.x policies using the ZfD Inventory Migration tool. For more information, see Manually Migrating ZfD 3. x Policies to ZfD 4. x Inventory Policies .
After migrating the policies, do the following:
We recommend that you apply the latest patches. For more information on the latest patches, see Novell Support.
We recommend that you to apply the latest patches such as Patch K and TID 2963557, or any support pack. For more information on the latest patches or support packs, see Novell Support.
In ConsoleOne with ZfD 4.x Workstation Inventory snap-ins installed, click Tools > ZENworks Inventory > Inventory Migration.
Click Browse to browse for and select the Inventory Service object or the container that has the Inventory Service object.
If you selected a container in Step 2, do the following:
If you want to search for the Inventory Service object in all the subcontainers within the selected container, select the Search SubContainers check box.
The Search SubContainers check box is available only if you select a container in Search Context.
Select the Search for Policies check box to search for the Inventory policies associated with the Inventory Service object within the selected container.
This option is available only if you select a container in Search Context. By default, this option is selected.
Click Find.
All the ZfD 3 SP1 or ZfD 3.2 Inventory policies that are associated with the Inventory Service object and are found within the specified context are displayed in the Report panel.
Click Migrate.
Click Close.
The following illustration shows a scenario with a mixed installation of ZfD 3.2 and ZfD 3 SP1 Inventory servers with different roles.
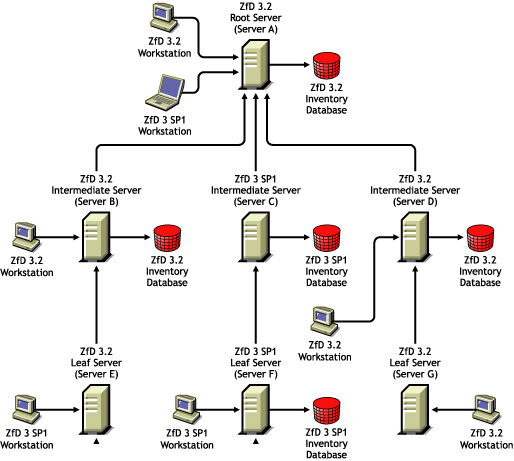
In this inventory tree, ZfD 3.2 and ZfD 3 SP1 Leaf Servers roll up the inventory scan data to ZfD 3.2 or ZfD 3 SP1 Intermediate Servers. The ZfD 3.2 and ZfD 3 SP1 Intermediate Servers roll up the inventory scan data to the Root Server. The Root Server A has ZfD 3.2 and ZfD 3 SP1 workstations directly attached to it.
To upgrade your Inventory servers to ZfD 4.x, proceed in this sequence:
Stop the Sender services running on Intermediate Servers B,C, and D.
In the Workstation Inventory policy, deselect the Enable Scan of Machine option to turn off inventory scanning for all inventoried workstations that send inventory data directly to this Inventory server.
Upgrade the database server associated with Root Server A and the Root Server.
Start the Inventory services.
This will migrate the Inventory database and allow the Inventory database to accept the ZfD 4.x inventory scan data.
Migrate the Inventory policies and the Inventory objects associated with Root Server A.
In the Workstation Inventory policy, select the Enable Scan of Machine option to reactivate inventory scanning for all the inventoried workstations that send inventory data directly to this Inventory server.
(Optional) You can now upgrade all or some workstations attached to Root Server A.
You can upgrade the workstations later.
Apply the authentication patches to the Intermediate Servers (B,C, and D) to enable the Intermediate Servers roll up their inventory scan data to Root Server A.
Start the Sender services on the Intermediate Servers (B,C, and D).
The Leaf Servers (E, F, and G) do not require any changes because they are still receiving the inventory scan data only from ZfD 3 SP1 or ZfD 3.2 workstations and, they are still rolling up the inventory scan data to ZfD 3.2 or ZfD 3 SP1 Inventory servers.
You can now upgrade any of the Intermediate Servers (B, C, or D).
If you choose to upgrade Intermediate Server D, proceed in this sequence:
Ensure that Root Server A, which receives scan data from Intermediate Server D, has been upgraded to ZfD 4.
Stop the Sender service running on the corresponding Leaf Server G.
In the Workstation Inventory policy, deselect the Enable Scan of Machine option to turn off inventory scanning for all inventoried workstations that send inventory data directly to this Inventory server.
Upgrade the database server associated with Intermediate Server D.
Start the Inventory services.
This will migrate the Inventory database and allow the Inventory database to accept the ZfD 4.x inventory scan data.
Migrate the Inventory policies and the Inventory objects associated with Intermediate Server D.
In the Workstation Inventory policy, select the Enable Scan of Machine option to reactivate inventory scanning for all the inventoried workstations that send inventory data directly to this Inventory server.
(Optional) Upgrade some or all workstations attached to the Intermediate Server D.
You can upgrade the workstations later.
Apply the authentication patches to Leaf Server G to enable Leaf Server G to roll up its inventory scan data to Intermediate Server D.
Start the Sender service on Leaf Server G.
Upgrade the other Intermediate Servers (B and C) or Leaf Server G.
You can now upgrade any of the Leaf Servers (E, F, or G).
If you choose to upgrade Leaf Server G, proceed in this sequence:
Ensure that Intermediate Server D, which receives scan data from Leaf Server G, has been upgraded to ZfD 4.
In the Workstation Inventory policy, deselect the Enable Scan of Machine option to turn off inventory scanning for all inventoried workstations that send inventory data directly to this Inventory server.
Upgrade Leaf Server G to ZfD 4.x and start the Inventory services.
Migrate the Inventory policies and the Inventory objects associated with Leaf Server G.
In the Workstation Inventory policy, select the Enable Scan of Machine option to reactivate inventory scanning for all the inventoried workstations that send the inventory data directly to this Inventory server.
(Optional) Upgrade all or some workstations attached to Leaf Server G.
You can upgrade the workstations later.
Upgrade the other Leaf Servers of your inventory tree (E and F).
NOTE: While upgrading Leaf Server F, ensure that you upgrade the database server before upgrading the Inventory server.
In the Workstation Inventory policy attached to this inventory server, deselect the Enable Scan of Machine option to turn off inventory scanning for all inventoried workstations that send inventory data directly to this Inventory server.
Upgrade the database server and the Inventory server to ZfD 4.
Start the Inventory services.
This will migrate the Inventory database and allow the Inventory database to accept ZfD 4.x inventory scan data.
Migrate the Inventory policies and the Inventory objects associated with this inventory server.
In the Workstation Inventory policy, select the Enable Scan of Machine option to reactivate inventory scanning for all the inventoried workstations that send inventory data directly to this Inventory server.
(Optional) Upgrade all or some workstations attached to the Inventory server.
You can upgrade the workstations later.
Stop the Inventory services on all the Intermediate Servers or Leaf Servers that are connected to the Inventory database.
Upgrade the database server.
Upgrade each Intermediate Server or Leaf Server.
If workstations are attached to the Inventory server, you can upgrade the workstations now or later.
When you install ZfD 4.x, you should upgrade your ZfD 3.x Workstation Imaging to benefit from the new ZfD 4.x image compression features.
Use the following steps to upgrade to the ZfD 4.x Workstation Imaging server:
Using the ZENworks for Desktops Program CD or the ZENworks 6 Desktop Management Program CD, run the ZfD 4.x installation program to install Workstation Imaging.
This will upgrade your ZfD 3.x imaging server.
Open each of the existing .zmg files on the imaging server with the imgexp.exe tool and create new, compressed images of these existing files.
NOTE: Because the compression feature was included in ZfD 3.2, this step is necessary only if you are upgrading from ZfD 3.
If you continue to use the Linux partition on your workstations, one of the following events will occur after you upgrade to ZfD 4.x imaging:
Following the automatic updates, all of the workstations with Linux partitions will be running the ZfD 4.x system.
If you decide to move to ZfD 4.x Preboot Services (PXE) to eliminate the Linux partitions on your workstations, use the following steps:
Install ZfD 4.x Preboot Services on a network server.
For installation instructions, see Installing and Setting Up ZENworks for Desktops Preboot Services in the ZENworks for Desktops 4 Preboot Services Installation and Configuration Guide. You can also open this document from the ZENworks for Desktops Program CD or the ZENworks 6 Desktop Management Program CD.
You might need to make some configuration changes to the DHCP server.
Verify that ZfD 4.x Preboot Services is working either through the PXE supplied on your network cards, or through a PXE bootable floppy you generate with pxebuilder.exe.
In ConsoleOne, right-click the ZENworks Imaging Policy in Server Policy Package > click Properties > General > Imaging Partition.
Disable the ZENworks imaging partition.
This procedure will make the Linux partition non-bootable on the workstation hard drive. It will not eliminate the Linux partition.
If you want to eliminate the Linux partition, you need to restore a base image on the workstation and select the option to delete the existing Linux partition in the Image object, which you can reference in the Server Policy package or the Workstation Policy package.
When you first install ZfD 4.x into your eDirectory tree, additional ZfD 4.x policy schemas are placed there. Existing ZfD 3.x policies are automatically migrated into your tree when new ZfD 4.x policies are created. The following tables include information to help you understand how these policies are organized in an updated ZfD 4.x system:
| Tab Name in the Policy Package | ZfD 3.x Policies Included | ZfD 4.x Policies Included | Differences in ZfD 4.x |
|---|---|---|---|
General |
Search Policy |
Search Policy |
Partition option removed. |
The list below includes some things you need to know when you upgrade ZfD 3.x policies:
When you upgrade the ZENworks Server to ZfD 4.x, nalexpld.exe and nal.exe are updated to launch naldesk or nalwin32 from the local directory where the ZfD 4.x Management Agent was installed. This change affects ZENworks 2 and ZfD 3.x workstations using the Novell Client that have not been updated with the ZfD Management Agent.
Until you can update the 3.x workstations, you need to make sure that users are able to access the old Application Launcher. There are solutions for two scenarios:
If your users primarily access the Novell Application Launcher while connected to the network, you might want to continue using the client login script to start the Application Launcher. One way of checking the workstation for updated ZfD 4.x files is to use the exist.exe tool to check c:\program_files\novell\zenworks for the existence of nalwin32.exe or naldesk.exe.
NOTE: The exist.exe tool can be downloaded from the Novell ZENworks Cool Solutions page. Run this tool from a login or application startup script to check for the presence of any file you specify. If the specified file is detected, the .exe returns ERROR_LEVEL of zero (0).
When you have downloaded exist.exe, edit your login scripts to put in a check to run the ZfD 3.x NAL locally, from the server, or to let the ZfD 4.x version run. These lines must be after the sys:\public directory is added to the search path or the exist.exe must have the full path specified. You need to modify the following (or an equivalent) line:
@z:\nalwin32.exe
This is how you need to modify the line:
; First check to see if the ZfD 4.x agent is present. If so, then you don't need
; to do anything; it will be launched automatically on the desktop.
#exist %<windir>\..\Program Files\Novell\Zenworks\naldesk.exe
; If the ZfD 4.x agent is NOT present, then keep checking
if "%ERRORLEVEL"!="0" then
; Check now to see if the ZfD 3.x App Launcher has been placed on the
workstation#exist %<windir>\system32\nalwin32.exe
; If the ZfD 3.x App Launcher has NOT been placed on the workstation then
; go and launch the App Launcher from the server.
if "%ERRORLEVEL"!="0" then
; Check our Windows 95 friends
#exist %<windir>\..\novell\client32\nalwin32.exe
			if "%ERRORLEVEL"!="0" then
				@z:\ZfD32NAL\nalwin32.exe
else
@%<windir>\..\novell\client32\nalwin32.exe
end
else
@%<windir>\system32\nalwin32.exe
end
end
This script change will launch Application Launcher in one of three ways:
The only difference in launching the ZfD 3.x files locally rather than from the server is that if you start the Application Launcher locally, updated ZfD 3.x Application Launcher files on the server are not pushed to the workstation. During a migration period, this is usually not necessary, but if it does become necessary, you can use an Application Launcher /i command line switch in a Policy package to update the local ZfD 3.x Application Launcher files. For more information, see Application Launcher/Explorer Command Line Switches in the ZENworks for Desktops 3.2 Adminstration Guide.
NOTE: If your network environment contains shared workstations, you should edit all of the login scripts at the same time, regardless of when the container, partition, or site is migrated to ZfD 4.x. This will prevent shared workstations from having old Application Launcher files distributed to them.
If your users are often disconnected from the network, you can start the Application Launcher by specifying in the ZfD 4.x Management Agent installation that the Application Launcher or the Application Explorer should be launched from the Startup Folder. Although this is the simplest method, command line parameters cannot be added to the shortcut and users sometimes remove items from the Startup folder.
If you want to specify command line parameters, you can start the Application Launcher by editing the Windows registry and adding NALWIN32 or NALDESK to the HKLM\Software\Microsoft\Windows\CurrentVersion\Run key.
Next, you should prepare your applications to move to ZfD 4.x. With ZfD 4.x, you need to decide if you are going to continue to have the Novell Client installed on your workstations or if you are moving to ZfD feature delivery through the Middle Tier Web interface.
If you are going to continue to use the Novell Client, application objects require no changes in order to function in the new ZfD 4.x environment.
If you plan to deploy the ZfD Management Agent and not use the Novell Client on the workstation, refer to TID 10081393 available from the Novell Support Web site.
Additionally, any MSI applications to be delivered outside the corporate firewall must be marked Forced Cache. The Microsoft MSI installer is not aware of the ZfD Middle Tier Server and cannot properly request applications through the browser; consequently, all of the files must be cached on the local workstation prior to installation.