Composer User's Guide
CHAPTER 3
Novell exteNd Composer is a powerful design environment for creating, testing, debugging, and packaging J2EE-based integration applications. It can run in standalone mode or as a subprocess of exteNd Director. The features and techniques described below are applicable in both running modes.
You can start exteNd Composer in one of the following ways:
From the Windows Start menu, click Programs then Novell exteNd, then Composer.
Open Windows Explorer, navigate to the \exteNd\Composer\bin directory, and doubleclick XC.exe.
Start Composer from exteNd Director using the procedure described below.
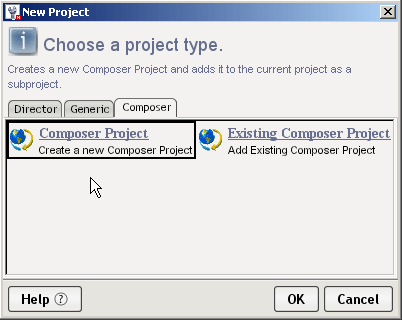
 To launch Composer from Director:
Open an EAR, WAR, or EJB-JAR project in Director, if you have not already done so.
Use Director's File menu to select New > Project. A dialog appears.
Select (single-click) Composer Project if you are creating a new Composer project from scratch. (It will become a subproject of the currently open Director EAR/WAR/EJB-JAR project.) Otherwise, select Existing Composer Project if you are interested in opening an existing Composer project. Again, the project you open will be added, automatically, to your current Director project.
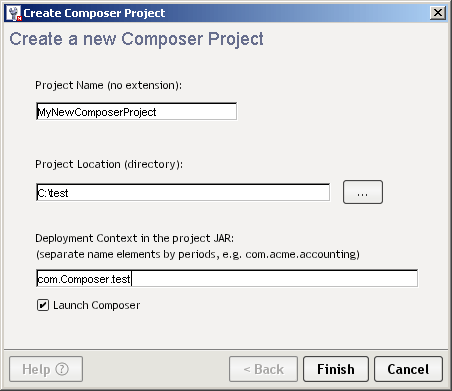
Specify a Project Location. (Use the Browse button, if necessary.)
Specify a Deployment Context for your project. This can be any series of alphanumeric strings separated by periods.
NOTE: Novell strongly recommends, as a best practice, that you include the word Composer in the context string, as shown in the illustration above, so as to provide clear, recognizable namespace separation of Composer deployment artifacts from other artifacts created in other programs.
Check the Launch Composer checkbox. This will ensure that Composer launches when the dialog is closed.
Click Finish. The dialog goes away, while Composer launches and comes to the front.

If you wish to start Composer with a Java Virtual Machine that is different than the one that comes with exteNd, you will need to modify the xconfig.xml file in the exteNd\Composer\Designer\bin directory. Locate the RUNTIME element in xconfig.xml and within it, simply add an element titled "VM" as shown below. The data for the element should contain the path to the java.exe or javaw.exe executable you wish to use.
  <RUNTIME>
     <!-- other entries -->
     <VM>d:\jdk14\jre\bin\java</VM>
  </RUNTIME>
NOTE: When the VM param is added to xconfig.xml and Composer is started, a Java console window remains opens behind Composer. You can use it to view error messages, most of which are the same as those that will show up in the Composer message log.
If you wish to add JVM startup parameters, add an element within RUNTIME called "VM_PARAMS" with the JVM command line options you are interested in. For example:
  <RUNTIME>
     <!-- other entries -->
     <VM>d:\jdk14\jre\bin\java</VM>
     <VM_PARAMS>-Xms256m -Xmx256m</VM_PARAMS>
  </RUNTIME>
The Xms param sets the VM's minimum (initial) heap size. The Xmx parram sets the maximum size to which the heap will be allowed to grow dynamically. (These and other VM params are well-documented by Sun.)
NOTE: Setting the starting heap size to the same value as the maximum allowed heap size has a definite benefit. When the two are unequal (that is, when the JVM is allowed to start with a smaller initial heap size than its final size), the heap expands dynamically, as more runtime memory is required. But expansion is a slow process, and during this heap expansion phase there is frequent garbage collection, heap compaction, etc. Performance will generally be poor until max heap size has been reached.
Exit out of Composer by selecting File > Exit from the main menu, or by typing Alt+F4.
Composer offers a rich design-time environment for creating XML-based B2B integration services. The services you build are deployed to a Java application server (either Novell's, or another J2EE server) and are executed by exteNd Composer Enterprise Server. Composer lets you create, organize, and collect together all of the resources needed (metadata, code, JARs, JSPs, and/or other items) to deploy a web application.
Within Composer, you'll find resource editors (e.g., component editors pertinent to the type of resource in question), a custom script editor, and component editors for creating action models. See the illustration below.
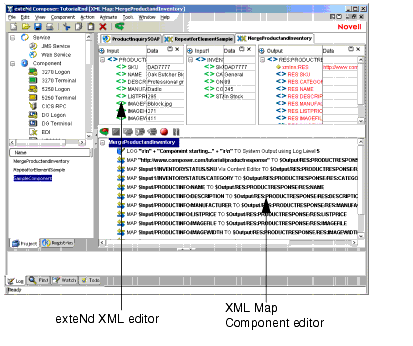
You use Composer component editors to create different types of components that can access various data source and map or transform XML structures and data.
Whether you are using Composer to build a relatively simple XML integration service, or a sophisticated web service, your approach to the building process will most likely follow these basic steps:
Become familiar with the Composer environment (explained in this chapter).
Create a project. A project holds all objects for the application you're building. It is stored with a a file extension of "spf."
NOTE: A single .spf file or project can contain many components and resources of many different types, as well as services that use these resources and components. You can deploy your projects straight from Composer or use the exteNd Director to import them into EAR/WAR files.
Create XML Categories that represent the way you want to organize the sample documents you'll use to build and test your application.
Create Resources (e.g., Connections, Custom Scripts, XSD or WSDL resources, etc.) that you need for the project.
You use the Composer main window to create and organize objects. The individual parts of the window are shown below. (The Navigator Frame has been specially highlighted with a dotted-line box.)
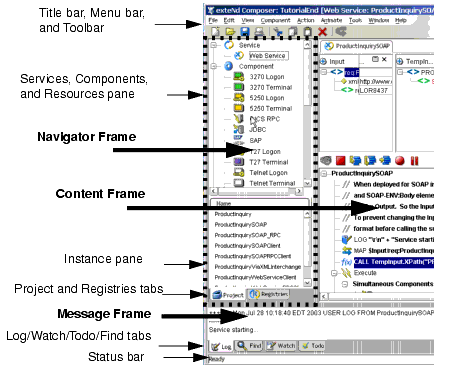
The Composer window, by default, exposes three frames: a Navigation frame (on the left), a Message frame (at bottom), and a Content frame (at right). The size of each frame can be adjusted relative to the others by dragging the separator bars that separate the frames. You can also adjust the size of the main window in the usual ways (maximize, minimize, iconize, and stretch). For maximum flexibility in managing "screen real estate," you can also hide the Navigator and Message frames individually. The Navigator frame's visibility can be toggled using the left/right arrows between the Navigator frame and the Content frame or by pressing Control-Shift-N. The Message frame's visibility can be toggled using the up/down arrows between the Content frame and the Message frame or by pressing Control-Shift-O.
The Navigator frame has two tabs at the bottom: a Project tab, and a Registries tab. The Project tab allows you to view Composer objects in Category (top pane) and Instance (bottom pane) views, as shown above. The Registries tab allows you to search for and display registry entries in UDDI-type registries. For more information on this feature, see Chapter 14.
The Message Frame, at the bottom of the Composer window, has four tabs: a Log tab, a Watch tab, a ToDo tab and a Find tab.
Log - This tab allows you to see error messages and Log Action output in real time during your Composer session, eliminating the need to open a log file manually or check system console messages.
Watch -This tab holds the watch list so that users can examine the data values of their variables during the execution or animation of a Composer Service or Component. Watch is a debugging tool which is explained in more detail in "Adding a Watch Variable" on page 138.
ToDo - This tab contains a tree list of ToDo Action items in your open component or service. To find out more about ToDo actions, refer to the section entitled "The Todo Action" on page 185.
Find - This tab allows you to view search results. See "Searching for xObjects or Text" on page 68 for more information about using the Find command.
The Content Frame (upper right) displays component-editor content, including DOM trees, action model, and Native Environment Pane.
Composer features a multi-document interface (MDI) in which you can have multiple editor windows open (and visible) simultaneously. As shown in the preceding illustrations, by default multiple open windows are shown as a tabbed interface. However, individual windows can be minimized, maximized, and closed, like any other windows. In addition, they can be tiled, cascaded, or arranged arbitrarily by clicking and dragging. You can use the Window commands in the Composer main menubar to control the arrangement of multiple open windows:

In addition, you can hide non-editor panes (such as Composer's Navigator and Message panes) by clicking on the appropriate icons in the upper right corner of the main screen. This is useful when you are working on an Action Model and you have no need to see the Log pane, navigator tree, etc.
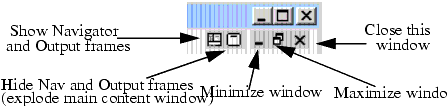
NOTE: The hide/show all panes icons will be visible only when the current editor window has been maximized. But you can always hide or show Navigator and Message panes individually using the commands under the View menu; see discussion below.
Hiding all non-editor panes explodes the current edit window to take up the whole Composer window (except for the toolbar and menus). This is often useful when an action model contains multiple subpanes containing numerous DOMs, or when you are working in the custom script editor and need more "real estate."
The View menu offers additional commands that adjust your Composer main window configuration:
Navigator Tabs is the same as typing Control-Shift-N. This toggles the visibility of the Navigation Frame of the main Composer window.
Output Tabs is the same as typing Control-Shift-O. It toggles the visibility of the Message Frame at the bottom of the window.
Document Tabs is the same as typing Control-Shift-D. It toggles the visibility of the Document Tabs. The documents themselves will still be visible, but the tabs separating them will appear or disappear as you toggle.
You can manipulate objects in Composer using standard Windows menus and toolbars. The following illustration shows the title bar, main menu, and toolbar that appears when you first open Composer.

The title bar displays the name of the current project you have open. A project is a collection of exteNd Composer services that are developed, maintained, and deployed together.
The following menu options are available.
|
Composer Menu Command |
Description |
|---|---|
|
File Menu |
|
|
New |
Used to create new xObjects and Projects. xObjects include: services, components, resources, XML templates, and XML categories. Resources include code tables, code table maps, connections, and custom scripts. See Creating an xObject. Clicking on New followed by xObject brings up a dialog from which you will select the kind of object you wish to create. |
|
Open |
Opens an xObject in the Detail pane. You can also open an object by doubleclicking on it, or by pressing Ctrl-O. See Opening an xObject. |
|
Delete |
Removes an object from the Composer window and deletes all associated files on disk. You can also delete an object by highlighting it and pressing Delete. |
|
Open Project |
Opens an existing project. |
|
Save Project As |
Saves a project under a different file name to a locatio you specify. |
|
Delete Project |
Deletes selected project from disk. |
|
Deploy Project |
Prepares a project for deployment by starting the Deployment Wizard. |
|
Import xObject |
Adds an xObject to your project. See Importing an xObject. |
|
Properties |
Displays the properties of the highlighted object. Properties include the object's header information (name and description) along with information particular to the object type. See Displaying an xObject's Properties. |
|
|
Prints the details of the highlighted object. You can also print an xObject by pressing Ctrl-P. See Printing an xObject's Properties. |
|
Recent |
Displays a list of recently opened xObjects and projects from which you can select to open. |
|
Exit |
Exits the Composer application. If any components are open and have not been saved, you are prompted to save them or ignore the changes. Composer can also be closed by pressing Alt-F4. |
|
Edit Menu |
|
|
Undo |
Deletes the last operation, returning the opened object to the state it was in prior to the operation. The Undo option is only available in a component editor's Action Model pane. See Creating an XML Map Component. |
|
Cut |
Deletes the highlighted object(s) or action(s) from the Composer window and puts them onto the Windows Clipboard. (You can also use Ctrl-X to cut.) |
|
Copy |
Puts a copy of the highlighted object(s) or action(s) onto the Windows Clipboard. (Ctrl-C also copies.) |
|
Paste |
Copies the contents of the Windows Clipboard into the Composer window. (Ctrl-P will also paste.) |
|
Delete |
Removes the highlighted object(s) or action(s) from the Composer window and deletes associated files for objects. (Pressing Delete with an object highlighted will also work.) |
|
Find |
Finds the first instance of a string in an object. The Find option is available whenever you have an xObject open. See also, Find on the Tools menu. |
|
Find Next |
Finds the next instance of the string you entered in the Find Text dialog box. The Find Next option (F3) is available whenever you have an xObject open. |
|
Replace |
Replaces a string with a new string you enter. The Replace option is only available in a component editor's Action Model pane. See Creating an XML Map Component. |
|
View Menu |
|
|
Navigator Tabs |
Toggles the display of the Navigator Frame on the left side of the main Composer window. |
|
Output Tabs |
Toggles the display of the Message Frame at the bottom of the main Composer window. |
|
Document Tabs |
Toggles the display of the tabs at the tops of the component editor pane |
|
XML Documents |
Allows you to modify the display of your XML documents. Sub-headings include: Show/Hide, Collapse All, Expand All, View as Tree/Text/Stylized. |
|
Windows Layout |
Gives you the ability to select the orientation of the various panels used in the component editor |
|
Tools Menu |
The options in this menu change depending upon the object type you select. |
|
Find |
Finds xObjects in the project by name, a string it contains, any XML templates it uses, or where a component is used. |
|
Next Occurence |
Find the next occurence of the last searched for string. (F4 will also search for the next occurence.) |
|
Previous Occurence |
Find the previous occurence of the last searched for string. (You can also use Shift-F4.) |
|
Preferences |
Allows you to customize General, Display, Editing and Designer Settings such as establishing an XML editor and Web browser, setting log file details, and entering proxy server settings. |
|
Project Settings |
Allows you to set project global variables and manage subprojects |
|
Profiles |
Allows you to create, edit and delete Registry Profiles for UDDI, WSIL and ebXML registry types. |
|
Window Menu |
Displays all open windows. |
|
Help Menu |
|
|
Help Topics |
Displays online help for Composer. |
|
Novell on the Web |
Displays a submenu with links to help on the World Wide Web. |
|
My Project |
Displays an HTML help file you create for a project. |
|
About exteNd Composer |
Displays program and version information about Composer. |
In addition to the menu options, the toolbar contains the following buttons:
In addition to the menu and toolbar, the Composer window has a status bar, at the bottom of the window frame, that displays the state of the currently selected object. When the status bar indicates READY, you can perform an operation on the object.
Composer uses icons to represent the different object types. The list below shows the icons and their types.
The main Composer window has a Navigator Frame on the left, which in turn can be used in two different modes depending on which tab you've selected at the bottom. The two tabs that control the modes are labelled Project and Registries.
When the Project tab is selected, the navigation frame contains a "Services, Components, and Resources" pane (top portion) and an "Instance" pane (lower portion).
NOTE: You can adjust the relative sizes of the two panes by dragging the small horizontal divider (between them) up and down.
The contents of the lower pane will change as you select different items in the upper pane. For example, if you click on the Web Service item in the upper pane, the lower pane will be populated with the names of any existing web services in your current project.
The Services, Components, and Resources pane contains the four main categories of objects (also known as xObjects) that you'll create with Composer: Services, Components, Resources, and Templates.
Services represent the high level units of work or business partner transactions that occur on the application server after you have deployed a project to your production system. They are used to combine various components you build to create a logical unit of work within the application server environment. Services are the primary objects within a project that are actually executed by exteNd Composer Enterprise Server. Services are primarily concerned with deployment related issues and can be differentiated by the input they receive (URL parameters or XML documents), the type of object that triggers their execution (Servlets or EJBs) and the output they return (XML or HTML documents).
A component is an object that accepts one or more XML documents as inputs, uses a collection of actions to operate on the inputs and returns an XML document as output. A component is usually called by a service and can contain calls to actions or other components. Components are differentiated by their ability to XML enable external data sources. The basic XML Map component can enable XML aware applications. The JDBC component can XML enable relational database systems via JDBC; the 3270 Terminal component (installed separately by the 3270 Connect) can XML enable mainframe transactions through the 3270 terminal data stream; etc.
Resources are xObjects that perform specialized operations. They are used by services and components to help perform their tasks. Resource types include Code Tables, Code Table Maps, Connections, and Custom Scripts.
An XML template contains the sample documents, definitions, and stylesheets that assist you in designing and testing a component. You'll create XML categories to contain similar XML templates. Next you'll create XML templates, that will be used as the inputs and outputs for the components you build.
You can add an object to one of the four xObject categories using the New option on the File menu. You can remove an object from a category by using the Delete option on the context menu (described below). You cannot remove a main category or add to the main categories in the xObject pane.
Each category has a plus or minus sign. The sign indicates the state of the icon in the tree. If a plus sign appears, you can click it to expand the category to show all child nodes under the category in question. Likewise, if a minus sign appears next to the icon, you can click it to collapse the category, hiding all child nodes.
The top pane has its own context menu, shown next, that can be accessed by clicking the right mouse button inside the pane.

Using the context menu, you can create a new xObject, import an xObject, and paste an xObject that has been copied to the Windows Clipboard. (These topics are addressed separately in other sections.)
The Instance pane lists all user-created objects that belong to a given xObject category. When you click on an icon in the upper pane, its instance objects appear in the lower (Instance) pane.
To change the view of the Detail pane:
Highlight an icon in the Category pane to display its contents.
From the View menu, select a view option. The options are Icons and List. See View Menu.
xObjects in the Detail pane have a context menu, shown below.

Menu items with functionality above and beyond the standard Windows-based functionality (Cut, Copy, Paste, Delete, Print) are explained in the table below:
When you select the Registries tab at the bottom of the Navigator Frame, the frame assumes this appearance:
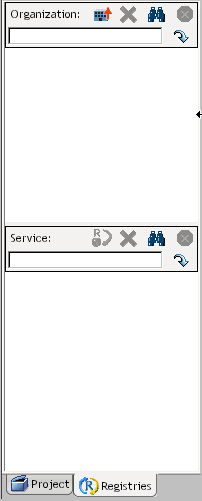
There are two panes, labelled Organization and Service (with an adjustable divider between them). These panes are used for searching and retrieving information contained in UDDI registries. For more information, see Chapter 14.
You can configure Composer in a variety of ways to meet your design-time requirements. The Preferences and Project Settings tabs located under the Tools menu are meant to assist you in customizing your user experience.
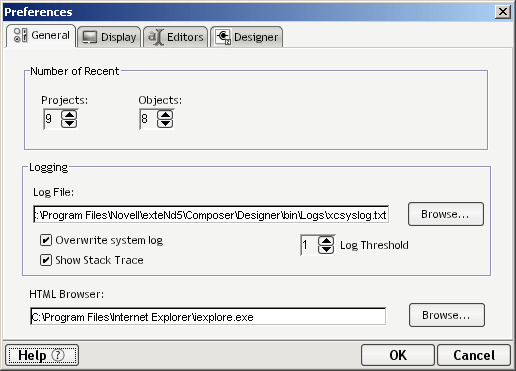
The Preferences dialog (available under the Tools menu) has four tabs: General, Display, Editors and Designer. The function of each tab is described below.
Using the up/down (spin) control, set the Number of Recent Projects to display under File>Recent
Similarly, set the Number of Recent Objects to display under File>Recent
Select a name and location for the System Log File by typing one in or clicking on Browse.
Check Overwrite system log if you want the system log cleared each time you start Composer.
Check Show Stack Trace to turn on the functionality to log the stack traces to the log file.
Set the Log Threshold to a value from 1 to 10. This value is a threshold value that controls which Log actions execute inside a component and which system messages get written out. Only Log actions with a priority setting equal to or greater than this number will execute. (See the"Log Priority Levels" section in the "Basic Actions" chapter, page 161.)
NOTE: Set this value to 10 if you wish to see all system messages (error messages); set it to a lesser value if you want to see only minimal system messages.
Select the executable you wish to use as your HTML browser. This will default to Internet Explorer.
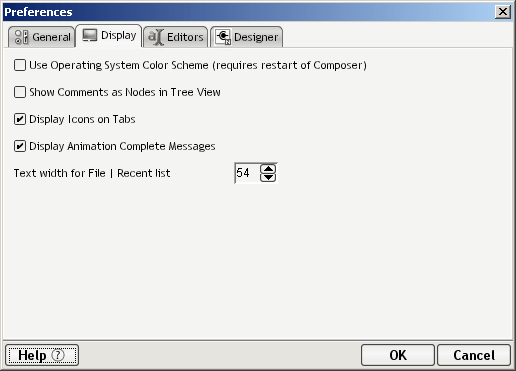
Check Use System Settings if you would like Composer to reflect your default Windows look and feel for colors, menu font sizes, etc. Uncheck to use the standard Composer look and feel.
Check Show Comments in Tree View if you want the be able to see XML comments. Uncheck to hide comments when viewing as a tree.
Check Display Icons on Tabs if you wish to see icons on the Project and Registry tabs. Uncheck to hide the icons.
By default, Display Animation Complete Messages is checked, indicating that "Animation Complete" messages will be displayed. Uncheck if you do not wish to see these messages.
Using the up/down (spin) control, set a number for the Directory Display Length for most Recent. This is used for both recent projects and objects.

Type the fully qualified path of the selected XML Editor or click Browse to locate the application on your disk or network.
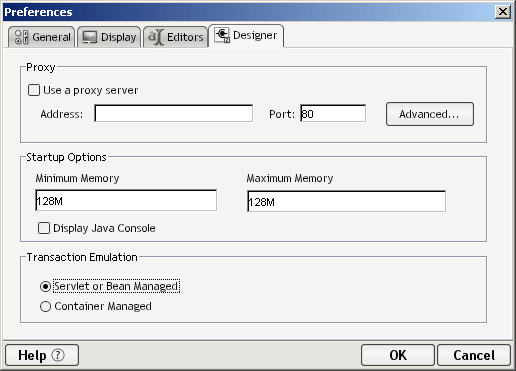
The Use a proxy server check box pertains to the Data Exchange actions during component execution in Composer. If the URL referenced in the action goes through a proxy server, click the Use a proxy server check box, then type in the Address and Port of the proxy server.
Click Advanced to set up Proxy Settings. (These are described in ".Entering Advanced Proxy Settings" below.)
Under Startup Options, you can set a value for Minimum Memory and Maximum Memory to be used on startup.
If you have installed the Novell exteNd Enterprise Edition version of Composer, you will see a group of controls relating to Transaction Emulation. (These controls are not available in the Professional Edition version.) Select the type of Transaction Emulation to use for design-time testing purposes. (This is a design-time setting only. You control runtime transaction behavior via individual actions.) Your choices are:
Servlet or Bean-Managed—Means that transacted action models or code blocks will roll back or commit in accordance with explicit calls made via Transaction Actions.
Container-Managed—Means that transaction scope is managed by the EJB container. If Begin, Commit, or Rollback commands are issued within a component, an IllegalStateException is thrown.
NOTE: See your Composer Enterprise Server Guide for a more detailed explanation of transaction control as it applies to deployed services
If you check Use a proxy server in the Tools>Preferences>Designer dialog box, you can enter advanced proxy settings. These settings establish the connections to HTTP and FTP servers, and allow you to exclude certain addresses from using the proxy server.
To enter advanced proxy settings:

Type an Address and Port for the HTTP and FTP servers. If both are the same, fill them in for one server and check Use the same proxy server for all protocols.
If you will be going to a site that requires NTLM authentication, check the Requires NTLM Authentication checkbox. Then click the Set button. A new dialog will appear:
Enter the appropriate information for UserID, Password, and Domain, then dismiss the dialog by clicking OK.
Type the addresses you do not want using the proxy server(s). Separate the addresses with a pipe character (|).
The Project Settings dialog (available under the Tools menu) has two tabs: Project Variables and Subprojects. The function of both tabs is described below.
You can think of Project Variables as being global variables with project scope. They are stored in their own XML document, which gets deployed with other project resources at deploy time. This tab allows you to specify the names and initial values of any global variables you want to use, with intra-project scope. (These variables will apply in the deployed project as well as at design time.) The variables are actually stored in an XML document at an XPath of $PROJECT/USERCONFIG.
From the Tools menu, select Project Settings. The Project Variables tab is selected by default.
Click the plus-sign icon in the dialog's mini-toolbar to add a variable. Click minus to remove a selected variable.
After adding a new variable, enter its name under Element Name and an initial value under Text Value. (Project variables must have String values.)
In the text field at the bottom of the dialog window, enter a deployment context for your variables. This can be any number of labels separated by periods. (See illustration above.)
NOTE: Do not use Java keywords such as protected, default, int, new, try, etc., in your context string. For the complete list of reserved words, see "Reserved Words" in the appendix.
NOTE: For further information on Project Variables, see Creating Project Variables.
The Subprojects tab of the Project Settings dialog is where you can add or delete subprojects (other Composer-created .spf projects) to your current project.
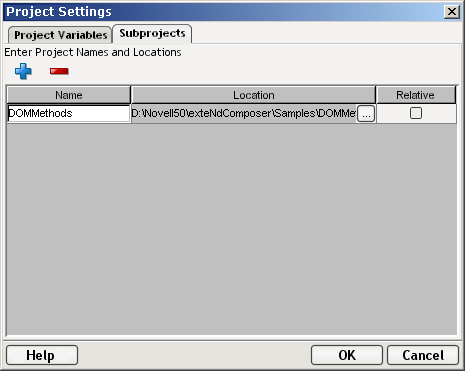
The advantage to importing projects in this way is that it can be done without actually making new copies of all the necessary files. This subject is discussed in detail in Creating and Managing Your Projects. Refer to that section for instructions on using this tab of the Project Settings dialog.
Your modifications to all the Preferences and Project Settings outlined in the foregoing pages are actually stored in two XML files called xconfig.xml and xuserpref.xml, located in Composer's \bin directory. These files can be edited directly, if you want, but in most cases the quickest, most convenient way to make changes to them is to use the Preferences and Project Settings dialogs as described above.
Composer has available several forms of online help to assist you when using the program. All online help can be accessed from the Help menu.
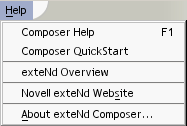
The commands available under this menu are shown below.
NOTE: The first time you call up the help system, you may notice a brief delay while the system is being loaded and cached into memory. This delay will not occur on subsequent accesses of the help system.
Figure 2-1: 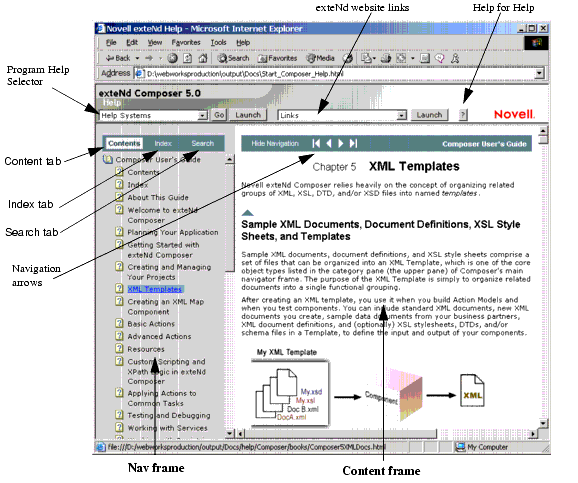 The exteNd Composer Online Help System
You can call for online help at any time by clicking F1. A new free-floating, non-modal window like the one above will appear.
NOTE: If you were in a modal dialog at the time you press F1, you will normally see context-sensitive help in the content pane of the help window.
The content of Composer's online help system comes from the product documentation and basically duplicates the PDF documentation, only in HTML form. The HTML files are organized in your installation directory (Program files\Novell\extend5). To find the HTML files for a particular product's help, go to ...Docs\help\Composer\books\, where you will see all the .html files for each Composer Product. You can view these HTML files with your favorite web browser, if you want. You do not have to use Composer's viewer.
Note that Composer's online help viewer gives you access to all help topics, covering all installed exteNd products (including Composer Connectors), in one consolidated helpset. Aggregated help for the entire installed product is always available, regardless of which exteNd application, which Composer component editor you might be in, which wizard panel you might be using, etc.
If, for example, you were viewing help for the Composer HTML connect and a question arose in your mind about the Application Server, you could simply change your Help System to exteNd Application Server, as shown below:

Composer's help system offers three navigational options, represented by a Contents tab, an Index tab, and a Search tab at the top of the left-hand (navigation) frame. (See graphic, above.)
Select the Contents tab to see a complete listing of all help topics covering all installed Composer products.
The "book" icons represent folders. Click any book icon to expand the tree under that folder level. (The content pane will not show useful content when a book icon is selected. Select a topic beneath the book for detailed content.)
"Page" icons (containing a question mark) represent individual topics for which detailed help is available. Single-click any page icon to see related content in the content frame of the viewer.
NOTE: When focus is in the nav frame, you can traverse topics quickly by using the up-arrow and down-arrow keys. You can also expand a folder (book icon) by hitting the Return key.
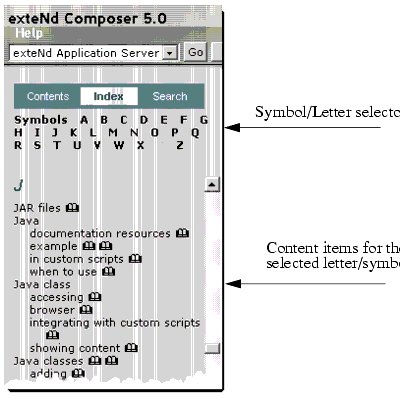
Select the Index tab to populate the nav frame of the help window with an alphabetized index of topics. Single-click any topic in the list to see its content.
Select any symbol or letter from the listing at the top of the frame to see the matching topic references in the index listing. This is usually faster than manually scrolling through each symbol and letter.
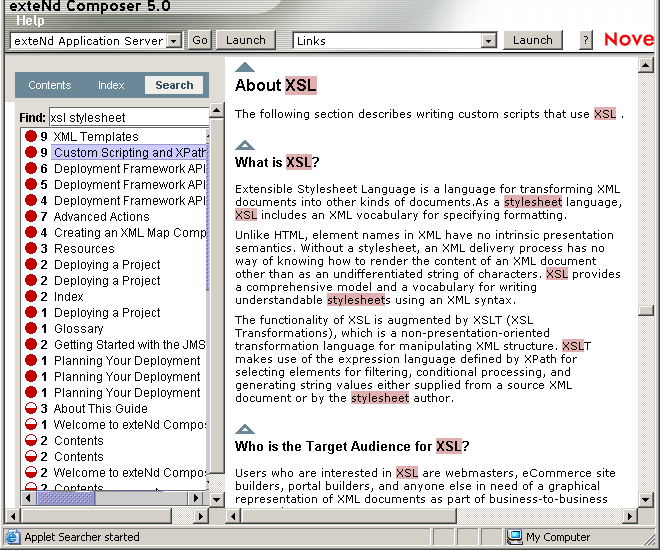
The fulltext search engine uses a natural language search technology where matches returned from Searches are ranked for relevancy using "relaxation rules."
The red circle in the first column of search indicates the relevancy rank, with a completely filled in circle indicating the most relevance and less filled in circles indicating less relevance.
The number next to the circle indicates the number of matches the search engine found for the topic listed in the third column.
The third column displays the names of the topics that contained matches. (See graphic, below.) The ranking and relevance ratings improve when search queries are more complex and contain more information.
Single-click any "hit" in the nav frame to see related content in the content frame. The viewer will automatically scroll any relevant section(s) of text into view; and you will see that "hit words" are highlighted in mauve. See below.
The search engine also uses a word morphing technology to find words with common roots. For example, when the term "build" is included in a search string, matches that contain "built", "builder", "building", and "builds" are returned.
Help likewise performs partial text searches. For example, entering the letter "x" in the Index Find box will locate: examples, execution errors and XML Integration. Help will also find close matches to a whole word so that searching for execute finds "execute" and "executes."
Copyright © 2003 Novell, Inc. All rights reserved. Copyright © 1997, 1998, 1999, 2000, 2001, 2002, 2003 SilverStream Software, LLC. All rights reserved. more ...