Composer User's Guide
CHAPTER 7
Up to this point, you've learned how to create XML templates and an XML Map component that uses templates for inputs and outputs. Now it's time to learn about the actual work that takes place. This is where the action is.
NOTE: This chapter defines the basic actions available within the XML Map component. The next chapter covers more powerful actions and Applying Actions to Common Tasks covers detailed examples of using some of these actions.
An action is similar to a programming statement in that it takes input in the form of parameters and performs specific tasks. For instance, the Send Mail action sends an e-mail when you supply the recipient's e-mail address as one of the parameters.
Before looking at individual actions, you should first understand exteNd's Action Model. You may remember an earlier discussion that a component is a set of instructions for processing XML documents or communicating with non-XML data sources. This set of instructions is called an Action Model. In Composer, an Action Model performs all data mapping, data transformation, and data transfer within components and services.
An Action Model is made up of a list of actions. All actions within an Action Model work together. As an example, the Action Model for a component might read invoice data from a disk, retrieve the e-mail addresses from the invoices, and send e-mail messages to notify the recipients that their invoices were received.
The Action Model mentioned above would be composed of several actions. These actions:
Composer provides actions with the basic XML Map component. These actions are also available for all other component types, such as JDBC Components, JMS Components, etc. Actions are grouped on the Action menu as Basic Actions and Advanced Actions. The following table lists the suite of basic actions available in Composer. The Advanced Actions are described in the next chapter.

There are four methods for creating a new action:
From the Context menu available by right-clicking within the Component Editor
Using keyboard shortcuts (available for the most commonly used actions only, see table above)
In all cases, you must have the component open before you can create an action.
 To create an action using the Action menu:
Click the mouse on (that is, highlight or select) a line in the Action Model just above the place where you want a new action. The new action will be inserted below the line you selected.
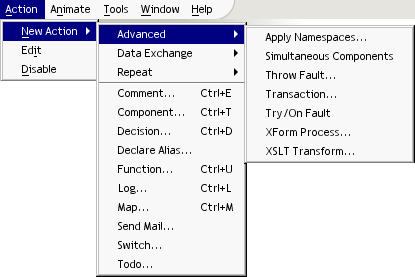
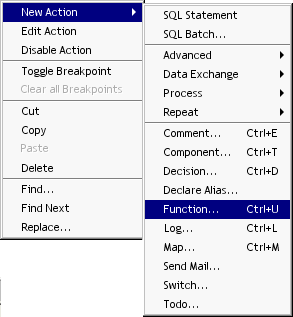
From Composer's Action menu (main menubar), select New Action and then the type of action you wish to create.
If a dialog appears, type or select parameters pertinent to the action, as required. (These are described individually in subsequent topics. See below.) Then dismiss the dialog, as applicable.
To create an action using the Context menu:
Select a line in the Action Model where you want to place the action. The new action will be inserted below the line you select.
To create an action using a shortcut key:
Select a line in the Action Model where you want to place the action. The new action will be inserted below the line you select.
Create your new action by pressing the key combination indicated in the table above. For example, pressing Ctrl-L will add a Log action to your model.
To Cut, Copy, or Paste an action:
Choose Cut, Copy, Paste, or Delete, as appropriate, from the Edit menu in the main menubar, or from the context menu available via right-mouse-click.
Type Control-Z (or choose Undo from the Edit menu) if you want to undo the operation.
In addition to adding actions, you can edit existing actions and disable actions within an Action Model. When you disable an action, it does not execute, but it remains in the Action Model, and you can enable it at a later time.
Alternately, you can select the action in the Action Model pane.
From the Action menu, select Edit. A dialog box for the action type appears.
From the Action menu, select Disable. The action is grayed out.
Repeat steps 1 and 2, selecting Enable, to enable the action again.
The rest of this chapter describes each basic action and gives examples on how to use them.
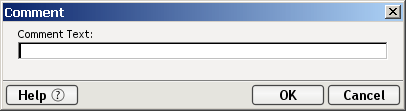
You can use the Comment action to document your Action Model and clarify the processing that takes place. You can add comments anywhere within an Action Model. They perform no processing of their own.
Select a line in the Action Model where you want to place a comment. The new comment is inserted below the line you selected.
From the Action menu, select New Action, then Comment, or press Ctrl-E. The Comment dialog appears.
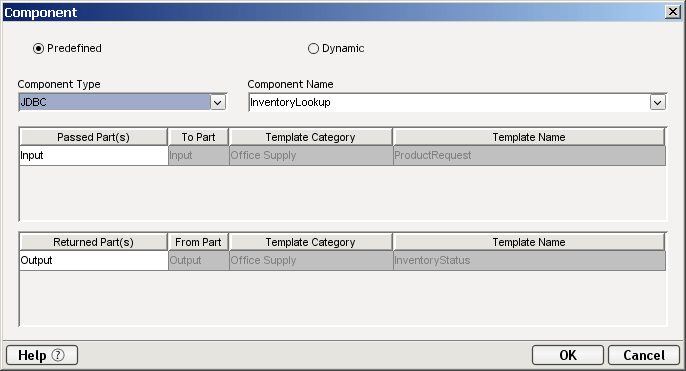
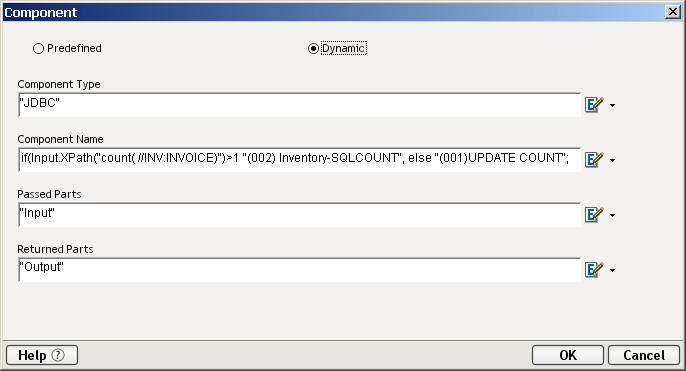
The Component action calls and executes another component or service with runtime inputs and outputs that you specify. You can call any component in your project. To call another component, you must specify four parameters to the action:
The Component Type is simply the category of component you wish to call. The component types do not correspond to those listed in the Composer Category pane under the Component heading. The following strings are valid values and are case sensitive:
depending on whether or not you have the Connect installed that implements that Component Type.
The Component Name is the name of the component you wish to call or target component. The Component Name must be one that exists within the Component Type you select.
The Passed ID are document names within the current component or service. You can specify none, one, or more documents to pass into the target component. The document names you specify here will be passed into the target component as its Input documents.
The Returned ID is the name of a document within the current component or service that will receive the results of the target component. You can use the name of an existing document or force the creation of a new document by specifying a name that does not already exist.
You can specify these parameters in one or two ways: Predefined or Dynamic. A Predefined Component action populates the four parameters with values derived from the current state of the project. Once specified, these values remain fixed for all executions of the action unless you manually change them. A Dynamic Component action populates the four parameters at runtime with values calculated from expressions you create. This allows the Component action's behavior to be flexible and vary based on runtime conditions each time it is executed. One Component action can execute a different component depending on various runtime conditions, or pass in different Input documents, or receive results into different result documents.
To add a Predefined Component action:
Select a line in the Action Model where you want to place a call to a component. The new action is inserted below the line you selected.
From the Action menu, select New Action, then Component, or press Ctrl-T. The Component dialog appears.
Select Predefined, by clicking on the radio button, if it is not already selected.
Select a Component Name to execute (the list of Components is context sensitive to the Component Type selected).
In the Returned ID field, select the source DOM into which the called component will return its Output. If you wish to create a new DOM, you may type the name in the Returned ID field.
To add a Dynamic Component action:
Select a line in the Action Model where you want to place a call to a component. The new action is inserted below the line you selected.
From the Action menu, select New Action, then Component, or press Ctrl-T. The Component dialog appears.
Select Dynamic, by clicking on the radio button, if it is not already selected.
Create an ECMAScript expression that evaluates to one of the following valid Component Types: map, service, JDBC, 3270, 5250, CICSRPC, JMS, HTML
NOTE: A Component Type will only be valid if the Connect implementing that Type is installed in your version of Composer.
Create an ECMAScript expression that evaluates to a valid component or service name in your project.
Create an ECMAScript expression that evaluates to a valid document ID at runtime in the current component or service. This document will be passed to the target component or service as its Input document. If passing more than one document, the expression must evaluate to a single string containing a comma-separated list of document IDs (e.g. Input, Input 1, Temp, MyDoc).
Enter an ECMAScript expression that evaluates to a document ID that will receive the results of the target component.
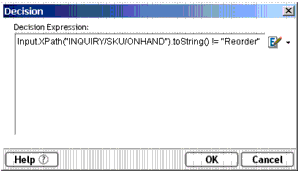
The Decision action creates an if. . . then branching between actions or group of actions. You use a Decision action to select one branch or another, based upon a condition you supply. The condition must use an ECMAScript comparison operator, such as = =, <, >,!, >=, <=, (&), OR (||), or <>. The expression must resolve to the Boolean true or false statement. For instance, you can check to see if an invoice is older than a certain date and send an e-mail if it is.
Select a line in the Action Model where you want to place the Decision action. The new action is inserted below the line you selected.
From the Action menu, select New Action, then Decision, or press Ctrl-D. The Decision dialog appears.
Type the expression using any of the ECMAScript comparison operators or click the Expression Builder button and create a Decision script (ECMAScript expression) that will evaluate to true or false at runtime.
Click OK. The Action Model displays the following Decision action, which tests for the existence of an INVOICE node.
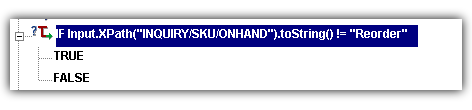
Add one or more actions that will execute if the expression is true. you can, of course, cut/copy actions via drag and drop from outside the true branch to within the true branch.
Add one or more actions that will execute if the expression is false.
You can nest other Decision actions inside the TRUE and/or FALSE branches of the Decision action. The following illustration shows a complete decision in the Action Model pane.

The Declare Alias action allows you to apply your own arbitrary custom label to a given XPath expression (valid within the scope of a given action model). You would use this action to make your action model more readable and save typing.
To add a Declare Alias action:
Select a line in the Action Model where you want to place the Declare Alias action. The new action is inserted below the line you selected.
From the Action menu, select New Action, then Declare Alias. The Declare Alias dialog appears.
If you have chosen the XPath radio button, select a target DOM (representing the document containing the target XPath) from the dropdown menu. Then enter the XPath to the target node in the text field below.
If you have chosen the Expression radio button, type the appropriate ECMAScript representation of the target XPath in the text field, or click the Expression Builder icon (to the right of the text field) and use the Expression Builder pick-lists to build an expression.
In the above example, the Input Part has a node called SHOW_PRODUCT/LIST_PRICE. Rather than type $Input/SHOW_PRODUCT/LIST_PRICE repeatedly throughout the action model, one could, for convenience, assign an alias (an arbitrary name) to the XPath expression. In this case, the alias "aPrice" has been assigned to $Input/SHOW_PRODUCT/LIST_PRICE. From this point on, throughout the action model, one can use "aPrice" instead of $Input/SHOW_PRODUCT/LIST_PRICE. At runtime, the alias will be expanded to the complete XPath.
The Function action executes either an ECMAScript function or a custom script function you have already created in the Custom Script Resource Editor. To manipulate a DOM element, the script you call in the Function action must reference a fully qualified DOM element name in the current component.
Custom Script functions you create and add to an Action Model can act upon any XML tree element. For instance, you can create a function that changes the format of a date element. You can create a function that performs a math function on the contents of an element. You can also perform file system, database, or URL functions that have no interaction with a Message Part. The Function Action can also be used to call Java methods that you have registered in the Custom Script Resources. This gives an ability to visually integrate complex (and simple) Java processing directly onto the Action Model.
Select a line in the Action Model where you want to place the Function action. The new action is inserted below the line you selected.
From the Action menu, select New Action, then Function, or press Ctrl-U. The Function dialog appears.
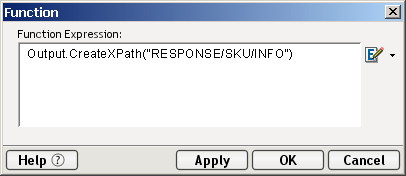
Type the function in the Function Call field or click the Expression Builder button to build an ECMAScript expression (discussed below). Function calls are case sensitive. Also, if the function requires parameters, make sure to include them in the function call.
Click OK. Alternately, you can click on the Apply button to see the affect of the Function action without closing the dialog. This allows you to make repetitive edits to a Function action quickly see the results.
To use the Expression Builder:
Add a new function action as described in the previous section.
Click the Expression Builder button to open the Function Expression Builder dialog.
Doubleclick variables, functions/methods, or operators to insert them into the function. You can also type directly into the function.
NOTE: Make sure the function follows ECMAScript standards or it will not compile or run correctly. It is usually more efficient to create functions within a Custom Script resource and test them before using them. When creating a Function action, you can simply refer to the Custom Script function name and supply it any parameters.
NOTE: Since ECMAScript is an interpreted language, Validate doesn't check any runtime dependent expressions other than to see if they conform to valid ECMAScript syntax.
Log actions are designed to provide customizable reporting capabilities (design-time as well as runtime) for Composer applications. You can exercise fine control over the degree of reporting desired, by the use of Log Level settings (see further below); Log Actions needn't simply be turned "on" or "off."
Some examples of where the Log Action might be used are:
To write out certain error information to the operator console when a Try On Fault condition is reached.
To aid in debugging. (Since Log messages can be constructed as ECMAScript expressions, you can log information about variables or DOM contents whose values are known only at runtime.)
To capture specific information from each cycle of a Repeat for Element loop.
To help create self-reporting components during development.
The Log action writes information to any of various locations external to Composer and exteNd Composer Enterprise Server. The actual locations are specified by the action. There are three locations for log output: System Output, System Log, and User Log (see below).
The System Output option writes out messages you specify in the Log Expression field to the Java Virtual Machine process window at design time or the Application Server console at runtime.
To create a Log message you can write any valid ECMAScript expression or use the Expression Builder to generate a Log Expression. Each message logged is preceded by a Date/Time stamp and the Component doing the logging. These messages also appear in the Message frame of the main Composer window.
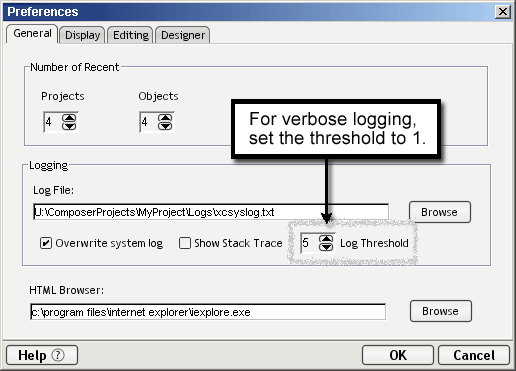
The System Log option writes out messages you specify in the Log Expression field to the filename specified in the <LOGFILE> element of the Composer configuration file: xconfig.xml. You can change the name and location of the log file from the Composer Tools menu by selecting Tools > Preferences from the Composer menubar and going to the General tab.
The User Log option writes out messages you specify in the Log Expression field to a file you specify in the User Log File field of the Log Action dialog (see below).
To create a Log message, you can enter a static string or write any valid ECMAScript expression (or use the Expression Builder to generate a Log Expression). The results of the Log Expression will be written out to the Log as text. Each message logged is preceded by a Date/Time stamp and the Component doing the logging.
To create a User Log File you can also write any valid ECMAScript expression to generate the file name, click the Expression Builder button to use the Expression Builder.
Individual Log Actions can be assigned priority levels (from 1 to 10). At runtime, a Log Action's priority level is compared against a reporting threshold value which you set in the General tab of the Preferences dialog under the Tools menu. Any Log Action whose priority is equal to or greater than the reporting threshold will be executed (that is, its message will be logged to system output or to disk, as appropriate), while Log Actions of lower priority will not have their messages reported.
Priority levels for individual Log Actions can be set in the Log Action dialog. The reporting threshold is set in the General tab of the Preferences dialog (as explained below). Once a threshold value is set, only Log Actions of equal or greater priority will execute. For example, if Log Action A has a priority setting of 4 and Log Action B has a priority of 9, and the threshold setting in the Preferences dialog is 8, then at runtime only Log Action B will execute. Log Action A will be ignored.
NOTE: The reporting level can also be adjusted after deployment of your project, via the exteNd Composer Enterprise Server console screen. Consult your Composer Enterprise Server documentation for details.
To set the reporting threshold for logging:
Go to the Tools menu, then choose Preferences. The Preferences dialog appears.
In the General tab, set the Log Threshold to a value from 1 to 10. The value you set here is a threshold value, which means that only Log Actions with a priority equal to or greater than this value will execute.
From the Action menu, select New Action, then Log, or press Ctrl-L. The Log dialog appears.
In the Log to radio group, choose the location to which you want messages written. (See explanation of locations further above.)
Use the Log Level spin control to select a priority level (1 to 10) for this Log action. The default is 5. In general, you should assign high numbers to messages with high importance. The priority you assign here will be ompared to the threshold number you chose in the last section (see further above). If the priority is equal to or greater than the threshold, the message is logged; otherwise it is not.
Enter a String or ECMAScript expression in the Log Expression text field. (You can use the Expression Builder—accessed by clicking the small icon to the right of the text field—to build an expression via pick-list selections).
Check Clear the Log File if you want the data in the log file to be cleared each time the component is executed.
More information about log files can be found in Viewing System Messages.
The Map action is a DOM-node input/output mapping. It transfers (and optionally, transforms) data from one document context to another document context. A context has two parts. The first part usually identifies a DOM and the second part identifies a location within the DOM. The basic document context in Composer is expressed as a DOM name combined with an element location (referred to as a location) identified through an XPath expression. The DOM name is usually Input, Input1, Input(n), Temp, Output, or any named DOM you have loaded in the component. The XPath expression identifying a location in a DOM has the path elements delimited by "/".
NOTE: A context in Composer can also be a Group name that itself is simply an alias or short-hand for an XPath expression.
When you create a Map action, you can choose between two methods for addressing locations in XML Documents: XPath and ECMAScript. The default choice is XPath, and it is the basic method of addressing.
The primary purpose of XPath is to address or locate parts of an XML document (i.e., elements and attributes). XPath also provides basic facilities for manipulation of strings, numbers and booleans through a simple expression syntax. XPath addresses message Part nodes, including element nodes, attribute nodes and text nodes.
XPath is based on pattern matching. You specify a pattern of element names that resolve to the nodes in the target document. Most of the time, XPath returns a node list containing the particular nodes that match your pattern. (Many XPath expressions return only one node, but it is very common to return multiple nodes.) Other times, XPath can return a primitive value (string, number, or boolean).
In all Composer dialogs that take an XPath expression, you can build the expression with the aid of pick-lists in an Expression Builder. (See "To build an expression using ECMAScript:" further below.)
The complete XPath specification can be seen at http://www.w3.org/TR/xpath.
NOTE: The XPath spec is also available under the \Doc directory of your Composer installation.
The second method to address locations in DOMs is to use ECMAScript with XPath. Choose this method if you wish to go beyond strict XPath addressing. ECMAScript is an object oriented scripting language for manipulating objects in a host environment (i.e., Composer). ECMAScript (ECMA-262 and ISO/IEC 16262) is the standards-based scripting language underpinning both JavaScript (Netscape) and JScript (Microsoft). It is designed to complement and extend existing functionality in a host environment such as Composer's graphical user interface. As a host environment, Composer provides ECMAScript access to various objects (including DOM objects) for processing. ECMAScript in turn provides a Java-like language that can operate on those objects.
Composer's built-in ECMAScript interpreter recognizes a custom Composer method called XPath(). It allows expressions such as:
Input.XPath("Inventory/Books/Engineering")
Construction of this type of expression is greatly facilitated by the user of Composer's Expression Builder facility. (See "To build an expression using ECMAScript:" further below.)
Select a line in the Action Model where you want to place the Map action. The new action is inserted below the line you selected.
From the Action menu, select New Action, then Map, or press Ctrl-M. The Map dialog appears.
The Source type is XPath. Select a Part (Input, Output, or Temp) from the pulldown menu, then type the appropriate XPath expression, locating the element you want.
NOTE: Alternatively, you can click the Expression Builder to have Composer assist you in building the XPath expression. See Using the XPath Expression Builder.
Together, the Part name and XPath specify the Source context for the Map action.
Under Options, in the middle of the dialog, check Content Editor and/or Code Table Map and/or Advanced to exercise finer control over the mapping.
NOTE: More information on the Content Editor and Code Table Map option is available in Transforming Elements. A discussion of Advanced options appears below. Note that you will
Click OK. The Map action appears in the Action Model pane as shown.
NOTE: You can press the Apply button to see the affect of the Map action without closing the dialog. This allows you to make repetitive edits to a Map action and quickly see the results.

When you use the Map action to map elements and attributes within XML Documents, certain default behaviors occur. The following table lists those default behaviors.
Many of these behaviors can be altered, on an action-by-action basis, through the use of options exposed in the Advanced mapping dialog (see next section).
A special situation can arise when an element is populated at runtime by a Java or ECMAScript operation. It's possible that the element might receive data that contains markup—in other words, strings with illegal characters, such as < and >. This presents a mapping challenge, in that if Composer were to merely map the raw contents of such an element, unchanged, to a node in the Output DOM, the output document would be malformed.
Composer resolves this issue by mapping any data that contains markup to a CDATA section created on-the-fly in the target document.
NOTE: A somewhat different behavior applies at design time, when markup is entered by hand. At design time, if you type markup data into a node (via right-mouse-click/Edit Data), the markup characters are entitized on the fly. If you examine the raw XML in Text View, you'll see that any '<' characters entered by hand are converted to < (and so on). The entitized data are then mapped directly to output.
When the Advanced checkbox is checked in the Map Action Dialog, the following dialog appears. Note that the options you set in this dialog affect only the current Map Action; not subsequent ones.
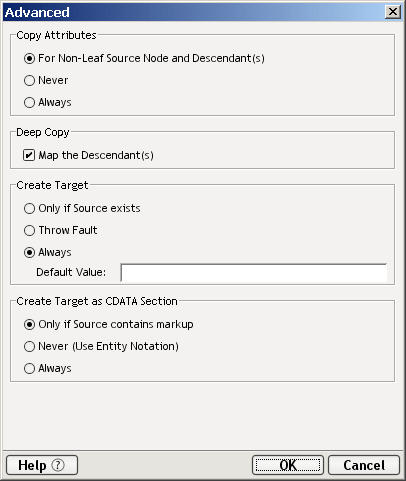
The options in this dialog give you finer control over how input Part nodes are mapped to the output Part.
This grouping of controls allows you to specify how attributes are mapped. Three radio buttons appear under this grouping.
For Non-Leaf Root Nodes and Dependents—This button, checked by default, represents the standard (default) mapping behavior of Composer: When a non-terminal (non-leaf) element is mapped to output, the element—minus its attributes—and its children are mapped to output. Attribute data for the children are included, but not for the original (-parent) element.
Never—This option means no attribute data (whether for parent or leaf nodes) will be carried over during mapping.
Always—All attribute data, for all nodes, will be mapped to output.
By default, Composer maps whole branches at a time (that is, the target node plus all of its children). In some cases, you may want to turn off this "deep copy" behavior so that you can copy just the parent element without its children. Uncheck the checkbox labelled "Map the Dependents" if you want to disable Composer's standard deep-copy behavior.
The Create Target option allows you to optionally create the destination node (or branch) that you specified under Target in the Map Action dialog, based on whether or not the source node (or branch) is present in the source DOM. The default behavior is that Composer always creates the target, whether or not the runtime source DOM contains the node(s) that you specified in the Source XPath for mapping.
For example: In the Map Action dialog, you may have specified a Source XPath that looks like
$Input/Root/MySourceElement
while under Target, you may have specified something like
$Output/Root/MyParentNode/SomeOtherElement
If the arriving Input document doesn't have a node corresponding to Root/MySourceElement, Composer will (by default) nevertheless create an empty Root/MyParentNode/SomeOtherElement node in the output DOM. In some cases, this might not be what you want. Using the radio buttons in the Advanced Mapping dialog, you can change the default behavior.
NOTE: The Create Target options are disabled if Code Table Map was selected in the Map Action dialog.
The options under this radio button grouping are:
Only if Source Exists—This means that the Map Action will simply be skipped (no target nodes created in the output DOM) if the node specified in the Source XPath doesn't exist in the input document.
Raise Error—If the input document doesn't contain the node specified in the Source XPath, it will be considered an error at runtime, if this button is selected. You should plan accordingly by wrapping your Map Action in a Try/OnError block so you can handle the error.
Always—Default behavior. (Target node is always created.) When this button is selected, the nearby Default Value text field becomes enabled so that you can optionally enter a default data value for the target element.
This radio-button group allows you to control the way element data gets mapped into CDATA sections. The options are:
Only if source contains markup—This choice means that if the source data contains XML tags, HTML tags, or other types of markup where "illegal" characters are used, the data will be placed, unmodified, in a CDATA section in the target DOM. This is the default behavior of Composer.
Never—With this option set, source data is guaranteed not to be wrapped in a CDATA section for output. Any illegal characters that occur in the source data will be converted to properly escaped entities, such as > for >, on the output side.
Always—This means that whatever form the source data might take, it will get wrapped in a CDATA section on output.
When you are in the Map Action dialog, you can build your own XPath expressions by choosing the Expression Builder button at the far right of the appropriate text field. The XPath Expression Builder dialog that appears will display pick-lists to help you construct valid XPath syntax in point-and-click fashion. This can be especially handy when you wish to go beyond basic XPath addressing and use some of the more powerful features of XPath.
exteNd Composer uses the XPath addressing syntax adopted by W3C. The XPath syntax is similar to URI address syntax in basic appearance but includes many subtle and powerful features for addressing and manipulating XML. Some of the more common syntax rules are listed in the following table.
The complete list of operators can be seen at http://www.w3.org/TR/XPath.
To build an expression using XPath
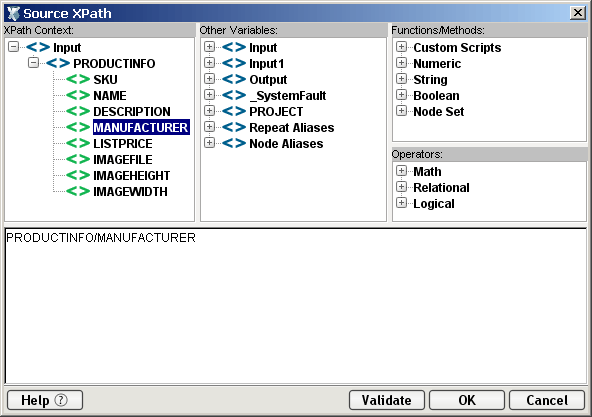
Click the Expression Builder button. The Source XPath dialog displays.
Create an expression by doubleclicking on the items from the panes.
Verify that your expression's syntax is correct (using the Validate button).
When you select the ECMAScript radio button in the Map action, the ECMAScript Expression Builder appears and helps you construct valid ECMAScript syntax. This is desirable when you want to go beyond strict XPath addressing and use some of the more powerful features of Composer's ECMAScript addressing.
The illustration below shows the ECMAScript Expression Builder.

Objects in the pick-lists are ordered with most frequently used objects first. All properties and methods for an object are also ordered. Properties are always listed first alphabetically, followed by all the object's methods alphabetically.
All of the items in the Functions/Methods pick-list and the Operators pick-list have tool tips associated with them. To view a tool tip, simply hover your cursor over the item you'd like to know more about. If you hover your cursor over the items in the Variables pick-list, data associated with that item will be displayed.
NOTE: While you can create complex ECMAScript expressions, they must evaluate to a document context consisting of a DOM and an address within the DOM.
To build an expression using ECMAScript:
Click the Expression Builder button. The Source Expression dialog displays.
Create an expression by doubleclicking on the items from the panes.
Optionally click Validate to verify that your expression's syntax is correct. (This does not execute the expression. The expression is merely parsed.)
The Send Mail action creates and sends e-mail messages dynamically during the execution of a component. When you create a Send Mail action, you specify the various parameters needed in order for Composer to know where and how to send the e-mail. The parameters can be hard-coded or (alternatively) ECMAScript expressions that evaluate at runtime.
Some possible uses of the Send Mail action include:
Sending an "order status" notice to a customer after he or she has placed an order via the web.
Triggering human intervention in a service that requires such intervention as part of normal workflow.
Notifying system administrators (or others) of critical error conditions requiring immediate action. (The mail could even be routed to a pager or other mobile device.)
The e-mail you send with the Send Mail action can have attachments of any arbitrary MIME type. Also, various Send Mail actions can use various mail servers (with or without user name and password).
Although some in-house mail servers might not require a user name or password for outbound mail, many SMTP servers issue an authentication challenge before granting access. If your Send Mail actions will be using a mail server that requires user ID/password authentication, you will need to create a Mail Simple Authentication connection resource. This resource simply stores the network address for the mail server you want to use, along with a user name and password. The resource, once created, can be reused by any number of components and/or services within your project.
It's worth noting that you are not required to create one Mail via SMTP resource for each server (or for each user name and password combo) you intend to use. All parameters in the Mail via SMTP connection resource can be indirected through ECMAScript, so that server names or user credentials (or both) are late-bound— perhaps obtained by lookup from a directory or database, at runtime. Using ECMAScript, you can apply your own business logic to decide which mail server (or which credentials) to use in a given circumstance at runtime.
NOTE: See the discussion at "About Constant vs. Expression Driven Connections" (in the chapter on Resources) for additional information on how ECMAScript can be used for late binding of connection-resource parameter values.
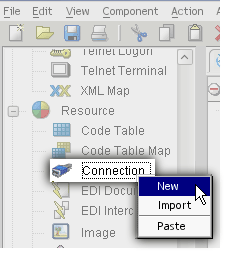
To create a Mail Simple Authentication connection resource:
Under Resource in the navigation (explorer) frame, right-click on Connection and choose New from the context menu as shown below:
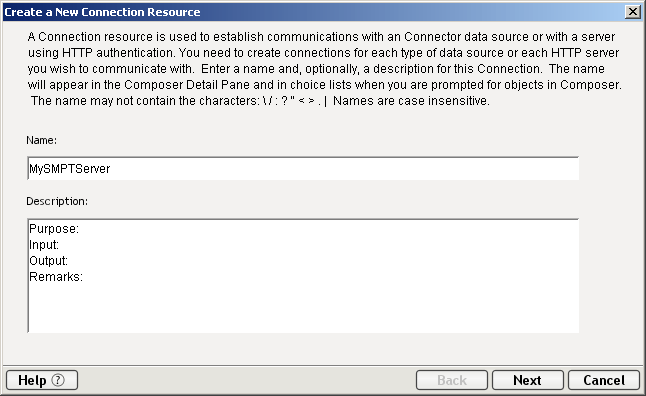
In the wizard pane that appears (see below), enter an arbitrary Name for this connection resource and (optionally) descriptive text.
Click Next. The second (and final) panel of the wizard appears:
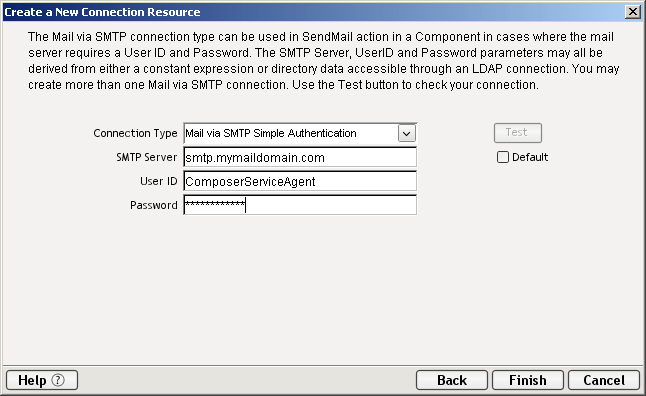
Using the pulldown menu control, select Mail via SMTP Simple Authentication as the Connection Type.
Next to SMTP Server, enter the name or IP address of the mail server you intend to use.
Next to User ID, enter the user name associated with the mail account you wish to use.
Next to Password, enter the password associated with the user account in question.
NOTE: Again, note that any of these parameters may be entered as ECMAScript expressions. See the discussion at "About Constant vs. Expression Driven Connections" (in the chapter on Resources) for additional information on using ECMAScript here.
Select a line in the Action Model where you want to place the Send Mail action. The new action will be inserted below the line you select.
From the Action menu, select New Action, then Send Mail. The Send Mail dialog appears. Note the presence of three tabs: Message, Server, and Attachments.
In the Mail Recipient field, type an ECMAScript expression to specify the e-mail address of a recipient. The expression should evaluate to a string of the general form name@domain.extension. If you are hard-coding a string value, make sure the text is enclosed in quotation marks.
In the Mail Sender field, enter an ECMAScript expression to specify the string you wish to show as the sender's e-mail address. (It can be any arbitrary string; it does not have to be an actual e-mail address.) Again, if you are hard-coding a text value, make sure the text is enclosed in quotation marks.
In the Mail Subject field, type a valid ECMAScript expression to specify the e-mail subject or type a subject line. Again, if you are hard-coding a string, make sure the text is enclosed in quotation marks.
In the Mail Body field, type a valid ECMAScript expression to specify the e-mail body text (or type the body text enclosed in quotation marks).
Under Encoding, specify (using the pulldown menu) the type of encoding your message should use. The default is ASCII.
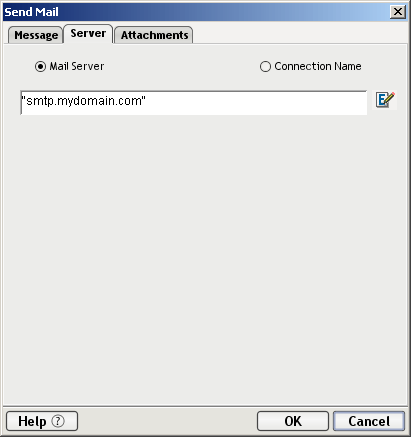
Select (click on) the Server tab. The dialog changes appearance:
Click the Mail Server radio button if you wish to specify an ECMAScript expression that will resolve to your mail server's address (as shown above). Alternatively, click the Connection Name radio button if you wish to use a server that has been specified in a "Mail via SMTP Simple Authentication" connection resource. (See the discussion of this resource type at "Mail via SMTP Simple Authentication" earlier in this section.) You would use the latter option in cases where user authentication (via username and password) is required in order to access the server.
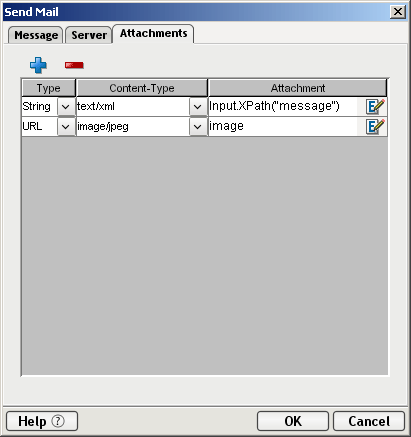
If you want to include attachments with the e-mail, click the Attachments tab. (Otherwise, click OK to return to the component editor.) The dialog changes appearance:
Under Type, specify String or URL (using the pulldown menu control).
Under Content-Type, specify the MIME type of the attachment. You can either choose from the MIME types shown in the dropdown menu, or you can enter your own MIME type in the editable field.
Under Attachment, enter the ECMAScript expression that will serve as the attachment content (if you chose String under Type) or as the URL to the file you wish to send. In the example above, the first attachment is a String consisting of the data associated with the /message node of the component's Input document. The second attachment (a JPEG image) specifies a URL string contained in the previously declared ECMAScript variable named "image." The variable in question could resolve at runtime to something like "file:///d:/server-1/resourcestore/images/stockimage.jpg."
Click OK. A new Send Mail action appears in the action model of your component:
The Switch Action (inspired by the Java and C-language switch statement) is designed to allow your application to branch to the appropriate custom logic based on the value of a particular input variable or XPath expression. The Switch Action is a convenience action that obviates the need for a series of nested Decision Actions. It increases the readability of your action model significantly by eliminating multiple actions and consolidating them into one coherent, easily documented, easy-to-read action.
The Switch Action compares a series of values or choices ("cases")—which may be either static or dynamic—against an input value. If an exact match occurs between the input value and one of the available choices, execution branches to the action(s) listed underneath the choice. Just as with a series of if/else statements, cases are tested in the order listed; and once a match is found, execution of the match logic precludes execution of any other logic in the Switch Action.
The custom logic associated with any Case can consist of a single action or a block of actions; and the actions can include any of the standard (basic or advanced) Composer actions, as well as actions specific to a particular Connect.
Suppose your incoming XML document represents a retail order for goods, and one of the tasks your application must perform is the determination of a shipping method based on the customer's location. The input to the Switch Action might be an XPath expression like:
$Input/Order/Customer/Address/Country
The case values for the Switch Action, and the associated logic for each choice, might look like:
  CASE:"USA"
     CALL shipMethod = (weight < 10) ? "FedEx" : "UPS";
  CASE:"ANGOLA"
     CALL shipMethod = "Air Gemini";
  CASE:"ARGENTINA"
     CALL shipMethod = "International First Services";
  CASE:"AUSTRALIA"
     CALL shipMethod = "Ansett International";
  .
  .
  .
  DEFAULT:
     CALL shipMethod = "UPS";
At runtime, the value of the Input DOM element at Order/Customer/Address/Country will be checked against each successive Case value, starting with "USA," until a match is reached. In this example, if the match occurs at "ANGOLA", the Function Action that assigns "Air Gemini" to the (ECMAScript) variable shipMethod will execute, then the Switch Action will exit immediately, and execution will continue with the first action (if any) following the Switch Action.
NOTE: No explicit Break action need be inserted in any Case action group, because the built-in "fall-through" behavior of Java and C-language case statement is not a feature of Composer's Switch Action. Once a match happens, fall-through to the next Case never occurs.
The foregoing example could be equivalently written as a series of Decision Actions. The pseudo-logic for the chain of Decision Actions would be:
  country = inputValue
  if (country == USA)
     ship via A or B
     else if (country == ANGOLA)
        ship via C
        else if (country == ARGENTINA)
           ship via D
           else if (country == AUSTRALIA)
              ship via E
  [etc]
                 else ship via Default shipper
The Switch construct eliminates the stairstep indentation and repetitive if/else logic that characterize this kind of code. It also results in easier-to-read-and-maintain code. In general, any time you are faced with a long series of conditionals, you should consider using a Switch Action.
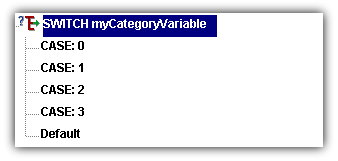
The final "Case" under every Switch action is always labelled Default. This line is generated automatically and cannot be removed. Actions placed under Default are executed if and only if the Switch Action, at runtime, encounters no matching Case in the list of Cases.
NOTE: While you are not required to place actions under Default, it is good programming practice to have at least some kind of fallback logic for the "no match" case, even if it's only a Log action or a Raise Error action.
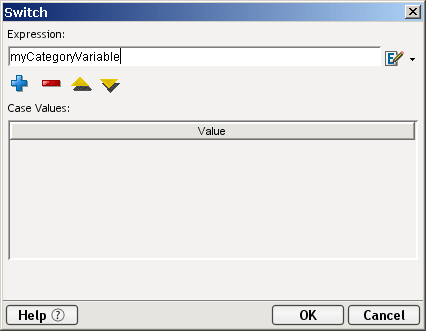
Select a line in the Action Model where you want to place a Switch Action. The new action will be inserted below the line you selected.
From the Action menu, select New Action, then Switch. The Switch Action dialog appears. (The text values in the dialog shown below are not defaults. Values were entered for purposes of illustration only.)
Enter an XPath or ECMAScript expression in the top of the dialog under Expression. This is the input value to the Switch Action.
In the combo box, enter the static string values or the ECMAScript expressions that will be checked against the input value that you specified in the previous step. Remember that at runtime, each Case value will be checked in turn, in the order you list them. (Tip: For optimal performance, list the most likely matches first.)
NOTE: New Case entries are, by default, added to the end of the existing list. But you can change the order of the choices by highlighting a given choice and clicking the Up and Down buttons as need be.
Click OK. The dialog goes away and the new Switch Action appears in your action model. See example below.
Once you have added a Switch Action to your action model, you will see a list of Case values. To associate your own custom logic with a given Case, click on the Case, then add new actions one at a time as needed, by clicking the right mouse button and choosing New Action from the context menu. Your Actions block can contain any number of actions (of any type).
To add custom case-handling logic:
In the action model, find the Case to which you want to add processing logic.
Right-click to bring up the context menu. Select New Action and pick from any of the actions available on the submenus.
Repeat the previous step as needed to add additional actions.
The primary tool for editing Switch Actions is the Switch Action dialog, which allows you to edit the input expression, reorder Cases, edit Case expressions, and add or delete Case values. To access this dialog, just doubleclick on any Switch Action within an action model.
Only a limited amount of editing can be done from the action model itself (without opening the settings dialog). The following limitations apply:
Cut, Copy, Delete, and Paste operations on the Switch Action (top line) itself result in the entire Switch block, including all matches and associated Action lists, to be cut, copied, etc.
You can Cut or Delete a Case value that has been selected in the action model, but you cannot add a new Case value (by pasting).
A Cut or Delete operation will cut/delete not only the Case itself but all associated actions.
Developing Web Services and XML-integration applications can be a very complex undertaking. Composer provides the ability for you to maintain a Todo list to help you organize and manage the many tasks associated with application development.
Select a line in the Action Model after which you want to place your Todo list. The list item will be inserted below the line you selected.
From the Action menu, select New Action, then Todo. The Todo dialog appears.
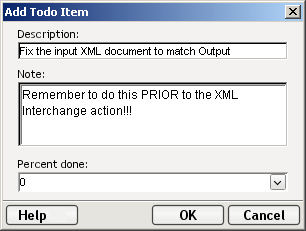
Enter a Description for the item that will be displayed in your Todo list.
If desired, enter a Note containing additional information. This text displays as part of the item's tool tip when the mouse pointer is over the item.
Use the down arrow to select a Percent Done value for your task, or leave it at 0. As tasks near completion, you should edit this action item and update the percentage complete.
Todo Lists are not only available within components. They can also be associated directly with a project.
To add a Todo list outside of a component:
Click on the Todo tab in the Message Frame (see "Navigation, Message, and Content Frames" on page 29.
Right-click with your mouse and select Add Item to add a new Todo list item. Create the item as indicated above.
Once it has been added to your component or project, you will be able to track the progress of the Todo Item using the Todo tab on the Message Frame.
When viewing items in the Todo tab, you will be able to see at a glance how far along you are in your list:
Todo items can be managed either from the Action Model or by right clicking on them in the Todo tab of the Message frame. Items can be edited, added and deleted and re-grouped in the list using the Indent and Outdent menu selections.

Copyright © 2003 Novell, Inc. All rights reserved. Copyright © 1997, 1998, 1999, 2000, 2001, 2002, 2003 SilverStream Software, LLC. All rights reserved. more ...