JMS Connect User's Guide
CHAPTER 6
JMS defines a mechanism, called the MessageListener object, whereby message consumers can be asynchronously notified whenever a message has been published to a queue or topic. This gives a receiving application the ability to treat incoming messages as events: Instead of the application having to go out and pull messages off a topic, messages are—in effect—pushed toward the application by the queue or topic manager.
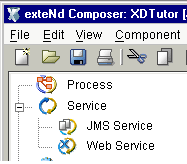
To take advantage of this capability, the JMS Connect introduces a new type of exteNd Composer xObject called the JMS Service (which appears as a category under Service in the main Composer window).

Like other exteNd services, the JMS Service can call external Components, perform XML Interchange actions, carry out Log actions, execute Function actions, etc. (See "Creating a Service" in the Composer User's Guide.) But the JMS Service differs from other services in a number of important ways:
The JMS Service is triggered by an incoming message (from a queue or topic).
To assure proper processing of the incoming message, the JMS Service must contain one (and only one) Receive Message action.
NOTE: With exteNd version 2.7 and subsequent, you can put Send Message actions inside a JMS Service, so that a listener can reply to incoming messages directly (instead of having to call another component).
It's important to note that JMS Components do not, in general, need to be packaged inside JMS Services. The distinguishing characteristic of a JMS Service is not its content but its triggering mechanism. The JMS Service is designed to be triggered by the arrival of a message at a queue or topic. Services that are designed to be triggered from HTTP servlets should be created as Web Services, even if they use JMS Components. See "Creating a Service" in the most recent edition of the Composer User's Guide.
A useful capability offered by the JMS Connector is the ability to deploy a JMS Service with multiple listeners. This makes it possible to have multiple instances of the same JMS Service running at the same time.
Creating a multiple-listener service is merely a matter of designing a JMS Service and deploying it using the same deployment wizard that you normally use. The JMS Service panel of the deployment wizard now has a Count field (see graphic in the section titled "Deployment of the JMS Service" further below) in which you can specify the number of listeners you want to deploy. Once deployed, the listeners can be administered from an HTML-based console window (see discussion further below under "How Do I Manage Deployed JMS Services?").
The JMS Service is created much like any other service. Before creating a JMS Service, however, you should already have created a JMS Connection resource for the queue or topic from which your service will be receiving messages. (See "Creating a JMS Connection Resource" for more information.) If you omit this step, you will see an error message similar to the one below:
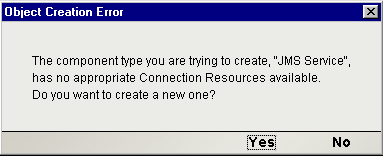
Click Yes in this dialog if you wish to create a new JMS Connection resource on the fly.
The following discussion assumes that you have already created a connection resource for use with your JMS Service.
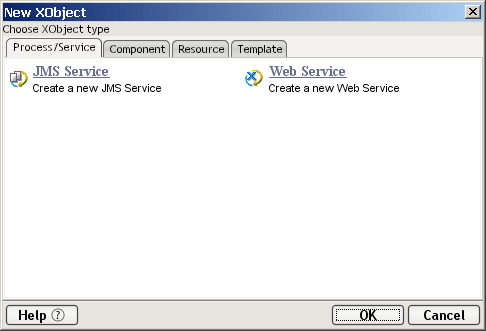
From Composer's main menu, select File, then New>xObject, then open the Process/Service tab and select JMS Service.
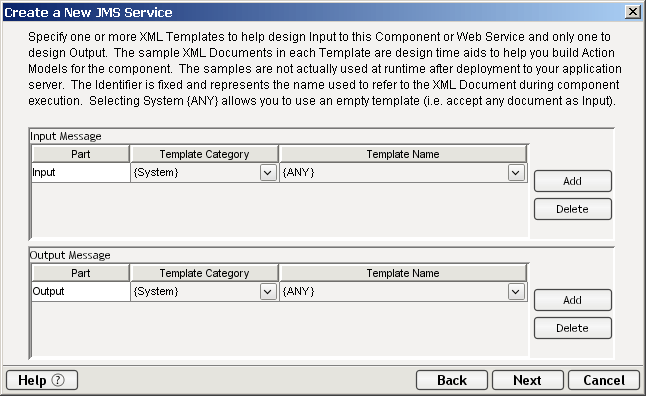
I n the first panel of the "Create a New JMS Service Component" wizard, type the Name you want the service to have and (optionally) Description information.
Specify the Input and Output templates as follows.
Type in a name for the template under Part if you wish the name to appear in the DOM as something other than "Input".
Select a Template Category if it is different than the default category.
Select a Template Name from the list of XML templates in the selected Template Category.
To add additional input XML templates, click Add and choose a Template Category and Template Name for each.
To remove an input XML template, select an entry and click Delete.
Select an XML template for use as an Output Part using the same steps outlined above.
NOTE: You can specify an input or output XML template that contains no structure by selecting {System}{ANY} as the Input or Output template. For more information, see "Creating an Output Part without Using a Template" in the User's Guide.
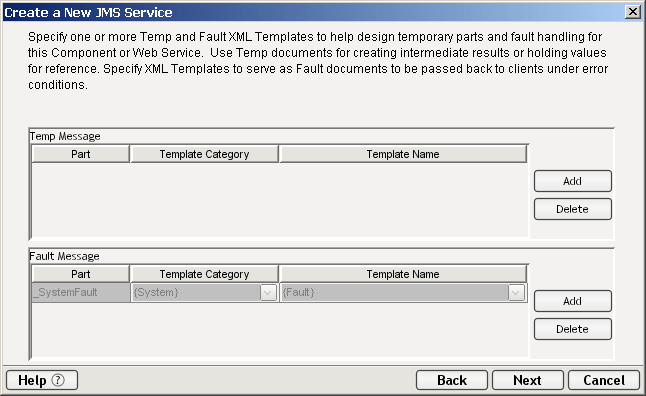
Click Next. The XML Temp/Fault Template Info panel of the New HP3000 Terminal Component Wizard appears.
If desired, specify a template to be used as a scratchpad under the "Temp Message" pane of the dialog window. This can be useful if you need a place to hold values that will only be used temporarily during the execution of your component or are for reference only. Specify the templates as indicated in Step 6 above.
Under the "Fault Message" pane, select an XML template to be used to pass back to clients when an error condition occurs.
As above, to add additional temp or fault XML templates, click Add and choose a Template Category and Template Name for each. Repeat as many times as desired. To remove an XML template, select an entry and click Delete.
Select a Connection from available queues and/or topics shown in the pulldown menu.
NOTE: Fields underneath the Connection menu will be greyed out (disabled). If you need to change the information displayed in any of these fields, you can do so by opening the appropriate Connection Resource from Composer's main window (after first dismissing this dialog).
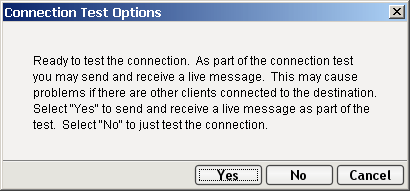
Click Test to see if your connection is successful. The Test Options dialog appears.
The Test Options dialog asks if you want to send a live message as part of the test of the connection's integrity. Clicking the Yes button causes Composer to send a live message (of type TextMessage, with a unique CorrelationID) to the queue or topic for which you're establishing a connection.
NOTE: Use care not to send this test message in a production environment (i.e., using a live queue, with potentially many listeners) unless you are reasonably certain that any existing applications in that environment won't be adversely affected.
Click No if you wish to create the necessary connection objects but not send any test message.
Click Finish. The JMS Service component is created and the Service Editor window appears.
A project containing JMS Service objects is deployed the same way as any other project, using the same Deployment Wizard. See the chapter called "Deploying a Project" in your exteNd Composer Enterprise Server User's Guide for step-by-step instructions on how to deploy a project.
The only part of the Deployment Wizard that is different for users of the JMS Connect is that the wizard includes a special panel as shown below.
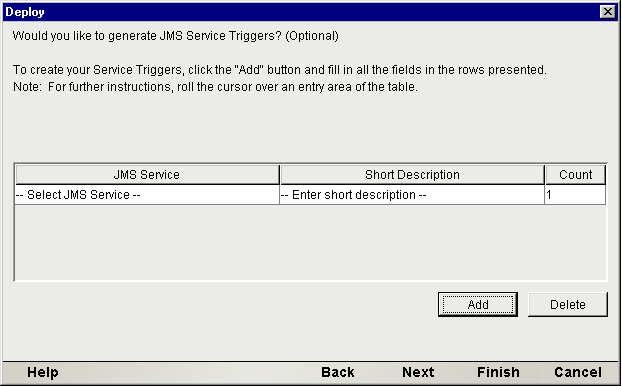
The purpose of this panel is to allow you to create a MessageListener object for each JMS Service that you wish to deploy, automatically associating each service with the onMessage() handler of the appropriate listener object. (At deployment time, listeners are registered with the JMS queue or topic connections specified in your respective JMS Service components.)
 To create a JMS Service Trigger
Click the Add button in the above panel. A new row appears in the inset pane.
Click in the space where it says "-- Select JMS Service --". A pulldown menu appears, listing the names of all available JMS Service objects in your project.
Under "Short Description," enter the plain-text descriptive info you would like to associate with this JMS Service.
NOTE: This field cannot be left blank.
Under "Count," enter the number of listeners you would like to associate with this service. The default value is one.
Repeat the above procedure as many times as necessary to add new JMS Services to the deployment.
The listener objects for each JMS Service in your project will now exist on the server. If you are using the Novell application server, there is no need to restart the server; listener objects are active as soon as deployment is complete.
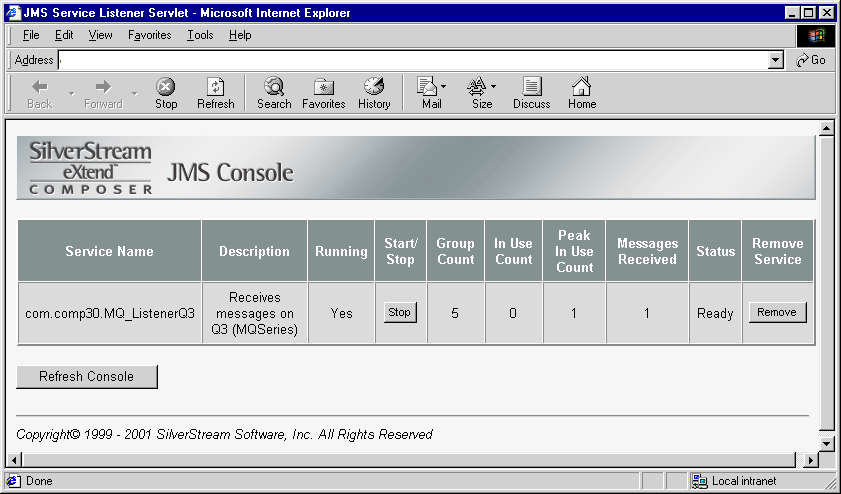
Once a project containing JMS Services has been deployed, the MessageListener objects for the various services will be actively listening for messages each time you (re)start your server. To start/stop these services individually, or to remove them from the server altogether, you need to gain access to the exteNd JMS Services Console. This browser-based console will allow you to see a list of JMS Services (along with the descriptive info you supplied in the deployment wizard), the status of each service (active or inactive), the running tally (Count) of messages received, and other administrative information. You will also see buttons labeled Start/Stop and Remove (one per service).
To gain access to the exteNd JMS Services Console
Launch your web browser and go to
http://[hostname]/extendComposer/jmsConsole
where [hostname] is the name (and :port) of your server; for example, "localhost:80."
The console window appears, listing any JMS Services that have been deployed.
To stop a JMS Service, hit the appropriate Stop button. (The button will then change to Start.)
NOTE: If messages are in the process of being handled by a service at the time of the Stop command, there may be some delay before the service actually exits. Hit the Refresh button periodically until the "Running" column of the console says No for the service(s) in question. The exact amount of latency you can expect when stopping a service is impossible to predict, since it depends on traffic conditions and vendor-specific JMS implementation details. You should consult your provider's documentation for information that may be helpful in suspending execution of a pub/sub topic.
To remove a JMS Service permanently, hit the appropriate Remove button.
Note that if a message is waiting on a queue or topic, hitting Start on the console page (to reinitiate a service) will cause the service's onMessage() method to be called immediately, but the Count field of the console (which normally displays a running total of messages received) will not update automatically. To make the Count display correctly, hit the browser's Refresh button after Starting a service.
Copyright © 2003 Novell, Inc. All rights reserved. Copyright © 1997, 1998, 1999, 2000, 2001, 2002, 2003 SilverStream Software, LLC. All rights reserved. more ...