JMS Connect User's Guide
CHAPTER 5
The primary purpose of the JMS Connector is to allow you to leverage the power of Message Oriented Middleware (MOM) in your exteNd services, making possible many types of interactions between front- and back-end portions of a business application. To fully exploit this capability requires that you understand, in some detail, the ways in which messages can convey various forms of content via JMS Components. This chapter explains the process of putting messages to work.
In this chapter, you will learn:
How to employ Message Filters (JMS Selectors) to receive or browse messages selectively, based on application-defined criteria
How to use exteNd's JMS-related ECMAScript extensions to manipulate message data
Before reading this chapter, you should have already read "Getting Started with the JMS Component Editor" beginning on page 23, "Creating a JMS Component" on page 39, and "Creating JMS Actions" on page 47; and you should already be familiar with exteNd Composer, as well as the concept of Map actions.
When you click on the Message Header tab in the Native Environment pane, a tree view of the JMS header is displayed:
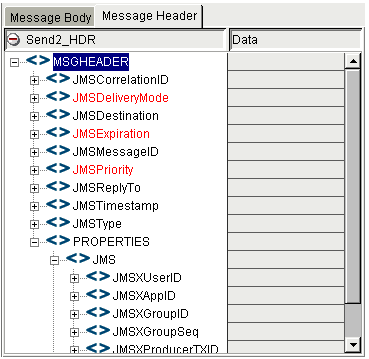
This header (which contains property info as well as JMS-defined header fields) constitutes a unique DOM for mapping purposes. In the example shown above, the header DOM has been named Send_HDR. (This name was set in the message action setup dialog; see page 57.) The Send_HDR DOM can serve as a target for mapping data into the message header. It can also serve as the data source for mapping to elements of an output DOM.
Because JMS defines a number of preexisting fields, a message-header DOM tree is associated with all messages (and appears automatically in the Native Environment pane whenever you select the Message Header tab); hence, you can use the drag-and-drop technique to map data from any portion of any input DOM straight into the message header (subject to the limitations outlined below), or in the opposite direction. Simply click on an input node, in any visible DOM pane, and drag over to the desired spot in the message header, then release the mouse button. The appropriate Map action is added to the Action Model automatically.

 Most JMS-defined header fields are read-only (or intended for use by the JMS provider) and therefore unavailable for use as drop targets. Only JMSCorrelationID and JMSType are intended to be mapped into by drag-and-drop. (If you attempt to drag an item into any other fields, you will see the "forbidden drag operation" symbol shown at left, along with the warning "Write-restricted drop target" in the status line of the component editor window.) JMSReplyTo is writable, but only through Send Options in the Send dialog (see discussion below). For more information about JMS header fieldsand their meanings, see Appendix C.
The JMSCorrelationID field is intended to serve as a tracking or control field for use by applications. A typical use of JMSCorrelationID is to serve as an identification string for request/response purposes. For instance, in the example shown further below (see "Actions Unique to the JMS Component Editor"beginning on page 48), the sending app may want to identify the business transaction represented by the current message with an unambiguous tracking number that may have significance for nonrepudiation. Using a Function action, one could assign a unique value, at runtime, to the JMSCorrelationID field consisting of the current ECMAScript date in milliseconds, plus the BOOKBUYER/NAME value (from the Input1 DOM), separated by a hyphen:
(Number(new Date)).toString() + '-' + Input1.XPath("BOOKBUYER/NAME")
At runtime, this will cause a value similar to '976128839742-Ingram' to appear in the outgoing message's JMSCorrelationID header field. A receiving application could take note of this value and place it in its outgoing messages. In this way, individual elements of a distributed application are able to identify this customer order as a unique order and operate on it in coherent fashion.
NOTE: JMS specifies that application-assigned JMSCorrelationID values must not begin with `ID:', since that prefix is reserved for the use of JMS providers.
The JMSType field can hold any string. A typical use of JMSType on outgoing messages is to hold sentinel values that receiving apps (pointing at the same queue) can inspect for filtering purposes. Depending on the nature of the application, you might choose to map this value from an input DOM, use a Code Table, base the value on an ECMAScript expression, hard-code a particular value, etc.
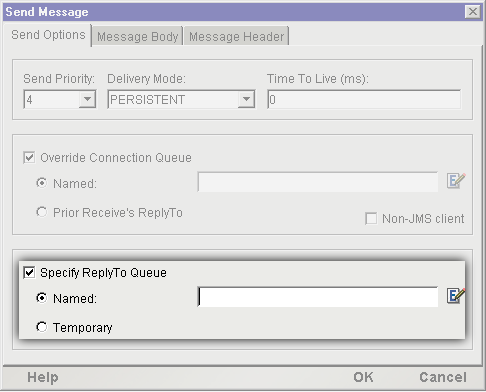
The JMSReplyTo field is writable, but not through drag-and-drop or direct editring. To put a "return address" value in this field, use the Send Options tab in the Send Message dialog (as explained in the previous chapter). In the Send Options tab, there is a checkbox called Specify ReplyTo Queue/Topic. When this checkbox is checked, you can enter a queue name (in quotes) in the associated text field, or specify an ECMAScript expression that will evaluate to a queue name at runtime.
Any custom properties that you defined when creating the message action will appear automatically in the Message Header DOM tree. You can map data to these properties in any of the usual ways: drag-and-drop, ECMAScript, etc.
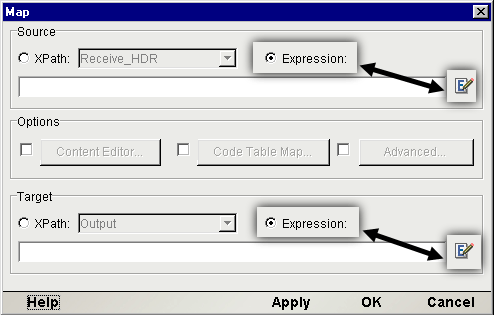
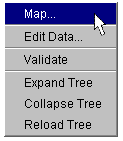
In the example further below, we have a custom property called SKU_PREFIX. Suppose we'd like to map a portion of the Input DOM's PRODUCT/SKU data into this item: in particular we want just the first portion of the SKU, up to (but not including) the first hyphen. One way to accomplish this would be to highlight the SKU_PREFIX node of the Message Header tree, then do a right-mouse-click and select Map . . . in order to bring up the Map dialog window.

Under Source, we've clicked the Expression radio button and entered an ECMAScript expression of:
String(Input.XPath('PRODUCT/SKU')).split('-')[0]
Here, we use the String object's split() method to split the SKU string at every hyphen. The split() method returns an array, the zeroth member of which is the first substring, up to the first occurrence of the delimiter (in this case, the hyphen). Hence, this expression, when applied to the string "ISBN-0596000162", returns "ISBN."
A receiving application, perhaps tailored to handle just messages with a SKU_PREFIX value of "ISBN," could selectively pull messages of this type from a queue, ignoring all others. Filtering of this sort is done with Message Selectors.
All user-defined Properties are read/write-enabled, which means that they can serve as drop targets for drag-and-drop mapping. The only restriction on this involves attempts to map incompatible data types. For example, if you attempt to drag a String value to a Property that has been defined as an Integer value, you will see the "invalid drag operation" icon as well as a status message (in the lower left corner of the component editor window) of "Invalid drag value for drop target: INTEGER." This is true for all header-field drag-and-drop operations: exteNd Composer will perform automatic type-checking during drag operations and prevent you from violating type constraints.
A common use of messaging is to send an XML document (or documents) to a queue. For example, orders taken in real time over the web might be handed off to a back-end fulfillment system via a message queue. The back-end application could retrieve orders on a fixed schedule or by polling or listening for orders as they arrive.
In the following example, a publishing company is receiving book orders via the web from wholesales and distributors. The requirement is for a JMS component that can take information from two XML sources (one representing customer-submitted information and the other representing product information obtained via a database lookup) and transform the information into a new XML document, which will ultimately be sent to a message queue.
First, a Send Message action is created using the XML message type (as described in the previous chapter; see "Creating JMS Actions").
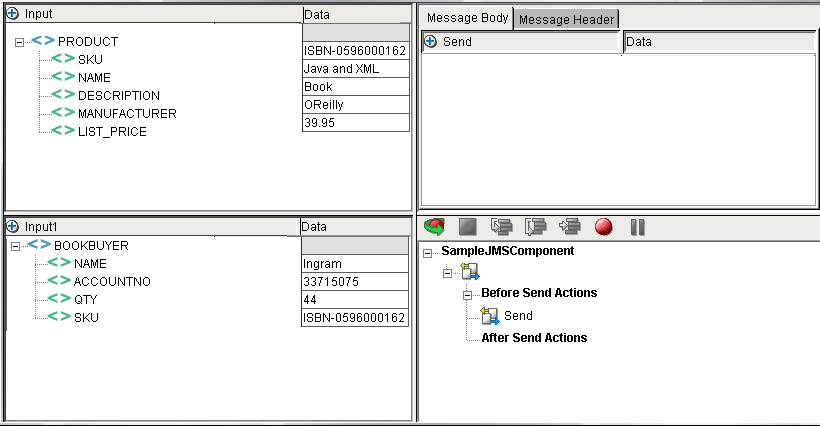
With the Message Body tab of the Native Environment pane selected, the body of the message is initially empty.
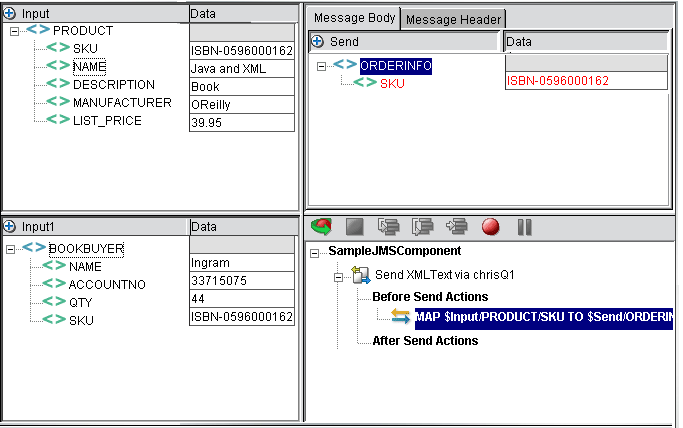
Notice that this particular component uses two input DOMs: Input (containing product information) and Input1 (containing customer information). These DOMs could originate in many ways. The Input DOM might represent data pulled from a database via a JDBC Component. Information in the Input1 DOM could be customer information that arrived via the web (or via a message that was processed by another JMS Component).
NOTE: In this example, an Output DOM is not shown, because the Message Body will contain this component's output. (Display of the default Output DOM has been suppressed using View > Window Layout > XML Layout.)
On certain occasions, you may want to map an entire XML document into a message body; in other cases, you might just want to map a portion of an XML document into a message body. We will discuss each case in turn.
With the Message Body tab selected in the Native Environment Pane, right-mouse-click inside the empty Body area to bring up a context menu; then select Map from the menu.
The standard XML Map Action dialog will appear:
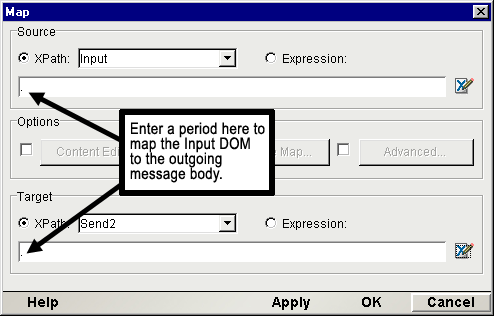
The default source DOM will be Input. (Use the pulldown menu to select another DOM, if you do not want to use Input.) Inside the Source text field of the Map dialog, enter a period (.), signifying that you want to map the entire source DOM to the target.
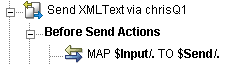
The default target will be Send (or whatever the name of the outgoing message is, as specified when the Send action was created). In the text field under Send, enter a period. Dismiss the dialog. You should now see a Map action in your action model that looks like:
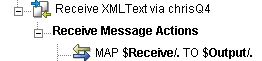
You can also map all of a message from Receive to Output as part of a Receive action using the same procedure. The result of this would be:
To map a portion of an XML document into the Message Body, start by doing a right-mouse-click inside the empty area of the Native Environment pane (with the Message Body tab selected). This brings up a contextual menu.
Select the Map . . . command. This will bring up the Map dialog.
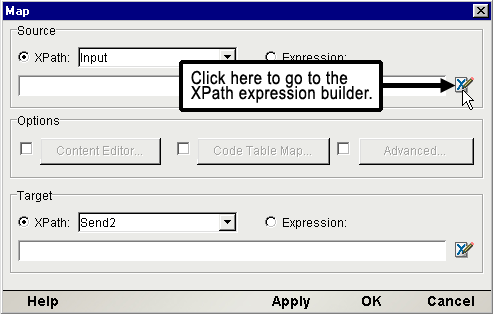
In the Map dialog, Input is shown as the default Source DOM and Send is shown as the default Target. (You can choose different Source and Target DOMs using the pulldown menus.) If you know the XPath fragment that you want to use as the source, type it in the box provided; otherwise, click on the blue Expression Editor icon at right. Clicking the Expression Editor icon brings up the Expression Editor dialog for the Source XPath.
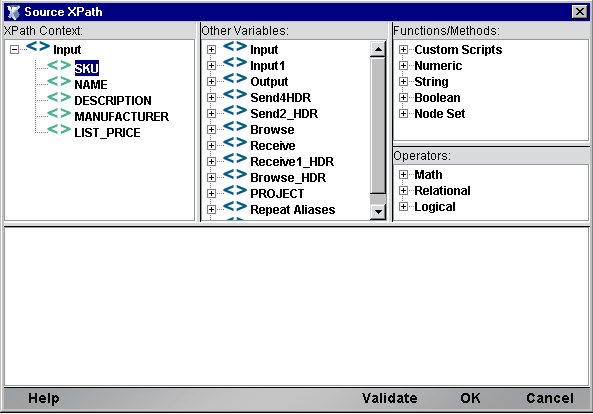
With the aid of the pick lists in the top portion of this dialog, you can build an XPath fragment and/or an ECMAScript expression simply by pointing and clicking. In this case, we've expanded the tree view of the Input DOM (in the upper left) to show the complete Input tree structure. Doubleclicking the SKU item in the tree causes PRODUCT/SKU (i.e., the XPath fragment for that portion of the tree) to appear automatically in the lower portion of the dialog. When we click OK, the XPath information appears in the appropriate place in the Map dialog.
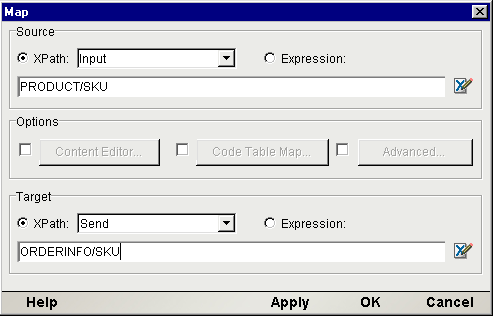
To cause PRODUCT/SKU information to be mapped from Input to an XPath location of ORDERINFO/SKU in the message body, we type ORDERINFO/SKU in the Target portion of the Map dialog:
When we click OK, the map dialog disappears and we're able to see the result of our mapping in the JMS Component Editor main window:
This procedure can be repeated as many times as necessary to populate the message body with data. Alternatively, you can use Function actions (in conjunction with ECMAScript DOM methods) to create XML nodes in the message body programmatically.
One of the most powerful features of the JMS Connect is its ability to send, receive, and browse messages whose payloads consist of COBOL copybooks. Being able to use copybooks in messages allows the application Composer to leverage a wide range of legacy system interactions in exteNd services. This is especially true when the CICS RPC Connect is used in conjunction with the JMS Connect. For example, a copybook received as a message in a JMS Component can be transformed in accordance with business needs and used as the input to an RPC session, all within the same service.
When you create a Send Message, Receive Message, or Browse Messages action and you specify "Copybook (JMS Bytes)" in the pulldown menu for Message Type, the bottom portion of the setup dialog (under Body Information Setup) will contain fields that allow you to associate a copybook with the message action.
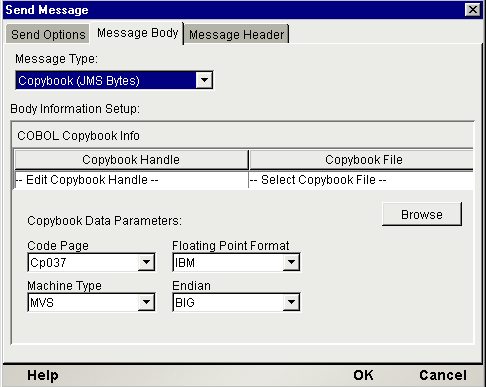
Under Copybook Handle, you can type an arbitrary text string that identifies the copybook for mapping purposes in the JMS Component editor.
The copybook's file name should show under Copybook File. If it does not, click the nearby Browse button and find the copybook you wish to use; its name will then appear in the Copybook File area.
Under Copybook Data Parameters, you will find four pulldown menus that allow you to choose the Code Page type, Floating Point format, Machine Type, and byte order (Endian), as appropriate to the target environment.
Supported character encodings vary somewhat according to the version of the Java 2 runtime environment that is present. The Code Page pulldown menu will list all of the character encodings supported by the Java runtime being used.
The two floating-point formats supported by the JMS Connect are IEEE-754 and IBM formats.
Machine Type refers to the target platform that will ultimately receive or process the copybook in question. The available choices are MVS, OS/2, NT, or AIX.
The two choices, BIG or LITTLE, refer to the native byte-order representation of the target platform. Intel architectures use a little-endian addressing scheme in which the least significant byte of a multi-byte entity is represented at the lowest memory address. Most other machine architectures are big-endian.
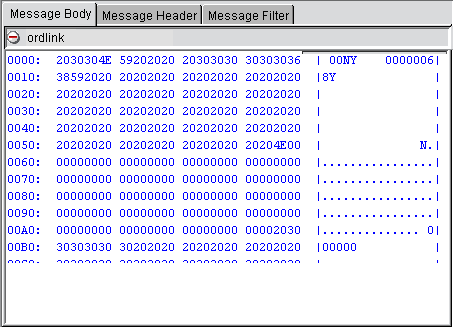
When you are in the JMS Component editor main window and you select (or highlight) a message action involving a copybook, the Native Environment pane displays information contained in the copybook that you selected in the message-action setup dialog.

In this case, a Receive Message action has been highlighted. The associated copybook is displayed in the Native Environment Pane in the upper right. There are three display modes for coypbooks in the Native Environment Pane:
To select a different view, perform a right-mouse-click inside the Native Environment Pane and choose a View from the contextual menu:
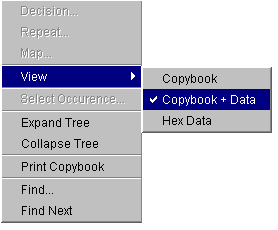
The Hex Data view creates a standard hexadecimal data view of the copybook contents.
This view is neither editable nor mappable; it is designed primarily as a troubleshooting and debugging aid.
The contextual menu that appears when you perform a right-mouse-click within a copybook's Native Environment Pane contains a number of copybook-specific commands, as explained below.
When a copybook is visible in the Native Environment Pane, in any view except the Hex Data view, you can use the drag-and-drop technique to map XML DOM elements to copybook fields or vice versa. Mapping into the copybook will ordinarily be done from Input DOMs as part of Send Message actions. Mapping out of the copybook will ordinarily be done with an Output DOM as a target, for Browse or Receive actions.
NOTE: The JMS Connect performs certain behind-the-scenes checks as part of every drag-and-drop operation. If a particular operation is forbidden, you will see the "forbidden drag operation" symbol, as well as an error message in the Component Editor's status line, and no "drop" will occur when you release the mouse button.
Mappings between DOMs and copybook fields can also be created using the Map . . . command in the Action > New Action menu (from the main menubar) or the Map . . . command of the contextual menus. To access a contextual menu, right-mouse-click on any element in a DOM or copybook. The advantage of using the contextual-menu technique is that the Map dialog will contain appropriate XPath information for the DOM/copybook element you clicked on, already filled out.
Mappings can also be created programmatically, using ECMAScript, inside Function actions.
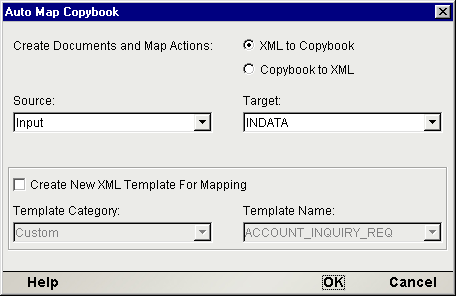
Using the mapping techniques described above, you may have to perform numerous keyboard and/or mouse operations to create required mappings to or from DOM elements and copybook fields. When the copybook is more than a few lines long, this quickly becomes a tedious affair. To make it easier to create large numbers of mappings, the JMS Connect provides an Auto Map Copybook command under the Component menu (on the main menubar):
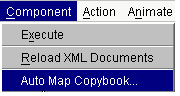
Selecting this command brings up the following dialog:
This dialog allows you to create batch mapping actions between DOMs and copybooks (in either direction) quickly and easily. Optionally, it allows you to create a new XML template document, based on a copybook, which can be saved permanently in the event you want to reuse it.
NOTE: The Auto Map Copybook dialog will appear only if a copybook is showing in the Native Environment Pane. (This, in turn, requires that a copybook-related message action be highlighted in the Component Editor's action list.)
 To create a batch mapping of XML elements to copybook fields (or vice versa)
Select the appropriate radio button in the upper right portion of the Auto Map Copybook dialog (XML to Copybook, or Copybook to XML).
Select the desired Source and Target documents from the two pulldown menus.
Click OK. The Component Editor Window appears and new Map actions are shown in your Action Model.
NOTE: You may want to inspect the Map action list that is thus created and remove any actions that are not relevant to your project.
To create a new XML Template document based on a copybook
Select the appropriate radio button in the upper right portion of the Auto Map Copybook dialog (XML to Copybook, or Copybook to XML). Selecting XML to Copybook indicates that you wish to create an Input document and Map Actions to move data into the Copybook. Selecting Copybook to XML indicates that you wish to create an Output document and Map Actions to move host program output data from the Copybook to the Ouput document.
Select the desired Source and Target documents from the two pulldown menus.
In the lower portion of the dialog, check the Create New XML Template for Mapping checkbox. This indicates that in addition to the batch-mapping operation (described above), you wish to create a new XML Template document. Checking the checkbox will activate the lowermost items in the dialog: Template Category and Template Name.
Select a Template Category if it is different than the default category, or enter a New Template Category Name over an existing entry.
Select a Template Name from the list of XML templates, or enter a New Template Name over an existing entry.
Click OK. The Component Editor Window appears with the Input Template created. (Also, the new template document appears on disk in the xmlcategories folder under your project's main folder, and the new template category appears under XML Templates in the navigation pane of Composer's main window.)
The JMS standard allows message filtering (that is, selective retrieval of messages) to occur based on user-determined criteria. Filtering occurs via a JMS message selector, which is a String containing a statement (with SQL-like syntax) that will evaluate to true or false. The selector statement will normally refer to one or more JMS message header fields and/or custom properties. (Message selectors cannot reference message body values.) Based on data exposed in the message header, the message will either be selected for retrieval, or not selected.
Selector setup occurs in the JMS Connect by way of the Native Environment Pane. The Browse Messages and Receive Message actions (for all message types) cause a Message Filter tab to be included in the Native Environment Pane, along with tabs for Message Body and Message Header. The Message Filter tab exposes a text-edit field where you can place a selector expression. The expression can be typed manually or constructed, in whole or in part, by doubleclicking pick-list entries from the upper part of the tab.
As an example, consider the following Message Filter:
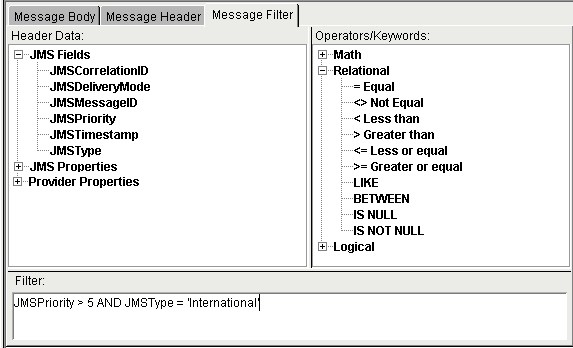
In this example, the selector expression requires that JMSPriority be greater than 5 and that JMSType exactly equal the string `International'. In the upper part of the tab, under Header Data, the JMS Fields node of the picktree is expanded to reveal the available header fields. (Not all of the ten JMS-defined header fields can be used for filtering; see "Limitations on Filtering" below.) JMSType is highlighted; doubleclicking it places "JMSType" in the Filter field, at the cursor's location. Operators and keywords can likewise be "picked" using the pick lists in the upper right, to form an expression (or part of an expression) without typing.
Using the filter expression example shown, any Browse Messages action will retrieve from the queue only those messages with a JMSType of "International" and a priority greater than 5. All other messages will be ignored.
In a Receive Message action, the filter would result in the first available message that meets the criteria being removed from the queue.
Other selector expression examples can be found in Appendix B.
NOTE: You should escape any colon characters (":") in your selector expressions with a backslash, since exteNd treats colons in SQL statements and JMS selectors as a marker, indicating the presence (after the colon) of an evaluatable script expression.
JMS imposes a restriction on which header fields can be used for filtering.Header field references inside selector statements are restricted to the following fields:
Data types can be important in selector statements, since if the comparison of non-like types is attempted, the statement will always return false. In the above list, all fields are Strings, except for JMSPriority, which is of type integer, and JMSTimestamp, which is of type long.
NOTE: Normally, JMSDeliveryMode is an integer, but in a selector context it will have the String value `PERSISTENT' or `NON_PERSISTENT'.
Custom, application-defined property fields can be used as the basis of selector statements. But if a selector references a property that does not exist, the value of the operation will be unknown. That's because SQL semantics treat NULL values as unknowns; and any operation involving an unknown value produces an unknown value. For a selector that references a NULL value to be useful, it must return true or false. The only way this can happen is if you use the IS NULL or IS NOT NULL operator to convert an unknown value into a boolean result.
You should be aware that JMS makes no provision for filtering by message body type (BytesMessage, StreamMessage, etc.) per se. If a client application requires access to this information, the relevant body-type info should be exposed in a custom property or header field by the sending application. A JMS receiver has no a priori way of knowing what the body type of a message is.
Notwithstanding this, in order for the JMS Connect to know what to do with the contents of an arriving message, it is necessary for some value to be selected in the Message Type field of the Receive Message (or Browse Messages) setup dialog's Message Body tab (see illustration, page 68). The value given in the Receive Message setup dialog will not be used for filtering, however, since there is no way for a JMS application to filter messages by body type (as just explained).
NOTE: It's important that your application take steps to ensure that only messages of the appropriate body type are received. Ordinarily, this will not be a problem since message-producing applications typically send their messages only to consuming applications that have been specifically designed to receive them. Nevertheless, should your application happen to receive messages with a body type incompatible with the type you select in the Receive Message dialog, exceptions will be thrown.
If your application will be receiving/browsing messages from a queue that contains many different kinds of message body types, it is advisable that you expose body-type info in a message property or header field and design a Message Filter (selector statement) that the receiving app can use to distinguish just the messages that are appropriate from those that are not.
Roundtrip request-response messaging is a common scenario in applications that use messaging. Some typical use cases are:
Your application sends a message to a queue or topic with the expectation of receiving an immediate reply (or replies). For example, a manufacturer may want to purchase a particular kind of part; to do this, it may broadcast a request for a bid on the item by publishing a message to a topic. Listeners on that topic may be set up to respond immediately with an acknowledgement (or an actual bid).
Your application sends a message to a queue or topic without any expectation of getting a response; but for purposes of error notification, your app specifies a ReplyTo destination in the outgoing message. (The ReplyTo queue might be in an entirely different domain, and might be set up solely to accumulate error reports.) Thus, your app sends messages out to one queue, but asks that error reports be sent to another queue.
Your application is a JMS Service that listens on a queue or topic and is designed to process the incoming message, then reply to it.
In each case, the sender needs to supply a queue or topic name in the JMSReplyTo header field of the sent message. This can be done using the Send Options tab of the Send Message dialog; see the section called "Return Address" under "The Send Message Action" in the previous chapter.
In the case where your application is responding to a query, you can set up your Send Message action so that it automatically uses the queue or topic that was present in the JMSReplyTo field of the last received message. In the Send Options tab of the Send Message dialog, there is a radio button called Use Prior Message ReplyTo Field, provided for this purpose. (See "Destination Queue/Topic" under "The Send Message Action" in the previous chapter.)
When your application is soliciting an immediate response, and you intend to block until a reply is received (or until a specified timeout value is reached), it is often convenient to create a temporary queue dedicated to receiving the reply. The advantages of using a temporary queue are:
Isolation from other processes (no client other than the one receiving your message knows about the temporary queue). This can simplify application design by minimizing or even eliminating the need for message filters.
From a resource and administration standpoint, temporary queues are cheap, since they are created on the fly and destroyed immediately after they have served their purpose.
To specify that a temporary queue be used for replies to a message, check the Use Temporary radio button in the Send Options tab of the Send Message dialog. (See "Return Address" under "The Send Message Action" in the previous chapter.) A temporary queue will be created for you automatically and its name will be placed in the JMSReplyTo field of your outgoing message. The queue will then exist for the lifetime of your component.
In cases where multiple outgoing messages will be sent in the lifetime of a single component, multiple temporary queues will be created. By default, the JMS Connectwill create a unique temporary queue every time an outgoing message is created (if the Use Temporary radio button has been set). If you want multiple outgoing messages to specify the same temporary queue in their ReplyTo fields, you can do it in the following fashion:
Create your first Send Message action in the usual way, checking the Use Temporary radio button in the Send Options tab. (See "Return Address" under "The Send Message Action" in the previous chapter.)
In your next Send Message action, do not check the Temporary radio button (since this will cause a new, unique temporary queue to be used). Instead, check the Named radio button.

In the Variable picktree (upper left), open the send header node (default name Send_HDR) for the first sent message. Expand the MSGHEADER node to reveal all of the JMS header field names.
Doubleclick the JMSReplyTo entry in the picklist. An ECMAScript expression appears in the edit field below.
Set any other message parameters that you might need to specify for this message, then click OK to close the Send Message dialog.
Repeat steps 2 through 7 for each subsequent Send Message action in your component that will use the original temporary queue.
The JMS Connect exposes a number of JMS-related ECMAScript extensions that you can use in your own Function and Map actions to extend the functionality of your JMS Components and services. For the most part, the extensions comprise "get" and "set" methods for manipulating the body content of messages.
Access to JMS-related ECMAScript extensions is available via pick lists in the Expression Builder dialog. (The Expression Builder, in turn, is available from the Map action and Function action dialogs. See example below.) You should note that the methods exposed via the Expression Builder's pick lists are exposed in context-sensitive fashion. For example, if you are working with a Copybook Message, the methods exposed via the picktree will correspond to copybook-related operations, whereas if your Message action involves a Bytes Message, the exposed ECMAScript methods will relate to working with the JMS Bytes Message body type.
In the example below, we show how to attach content to a JMS Bytes Message using ECMAScript. Unlike most other message types, the Bytes Message type has no user interface for mapping (no Body tab in the Native Environment Pane). Hence, ECMAScript is the only way to attach content to the body of a Bytes Message.
NOTE: The JMS Object Message also has no user interface for mapping. You must use ECMAScript to attach content to an Object Message. (Typically, you will rely on ECMAScript's Packages mechanism to call Java code to retrieve Serializable objects associated with Object Messages. See Chapter 10 of the exteNd Composer User's Guide.)
To work with JMS-related ECMAScript extensions in the Expression Editor
Create a Send Message (or other JMS) action. Select a body type corresponding to the type of content your message will have. For this example, a Bytes Message will be used, but the principles demonstrated here will apply to all body types.
With the Message action highlighted, create a new Map action. In the example below, we have selected Action from the main menu, then New Action, then Map, to create a new Map action.
Click the Expression radio button for Source as well as Target.
Type the Source expression representing the source of your message-body data, or (alternatively) click the Expression Editor icon next to the text-edit area for Source. The Expression Editor window appear will appear.
NOTE: In this example, we will map data from the PRODUCT/NAME XPath of our Input DOM, but you can also map from other sources. For example, you could use the File constructor and readAll() method to obtain data from a file on disk. (The "Extended ECMAScript" pick list contains File I/O and other methods.)
Type the Target expression, or build it using the Expression editor. Click the Expression Editor icon next to the text-edit area for Target. The Expression Editor window appears.
In the upper middle part of the Expression Editor, click the JMS-MQSERIES item to expand the picktree to reveal nodes labeled Message Handle, Message Methods, and Send JMSBytes Methods.
NOTE: If you do not see any JMS-related nodes in the picktree, it is because your Map or Function action was not associated with a Message action. Be sure to highlight a Message action (or related section of the action list, such as "Before Send Maps") prior to creating the Map or Function action.
Expand the various nodes of the tree under JMS-MQSERIES. You will see terminal nodes with names like JMSMESSAGE, getJMSMessage(), and setJMSBytesBody(). Doubleclick these names (and/or other leaf nodes in other picklist windows) as necessary to build the desired ECMAScript expression. The relevant labels appear in the text-edit portion of the window as you doubleclick.
Dismiss all dialogs by clicking OK. Your Map action appears in the component's Action list.
To attach content to a message using ECMAScript, use the target expression:
JMSMESSAGE.setJMSBytesBody( );
No arguments are necessary. This "setter" method will take data from the Source part of the Map action, convert it to the appropriate format (a byte array, in the case of a Bytes Message), and attach it to the body of the message. Corresponding "getter" methods operate in similar fashion, although some of these methods require arguments. The calling conventions are set forth below.
Available JMS-related ECMAScript extensions and usage are as follows. Most methods will be called on the JMSMESSAGE handle; the exceptions are Copybook methods (called on the Copybook handle) and CopybookField methods (called on CopybookField objects).
When called on the JMSMESSAGE handle, this method returns a JMS Message object. To work with a specific type of JMS Message body, caste the returned message to the appropriate type. For example:
TextMessage lMsg = (TextMessage)getJMSMessage()
Call this method on JMSMESSAGE to obtain the body of a message as a String.
Call this method on JMSMESSAGE to obtain the body type of a message as a String. The return value will be one of JMSText, JMSBytes, JMSMap, JMSObject, or JMSStream. Notice that no special XML or Copybook type is ever returned since these are not JMS-defined types.
Suppose you have the following copybooks:
Perhaps you're interested in referencing the first PARTID (under INDATA), but you don't want the PARTID under OUTDATA. To resolve the duplicate name issue, reference the parent cobolDataDesc as follows (assuming a Copybook Handle of MYCOPYBOOK):
MYCOPYBOOK.getField("PARTID IN INDATA")
The returned CopybookField object has two methods: toString() and setValue().
This method sets the value for a CopybookField object.
Returns the value set for the CopybookField object.
Gets the value for a JMS BytesMessage object's body as a String representation. The aibufSize parameter is the size of the body in bytes. Returns a String.
Sets the body for a JMS BytesMessage object.
Returns a Java byte[ ] Object of size specified by aiSize.
Returns a Java byte[ ] Object.
Gets the value for a JMS MapMessage object body field. Returns a String.
Sets the name and type of a JMS MapMessage object body field.
Gets the value for a JMS ObjectMessage object body (after a Receive Message action). Returns a Serializable object.
Sets a JMS header of a given name and type to a given value.
setJMSObjectBody(Serializable aObject)
Sets the body of a JMS ObjectMessage object.
Gets the value for a JMS StreamMessage object body field. Returns a String.
This method sets the value of a JMS StreamMessage object body field.
Gets the value for a JMS TextMessage object body. Returns a String.
Copyright © 2003 Novell, Inc. All rights reserved. Copyright © 1997, 1998, 1999, 2000, 2001, 2002, 2003 SilverStream Software, LLC. All rights reserved. more ...