JMS Connect User's Guide
CHAPTER 4
An action is similar to a programming statement in that it performs a specific, well-defined task, often with input in the form of parameters. Related actions are often chained together to form a single functional unit. In exteNd, this functional unit is the Component; actions that make up the Component are part of an action list or Action Model. (Please see the chapters in the Composer User's Guide devoted to Actions.)
The JMS Component Editor allows you to create actions that involve sending, receiving, or browsing messages, optionally as part of a transaction. The powerful XML mapping capabilities of exteNd Composer allows you to map XML information between messages and DOMs with ease, while also permitting the transformation of data with business logic. JMS Components created in exteNd Composer thus bring sophisticated messaging capabilities to XML integration applications.
Within a Component, an Action Model is made up of a list of related actions that work together to achieve a desired result. As an example, in a JMS Component, an Action Model might contain actions that read order data from a queue, map the data to a temporary XML document, perform data transformations on specific line items, and map the converted data to an output XML document.
The Action Model mentioned above would be composed of several discrete actions. These actions would:
The JMS Component editor contains all the core functionality of exteNd Composer's XML Map Component editor, plus four connector-specific action types:
Except for the Message Transaction action type (which simply allows you to place Commit and/or Rollback statements in a JMS Component; see "The Message Transaction Action" further below), the various message actions all share a common setup dialog. The setup dialog has three tabs:
An Options tab (labelled Send Options, Browse Options, or Receive Options, as appropriate to the action type)
The Browse and Receive dialogs also have a Filter tab (discussed under "The Browse Messages Action" and "The Receive Message Action" further below).

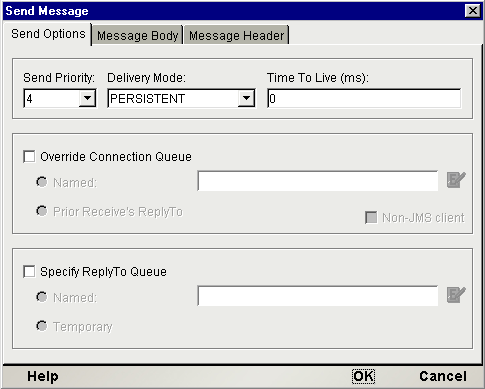
The Options tab exposes options specific to the type of action in question (Send, Browse, or Receive). For example, the Send Message action has an Options panel that looks like this:
The options shown in this tab are action-specific, but not message-type-specific. That is to say, the appearance of this tab will not be different for a BytesMessage than for a MapMessage.
The Message Body tab brings up a pane containing setup parameters that differ depending on the message type:
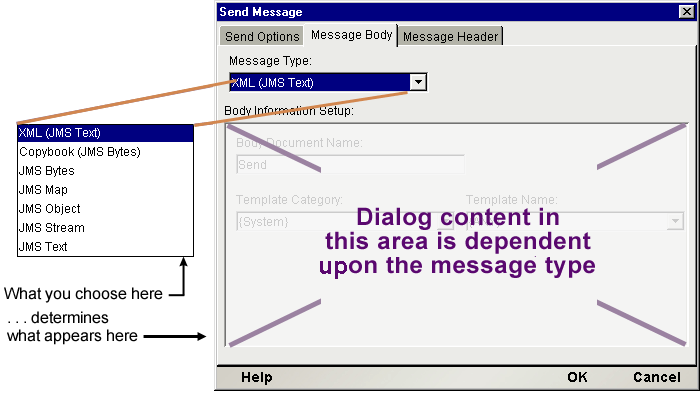
This pane contains a Message Type pulldown menu as shown above, allowing access to the XML and Copybook types plus the five predefined JMS message types. Depending on what you select here, the Body Information Setup pane in the lower portion of the dialog will change. (See the sections that follow for a more complete description of the various fields and their usage.)
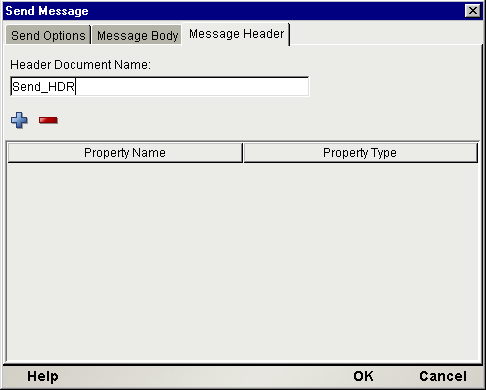
The Message Header tab brings up a pane that looks the same for all message action types:

This tab is where you can optionally create custom properties (equivalent to custom header fields) to supplement the built-in header fields defined by JMS.
Under Header Document Name, you must provide a name that can later be used as a target label for purposes of mapping values to property fields in the Native Environment pane. (Fields cannot be assigned values directly in this dialog.) The default name, in the case of the Send Message action, is Send_HDR.
The Send Message action can be used to post messages to a queue or topic. The message priority, delivery mode (persistent or non-persistent), and Time to Live can be specified on an action-by-action basis. In addition, you can specify the destination queue or topic on an action-by-action basis and you can optionally specify a named queue in the JMSReplyTo field of the outgoing message's header.
The button groups in the Send Options tab of the Send Message action require separate discussion. There are three button groups. The top group allows you to specify settings related to quality of service. The middle group allows you to specify a destination queue or different from the one you specified in the Connection Resource for the component. The bottom group is for letting you specify a "return address" for your outbound message. Each button group will be discussed in turn.
The top button group in the Send Options panel allows you to specify properties important to quality of service:
Send Priority—Lets you assign a priority to the message, from one to nine. The JMS-defined default priority is four. Use the pulldown menu to override the default. (Note that the implementation details associated with message priority are not specified by the JMS standard.)
Delivery Mode—Allows you to specify whether the message will be persisted to storage en route to its destination (for maximum reliability) or delivered more quickly but without recoverability.
Time to Live—Lets you assign a maximum lifetime to the message, in milliseconds. If a zero value is specified, the message will not expire.
The default destination queue for your Send Message action will be the one specified in the JMS Connection Resource for the component. (To change the default destination from within a JMS Component, choose File > Component > Connection Info and select a different queue from the pulldown menu.)
If you want to override the default behavior, you can specify destination queues or topics for Send actions on an action-by-action basis. To override the default behavior, simply check the Override Connection Queue/Topic checkbox in the Send Options panel of the Send Message dialog:
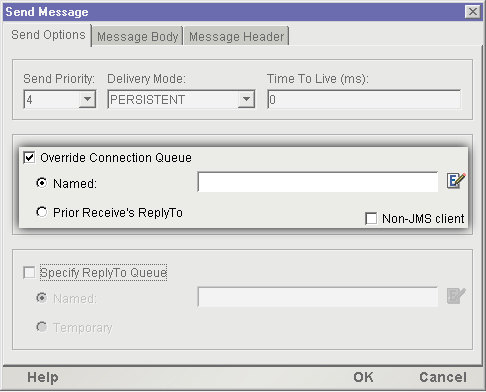
Checking the Override Connection Destination box (see above) enables two radio buttons underneath.
The Named radio button allows you to enter a queue or topic name in the accompanying text field (as a quoted string) or specify the queue/topic using ECMAScript. The ability to specify a script here means that you can base the choice of queue or topic on custom logic involving conditionals and/or values obtained at runtime. To create a script that specifies the named queue, click the Expression icon to the right of the text field; this will bring up the Expression Editor dialog. Type your script in the Expression Editor (or build it with the aid of the picklists shown there) and click OK. Your script will appear in the text field. Obviously, the script must ultimately evaluate to a string representing the name of a particular queue or topic.
NOTE: When you are using an IBM MQSeries queue, you can specify a fully qualified queue URI in the Use Named text field, such as:
queue://qmanager/queue1?CLIENTTYPE=0
The second radio button in the "Override" button group, Prior Receive's ReplyTo, will (if selected) cause the outgoing message to go to the queue or topic specified in the JMSReplyTo field of the last received message having a non-empty JMSReplyTo field. You would select this radio button if your Send Message action is specifically aimed at replying to an incoming message (a prior Receive Message action in the same component).
NOTE: The JMSReplyTo field that is referenced for purposes of this radio button is the last JMSReplyTo field associated with the last received message (within this component) that has a non-empty JMSReplyTo field. For example: If your component has three Receive Message actions—A, B, and C (in that order)—and the JMSReplyTo field was empty on B and C but non-empty for Message A, setting the Use Prior Receive's ReplyTo radio button will cause your Send Message action to use the queue specified by Message A. If all three messages were to have non-empty ReplyTo fields, and you wanted to reply to Message A, you would not set the Use Prior Receive radio button. Instead, you would select Use Named and specify an Expression that grabs the JMSReplyTo element from the header DOM of Message A.
In the Override Connection button group, a special Non-JMS Client checkbox will appear if your connection resource specifies an IBM MQSeries message queue. You can check this box if you are sending a message to a non-JMS message consumer, which is to say, a user of native MQSeries services. When this option is used, the assumption is that the receiving process is a non-Java message consumer that has no knowledge of (for example) JMS rules for header encoding and decoding. Therefore, when you use this option, you should not assume that any header information will be received by the message recipient, or that the recipient would know what to do with such information even if it was received. You should not, for example, specify user-defined header properties of any kind, nor map values into JMSCorrelationID nor JMSType header fields.
Notwithstanding the above, it's important to remember that the queue manager (which is JMS-aware) will still use certain header values even if the message is intended for a non-JMS client. In general, any header fields that have to do with quality of service (such as JMSDeliveryMode or JMSExpiration) will be honored by the queue manager, even if Non-JMS Client is checked.
Note that when you are using an IBM MQSeries queue, you can specify a fully qualified queue URI in the Use Named text field of the Override Connection Queue control group, such as:
queue://qmanager/queue1?CLIENTTYPE=0
The lowermost button group in the Send Options panel gives you control over the value that the JMSReplyTo header field will have in your outgoing message.
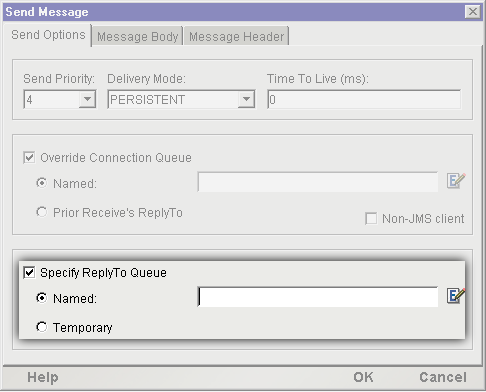
By default, the JMSReplyTo field in an outgoing message is empty. You will typically change this behavior if you want your outgoing message to trigger a reply on the part of a receiver, or if your outgoing message might elicit a reply (such as an error report) at least some of the time. To override the default behavior (and specify a return address in the JMSReplyTo field), first check the Specify ReplyTo checkbox (see above), then select one of the two radio buttons underneath.
There are two possible reply scenarios: asynchronous and synchronous. (It's important to remember that in neither case can your component be assured of receiving a reply.) The radio buttons are meant to accommodate these two scenarios.
The Named radio button implies an asynchronous scenario. When you select this radio button, you are specifying a queue or topic name in the outbound message's JMSReplyTo field. In essence, you are saying to the receiver: "If a reply is sent, be sure it goes to this address." You must type a queue name (or topic name) manually, enclosed in quotes, in the associated text field; or create an ECMAScript expression that evaluates to a queue/topic name.
The Temporary radio button is designed to be used in cases where you expect to receive a reply in a synchronous manner. When you select this radio button, a temporary queue is created for purposes of receiving an immediate reply, and the outbound message has the temporary queue name in its JMSReplyTo header field so that the receiving process knows where to send its response. (The temporary queue will exist only for the lifetime of your component. See "Temporary Queues" in the next chapter.)
 To create a Send Message action
Create or open a JMS Component (as described in the previous chapter).
Highlight a line in the Action Model where you want to place the Send Message action. The new action will be inserted below the line you highlight.
From the Action menu, select New Action, then Send Message. The Send Message setup dialog appears, with the Send Options panel displayed.
From the Send Priority pulldown menu, select a priority ranking (from 0 to 9) for your message. Zero represents the lowest priority; 9, the highest.
NOTE: The details of how this priority value is implemented are not defined by the JMS specification. Consult your MOM vendor's documentation for details.
From the Delivery Mode pulldown menu, select PERSISTENT or NON_PERSISTENT. (See "What About Delivery Guarantees?" on page 15 for more information on the meaning of these terms.)
Enter a millisecond value in Time To Live to give your message a finite lifespan; or else enter zero, if you do not want your message to expire. (See "Message Headers and Properties" on page 127 for more information on this setting.)
If you wish to send your message to a queue or topic other than the one specified in your connection resource, click the Override Connection Queue checkbox and select the appropriate radio button as described in the discussion above under .
If you wish to specify a value in the JMSReplyTo field of your outgoing message's header, click the Specify ReplyTo checkbox and select the appropriate radio button as described in the discussion above.
Select one of the seven available message types from the Message Type pulldown menu. (In this example, the XML type is selected, indicating that the posted message will contain an XML-formatted text document.)
In the Body Information Setup portion of the dialog, enter information as necessary. This portion of the dialog will vary in appearance depending on the Message Type selected. In this example, the Message Type is XML; hence, you are prompted to enter information for Body Document Name (i.e., the name you want to apply to the Message Body DOM), Template Category (the XML Template resource name), and Template Name (name of the XML stub document you want to apply to the Message Body, if appropriate). See "Using Other Actions in the JMS Component Editor" on page 75 for additional information.
If you would like to add your own custom Properties to the message header, click on the Message Header tab. The Message Header pane appears.
Enter a Header Document Name (or accept the default name, which begins with Send_HDR). This name will be shown in the Native Environment Pane as the name of the header tree, for purposes of mapping values to fields.
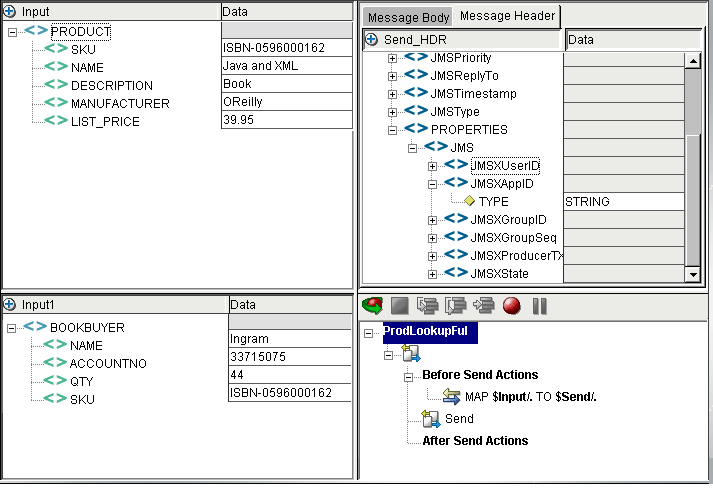
Click the plus (+) icon to add a Property. Type the name of the custom property under Property Name and click in the Property Type column to bring up a menu of available data types. Choose the data type appropriate to your property. In the above example, a single custom property called SKU_PREFIX has been created, specified as a String.
NOTE: You must go to the Native Environment Panel to specify values for your properties. This dialog merely creates the empty properties.
Click the plus (+) icon as many times as needed to add extra properties. Fill out the Name and Type information for each one.
Click OK. The JMS Component editor main window appears, containing the new Send action in the action list.
Note that when the Message Header tab is selected in the Native Environment pane (above), a User property called SKU_PREFIX is visible. This is the custom property we created in the setup dialog.
When a Send Message action has been created, the action list shows "Before Send Maps" and "After Send Maps" lines. The reason there are two map lists is that some JMS-defined header fields are empty before the Send action is executed; after the Send, the same fields contain data supplied either by the JMS provider or by the JMS Component's internal methods. In particular, the fields that are populated after Send time are:
Any data mapped into these header locations prior to sending a message will be overwritten at Send time. These fields should be considered read-only; and the data in them should be considered valid only after a Send.
The header fields that are writable are:
You can double-click in these fields (in the Native Environment Pane) to enter data manually, or you can use them as drop targets in drag-and-drop mapping from DOMs.
NOTE: The JMSReplyTo field is writable, but not through drag-and-drop or direct editing. To populate this field, you must use the controls provided in the Send Options tab of the Send Message dialog.
T
he following graphic shows what the Native Environment pane might look like after a message has been sent (that is to say, after fields have been auto-populated):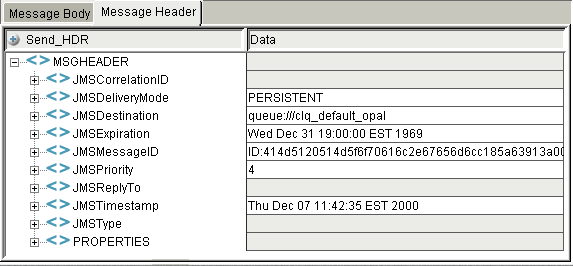
If you wish to use the data in read-only fields for logging purposes, debugging, mapping to an Output DOM, etc., you should add the relevant Map actions below the "After Send Maps" line in the Action model. If you have input-DOM data that you wish to map to a header field (such as JMSCorrelationID), you can use the drag-and-drop method to create mappings between input DOM elements and header fields as described on page 77.
A browse operation allows your application to inspect messages from a queue without causing those messages to be removed from the queue. That is to say, after a browse operation, all messages are still available on the queue for any consuming application to obtain.
In response to a browse request, a queue manager will return a java.util.Enumeration containing all available messages, unless a Message Filter (or "selector") has been specified, in which case only those messages matching the selector statement will be returned. (For information on using selectors, see "Working with Message Filters (Selectors)" on page 94.)
In a JMS Component, the Browse Messages action is used to browse messages from a queue. By default, the queue that will be browsed is the one specified in the JMS Connection Resource for the component. (To change the default queue from within a JMS Component, choose File > Component > Connection Info and selected a different queue from the pulldown menu.) You can also override the default on an action-by-action basis (see below).
NOTE: Browsing is a Point-to-Point operation only. In Publish/Subscribe, browsing is not defined. Your connection resource should be configured to use a queue (not a topic) if you will be using the Browse Messages action.
To create a Browse Messages action
Create or open a JMS Component (as described in the previous chapter).
Highlight a line in the Action Model where you want to place the Browse Messages action. The new action will be inserted below the line you highlight.
From the Action menu, select New Action, then Browse Messages. The Browse Message dialog appears, with the Browse Options panel displayed.
(Optional) If you would like to browse a message queue other than the one specified in your component's connection resource, check the Override Connection Queue checkbox (which is unchecked by default).
Click the Use Named radio button if you wish to specify a queue name manually. (Type the queue name in the accompanying text field, surrounded in quotes, or build an ECMAScript expression that evaluates to a queue name.)
Click the Use Sent Message ReplyTo Field radio button if you wish to browse a queue that was specified in the last Send Message action. (To obtain the destination queue name, exteNd will search for the last received message that had a non-empty JMSReplyTo field. This may or may not be the same as the last received message.)
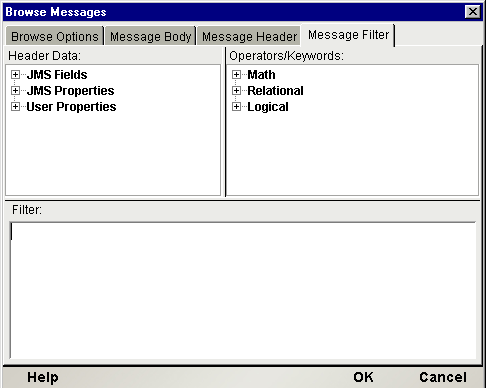
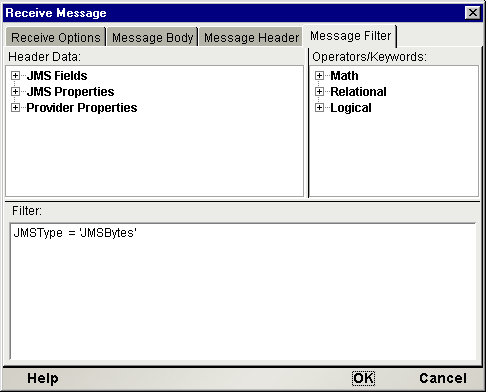
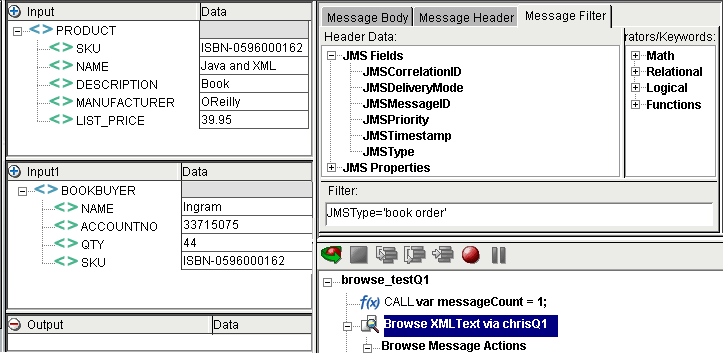
If desired, specify a Filter expression in the text field under Filter. (See Appendix B, "Message Filter Syntax," for more information.) This is an ECMAScript expression, so be sure to wrap strings in quotes.
From the Message Type pulldown menu, select the message type that corresponds to the kind of message your component is designed to process. This will preconfigure the Message Body to receive and store incoming data in a format that's acceptable to your application's requirements.
NOTE: This choice does not tell exteNd Composer to filter out unwanted message types. A browse operation, under JMS, always returns an enumeration of all available messages, regardless of body type.
Uncheck the Error on Invalid Message Type checkbox (checked by default) if you do not want exteNd Composer to throw an exception when an unexpected message body type is encountered. Normally, a JMS process is designed to "understand" and handle one specific JMS message type (such as JMSText), which usually means that if an unexpected message type (such as JMSBytes instead of JMSText) is encountered, processing errors eventually occur. Usually, it is better for processing problems to be discovered earlier rather than later; hence, the default state of this checkbox is checked. It is quite possible, however, especially for testing purposes, that you might want your JMS Component to handle all available messages regardless of body type. In that case, you'd want to uncheck the box.
In the Body Information Setup portion of the dialog, enter whatever information might be appropriate to the Message Type. (This portion of the dialog will change in appearance according to the Message Type that you've chosen.) In this example, the Message Type is XML; hence, you are prompted to enter information for Body Document Name (i.e., the name you want to apply to the Message Body DOM), Template Category (the XML Template resource name), and Template Name (name of the XML stub document you want to apply to the Message Body, if appropriate). See "Using Other Actions in the JMS Component Editor" on page 75 for additional information.
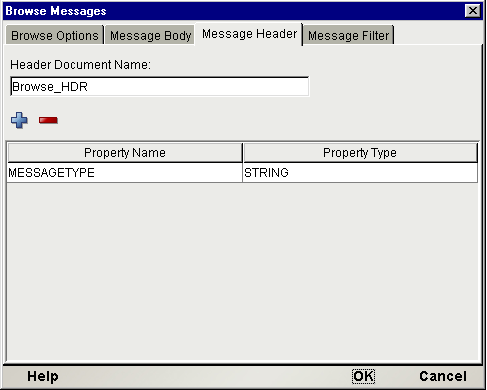
Enter a Mapping Name (or accept the default, which begins with Browse_HDR). This name will be shown in the Native Environment Pane as the name of the header tree, for mapping purposes.
Click the plus (+) icon to add a Property. Type the name of the custom property under Property Name and click in the Property Type column to bring up a menu of available data types. Choose the data type appropriate to your property.
NOTE: The purpose of this procedure is to build a property list that corresponds to the anticipated property list of the incoming message(s). If any incoming messages have property fields that aren't accounted for here, the extra fields will be ignored and any associated data will be lost.
Click the plus (+) icon as many times as needed to add extra properties. Fill out the Name and Type information for each one.
If you want to apply a JMS Message Filter to your Browse operation, enter it (and/or build it using the picklist items) in the text area in the lower half of the dialog. (See "Working with Message Filters (Selectors)" on page 94 for more information.)
Click OK. The JMS Component editor main window appears, with the new Browse action shown in the action list. (See illsutration.)
When you create a new Browse action, the line "Browse Messages: Type = . . ." appears in the action list, followed by a line "Browse Message Maps," followed (in turn) by a line that begins:
WHILE JMSMESSAGE.hasMessages() . . .
Because a JMS browse operation always returns a list of every available message (subject to filtering constraints; see "Working with Message Filters (Selectors)" on page 94), the JMS Connect automatically constructs a WHILE loop as part of every Browse Messages action. This loop iterates through each available message. As part of your action model, you can place whatever Map actions (or other processing) you might need, within the loop. You can also exercise loop control (using the component editor's Break and Continue commands) as you would for any other loop.
Note that as with the Receive Message action (described below), the Native Environment pane for the Browse Messages action contains Message Body, Message Header, and Message Filter tabs. Working with these tabs is the subject of the next chapter.
A receive operation allows your application to retrieve a message from a queue. The act of receiving a message causes that message to be destructively removed from the queue. The only exception to this occurs when a message session is transacted and a rollback takes place; in that instance, although a Receive Message action takes place, the message is ultimately not consumed. It remains on the queue.
In response to a receive request, a queue or topic manager will return the first available message, except when a Message Filter (or "selector") has been specified, in which case only the first available message that matches the selector statement will be returned.
In a JMS Component, the Receive Message action is used to obtain a message from a queue or topic. The queue or topic that will be used is the one specified in the JMS Connection Resource for the component. (To change queue/topic from within a JMS Component, choose File > Component > Connection Info and selected a different queue or topic from the pulldown menu.)
NOTE: Since the Receive Message action retrieves, at most, a single message at a time, you will need to construct a Repeat/While loop in order to receive all messages from a queue or topic. The Repeat While action should be designed in such a way that looping terminates when the JMSMessageID header field is empty.
To create a Receive Message action
Create or open a JMS Component (as described in the previous chapter).
Highlight a line in the Action Model where you want to place the Receive Message action. The new action will be inserted below the line you highlight.
From the Action menu, select New Action, then Receive Message. The Receive Message dialog appears, with the Receive Options panel showing.
Check the Error on No Message checkbox (which is checked by default) if you want an exception to be thrown whenever no message is received within the timeout period. Note that the default timeout period (unless one is user-specified; see step 6) is NO_WAIT, or zero.
NOTE: If this box is left checked, you should wrap your Receive action in a Try/On Error action and execute appropriate recovery steps in the On Error branch. But whether you check the checkbox or not, you should anticipate (and make sure your application can gracefully handle) the possibility that the queue is empty when your Receive action executes.
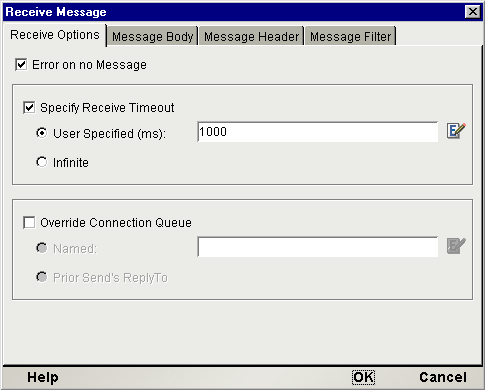
Check the Specify Receive Timeout checkbox (unchecked by default) if you wish to specify a timeout value other than the default of NO_WAIT (zero). If the checkbox is not checked, the action will simply check the queue or topic and retrieve a message if one is available, then return immediately without waiting. To force the action to block for a specified time, you must check this checkbox and specify a wait time.
Select the User Specified radio button if you want to enter your own timeout value. Enter the timeout value (in milliseconds) in the accompanying text field, or create an ECMAScript expression that evaluates to a suitable number.
Select the Infinite radio button if you want the Receive action to block indefinitely (until a message is received).
Check the Override Connection Queue checkbox (unchecked by default) if you want to specify a queue or topic other than the one given in the component's connection resource.
Select the Use Named radio button (the default) if you want to explicitly specify a given queue or topic. Type the queue or topic name in the accompanying text field, in quotation marks, or enter an ECMAScript expression that evaluates to a queue or topic name.
Select the Use Prior Message ReplyTo Field radio button if you want to use the queue or topic named in the JMSReplyTo field of the last sent message that contains a non-empty JMSReplyTo header field.
NOTE: If your action is waiting for a reply to a previously sent message, you should have specified an appropriate timeout value in Step 6 above. Some testing may be required in order to determine the timeout value that provides the best ratio of safety to performance.
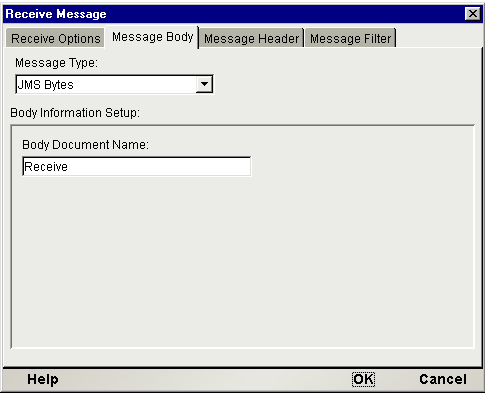
From the Message Type pulldown menu, select the message type that corresponds to the kind of message your component is designed to receive. This will preconfigure the Message Body to receive and store incoming data in a format that's acceptable to your application's requirements.
NOTE: It's important that your application take steps to ensure that only messages of the appropriate body type are received. Ordinarily, this will not be a problem since message-producing applications typically send their messages only to consuming applications that have been designed to receive them. Should your application happen to receive messages with a body type incompatible with the type you select in the Receive Message dialog, an exception will be thrown. If your application will be receiving messages from a queue that contains many different kinds of message body types, it is advisable that you design a Message Filter (selector statement) that can distinguish just the messages that are appropriate for your application.
Under Body Document Name, enter the name you wish to associate with the body of the incoming message, for purposes of DOM context (or accept the default, which begins with "Receive").
NOTE: This portion of the dialog will change in appearance according to the Message Type that you've chosen.) In the screen shot shown above, the Message Type is XML; hence, you are prompted to enter information for Body Document Name (i.e., the name you want to apply to the Message Body DOM), Template Category (the XML Template resource name), and Template Name (name of the XML stub document you want to apply to the Message Body, if appropriate). See "Using Other Actions in the JMS Component Editor" on page 75 for additional information.
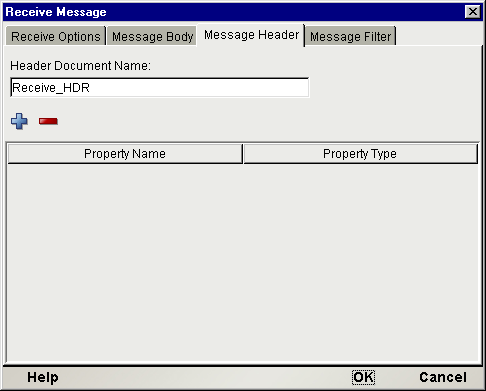
Click the Message Header tab. The Message Header pane appears.
Enter a Mapping Name (or accept the default name, which begins with "Receive_HDR"). This name will be shown in the Native Environment Pane as the name of the header tree, for mapping purposes.
Click the plus (+) icon to add a Property. Type the name of the custom property under Property Name and click in the Property Type column to bring up a menu of available data types. Choose the data type appropriate to your property.
NOTE: The purpose of this procedure is to build a property list that corresponds to the anticipated property list of the incoming message. If the incoming message has property fields that aren't accounted for here, the extra fields will be ignored and any associated data will be lost.
Click the plus (+) icon as many times as needed to add extra properties. Fill out the Name and Type information for each one.
If you want to apply a JMS Message Filter to your Browse operation, enter it (and/or build it using the picklist items) in the text area in the lower half of the dialog. (See "Working with Message Filters (Selectors)" on page 94 for more information.)
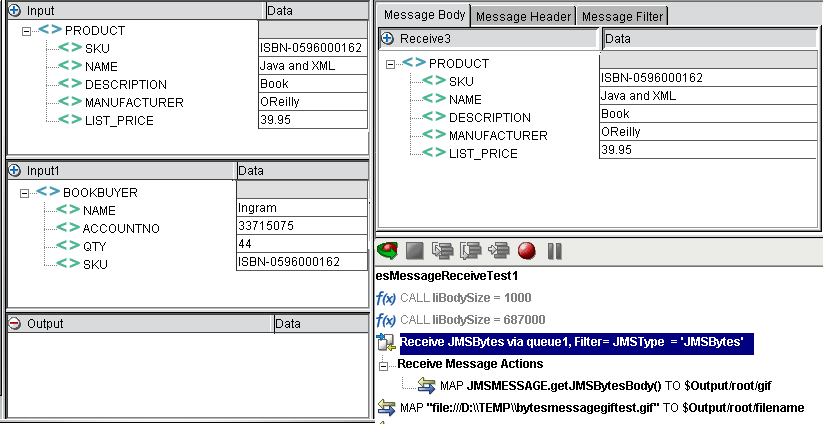
Click OK. The JMS Component editor main window appears, and a new Receive action is displayed in the action list (see illustration).
When you create a new Receive action, the line "Receive Message . . ." appears in the action list, followed by a line "Receive Message Maps." Under "Receive Message Maps," you can insert any Map actions or other processing needed to make use of information contained in the received message.
Unlike a Browse Messages operation, a Receive Message action is limited to retrieving one message at a time. Therefore, the JMS Connect does not include a WHILE loop as part of every Receive Message action.
NOTE: To iterate through all available messages, you should enclose your Receive Message action (and any associated processing) within a Repeat While action that terminates when the JMSMessageID field is empty.
Note that as with the Browse Messages action (described above), the Native Environment Pane for the Receive Message action contains Message Body, Message Header, and Message Filter tabs. Working with these tabs is covered in the next chapter.
The Message Transaction action allows you to group two or more message-related actions into one logical unit of work that is executed (or not executed) atomically. When a transaction commits, all of its inputs (in terms of messages) are acknowledged and all outputs are sent. When a transacted message session rolls back, any produced messages are destroyed and any messages consumed during the session are recovered.
In order to utilize the Message Transaction calls within a JMS Component, it's essential that the session occur in Transacted mode. The way one configures this is by setting the "Transacted" checkbox in the JMS Connection resource for the component. (The procedure for doing this is explained below. Also see "Creating a JMS Connection Resource" in Chapter 2.) When the JMS session associated by the JMS Component is in Transacted mode, you can safely use Commit and Rollback statements (via the Message Transaction action) in your Action Model.
When you issue a Commit, every message action (starting either from the beginning of the Action Model or the last Commit or Rollback statement, as appropriate) is executed, which means every message produced up to that point is sent and every message consumed up to that point is acknowledged. (On a receive operation, message acknowledgement signals the queue manager that it is okay to destructively remove the message from the queue.)
When you issue a Rollback, every message action (starting either from the beginning of the Action Model or the last Commit or Rollback statement) is nullified, which means every message produced up to that point is destroyed (not sent) and every message consumed up to that point is recovered (i.e., allowed to remain on the queue, as if nothing had happened).
An ambiguous state can arise if a transacted session uses no Commit or Rollback statements at all; or if an Action Model that contains several properly committed (and/or rolled back) actions ends with a message action that is neither committed nor rolled back. Interestingly, MOM vendors differ significantly in their handling of this situation. Some automatically commit unresolved actions; others roll back anything that is not committed.
The exteNd JMS Connect enforces an automatic-rollback protocol in situations where transactions are left uncommitted. (This is similar to the behavior of the JDBC Connect, where checking "Allow SQL Transactions" in the connection resource setup dialog causes automatic rollback to occur if the final SQL statement in a transacted JDBC Component uses neither a commit nor a rollback. See Chapter 2 of the JDBC Connect guide.) That is to say, any message actions that have occurred since the last Commit or Rollback statement will be rolled back when the session closes. Due to the way JMS "wrappers" MOM services, this behavior takes precedence over the MOM's normal behavior. No matter whether your MOM defaults to automatic commit or automatic rollback, the JMS Connect guarantees one consistent behavior: automatic rollback of uncommitted messages.
Because the JMS Component allows the use of non-message-related Transaction actions (New Action > Advanced > Transaction) as well as Message Transaction actions, it's important to understand the difference between the two.
The Message Transaction action calls commit() and rollback() methods that are scoped to the JMS session. Therefore, these methods cover message-related processes only. For example, while a Message Transaction command could roll back the sending of a message, it could never roll back a database operation conducted by an external call to a JDBC Component from within the Action Model of a JMS Component. If your Action Model contains a Receive Message action, followed by a Component action (involving a call to a JDBC Component), followed by a Send Message action, and you want to roll back everything (including the database operation) in the event of an error condition, you would need to demarcate the transaction using New Action > Advanced > Transaction (which is available in all Components) rather than New Action > Message Transaction (which is specific to the JMS Component). The latter would roll back message operations only.
A typical use of JMS transaction demarcation is to force "all or none" behavior in a set of related message actions. For example, suppose a set of messages (involving an order acknowledgement, a vendor notification, and a back-end query) must all be sent at once, or else not sent at all. Complex business logic may be involved in the determination of whether the sending of the messages should be authorized. Using a transacted JMS Component, the session could be set up such that messages are "sent" by default, but on any error condition or unsuccessful return from any point in the process, any Send Message (and/or Receive Message) operations are simply rolled back.
Another possible use of a transacted session involves nondestructive reading of messages. Normally, when an application reads a message off a queue, that message is permanently and irrecoverably removed from the queue. But if a JMS application reads a message in a transacted session, it can inspect the contents of the message before deciding whether or not to roll the session back. If the session is rolled back, the message will remain on the queue as if nothing happened. Why is this more useful than simply browsing? (Recall that browsing, unlike receiving, does not destructively consume messages.) Consider the case of an application that needs to inspect the body of a message before deciding whether to take action on that message. With browsing, the workflow would be:
If the message needs processing, read it from the queue (so as to ensure its removal from the queue); and process the message contents. Otherwise, do nothing.
Notice that the application must first do a browse, then a read operation. This represents two trips to the queue. With a transacted session, the workflow is:
1. Read the message off the queue.
2. Inspect message contents.
3. If the message requires processing, take action. Otherwise, roll back the session.
In this case, there is only one trip to the queue (to read the message). If the message is not suitable, rolling back leaves the message on the queue as if nothing had happened. No matter whether the message is usable or not, there has been only one trip to the queue.
To create a Message Transaction action
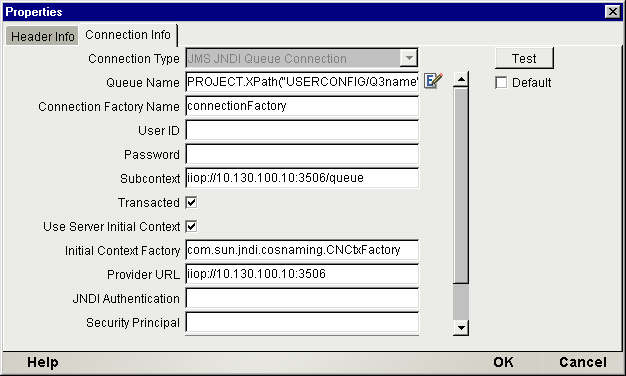
Check to be sure the JMS Connection resource is transaction-enabled. In the navigation pane of the exteNd Composer main screen, click Connection, then Resource; then doubleclick the appropriate JMS Connection resource in the detail pane. Select the Connection Info tab of the Properties dialog. The following screen appears:
Notice the Transacted checkbox in the lower part of the dialog. This box must be checked if you are going to employ Message Transaction commands in your JMS Component. If the box is left unchecked, Message Transaction calls in your component will cause exceptions to be thrown.
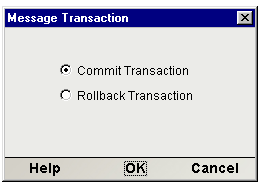
From the main menu, select Action, then New Action, then Message Transaction. A dialog box appears:
Select Commit Transaction or Rollback Transaction as appropriate.
NOTE: There is no need to issue a Begin statement. The Begin is implicit, based on your having checked the "Transacted" checkbox in the connection resource (see above). Checking this checkbox places the entire JMS session within a transacted context.
Click OK. The appropriate statement is inserted in the action list.
In addition to the Send Message, Browse Message, Receive Message, and Message Transaction actions, you have all the standard Basic and Advanced Composer actions at your disposal as well. The complete listing of Basic Composer Actions can be found in Chapter 7 of the Composer User's Guide. Chapter 8 contains a listing of the more Advanced Actions available to you.
Copyright © 2003 Novell, Inc. All rights reserved. Copyright © 1997, 1998, 1999, 2000, 2001, 2002, 2003 SilverStream Software, LLC. All rights reserved. more ...