Content Management Guide
CHAPTER 16
This chapter describes various ways to access and update existing content using the CMS Administration Console. It has these sections:
Here is a workflow that shows the variety of operations available to authorized users who are responsible for maintaining content in the CMS Administration Console:
This section presents procedures for:
Users with READ permission can preview documents to get a view of how content will appear to users of the Web site. Using the preview function, document reviewers verify the accuracy, structure, and layout of content before it is published.
 To preview the latest version of content:
Enter content mode by clicking the Content button in the toolbar.
Your folders appear in the content tree view. You may need to expand some of these containers to see the complete view.
Click to select the folder that contains the content of interest.
Select the document of interest to open its Property Inspector.
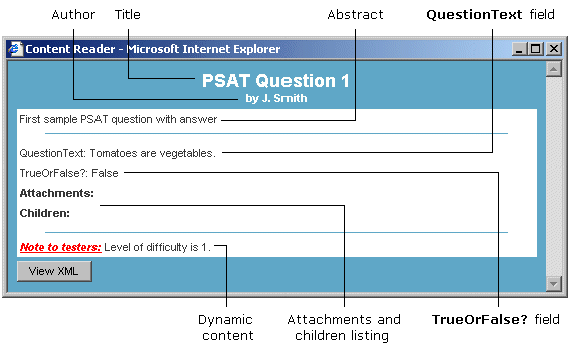
The latest version of the document's content opens in the Content Reader window:
To preview a specific version of content:
Enter content mode by clicking the Content button in the toolbar.
Your folders appear in the content tree view. You may need to expand some of these containers to see the complete view.
Click to select the folder that contains the content of interest.
Select the document of interest to open its Property Inspector.
A list of content versions appears, ordered from most recent to earliest.
The currently published version of content appears with the published-version icon:
If no version has been published, all versions appear with the default document icon:
The selected version of the document's content opens in the Content Reader window:
NOTE: If no version of this document has been published, no dynamic content appears in the Content Reader. Instead, a message appears at the bottom of the Content Reader window indicating that there is no currently published content for the document. For information about publishing content, see Administering version control.
Users with READ and WRITE permission can edit content. Documents must be checked out before they can be modified. The CMS Administration Console applies edits to the latest version of a document and saves the modifications as a new (later) version.
Enter content mode by clicking the Content button in the toolbar.
Your folders appear in the content tree view. You may need to expand some of these containers to see the complete view.
Click to select the folder that contains the content of interest.
Select the document of interest to open its Property Inspector.
An edit window appears in which metadata, fields, and dynamic content can be modified.
Edit the content, then click Update The Content.
NOTE: To undo your edits, click the Reset button to return the document to its original state.
The updated content is saved in a new version of the document.
 For more information about checking documents in and out, see Checking documents in and out.
Users with READ, WRITE, and LIST permissions can modify the properties of the following CM elements in the CMS Administration Console:
Select the CM element of interest and open its Property Inspector.
Here's how to access the Property Inspector for each element:
|
CM element |
How to access |
|---|---|
|
Folder |
|
|
Taxonomy and category |
|
|
Document |
|
|
Document field |
In the Property Inspector, modify properties as needed.
TIP: Some properties cannot be edited.
|
For |
Do this |
|---|---|
|
Folders, taxonomies, categories, and documents |
Click Save. |
|
Document fields |
For more information about checking documents out and in, see Checking documents in and out.
You can change the folder, categories, and taxonomies anytime for any document for which you have READ, WRITE, and LIST permissions.
To change a document's folder:
Enter content mode by clicking the Content button in the toolbar.
Your folders appear in the content tree view. You may need to expand some of these containers to see the complete view.
Select the document of interest to open its Property Inspector.
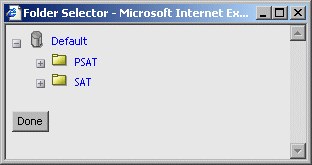
Click the ellipsis next to the Folder field.
Navigate to the new folder, click the folder name, and click Done.
The name of the new folder replaces the old one in the Folder field of the edit window.
To assign a document to categories or taxonomies:
Enter content mode by clicking the Content button in the toolbar.
Your folders appear in the content tree view. You may need to expand some of these containers to see the complete view.
Select the document of interest to open its Property Inspector.
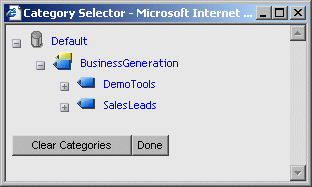
Click the ellipsis next to the Categories field.
Navigate to an appropriate category or taxonomy and click the name.
The name of the new category appears in the Categories field of the edit window.
You can click additional categories and taxonomies to add the document to them.
TIP: If you click a category or taxonomy that already contains the document, that document is removed from that category or taxonomy. (In the Edit Document dialog, the document's name is removed from the Categories listing.)
When you have finished specifying categories and taxonomies, click Done.
The Category Selector window closes and your choices are reflected in the Categories listing.
To change a document's categories or taxonomies:
Enter content mode by clicking the Content button in the toolbar.
Your taxonomies and categories appear in the content tree view. You may need to expand some of these containers to see the complete view.
Click the category or taxonomy that contains the document of interest.
Select the document of interest to open its Property Inspector.
Select the ellipsis next to the Categories field.
Navigate to the appropriate category or taxonomy and click the name.
The name of the new category appears in the Categories field of the edit window.
You can click additional categories and taxonomies to add the document to them.
To remove the document from a category or taxonomy, click that category or taxonomy. (In the Edit Document dialog, the document's name is removed from the Categories listing.)
When you have finished specifying categories and taxonomies, click Done.
The Category Selector window closes and your choices are reflected in the Categories listing.
Authorized users can modify a display style by uploading changes to its XSL style sheets. The CMS Administration Console stores these updates as new versions of the style sheets. Users then publish the version they want to apply to content.
This section describes the procedure for modifying style sheets in a display style.
NOTE: Before you begin, make sure you have updated the style sheet in an external editor and can access the file containing these modifications from your local file system, the network, or the CMS Administration Console.
Enter content mode by clicking the Content button in the toolbar.
Your folders appear in the content tree view. You may need to expand some of these containers to see the complete view.
Navigate to the folder that contains the XSL style sheet you want to modify.
TIP: Style sheets appear as system resources.
Select the style sheet of interest to open its Property Inspector.
The style sheet is checked out and appears with the checked-out document icon:
Switch to templates mode by clicking the Templates button in the toolbar.
A panel appears listing all document types that have been defined.
Select the document type that contains the display style you want to change.
Click the XSL Style Sheets tab.
Two panes appear. The Default Display Styles pane lists the display styles that have been created for the document type, and the Properties pane displays the properties of a selected display style.
In the Default Display Styles pane, expand the display style you want to modify to display its associated XSL style sheets.
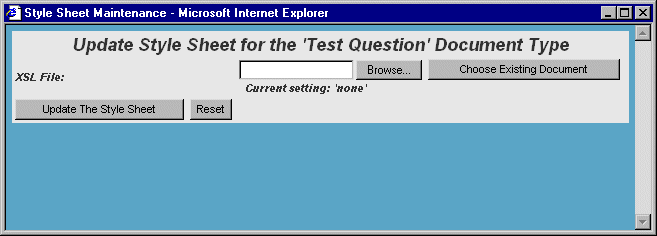
Select the style sheet you want to modify and click Upload.
Enter the name of the updated XSL style sheet using one of these methods:
Enter content mode by clicking the Content button in the toolbar.
The style sheet document should still be selected with its Property Inspector open.
For more information about checking documents in and out, see Checking documents in and out.
NOTE: To apply the updated style sheet to content, you must publish the new version, as described in Administering version control.
Authorized users can edit document types. All changes apply to legacy documents as well as new documents of the designated type.
Enter templates mode by clicking the Templates button in the toolbar.
A panel appears listing the document types that have been defined.
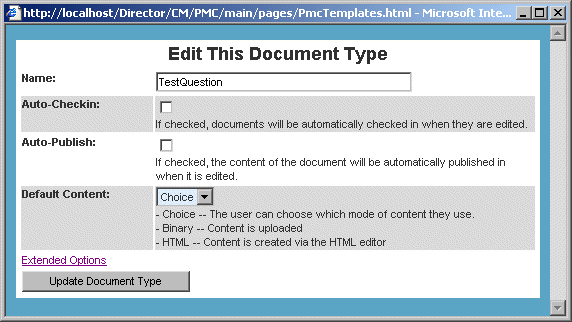
Select the document type you want to modify and click Edit.
The Edit This Document Type window opens:
NOTE: If you created the document outside of the CMS Administration Console using the CM APIs, you might not be able to access the document type and associated data. The CMS Administration Console requires that certain meta data be included. For more information, refer to EbiContentMgmtDelegate in the on-line API Reference section.
(Optional) Click Extended Options to display additional document type options.
Edit fields and options as needed.
For details about the individual options, see Creating document types.
Authorized users can edit fields, but only from within the document types where the fields were originally created.
Enter templates mode by clicking the Templates button in the toolbar.
A panel appears listing all document types that have been defined.
Select the document type in which the field was created.
The fields defined for that document type appear along with the list of all available fields.
NOTE: If you created the document outside of the CMS Administration Console using the CM APIs, you might not be able to access the document fields. The CMS Administration Console requires that meta data from the document fields be included. For more information, refer to EbiContentMgmtDelegate in the on-line API Reference section.
The Available Fields list displays the parent document type in parentheses next to each field. Use this information to verify that you are editing the field in its parent document type.
Edit the properties of the field as appropriate and click Update.
There are occasions when a content administrator needs to set an expiration date for a documents that has a limited life span. The CMS Administration Console allows users with WRITE permission to set or change this date anytime after the document is created.
When expiration dates are set, developers can write queries in portlets to remove expired content, or write a scheduled business object to check expiration dates and take specified actions if content is obsolete.
To set the expiration date of a document:
Enter content mode by clicking the Content button in the toolbar.
Your folders appear in the content tree view. You may need to expand some of these containers to see the complete view.
Click to select the folder that contains the document of interest.
Select the document of interest to open its Property Inspector.
In the Expiration Date field, enter an expiration date of the form:
YYYY-MM-DD HH:MM:SS
For more information about checking documents in and out, see Checking documents in and out.
Authorized users can delete certain CM elements in the CMS Administration Console. This section describes procedures for:

When you delete a folder, all folders and documents it contains are also deleted.
Enter content mode by clicking the Content button in the toolbar.
Your folders appear in the content tree view. You may need to expand some of these containers to see the complete view.
Select the folder of interest to open its Property Inspector.
When you delete a taxonomy or category, all categories it contains are also deleted. Documents are always retained in their parent folder, even if their assigned taxonomies or categories have been removed.
To delete a taxonomy or category:
Enter content mode by clicking the Content button in the toolbar.
Your taxonomies and categories appear in the content tree view. You may need to expand some of these containers to see the complete view.
Select the taxonomy or category of interest to open its Property Inspector.
You must check out a document before you can delete it. When you delete a document, all versions are removed.
Enter content mode by clicking the Content button in the toolbar.
Your folders appear in the content tree view. You may need to expand some of these containers to see the complete view.
Navigate to the document of interest and select it to open its Property Inspector.
In the Property Inspector, select the General tab and click Check-Out.
The Property Inspector refreshes to display new function buttons.
For more information about checking documents in and out, see Checking documents in and out.
When you delete a display style, the CMS Administration Console also removes all XSL style sheets that have been created for that display style.
Enter templates mode by clicking the Templates button in the toolbar.
A panel appears listing all document types that have been defined.
Select the document type that contains the display style to delete.
Select the XSL Style Sheets tab.
A list of the document type's display styles appears in the Default Display Styles pane.
When you delete a document type, the CMS Administration Console also removes all documents that have been created using that document type.
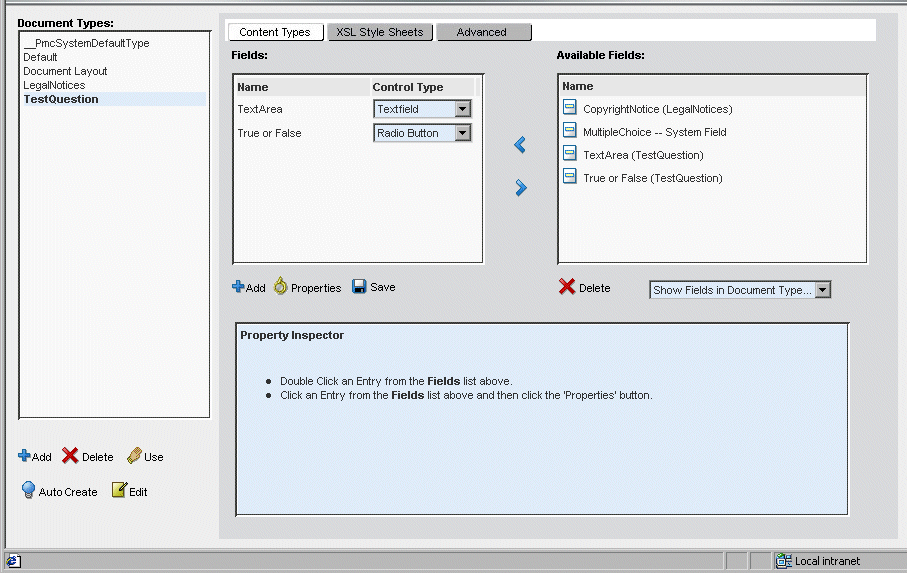
There is another side effect of deleting document types: any fields that were created within that document type are adopted by a new parent—the system document type—that appears in the Document Types list as _PmcSystemDefaultType.
Once adopted, these fields remain part of the available pool of fields but can be edited only from within _PmcSystemDefaultType. You can easily identify adopted system fields: they appear in the Available Fields pool with the suffix --System Field appended to their names.
In the following example, Multiple Choice is an adopted system field:
Enter templates mode by clicking the Templates button in the toolbar.
A panel appears listing all document types that have been defined.
When a confirmation window appears, click OK.
The CMS Administration Console deletes the document type and all documents that have been created using that document type.
There are two separate operations:
|
Operation |
Description |
|---|---|
|
Permanently deleting fields—from the CMS Administration Console |
Deletes fields from all documents and from pool or available fields |
|
Removed fields from all documents—but leaves fields in pool of available fields |
You can delete document fields permanently from the CMS Administration Console, but only from within the document types where they were originally defined. When you delete a field from the CMS Administration Console, the field is removed from all existing documents in which it appeared and from the pool of available fields.
CAUTION: Although this is a convenient way of applying one deletion to multiple documents, be aware that the effect is global and irreversible.
To permanently delete a document field from the CMS Administration Console:
Enter templates mode by clicking the Templates button in the toolbar.
A panel appears listing the document types that have been defined.
When a confirmation window appears, click OK.
The CMS Administration Console deletes the field from the Available Fields pane and from all documents that have been created using document types that contain the field.
You can remove a document field from the document types where it was originally defined but leave it in the available pool of fields for later use.
When a field is removed from its parent document type, it is adopted by the system document type _PmcSystemDefaultType. You can then add the field to any document type, but edit it only from the system document type.
What happens to legacy documents when you remove a field from its parent document type? There are two scenarios:
For more information about the Clean Up Data option, see Creating document types.
To remove a document field from a document type (but leave it available):
Enter templates mode by clicking the Templates button in the toolbar.
A panel appears listing the document types that have been defined.
Select the field in the Fields pane and then click the Remove Field button:
The field is removed from the Fields pane and refreshes in the Available Fields pane as a system field.
Copyright © 2003 Novell, Inc. All rights reserved. Copyright © 1997, 1998, 1999, 2000, 2001, 2002, 2003 SilverStream Software, LLC. All rights reserved. more ...