Composer User's Guide
CHAPTER 15
When you've completed the design, building, and testing of your project, the next step is to deploy it to the application server, where it will execute.
Some of the major topics discussed in this chapter include:
Deploying Directly from Composer (Enterprise Edition only)
Deployment from exteNd Director (all editions)
Defining SOAP Triggers (Composer UI for)
Composer Web Service Wizard: SOAP Service Deployment (Director UI for)
Both editions of the Novell exteNd suite (Professional and Enterprise) offer tools for deploying Composer projects. In the Professional Edition suite, you will use exteNd Director to carry out your deployments. In the Enterprise Edition suite, you also have the option of deploying projects directly from Composer to any supported app server (Novell exteNd, WebSphere, WebLogic, Tomcat) without the need to switch between Composer and Director environments.
The sections immediately following this one will tell you about:
Composer's design-time UI for creating and managing deployment artifacts (applicable to the Enterprise Edition suite)
Composer-related deployment aids and wizards available in Novell exteNd Director (applicable to all editions of the Novell exteNd suite)
App-server-specific issues, including administration issues pertinent to deployed Composer services, are discussed in a separate document: the Composer Enterprise Server User's Guide. Consult that guide if you have concerns about issues that are not addressed in this chapter.
NOTE: This discussion assumes some prior knowledge of J2EE deployment concepts, such as JAR (Java archive), WAR (Web archive), and EAR (Enterprise application archive) packaging, deployment descriptors, etc. If such concepts are unfamiliar to you, you may want to consult books or articles on J2EE deployment architecture before proceeding.
Before deploying a Composer service, you should consider:
Packaging requirements—Do you want to deploy services individually, straight from Composer, into the app-server environment; or will you instead be packaging whole projects (containing multiple services) into WAR or EAR files created in Novell exteNd Director (or possibly some other environment)?
Triggering needs—How will your service(s) be fired off? The trigger object can be a servlet, an EJB, an EJB triggered through a servlet, a custom Java class that calls your service programmatically (directly), or a JSP that uses Composer tag library routines. If you have the JMS ConnecForm Resourcet installed, you can also fire a service from a (JMS) MessageListener object that "listens" for incoming requests on a queue. If you have the SAP Connect, you can trigger a service off an SAP function. (See the appropriate Connect user guides for more information.)
How arriving data might be packaged—Will the incoming data be in the form of urlencoded param/value pairs appended to a URI (i.e., HTTP Get)? Will your service trigger handle incoming XML via HTTP Post with multi-part MIME attachment? Will your service be a SOAP service? Will the SOAP payload be encrypted or digitally signed?
Shared resources—Do you want to deploy some resources, such as WSDL, JSP, JAR, XSL, or XSD files, as published resources so that other Composer services can share them?
These are just some of the considerations will affect how you deploy your Composer-created services. For some types of services, you will also want to consider connection pooling, container-based transaction management, directory storage of passwords and public key info, and perhaps other items as well.
A service trigger is a process (such as a servlet or bean) that initiates execution of a Composer service in response to some kind of input. The input may arrive via HTTP, but could also be an e-mail arriving via SMTP or a JMS message arriving at a queue. Various kinds of Composer triggers are available to handle various kinds of requests arriving via various transports. Composer can create triggers for you, or you can generate them using exteNd Director's code wizards. s
The following trigger types are supported by Composer:
E-mail—A process on the server polls a mailbox at a specified interval and kicks off a Composer service when an e-mail meeting certain size limits arrives in the mailbox.
EJB—The trigger is an Enterprise Java Bean (which responds to programmatic requests).
EJB with servlet—The trigger is an EJB invoked by a servlet. The servlet "listens" on a URL, handles HTTP requests, and uses the bean to mediate interaction with a Composer service.
File—A process on the server watches for the arrival of files in a particular location on a physical drive. When a file arrives, the Composer service fires.
JMS—The trigger is a JMS listener. Arrival of a message at a topic node causes the Composer service to fire. (This trigger type is available only in the Novell exteNd Enterprise Edition version of Composer.)
JSP—The trigger is a Java Server Page containing scriplets that can call a Composer service directly.
SAP Service—Execution of an SAP function causes a Composer service to fire.
Servlet—Arrival of a request over HTTP causes the trigger to invoke a Composer service.
SOAP HTTP—Arrival of a SOAP request causes the service to fire.
Timer—A daemon process on the server causes a Composer service to fire at a set interval.
In addition to these "event-oriented" trigger types, it is possible for a custom Java class to invoke a Composer service directly. Novell exteNd Director has wizards, in fact, that can generate the necessary code. (See "Director JSP Wizard" and "Java Class Wizard" below.)

In a contractual sense, triggers have two responsibilities: They not only listen for specific events (whether it's the arrival of an HTTP request, arrival of e-mail, etc.) and take action on them; but they also must harvest and "hand off" XML data to the Composer service. To do the hand-off, the trigger has to know how to collect the data over the transport in question and package it in a form Composer can understand. Various helper classes (included in the Composer Server installation) are available to help a trigger servlet marshall/unmarshall data appropriately. (Those classes are described in more detail in the discussion at "Converter Classes" in the appendix on JSP tag-library methods.)
For example, a servlet can acquire data as part of an HTTP GET, or as part of HTTP POST. In the simplest case, user data consists of name/value pairs attached to the end of a URL (i.e., a request arriving by HTTP GET). But data can arrive in other ways as well, such as a SOAP request; XML via HTTP POST where XML is embedded in a form field; XML via HTTP POST with XML constituting the entire content portion of the stream; or XML via HTTP POST as multipart-mime attachments. Composer will also let you define triggers that fire when e-mail is received. In that special case, XML arrives in the form of an e-mail attachment.
In the discussions that follow, familiarity with the basic trigger types available in Composer is assumed. If you are not already familiar with Composer's trigger architecture, consult the Composer Enterprise Server User's Guide.
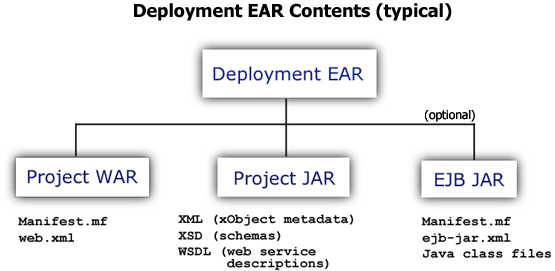
At deployment time, Composer packages all of the deployable services in a project into an EAR (Enterprise application archive). This is the so-called "deployment EAR." Its contents are as shown below.
When you deploy directly from Composer, the following steps happen automatically (in the order shown):
Composer packages your deployable resources—including the metadata (XML) describing your services—into a Project JAR. This JAR, along with the files mentioned below, is written to a staging directory (typically a subdirectory in your project directory).
Composer creates a WAR file containing two items: a manifest that points to the foregoing JAR, and a web-xml file that describes all of the trigger servlets that apply to your deployed services (as well as URL bindings for them), so that the app server knows how to find and expose your services.
The EAR is uploaded from the staging area to your app server.
The last step varies in implementation depending on the type (and version) of app server to which you are deploying. In some cases, Composer will create and execute a batch file that carries out the steps needed to put the EAR (and any deployment descriptors) on the app server. In other cases, Composer Enterprise Server will "pull" the deployment EAR onto the server. In all cases, Composer will (as part of Step 4) launch your web browser and lead you through a short series of forms, where you will provide any user-ID, password, or other information the server may need in order for the deployment to finish normally.
It may or may not be necessary to restart the server after deploying the EAR (this varies by app server; consult your app server's documentation).
NOTE: You should ensure that the app server and Composer Enterprise Server are running before undertaking any kind of Composer deployment.
In Composer 5.2, you have the option of letting Composer package your project into EAR, WAR, and JAR archives and write them to disk. You can later work with these archives in a J2EE tool of your choice or install the files manually into an app server environment of your choice, etc.
NOTE: Deployment objects (in the discussion below) are supported only in the Enterprise Edition of the product.
 To create EAR, WAR, and JAR archives from within Composer:
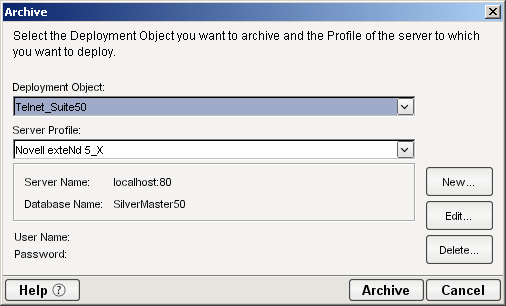
Using the File menu, select the Archive Project command. A dialog appears.
Use the Deployment Object dropdown menu to select the Deployment Object applicable to the application you wish to archive.
Choose the Server Profile that corresponds to the intended deployment environment. (Use the New, Edit, or Delete buttons as necessary.)
Click the Archive button to initiate the archiving process, or Cancel to abort.
When Composer has finished creating archives, you will find them under the staging folder that you previously specified when creating your deployment object. (To see this preference, open the Deployment Object in question and use File > Properties to view its setup params.)
When it comes to building and deploying the deployment EAR, there are several options.
The first option is to use Composer's native design-time UI to package and install deployable objects for a given project. (This requires the standalone version of Composer, or the exteNd Suite Enterprise Edition. It is not an option in the Professional Edition suite.) The "Composer-direct" method is the easiest and quickest way to deploy Composer-built web applications.
The second option is to use exteNd Director's utility-tools UI for building and/or customizing a deployment EAR. This option should be considered when your Composer project needs to be bundled into an EAR with other Java objects (such as portal components) as part of a large deployment.
A third option is to build JARs, WARs, and/or EARs manually (or with a third-party tool) and install your deployment objects "by hand," following the procedures recommended by your app-server vendor. This option should be considered only when you need low-level control over the deployment process for one reason or another.
We'll discuss the first two options in depth, beginning with Composer-direct deployment.
If you are using Composer Enterprise Edition, you can deploy projects directly from Composer. (The Professional Edition does not support this capability. If you will be using Professional Edition, you should skip this section and proceed directly to "Deployment from exteNd Director" further below.)
The basic steps involved in deploying your project from the Composer design-time environment are:
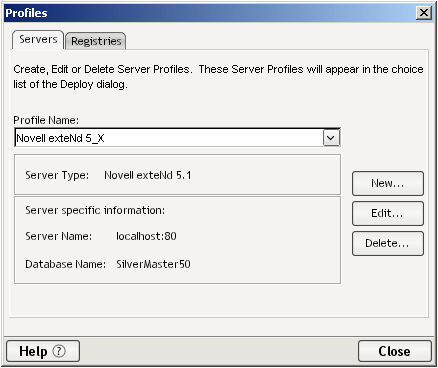
Server profiles define a target server and the necessary server-specific information required for deplyoment to that server. Creation of a server profile is a necessary prerequisite for deployment of a Composer project to the app server (regardless of app server type: Tomcat, Novell exteNd App Server, WebSphere, or WebLogic).
NOTE: Server profiles are not project-level resources. They are stored in a properties file and are available for use with all projects you create using a given installation of Director or Composer.
Before creating your server profile, you should make sure that the application server to which you will be deploying is running and has the exteNd Composer Enterprise Server (and any necessary Connects) installed and running as well.
Click on New... to create the new Server profile. A dialog appears:
Specify a Profile Name. The name you type will be used to identify this particular profile when you deploy your project.
Select a Server Type from the drop-down list. The choices are:
NOTE: These were the choices as of the exteNd 5.2 release timeframe. Consult the Novell website for the latest upgrade and patch information.
The fields in the "Server Specification Information" area of the dialog will change according to which Server Type you specify in this field.
In all cases, you will need to provide a Server Name. In the example above, localhost:80 was entered, since this refers to a locally installed exteNd Application Server.
Enter a User Nameand Password if your server requires authentication.
Click the checkbox if you would like to use this Server Profile as your default.
NOTE: To modify existing server profiles, go to Tools > Profiles and select the Servers tab. Select the profile you wish to change and click on Edit. Similarly, if you wish to delete a Server profile, click on the Delete button.
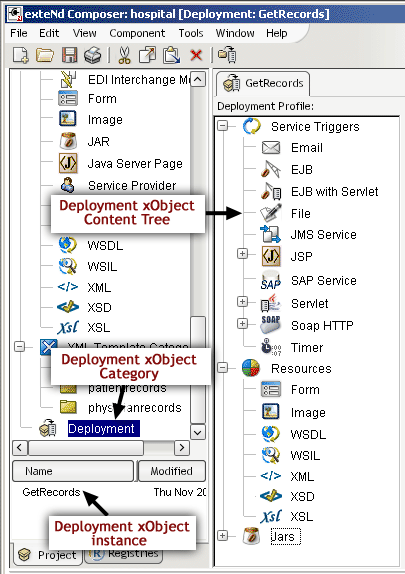
Deployment objects, like Services, Components and Resources, are another species of Composer xObject. They contain metadata about your deployment: information about which service triggers to create and which resources to deploy.
NOTE: This discussion does not apply to the Professional Edition suite. The Deployment xObject is available in Composer only in the Enterprise Edition suite. If you are using the Professional Edition, you will create and manage deployment artifacts in the Director environment. See "Deployment from exteNd Director" further below.
Like other xObjects, Deployment objects are accessed through Composer's Navigator Pane.
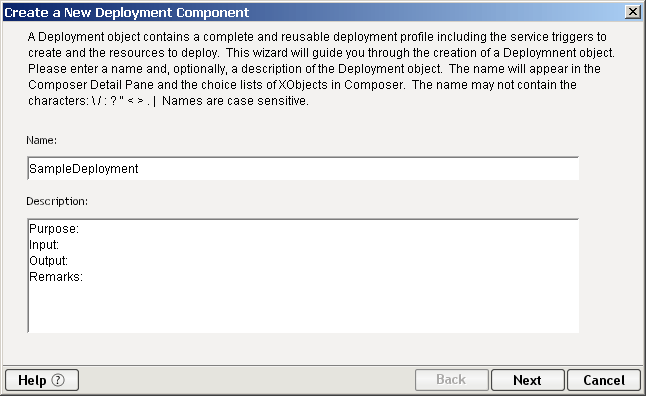
The procedure for creating a Deployment xObject will probably feel familiar to you, since it involves a wizard that operates much like Composer's other xObject-creation wizards.
To create a Deployment Object:
Click with your right-mouse button on Deployment in the Navigator Tree and select New. (Alternatively, use File > New > xObject, and select Deployment on the Component panel.)
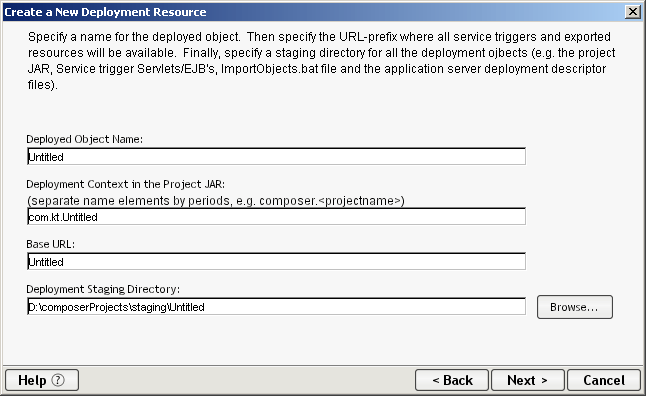
Specify a Deployed Object Name (this will default to the name you entered on the previous screen).
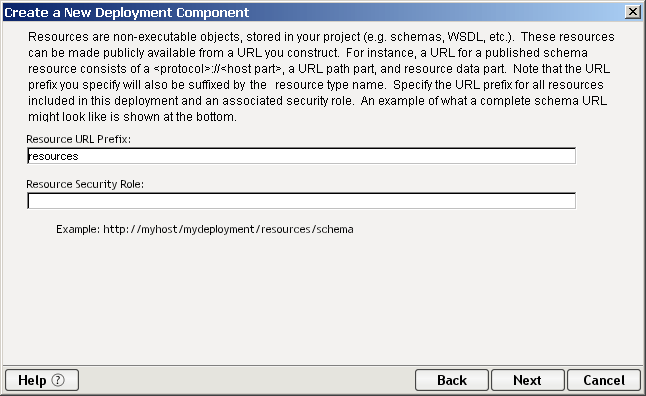
Specify a Base URL by entering the URL-prefix where your service triggers and other resources (JSPs, images, etc) will be available.
Finally, browse your file server to designate a Staging Directory to hold your deployment objects and descriptor files.
Specify a Resource URL Prefix to be used to access any resources used by your project which you would like to be publicly available.
You can also designate a Resource Security Role, if you are using J2EE 1.3 (or higher), to prevent users from surreptitiously accessing resources
NOTE: The security role is ignored for Composer Services in the project that use the resource.
Click Next to proceed to the final screen of the Deployment Object creation wizard:
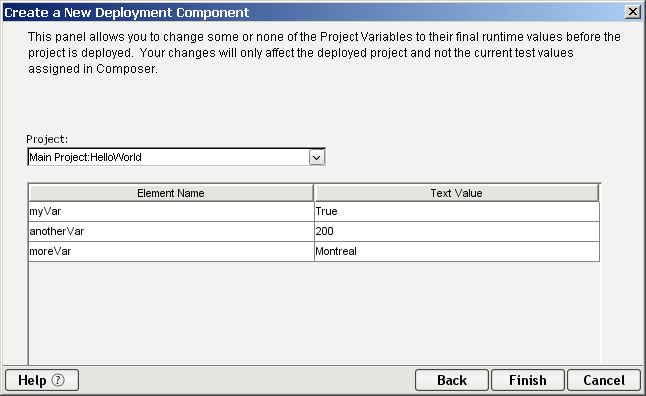
This panel provides you with an opportunity to override project variables that exist in the project (and any subprojects called by it) and set them to the values they will need at runtime. The table is pre-populated with the project variables and their values currently defined in the project.
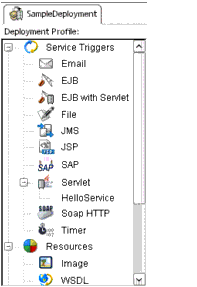
Click Finish to create the deployment object and have it appear in your work area in the form of a Deployment Content Tree, as shown below:
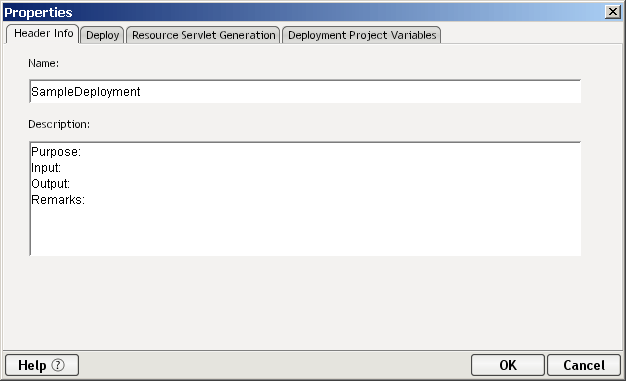
Like all other xObjects, once a Deployment object is created, you can access a tabbed dialog containing all the wizard panels by selecting a Deployment object and using the RMB to select Properties. Values can be modified, as necessary, using the Properties dialog. An example of the tabbed interface is shown below.
The discussions below describe how to set up and carry out various kinds of deployment operations from the Composer design-time environment using standalone Composer or the Enterprise-Edition suite (not Professional Edition).
NOTE: If you are using the exteNd Suite Professional Edition, you should skip the following discussion and go directly to the discussion at "Deployment from exteNd Director" further below.
IMPORTANT: Before attempting any of the following procedures, you should already have created an applicable server profile (see "Server Profiles" above), as well as a Deployment Object (see discussion at "The Deployment xObject") to contain this project's deployment contents. You should also have already created (and added to your Deployment Object) any special resources needed by your service(s), such as WSDL resources for SOAP services.
One of the most important configuration choices regarding the deployment of services is deciding what kind of triggering mechanism to associate with the service. Composer can create many different kinds of trigger objects. All you do is decide which kind(s) of triggers to associate with which individual services, and specify a few parameters appropriate to each trigger.
Note that you can associate more than one trigger type with a given service. You can also associate more than one service with a given trigger type.
In the sections to follow, you'll learn about:
Defining EJB-Based Triggers (including EJB-with-Servlet)
NOTE: For information on how to set up JMS-based or SAP-gateway-based service triggers, see the separate JMS Connect User's Guide or the SAP Connect User's Guide, as appropriate.
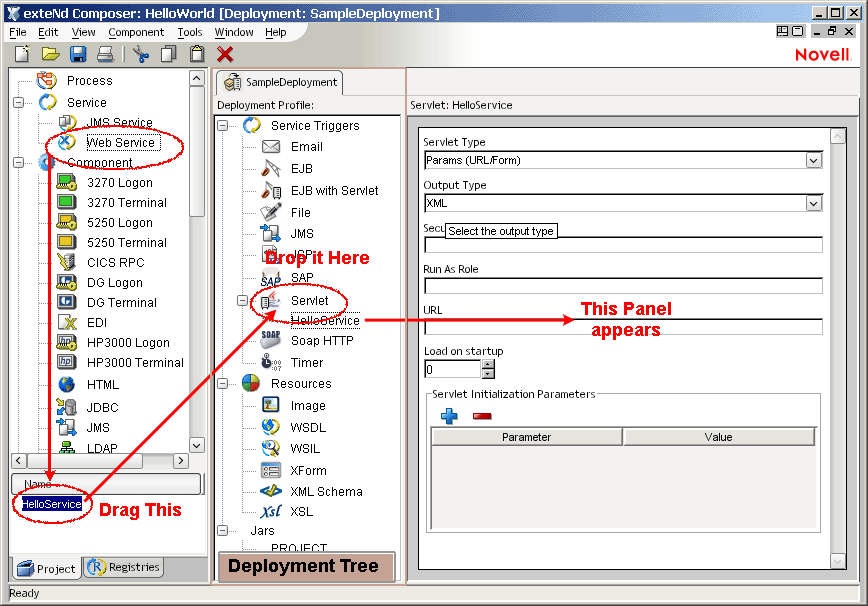
Most of the procedures described in this chapter use the drag-and-drop GUI metaphor extensively. Drag-and-drop affords an easy, quick method of associating triggers with services. But it should be noted that the same associations can also be created using menu commands instead of drag-and-drop. (See next section.)
The drag-and-drop procedure is easy:
Drag a particular service instance over to the Deployment tree and drop it on the trigger type of interest
To create a Service Trigger, simply right-click on the object in the Navigator pane. There are caveats, however. In order to create a Service Trigger, the following two conditions must be met:
A deployment xObject must be open and active in the native environment panel editor.
The object that was right-clicked on must actually be able to be used to create a service trigger.
If these conditions are met, then the items listed in the sub-menu will be the service triggers that can be created using the object that was right-clicked on.
NOTE: A service must have an associated WSDL resource to be deployable as SOAP HTTP and thus for the menu item to appear.
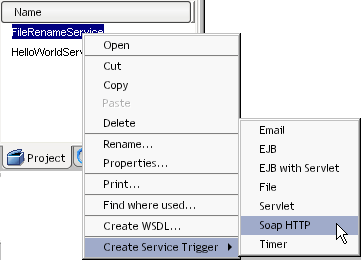
Clicking on one of these items will create the appropriate entry in the deployment tree pane (as if the user had dragged it there manually) and cause its property sheet to appear in the deployment properties pane.
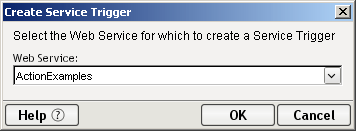
You can also create a Service Trigger using the Create Service Trigger submenu in the Component menu (in Composer's main menubar), as illustrated below.
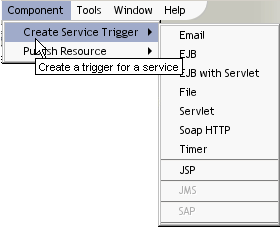
When you make a selection from one of the trigger options shown in the submenu, a small dialog appears:
Use the pulldown menu control to select the service to which the trigger will be bound. Then click OK.
NOTE: The JMS and SAP service-trigger options are not available unless the relevant Connect products are installed.
You can configure a Composer service to fire when an e-mail arrives in a particular mailbox. The e-mail becomes the payload, such that if you were (for example) to write Input.getXML() to System.out, using a Function Action, you would see the entire message appear in your system console, in XML format, similar to the following:
<?xml version="1.0" encoding="UTF-8"?>
<Message>
<X-Auth-OK>joeblow@smtp-send.myrealbox.com</X-Auth-OK>
<Return-Path><jblow@myrealbox.com></Return-Path>
<Received>from JBLOW-DT1 jblow@smtp-send.myrealbox.com [12.23.52.5]
by smtp-send.myrealbox.com with NetMail SMTP Agent $Revision: 3.42 $
on Novell NetWare;
Mon, 29 Sep 2003 13:09:23 -0600</Received>
<Message-ID><13140405.1064862444476.JavaMail.JBlow@JBLOW-DT1>
</Message-ID>
<Date>Mon, 29 Sep 2003 15:07:24 -0400 (EDT)</Date>
<From>joeblow@myrealbox.com</From>
<To>joeblow@myrealbox.com</To>
<Subject>Trigger Test Mail</Subject>
<Mime-Version>1.0</Mime-Version>
<Content-Type>text/plain; charset=ASCII</Content-Type>
<Content-Transfer-Encoding>7bit</Content-Transfer-Encoding>
<Body charset="ASCII" encoding="7bit" subtype="plain" type="text">This is a test message
</Body>
</Message>
Before creating an e-mail trigger, you should know:
The IP address of the target mail server (e.g., pop3.myrealbox.com)
The account-holder's name (such as the "myname" in myname@mydomain.com) and any associated password
The account name and password info should exist in the form of a Mail Simple Authentication connection resource. (Instructions for creating this type of connection resource can be found under "Mail Simple Authentication Connection Resource" in the discussion of Connection Resources.) If you have not created a resource of this kind to hold your account info, do so before using the procedure shown below.
You should also have some idea of how often you would like the target mailbox to be checked, and whether or not e-mails larger than a certain size should be ignored.
Note that as e-mails are detected and processed, they are consumed (removed) from the mailbox. Any e-mails that are detected but not processed (due to size constraints—see below) will be left in the box unread.
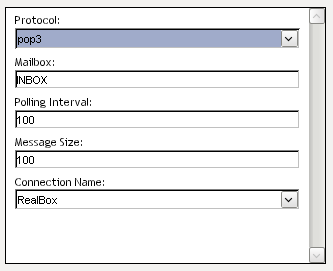
To associate an E-mail Trigger with a service:
In the Navigation Category pane, under Services, click on Web Services.
Find the service you wish to deploy in the instance pane and highlight it by clicking.
Drag the service onto the E-mail node of the Deployment tree, under Service Triggers. When you let go of the mouse, a property sheet similar to this one should appear:
Under Polling Interval, enter a numeric value representing the time, in seconds, to wait between checks of the mailbox.
NOTE: If the box contains e-mail and the trigger fires, Composer waits until the service finishes executing before checking the box again. So in other words, if the service should happen to take two seconds to execute, and the polling interval is 10 seconds, it might take as long as 12 seconds for the box to be checked again after the previous e-mail has been detected.
Under Message Size, enter a numeric value representing the size, in kilobytes, of the largest e-mail that will be processed. Any e-mail that is smaller in size than this number will be processed: the service will fire and the mail will be passed to it (and removed from the mailbox in the process). Any e-mail larger in size than this value will simply be ignored.
Associating an EJB trigger with a service can be done in two slightly different ways. One way is simply to designate an EJB (session bean) as the object through which service access occurs. In this case, there is no URL to hit: instantiation of the EJB has to occur programmatically (perhaps through a custom trigger object of your own design). The only deployment parameters you can set in this case are the JNDI name, session type, and transaction attribute. Your service, after deployment, becomes available through normal JNDI/EJB mechanisms, but otherwise has no "web-facing" layer.
The other way of deploying a service to the EJB container is to choose the "EJB with Servlet" trigger option and let Composer produce the EJB as well as a servlet that knows how to access the EJB. In this case, Composer "front-ends" your EJB-based service with a web-tier component (a servlet) that can act on HTTP requests.
To associate an EJB (or EJB-and-Servlet) with a service:
In the Navigation Category pane, under Services, click on Web Services.
Find the service you wish to deploy in the instance pane and highlight it by clicking.
Drag the service onto the EJB or EJB with Servlet node of the Deployment Profile tree, under Service Triggers.
If you drop the service onto the EJB trigger node, you will get a property sheet that has fields only for three items: JNDI Path, Session Type, and Transaction Attribute. See explanations below.
If you drop the service onto the EJB with Servlet category node, the property sheet that appears will have the aforementioned three items as well as several more:
(Enterprise Edition only) For Transaction Attribute, select the applicable JTA transaction behavior from the dropdown list. Choices include:
If a Stylesheet Resource is to be used for transforming this service's output, select the appropriate Stylesheet Resource from the pulldown menu provided.
NOTE: You will typically use this option when the Output Type specified in the previous step is XHTML.
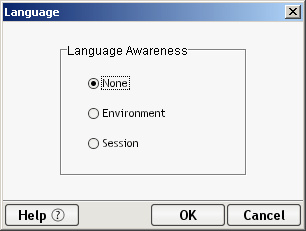
If you are using a stylesheet (per the previous step) and you have implemented multiple language versions of the stylesheet, and you wish to specify the language version to use, click the Language button. A dialog will appear.
Choose one of the radio buttons:
NOTE: Please refer to "Support for Language Versioning of Resources" for a more detailed discussion of this dialog and its intended use.
If this is a J2EE 1.3 (or higher) application, optionally specify a Security Role.
NOTE: Security roles are a J2EE-defined mechanism for managing access control. The implementation of this layer is app-server-dependent. It is not implemented by Composer. For more information on J2EE security role concepts, consult the Sun web site and/or your app-server documentation.
If this is a J2EE 1.3 (or higher) application, optionally indicate a Run as Role.
The File trigger enables you to set up a scenario in which the appearance of a new file on a particular path on the local hard drive will fire a service. This can be useful for situations in which documents that need to be processed on a timely basis (as part of a workflow) can be handled in automated fashion.
When a File trigger is used, a process on the server monitors a given folder (or subdirectory) on the local hard drive, checking for the appearance of new files at regular intervals. (You can specify any interval you want.) As documents appear in the target directory, the trigger detects them and sends them, one by one, to your Composer service. Each time a file is detected, the following events take place:
A copy of the file is written to a destination directory. You will specify a destination directory when you set up your trigger at design time (see setup procedure below). The destination might, for example, be called \dest. At runtime, each time a file is processed, Composer creates a new folder within the \dest folder. The new folder's name will be its timestamp: e.g., 2003.09.30_08.54.48. Thus, a copy of the original file (bearing the original name) is written to \dest\2003.09.30_08.54.48.
Depending on the type of file-handling you specified in your trigger, your service will receive, in Input, either the contents of the detected file or a URI that points to a copy of the file. The file-handling options you can specify are as follows:
Content as XML—The file itself is assumed to be well-formed XML. The unmodified file becomes the Input message part to your service.
Embed Content in XML—The file contents are copied into a CDATA section of an XML skeleton file. That XML file becomes the Input message part in your service.
File Reference—A URI (relative path) that points to the new copy of the file is placed in an otherwise-empty Input message part.
The original file is deleted from the source directory (the directory that the trigger process monitors).
The timer restarts. That is, if the polling interval is ten seconds, the clock will start at zero again as soon as the service has finished running.
You can set up a File trigger to pass data to your service in any of three ways.
When you specify this option, each new file that appears in the target directory is assumed to consist of well-formed XML.
The Embed Content in XML option is appropriate when arriving files are not in XML format. (For example: EDI files.) Composer merely wraps the content of the file in a CDATA section, so that your service's Input document looks like:
  <?xml version="1.0" encoding="UTF-8"?>
  <Root>
     <![CDATA[ the input file's raw content appears here ]]>
  </Root>
By default, the root element is named Root. But you can override this behavior, as shown further below.
NOTE: Binary content is not appropriate for CDATA, since binary streams can contain XML-illegal characters. If you will be processing binary files, or files that may contain illegal characters, you should not use the "Embed Content in XML" option. Instead, use "File Reference," and read the file via a URL/File-Read action inside a component, with base64-encoding enabled. (If you need the data in raw form, rather than base64-encoded, you will need to perform the necessary file I/O operations yourself, in a custom Java class.)
When you use the "File Reference" option, your Input will look similar to:
  <?xml version="1.0" encoding="UTF-8"?>
  <Root>..\dest\2003.09.30_09.10.15\myIncomingFile.dat</Root>
Again, by default, the root element is named Root. But you can override this behavior.
NOTE: All pathnames are relative to the app-server \bin directory by default. You can override this behavior, however.
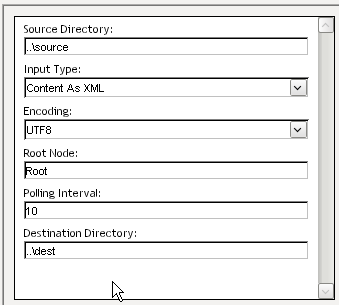
To create a File-based trigger:
In the Navigation Category pane, under Services, click on Web Services.
Find the service you wish to deploy and highlight it in the instance pane by clicking.
Drag the service onto the File node of the Deployment tree, under Service Triggers. When you let go of the mouse, a property sheet similar to this one should appear:
Under Source Directory, enter a URI pointing to a directory on a local storage drive that should be checked for arriving files. The URI can be a relative path (in which case it will be treated as relative to the \bin directory of your app-server installation), or it can be a fully qualified path, such as d:\temp.
NOTE: The source directory need not already exist before you deploy the service.
Use the dropdown menu under Input Type to specify how each file's contents should be handled. (See the discussion under "File-Handling Options" above.)
Content as XML—Arriving files are assumed to be well-formed XML. The unmodified file becomes the Input to your service.
Embed Content in XML—File contents are copied into a CDATA section of an XML file. That XML file becomes the Input message part in your service.
File Reference—A URI (relative path) that points to the new copy of the file is placed in an otherwise-empty Input message part.
If you are using Embed or File-Reference handlers, enter the name you would like Composer to use for the root node of the Input document. The default is Root. Change this to any XML-legal element name.
Under Polling Interval, enter the number of seconds Composer should wait between inspections of the Source Directory.
NOTE: Polling is suspended when your service is executing. It resumes again when the service has finished running.
Under Destination Directory, enter the path to the directory that will receive copies of processed files as described earlier. (Composed will create datestamped folders in this directory at runtime: one per file processed.)
The file-I/O portions of a service that uses the File trigger cannot be tested using ordinary design-time debugging techniques, since the polling, file-handling, and output functions of the trigger will only work on the server. Deployment to a server is a necessary part of testing File-triggered services.
Of course, regular "action model" actions can be tested and debugged as usual in the components that implement your service's business logic. In order for your action model to operate against realistic Input data, you may need to "dummy up" some specimen XML documents of the type Composer will create in actual operation. (See the XML examples shown under "File-Handling Options" further above.) Use sample documents for action-model debugging; then deploy the service and test.
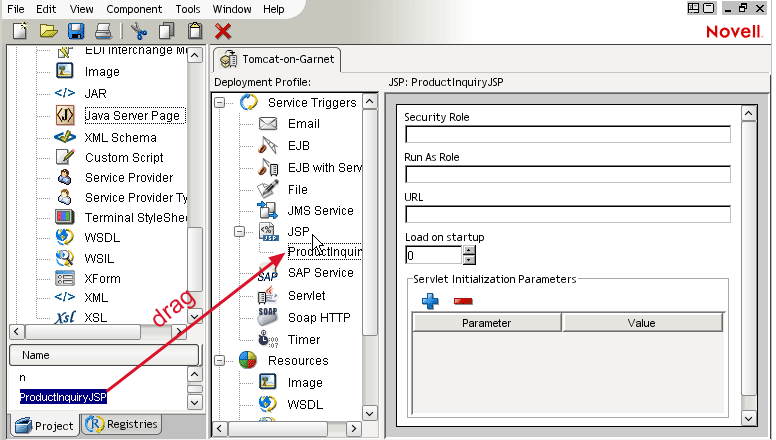
If you are "front-ending" your service with a JSP, you can specify the JSP-to-service binding using the following procedure. Note that you should already have created a JSP Resource for the Java Server Page in question, prior to beginning this procedure. (For information on how to create JSP Resources, see "About JSP Resources" in the section on Resources.)
To associate a JSP with a service:
In the Navigation Category pane, under Resources, click on Java Server Pages.
Find the particular JSP you wish to use as a trigger in the instance pane and highlight (select) it by clicking.
Drag the selected JSP Resource onto the JSP node of the Deployment Profile tree, under Service Triggers.
The JSP Resource you selected now appears as a node under the JSP node in the trigger tree, and the JSP Properties sheet is displayed in the editor pane on the right (see illustration).
Optionally enter a name to use in Security Role.
NOTE: Security Roles are valid for J2EE 1.3 only.
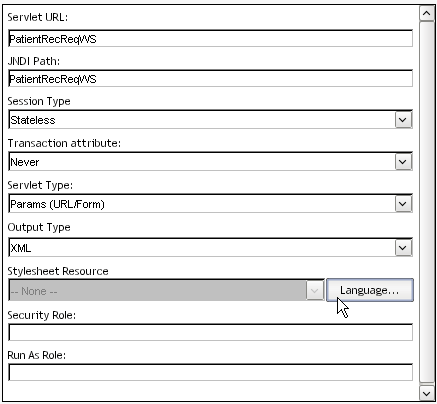
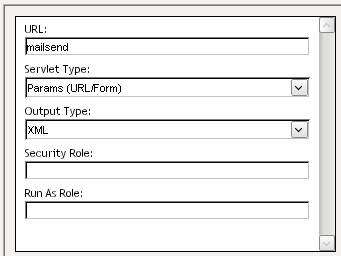
In many cases, you will simply trigger a service off a servlet that handles requests on a given URL. (The servlet can be exposed through a JSP or not. In this case, we will assume not. If you wish to bind a JSP to a particular service, see the discussion at "Defining JSP-Based Triggers" elsewhere.) The servlet may be configured to handle data arriving via HTTP GET or POST; and in the latter case, the XML data might be contained in a particular form field, or it might arrive as multi-part mime content, or it may comprise the content stream of the HTTP POST.
To define a servlet-based trigger for a service:
In the Navigation Category pane, under Services, click on Web Services. The names of existing services will appear in the instance pane.
In the instance pane, find the service you wish to deploy and highlight (select) it by single-clicking.
Drag the selected service onto the Servlet node of the Deployment tree, under Service Triggers, as shown above.
The service you selected now appears as a node under the Servlet branch, and the Servlet Properties sheet is displayed in the editor pane.
Fill in a URL for deployment. This will form the tailmost fragment of the URL for your service. The complete URL will be something like:
http://localhost:80/[MyDataBase]/[MyDeploymentEAR]/myurl
where [MyDataBase] is the database in which the deployment will occur on the app server (Novell exteNd app servers only); [MyDeploymentEAR] is the name of your Composer project (Professional Edition) or Deployment xObject (Enterprise Edition); and myurl is the value you entered above.
Select an appropriate Servlet Type from the dropdown list as the source of data which will be used as input to the service. The choices are:
Select an Output Type denoting the MIME type of the response data for the service. Valid types include:
Optionally enter a Security Role name.
NOTE: Security Roles are valid for J2EE 1.3 only.
Under Run As Role, type the name of a Role to use while running the service.
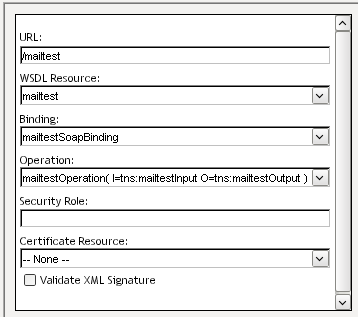
The procedure for associating a SOAP trigger with a Web Service involves a process similar to the ones described above.
NOTE: The following procedure assumes familiarity with SOAP, WSDL, and XML Signature concepts. If you are not familiar with these technologies, consult the http://www.w3.org web site and/or other resources as necessary before proceeding.
To associate a SOAP trigger with a service:
In the Navigation Category pane, under Services, Click on Web Services.
Find the service you wish to deploy in the instance pane and highlight it by clicking.
Drag the service onto the SOAP HTTP node of the Deployment Profile tree, under Service Triggers. The property-sheet pane changes to the following appearance:
In the property sheet, enter a URL name for the service. This is the final portion of the URL (not the complete URL).
NOTE: An HTTP GET on this URL will return the WSDL for this service. An actual SOAP request on the URL will trigger the service.
IMPORTANT: The value you enter here will be reflected through to the <service> element of your service's WSDL after deployment. Changes will also be reflected in child elements <port> and <soap:address>. In other words, the <service> element is updated dynamically to use the URL you specify here.
Select the appropriate WSDL Resource if it is not already displayed.
Select the appropriate Binding if it is not already displayed. (Some WSDLs define more than one binding; when this is the case, you can choose the binding that applies to the URL you specified earlier. In the vast majority of cases, you will simply accept the default value shown.)
Optionally enter a Security Role (for J2EE 1.3+ applications).
Optionally use the dropdown list to select a Certificate Resource (if any) from the ones currently associated with the project. This is necessary only if the service will sign outgoing responses using the XML Signature scheme. (See "About Certificate Resources" for more information on Certificate Resources and their usage.)
If the service requires inbound SOAP requests to be digitally signed, check the Validate XML Signature checkbox.
NOTE: If you check this checkbox, it means that every inbound request must contain digital signature information in the SOAP header, in accordance with the XML Signature standard. If a request does not contain such a signature, a SOAP fault will result.
A Timer trigger causes a particular Composer service to be executed on a periodic basis, independent of any events. This type of triggering mechanism lends itself to many use-cases. For example:
You may want a service to generate daily or weekly reports: activity reports, inventory reports, payroll, financials, etc.
You may have a need to run maintenance jobs on a scheduled basis, such as scanning a database for stale data every 48 hours, pruning "opt-outs" from a mailing list every day, etc.
Composer's Timer trigger supports two types of periodic invocation: two notions of repeat-processing. At one level is the idea of scheduling: tying the execution of a process to one or more fixed dates on a calendar. This is calendar-based recurrence, or simply recurrence. Composer supports recurrence in the general case. You can schedule a job to occur once (i.e., recur zero times), at a given date/time, or you can schedule it to occur at multiple dates/times (which might not be evenly spaced). The key intuition is that the job follows a schedule which begins on a certain date and recurs zero or more times at other dates.
The second notion of timing supported by the Timer trigger is periodic invocation of a process until a certain number of invocations has occurred. The use case here is "This service needs to execute X times, with a wait-time between executions of Y seconds" (or minutes, days, etc.), independent of calendar date. The implied parameters are an execution count and an execution interval.
By combining these two notions of timing, it's possible to achieve a high degree of customization of execution schedules. For example:
To execute a service once an hour during business hours (e.g., 9:00 to 5:00), you can schedule the service to recur daily, beginning at 9:00, with an execution count of nine and an execution interval of 60 minutes.
To execute a service once an hour, continuously, schedule it as a daily recurring item, with an execution count of 24 and an execution interval of 60 minutes.
Composer allows you to configure recurrences based on daily, weekly, or monthly invocations. In the weekly case, you can further specify recurrence by one or more specific days (such as every Sunday, or Tuesdays-and-Saturdays, or Monday-Wednesday-Friday). When the recurrence is monthly, you can further specify that invocation occurs on the first day of the month, the last day of the month, or a specific day.
To create a Timer-based trigger:
In the Navigation Category pane, under Services, click on Web Services.
Find the service you wish to deploy and highlight it in the instance pane by clicking.
Drag the service onto the Timer node of the Deployment tree, under Service Triggers. When you let go of the mouse, a property sheet similar to this one should appear:
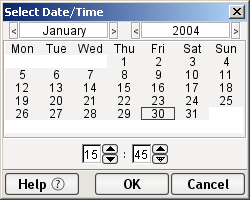
If you want the trigger to begin on a certain date, click the Calendar button. A dialog will appear, similar to the one below.
Use the various controls in this dialog to select the date and time for initial invocation of the service. Then click OK to dismiss the dialog. The date and time you chose will appear in the Date and Time field of the trigger's property sheet.
If this is to be a recurring process, click the Recurrence button. (It will be labeled "Non-recurring" until you have specified more information.)
NOTE: The Recurrence button will be enabled only if a date is showing in the Date and Time field. If the button is disabled, go back to the previous step.
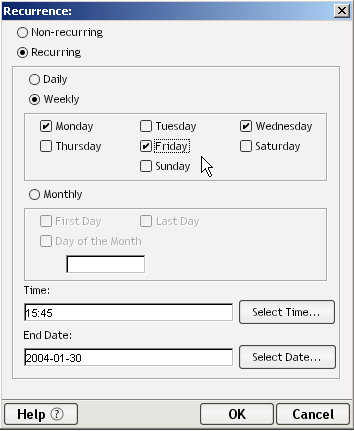
When you click the Recurrence button, a dialog will appear as shown below.
Click the Recurring radio button. Other controls in the dialog become enabled.
Click the Daily, Weekly, or Monthly radio button as appropriate. Additional controls become enabled.
Under Time (near the bottom of the dialog), enter a time (in 24-hour-clock format) representing the time of day when the service should kick off. If desired, use the Select Time button to bring up a time chooser dialog with spin controls for specifying hour and minutes.
Under End Date, enter a date (in YYYY-MM-DD format) representing the final date beyond which no more executions will occur. If desired, use the Select Date button to bring up a date chooser dialog with point-and-click controls for specifying a calendar date.
Under Execution Count, enter the total number of repetitions for execution of this service.
Under Execution Interval, enter the time interval to wait between executions. (Composer will wait this amount of time, after the service finishes, to execute it again.) Append `s' to the numeric value for seconds; `h' for hours; `d' for days. For example, 8h means "eight hours." The default (if no units are specified) is seconds.
Note that it is possible for you to specify recurrences, execution intervals, and counts that, taken together, make little sense (such as daily recurrence of a process that is to repeat 10 times at 25-hour intervals). Composer won't complain: It will simply add points to the execution timeline, and try to execute your service when each point arrives. The results may or may not be what you expect. It's up to you to sanity-check your trigger's parameters.
Resource objects listed in the object detail pane can be added to a deployment by simply dragging them onto the appropriate tree node in the deployment-object tree pane. This will add a new child to the category in question. You will be able to drop resources only onto targets that are appropriate for the category. When you hover over a disallowed drop target, the cursor changes to a circle-slash symbol.
The drag-and-drop UI metaphor makes resource deployment simple and quick. For example: To deploy an image resource, just drag an image resource from the object detail pane to the "Image" node of the deployment tree pane. Since resources have no associated properties, the deployment properties pane would be blank in this case. Default URLs are automatically assigned based on both the resource type and the base URL that were defined when creating the deployment object.
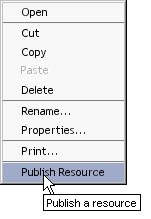
Under some circumstances, you can highlight a resource in the instance pane and then right-click on it to expose a context menu from which to deploy the object. Two conditions must be met:
The resource you've selected must be one that can be "made publicly available" (published to the outside world) in a deployment object. For example, Image resources can be published on a URL. But Custom Script resources generally would not be since they are used internally by Composer.
If (and only if) these conditions are met, then right-clicking on a resource will bring up a context menu, in which the last (bottommost) command is a Publish command.
Once all the required services and resources have been added to the Deployment xObject, and all trigger associations have been specified, the actual deployment of your project to the app server can occur.
NOTE: The features described in this section are available only in Composer Enterprise Edition.
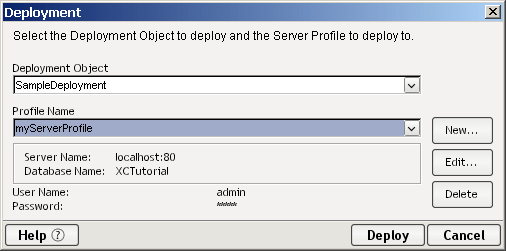
This will take you to a dialog that allows you to associate a Deployment xObject with a server profile.
Select a Profile Name from the dropdown list of server profiles.
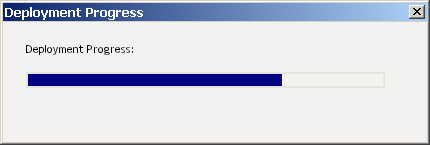
You will see a status bar indicating the progress of the deployment:
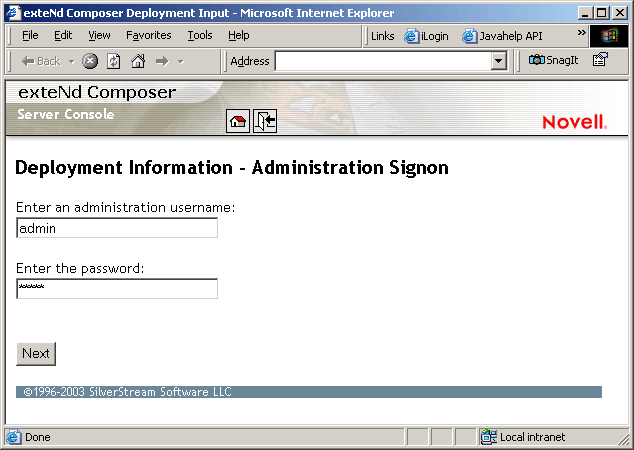
When the progress thermometer is finished, your web browser will launch and you will see a screen similar to the following. (This example assumes that you are deploying to the Novell app server. Somewhat different screens apply in the case of other app servers.)
Enter the name and password information appropriate to your app server in the spaces provided, then click the Next button. A new screen will appear.
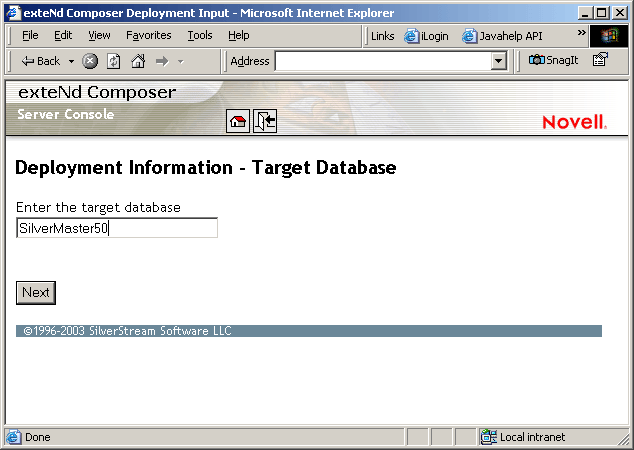
If you are deploying to a Novell 5.x app server, this screen prompts you for the name of the database into which the project EAR will be deployed. The default is SilverMaster.
Click the Next button. A third and final browser screen appears.
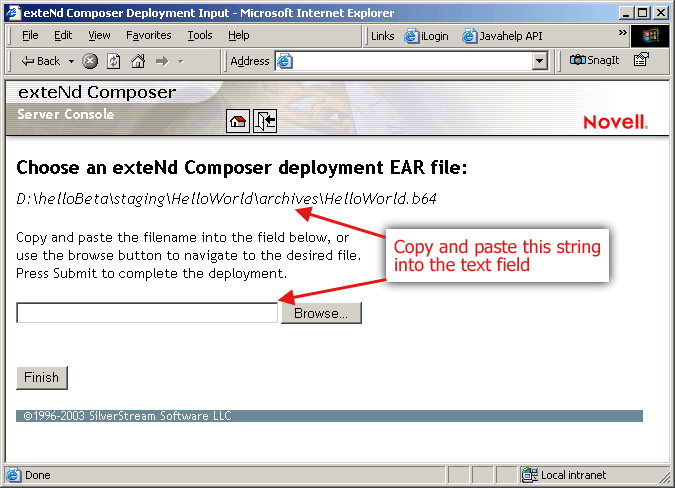
Copy and paste the deployment-archive name (i.e., the file name shown in italics near the top of the page) into the text field shown. (Alternatively, use the Browse button to browse your file system until you've located the deployment archive you wish to deploy.) This is the delpoyment EAR that Composer created in a staging area (the staging area described earlier in "To create a Deployment Object:", above).
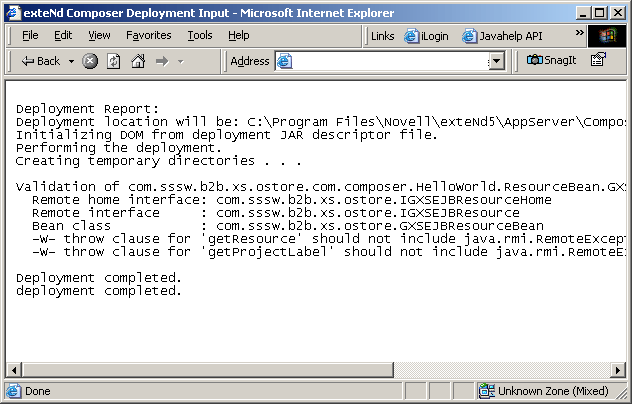
Click the Finish button. A status report page will appear:
This page will tell you whether the project deployed normally, or an error was encountered. In case of error, there will usually be a complete stack-trace listing information that can be helpful in troubleshooting the cause of the problem. (Note that a delay of more than a few minutes in navigating between the browser screens described above can cause connections to time out. In that case, repeat the deployment procedure as needed.)
You can package your project into a deployable EAR archive using exteNd Director, if you do not want (or are unable ) to use Composer's native deployment facilities.
NOTE: For users of the Professional Edition exteNd suite (which does not expose the Deployment xObject features discussed earlier), the deployment procedures outlined here represent the only way to deploy Composer applications built in the Professional Edition suite. If you are a user of the Enterprise Edition suite, you may choose to deploy either from Director (as outlined here) or directly from Composer (as outlined above).
The basic procedure is straightforward:
Add your Composer .spf file as a Subproject to the already-open EAR project.
In Director, use File > New > Web Services > Composer Web Service to initiate the wizard that will lead you through the creation of "service trigger" artifacts for a given Web Service in your project. (This step will need to be repeated for each service in your project.)
Director also has code-generation features to help you create a variety of different kinds of skeleton files containing Java code to trigger Composer services directly. (This is discussed further below.) By editing the generated source code, you can quickly embellish, override, or extend Composer's "plain vanilla" service triggers to suite your needs.
NOTE: In addition to the discussion here, be sure to see the Novell exteNd Director documentation for additional information on the many J2EE deployment capabilities of Director.
If your Director project contains a Composer (sub)project, you can use Director wizards to specify deployment parameters for a service that is to be triggered by a SOAP servlet. The procedure is as follows.
To prepare a Composer service for deployment as a SOAP service:
IMPORTANT: In order for the following steps to succeed, you must have an EAR, WAR, or EJB-JAR project open in Director. WSDL must also exist for the service in question. (See "To generate a WSDL Resource from an existing service or create one in the XML editor:" in the Resources chapter of this guide for information on how to generate WSDL automatically.)
In Director, choose Control-N or File > New > File. The new-file dialog opens.
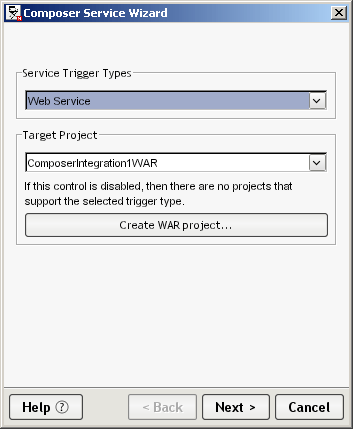
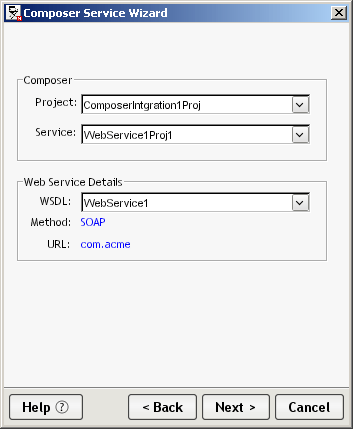
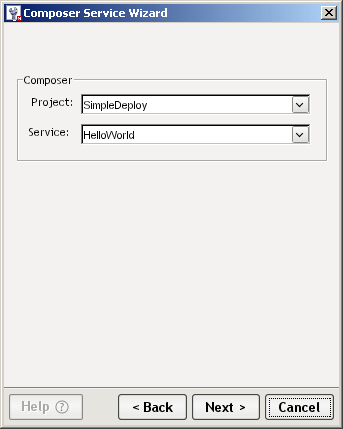
In the Web Services tab, select Composer Web Service and click OK. The first panel of the Composer Web Service wizard appears.
Use the pulldown menu control to select a Service Trigger Type of "Web Service."
Use the pulldown menu controls to select a Composer Project and a Service within that project.
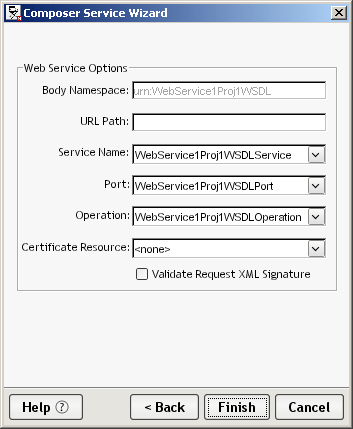
Using the pulldown menu, choose a WSDL resource that describes this service.
Enter a path next to URL Path describing the location of the service. (This may or may not be prepopulated.)
Next to Service Name, select the appropriate service name if it is not already showing.
Next to Port, select the appropriate port description if it is not already showing.
Choose an Operation from among those listed in the WSDL. (This list will be prepopulated.)
Optionally check the Validate Request XML Signature checkbox if you want to require that every consumer of this web service provide a digital signature as part of the SOAP request (using XML Signature standard techniques).
Click the Finish button. A summary dialog will appear, explaining what was done.
If your Director project contains a Composer (sub)project, you can use Director wizards to specify deployment parameters for a service that is to be triggered by a servlet or JSP. The procedure is as follows.
To create a servlet or JSP to trigger a Composer Web Service:
IMPORTANT: In order for the following steps to succeed, you must have an EAR, WAR, or EJB-JAR project open in Director.
In Director, choose Control-N or File > New > File. The new-file dialog opens.
In the Web Services tab, select Composer Web Service and click OK. The first panel of the Composer Web Service wizard appears.
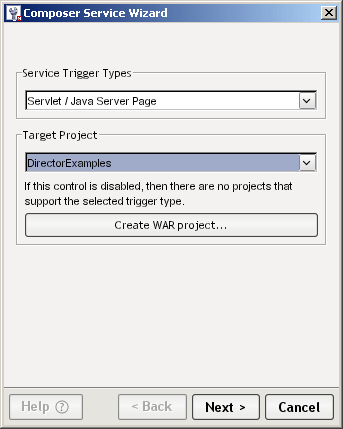
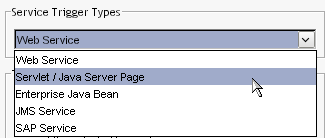
Use the pulldown menu control to select a Service Trigger Type. Depending on the type of project you have open and what it contains, and whether you are using Professional Edition or Enterprise Edition, you may see any or all of the following choices:
The following discussion assumes that you will be choosing "Servlet/Java Server Page."
Use the pulldown menu controls to select a Composer Project and a Service within that project.
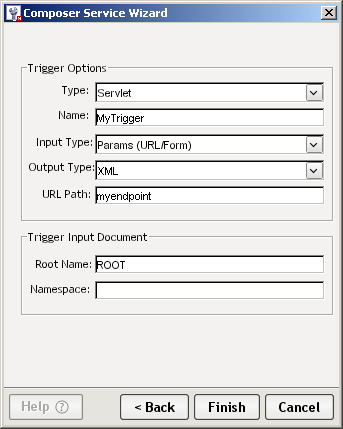
Under Trigger Options, use the Type pulldown menu to choose from the available trigger types.Enter a Name for the trigger.
Next to Input Type, select the option that corresponds to the manner in which your service will receive its XML input document(s):
Use the Output Type selector to choose the appropriate output format for your servlet: XML or HTML.
In the URL Path field, enter an arbitrary string representing the URL name of the servlet. For example, if your servlet were to handle requests on the following URL, you would enter "abcdef":
If you selected Params "(URL Form)" as the Input Type, above, you will see two fields under Trigger Input Document.
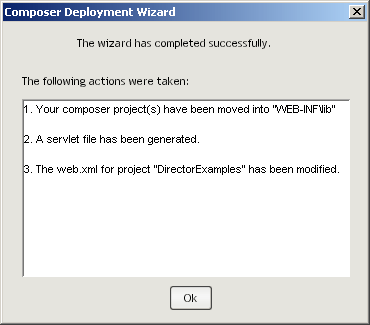
Click the Finish button. A summary dialog will appear, explaining what was done:
Once you have configured all of your project's Composer services in terms of deployment parameters, you can deploy the archive using Project > Deploy Archive (Control-F5) on Director's main menubar.
The following topics are discussed in more detail in Director's documentation:
Director has wizards that can help you with the creation of custom service-trigger code of various kinds. Code generation exists for JSPs, servlet code, and custom Java classes that implement direct execution of Composer services.
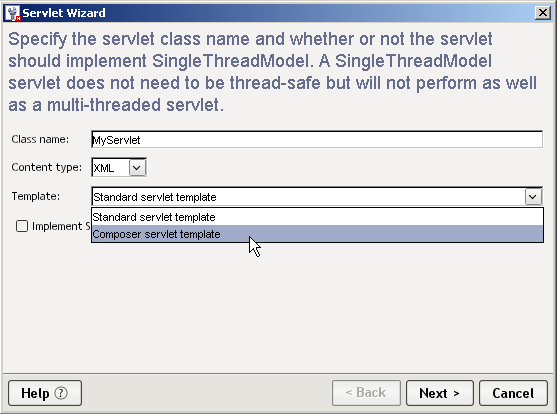
You can generate servlet source code for a Composer service trigger using Director's File > New servlet wizard. This wizard differs slightly from the one previously described (see above) in that you do not need to have a Director project open in order to use this wizard. So for example, if you merely want to generate the source code file for later use, you can do so with the following procedure, without first having to open an EAR or WAR project.
To create servlet code for triggering a Composer service:
In Director, choose Control-N or File > New > File. The new-file dialog opens.
Choose the output-content type of the servlet by using the pulldown menu next to Content type.
Using the pulldown menu next to Template, select Composer servlet template.
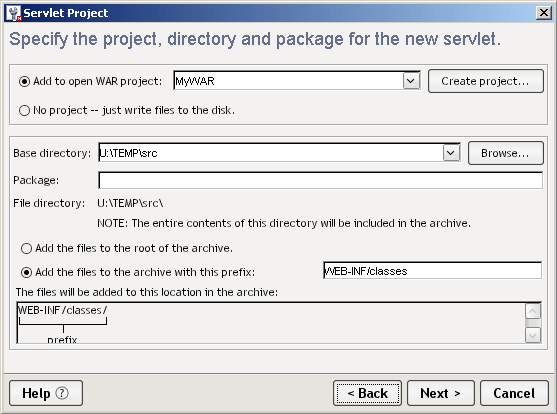
If you are adding this servlet to an open project, choose the Add to open WAR project radio button as shown in the illustration. (This button will be greyed out if you do not have a project open.) Otherwise, use the second radio button if you merely want to create a file and write it to disk.
Specify Base directory, Package, and File directory information in the lower portion of the dialog, as needed.
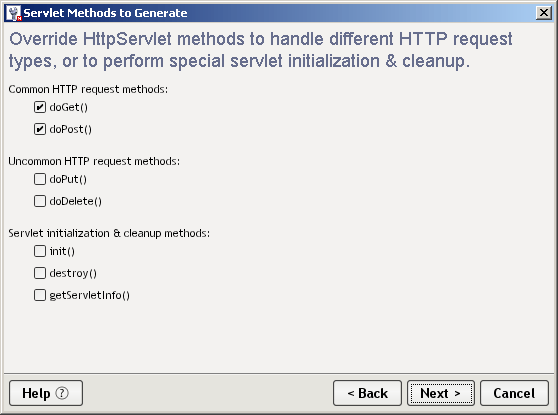
Select the servlet methods, if any, that you wish to override, using the checkboxes provided.
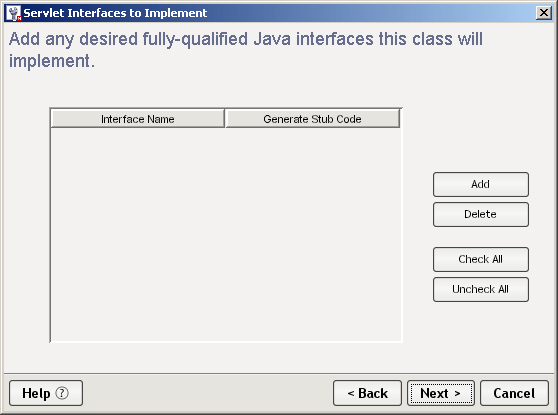
(Optional) Use the Add button to specify interfaces that your servlet class will implement, if any.
Click Finish. Director generates the servlet source code and displays it in the code editor.
Note that when you generate servlet code this way with no project open, it is up to you to add appropriate entries to the web.xml file for any web application in which you wish to use the servlet. (Director will do this for you automatically if you have a WAR project open already, before starting the wizard.)
You can use Director's JSP wizard to create a Java Server Page that contains tag-library calls designed to invoke Composer services. The procedure is outlined below.
To create a JSP for triggering a Composer service:
In Director, choose Control-N or File > New > File. The new-file dialog opens.
Use the Template pulldown menu control to select the template upon which the generated JSP will be based:
Specify project, directory, and package info for the servlet.
Click Next (or Finish, as applicable) to exit the wizard. Director will create the JSP code and open the new JSP in the code editor.
You may find it necessary or convenient, in some situations, to invoke a Composer service directly from a Java class rather than via traditional HTTP-based servlet or JSP sessions. Novell exteNd Director contains wizards that can autogenerate a Java stub class that contains methods for calling a Composer service directly.
The following procedure explains how to create a Java class that programmatically executes a Composer service, using the built-in Director wizard.
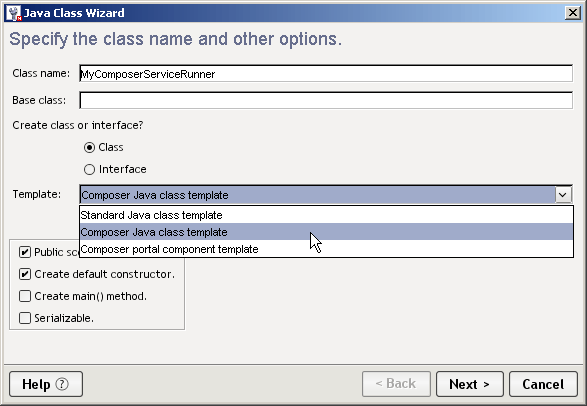
To create a Java class that invokes a Composer service:
If you have not already done so, open a Composer project or a Director project that contains a Composer subproject.
In Director, choose Control-N or File > New > File. The new-file dialog opens.
If the new class should inherit from another class, enter the appropriate Base class name; otherwise, leave the Base class field blank.
Accept the default (enabled) state of the Class radio button.
Next to Template, select Composer Java class template as shown above.
Use the checkboxes provided, as required, to customize the generation of the Java class in terms of visibility, default constructor, creation of a main() method, etc.
Click Next. A new wizard panel appears, prompting you for the names of any interfaces you want your class to implement. Add interface names as desired.
Click Next. A new wizard panel appears, prompting you for the names of any additional classes or packages to import. Add names as desired.
Click Next. A wizard panel prompts you for information about the project, directory, and package(s) with which to associate the new class.
Click Finish. Director generates source code and displays it in the editor.
The code generated by Director is straightforward. Commented areas show where to insert information pertinent to your service (such as the service's name). The generated code instantiates a GXSServiceComponentBean and uses it to invoke your service.
NOTE: For further information about GXSServiceComponentBean and other Composer runtime framework classes, consult the relevant Javadoc and source code archives located in your AppServer/Composer/api_xs directory.
In Director, use Project > Compile (when a Java source file is open in the editor) and/or Project > Build to make "generated" items ready for deployment. See the discussion of archive-related tasks in Director's documentation.
A properly configured EAR can be deployed directly from Director using Project > Deploy Archive. See the discussion of deployment-related tasks in Director's documentation.
The deployment characteristics for the supported application server environments vary somewhat across product versions and vendors. Accordingly, server-specific instructions for deploying Composer projects are given in separate documents: the Composer Enterprise Server User's Guide for the Novell exteNd Application Server and corresponding titles for WebSphere and WebLogic servers. Consult those guides for detailed discussion of deployment issues, including:
How to use the Composer Enterprise Server Framework API to create custom trigger objects or manipulate Composer objects programmatically.
Additional information about the Composer Enterprise Server runtime architecture, and the runtime architecture of Composer services in general.
Copyright © 2004 Novell, Inc. All rights reserved. Copyright © 1997, 1998, 1999, 2000, 2001, 2002, 2003 SilverStream Software, LLC. All rights reserved. more ...