Utility Tools
CHAPTER 2
Your work in the Novell exteNd Director development environment is organized into projects for creating the J2EE and other archives that make up an exteNd Director application. Working in a project involves editing sources (such as Java and data files), building classes, generating the archive, and deploying the archive. This chapter describes the basics:
A project is a collection of source files that you work with in the exteNd Director development environment to create J2EE modules. A project can also be thought of as a series of rules that define how parts come together to create an archive.
An archive is what gets generated from a completed project. A project can represent any of the following types of archive:
You aren't limited to creating J2EE projects and archives. You can also develop and build nonarchive projects (projects that simply build other files) and utility projects (such as class files stored in a ZIP or JAR file) in the exteNd Director development environment.
What a project includes A project can include:
Source code that will be compiled (the resulting files will be put into an archive)
Content files that you put directly into the archive (JSP pages, XHTML or HTML pages, XML files, images, and so on)
Project file Each project and subproject has a project file (SPF file) that defines it. This file is automatically created to store settings that you specify in the exteNd Director development environment. The project file defines how the project references subprojects, where files are stored on disk, and how files will be structured in the generated archive—and stores classpath entries and deployment settings. Changes you make to a project are automatically reflected and saved in the project file. When you add or move a component in a subproject, the change is updated in the subproject's project file.
CAUTION: There is no reason to directly edit the project file. All settings can be defined within the development environment. If you manually change the file incorrectly, you may compromise your ability to open the project.
When you create a project, you must specify which directories (or files) in your file system are to be included in the project and where to save the Java archive that is to be built by the project.
You must also decide how to structure subprojects within a project. For example, a top-level EAR project might contain various subproject modules such as WARs and EJB JARs that define an application's user interface, business logic, database access, and so on.

Design decisions affect how you create the projects, subprojects, and components that make up your application.
The exteNd Director development environment supports almost any method for creating projects and components, including bottom-up (creating components first and then projects and subprojects) and top-down (creating projects and subprojects first and then components). In most cases, you should follow a top-down approach—first create the project and subproject structure and then create new components and add them (and any existing components) to your project.
 For information about creating an entirely new project, see Creating projects and subprojects. For information about creating a project that contains existing source files and components, see Working with existing source files.
For project considerations specific to exteNd Director applications, see the part on working with projects in Developing exteNd Director Applications.
The exteNd Director development environment provides a lot of flexibility in defining the directory structures for your project's source files and the archive built from those source files.
Directory structure of your source files The directory structure of the source files on your file system does not need to match the directory structure of the generated files in the archive. For example, files in different source directories can be assigned to the same directory in the archive. To simplify development, however, you may want to set up your project directories to mimic the directory tree structure that will group J2EE components into archives.
You could create your project source file directory structure so that the project (SPF) file is located at the root of that directory structure, and then create a project src directory (at the same level as the project file) in which you can place all of the project source code. For example:
  myWebProject\
    myProject.spf
    src\
      dbAccess\
        addItem.java
        changeItem.java
        deleteItem.java
        queryDB.java
      loginProcessing\
        login.java
        user.java
      userInterface\
        intro.jsp
        login.jsp
        loginError.jsp
        welcome.jsp
When creating an enterprise archive (EAR) project with multiple subprojects (JARs, WARs, EJB JARs, and so on), it may be easiest to have all the project files at the same level, and have the sources of each subproject in separate src subdirectories. For example:
  myWebProject\
    myProject.spf
    myProjectDB.spf
    myProjectLogin.spf
    myProjectUI.spf
    src\
      dbAccess\
        addItem.java
        changeItem.java
        deleteItem.java
        queryDB.java
      loginProcessing\
        login.java
        user.java
      userInterface\
        intro.jsp
        login.jsp
        loginError.jsp
        welcome.jsp
If your project package structure becomes too cumbersome, you can always move the subproject components into separate subdirectories. You can structure projects using a single or a combined source tree.
For more information on project settings, see Managing project content settings.
Directory structure of an archive The internal directory structure of a J2EE archive depends on the archive type. Each type of archive has an XML descriptor that conforms to a particular DTD.
For example, when creating a Web archive (WAR), you must specify which files are accessible directly through an URL (such as JSP pages and servlets) and which files are not (such as supporting class and archive files). J2EE specifies that you locate files that are not to be made accessible through an URL in a WEB-INF directory in the archive directory structure. This WEB-INF directory should be located beneath the archive root directory and typically includes:
The JSP pages that are URL-accessible typically are located in the root directory of the archive. You may want to hide some JSP pages (such as those used by Struts) from URL access. Files under the WEB-INF directory are by default not accessible via URL, although you can configure them for URL access. The locations of other files are up to you.
CAUTION: When you create the WEB-INF directory, you must ensure that the directory name is in all uppercase text.
For more information This section has provided only a glimpse into some of the issues you may encounter when designing your source file and archive directory structures.
To learn more about specifying archive directory structures and packaging archives for J2EE, see the Sun J2EE Blueprints document.
For information about how you can specify source and archive directory structures in the exteNd Director development environment, see Managing project content settings.
For project considerations specific to exteNd Director applications, see the part on working with projects in Developing exteNd Director Applications.
The projects (and subprojects) you can create fit into these categories:
exteNd Director projects, which you typically use for the bulk of your application development work. These projects provide a wealth of functionality built in and ready to tailor to your needs.
To learn about creating exteNd Director projects, see the part on working with projects in Developing exteNd Director Applications.
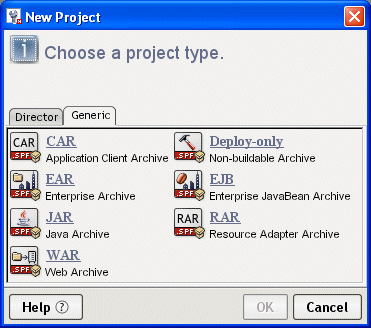
Generic projects, which you typically use when necessary to develop supporting modules. A generic project can be an EAR, EJB JAR, WAR, RAR, JAR, deploy-only archive, or application client.
As you create a generic project, you define a project name and a location for your source files. exteNd Director maps all of these source files to names and locations that you define for the archive. The following steps (using the New Project Wizard) apply to each type of generic project, with exceptions noted.
For information on organizing the development workspace before beginning a project, see Project directory structure considerations.
NOTE: If you are creating a subproject, you must open the parent project in the exteNd Director development environment before starting this procedure.
On the Generic tab, choose a project type and click OK.
If you want to create a nonbuildable archive, select Deploy-only. For detailed instructions, see Creating a deploy-only project.
If you are creating an EJB JAR and EJB client JAR pair, you should first create the parent WAR or EAR for both so that both projects can be open at once. For detailed information on the relationship between the EJB JAR and the client JAR, see Specifying the EJB JAR configuration.
If you want to create a project that includes a completed archive (along with its source code) from a third-party source, choose a project type and follow the instructions in Working with existing source files.
NOTE: The following New Project Wizard panels (to create a WAR) apply to each type of project.
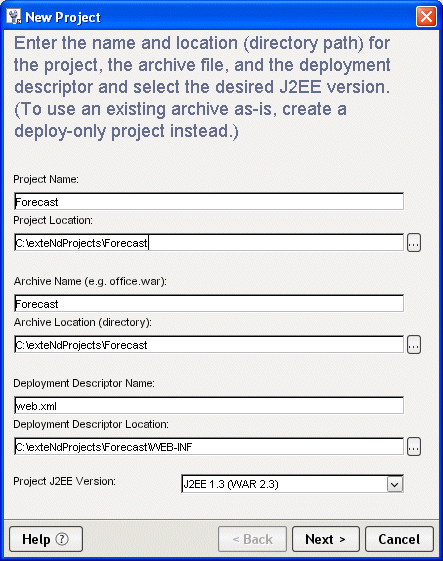
Specify project information as follows:
|
New project setting |
What you do |
|---|---|
|
Project Name |
Specify the name you want to use for the project (the .SPF extension is automatically appended). This name appears in the source layout. As you enter a project name, the archive name is filled in automatically. You can keep the same name for your archive or enter another one. |
|
Project Location |
Specify the directory where you want the project (and other source files) to be located. exteNd Director creates a project file (with an .SPF extension) in the project location. As you enter a project location, the rest of the new project settings are filled in automatically. You can change these settings. You can click the ellipsis beside the Project Location field to select a location, or type the project directory. If you specify a project location directory that does not exist, the wizard prompts you to create it. If you do not specify an absolute path, the wizard locates the project under the Novell exteNd tools\bin directory. |
|
Archive Name |
Specify the name of the archive file that will be generated. The resulting name will appear in the archive layout. An extension based on the archive type will automatically be appended to the name. You can keep the default archive name (that matches the project name) or enter a new one. To create a project based on an existing archive or to create a deploy-only project, enter the name of the existing archive that you want to include.
|
|
Archive Location |
Enter the location of the project archive or accept the default (the project root directory). The archive location appears in the archive layout of the Navigation Pane after the project has been created. |
|
Deployment Descriptor Name |
The wizard fills in a deployment name (based on the project type) after you enter a project location. Each archive stores its own set of deployment information in this XML deployment descriptor source file. exteNd Director creates the default deployment descriptor name and location (based on archive type) when you build and archive the project. In most cases you should accept the default name and location. If you are converting an existing archive project (by creating a new project file), enter the name of the deployment descriptor file on disk. If you want to have multiple J2EE subprojects of the same type sharing the same deployment descriptor directory location, see Deployment Descriptor Location (below). The deployment descriptor name you enter here affects only the source file name—not the file name that is used in the JAR. When exteNd Director builds the archive, it includes this deployment descriptor file in the archive using the standard name and location defined by the J2EE specification for the archive type.
|
|
Deployment Descriptor Location |
Enter the location of the deployment descriptor or accept the default. Each archive type uses a required J2EE default directory location. If you are converting an archive project, enter the location of its deployment descriptor. In most cases you should accept the default name and location. However, if you want to have multiple J2EE subprojects of the same type sharing the same deployment descriptor directory location, you should either enter a different source file name for each deployment descriptor or create a separate directory structure beneath the root directory for each descriptor. If you specify (or if exteNd Director finds) a deployment descriptor in the project source location matching the one you specify, it prompts whether or not you want to use the existing deployment descriptor. If you answer no, you will need to change the deployment descriptor name or location before continuing.
|
|
Project J2EE Version |
Specify the version of J2EE for this project.
|
NOTE: All settings on this wizard panel are required—except the two deployment descriptor fields and the J2EE version, which are not required (or displayed) for the Java or deploy-only archive.
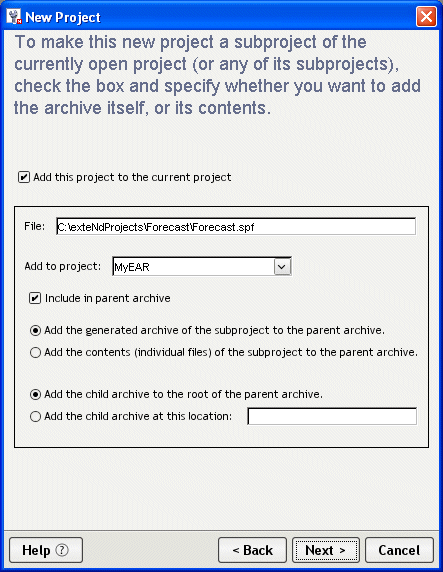
If you have a project currently open, the wizard asks if you want to add the new project as a subproject to that project or one of its subprojects.
If no project is currently open, this panel does not appear.
If you do not want to create this project as a subproject, deselect Add this project to the current project and click Next. (You can proceed to Step 6.)
To create the project as a subproject of another project:
Select the parent project under Add to Project. This list contains the currently open project and all subprojects associated with it.
If you want to add the generated archive of this project to the parent archive (as opposed to adding all of the generated files), select Add the generated archive of the subproject to the parent archive.
If you want to add the generated files (instead of the generated archive) of this project to the parent archive, select Add the contents (individual files) of the subproject to the parent archive.
The wording of the next two options varies, depending on whether you choose to add the archive or the individual files to the parent archive.
In either case, you are asked whether to add the archive or files to the root of the parent archive or to specify some other location in the parent archive.
The wizard summarizes the project details. Click Finish to create the project.
You can see the new project in the Project tab of the Navigation Pane. If necessary, you can view or change project names and locations using the Project Settings dialog.
Once you have defined how your projects and subprojects will be structured, you can start adding source directories and files to a project, as described in Adding to projects.
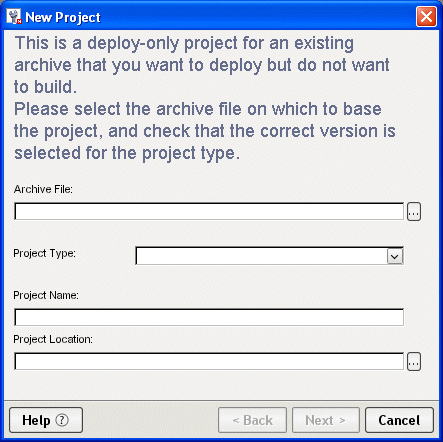
You can validate and deploy an archive for which you have no source code by first creating a deploy-only project for the archive. For example, if you received a completed EJB JAR archive from a third party without any source code, you could create a deploy-only project for it. You cannot add to a deploy-only project.
NOTE: If you receive a completed archive along with its source code, you should create a regular project, not a deploy-only project.
An EAR can contain both deploy-only and regular projects. For example, you can create an EAR containing an EJB JAR that you don't have the source for and a regular WAR that calls that EJB JAR.
For more information, see Working with existing source files.
How you tell that a project is deploy-only When you open a deploy-only project:
The build commands on the Project menu are disabled. This prevents you from accidentally overwriting the archive—which you would be unable to recreate.
The Contents tab of the Project Settings dialog is replaced by the following message:
The archive is deploy only. Its contents cannot be modified or examined.
 To create a deploy-only project:
In the New Project Wizard, specify project information as follows:
If you have a project open, the wizard asks if you want to add the new project as a subproject of that project or one of its subprojects. For more information, see Step 5 under the preceding procedure for creating a project.
You can see the new project in the Project tab of the Navigation Pane, but you cannot edit its contents. If necessary, you can view or change project names and locations using the Project Settings dialog.
There are several ways you can use J2EE components and modules created with third-party tools in the exteNd Director development environment:
If you want to create a nonbuildable archive that you validate and deploy in the exteNd Director development environment, you must create a deploy-only archive (a completed archive without any source code). For detailed instructions, see Creating a deploy-only project.
If you have source code files and want to build an editable archive, you should create a regular project file as described below.
The following procedure describes one (directory-centric) approach where the resulting archive structure mirrors the directory structure of the source files. You can create a new project in a deploy-only archive using this same approach. The only difference is that you will not be able to add source files to this type of archive later.
To create a project that includes existing source files:
Create a source directory structure and locate all your source files there.
When including existing archives, you may want to add the entire directory structure, since it is easier to maintain your project source files if you add directories rather than individual files. Once you have set up a project directory, files you add to it later will be automatically included in the resulting archive.
Create a project, as described under Creating projects and subprojects.
Add the source directory you created in Step 1 to the project, as described under Adding to projects.
Once you have added the source directory to the project, any changes you make later are automatically included in the archive and you avoid possible duplication of files.
Once you have a project, you can populate it by doing either (or both) of the following:
The exteNd Director development environment provides a wide selection of wizards that you can use to create new source files for your projects. These wizards prompt for information about what you want to generate and where (project and/or directory).
Source files include:
Source code, such as Java files that will be compiled into an archive
Content files that will be put directly into the archive, such as JSP pages, XHTML or HTML pages, XML files, images, and so on
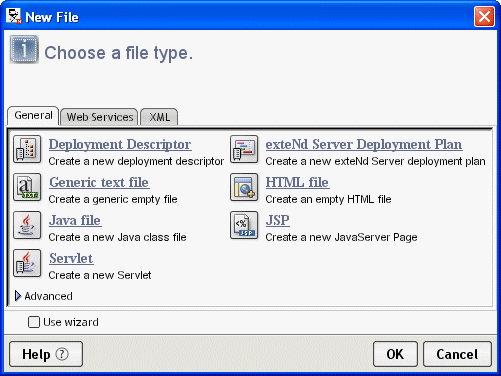
Go to the tab that matches your need (note that the tabs you see depend on your exteNd product configuration).
Choose a file type and click OK. The wizard for that file type starts.
TIP: To sidestep the wizard and immediately open a new blank file in the appropriate source editor, deselect the Use wizard checkbox (when supported).
Follow the prompts onscreen. For more information:
When the wizard finishes, a source editor containing the wizard-generated file(s) opens in the Edit Pane.
For information about the source editors (text, Java, etc.), see Source Editors.
You can add source files, directories, and subprojects to an existing project.
The following procedure describes how to add files and directories to a project.
To add files and directories to a project:
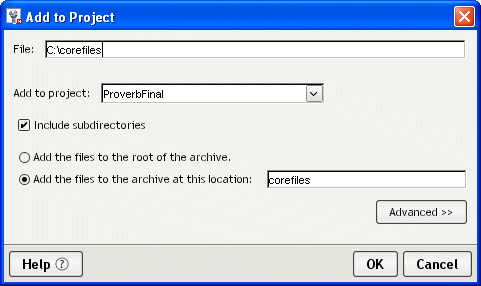
Select Project>Add to Project.
For other methods, see Other ways to add files and directories to a project.
Choose whether you want to add a file or a directory.
Typically, you add directories rather than individual files to your project.
Navigate to and choose the file or directory you want to add.
Set the following options to specify how the file or directory will be added to the project and where you want it to be located in the archive:
|
File and directory setting |
Description or action |
|---|---|
|
File |
Shows the (editable) path of the directory or file that you are adding to the project. |
|
Add to project |
Select the project that the specified item will be added to. Only the top-level open project and associated subprojects appear on the menu. |
|
Include subdirectories |
When adding directories, select to add the contents of the subdirectories as well as those of the specified directory. |
|
Add the file(s) to the root of the archive |
Select to add the specified files to the root of the archive. Clicking this option means you cannot remove the contents from the project without manually deleting the contents from the file system. |
|
Add the file(s) to the archive at this location |
Select to add the specified item to a specified location other than the archive root. You can also use relative paths or environment variables when locating shared project files or referring to files located outside the project's directory structure.
|
If you are adding a directory to your project, click Advanced.
The following project entry settings let you specify how to include Java sources (of the files or directories) in the generated archive.
NOTE: You can also edit these project entries in the Edit archive entry dialog (by clicking Edit in the Contents tab of the Project Settings dialog).
Click OK to add the file or directory to the project.
To see (or edit) how contents have been added to your project, click the Contents tab of the Project Settings dialog.
For information about editing project contents, see Managing project content settings.
Other ways to add files and directories to a project Using Project>Add to Project is only one way to add files and directories to a project. Other ways include:
Clicking Add Entry or Add Directory on the Contents tab of the Project Settings dialog
Using the popup (right-mouse) menu on the file or directory you want to add in the Directory tab of the Navigation Pane and choosing Add to Project
Using this technique, you can add multiple files at the same time: press Ctrl+Click to add multiple noncontiguous files; press Shift+Click to add multiple contiguous files.
Notes about adding individual files You typically add entire directories to your project. However, you can also add:
If you add a subproject as contents rather than as an entire project to a top-level project, the name will appear grayed out and within parentheses in the archive layout view of the Navigation Pane.
Refreshing the Navigation Pane When you make changes in the exteNd Director development environment, the Directory and Project tabs of the Navigation Pane automatically update. If you make changes outside of the development environment, select View>Refresh or press F5 to see the changes.
When you add a directory or directory tree to a project (as described in Adding source files to a project), the structure of the files and directories in the archive matches the layout of the files and directories of your (on-disk) source directories.
When you specify an entire directory, anything you later change, add, or remove within that on-disk directory is automatically reflected in the project. To relocate archive files, you can simply move them from the existing source directory structure on your file system. Any such changes will be automatically reflected in your project, provided that you keep them within the source directory structure used by the project.
What gets excluded automatically When you add the entire directory to a project, exteNd Director excludes the following types of files from the generated archive:
Any files ending in JAVA (by default, though you can choose to include Java files when adding the directory)
These are generally backup or version control information files and don't belong in the generated archive.
Choosing other files to exclude After you add a directory to a project, you can manually exclude individual files that you don't want to participate in the project.
For more information, see Excluding individual files from a project directory.
The following procedure describes how to add a subproject to a project.
For details about creating subprojects, see Creating projects and subprojects.
To add a subproject to a project:
Select Project>Add to Project>Subproject.
For other methods, see Other ways to add files and directories to a project.
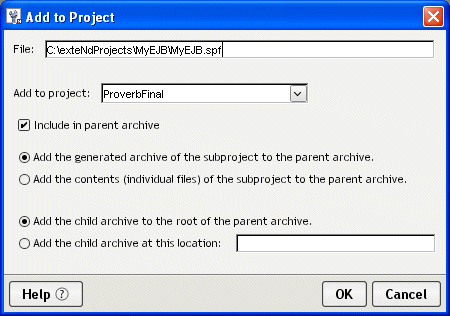
In the Add to project field, select the project that the specified archive will be added to.
NOTE: Only the top-level project and any associated subprojects appear as choices.
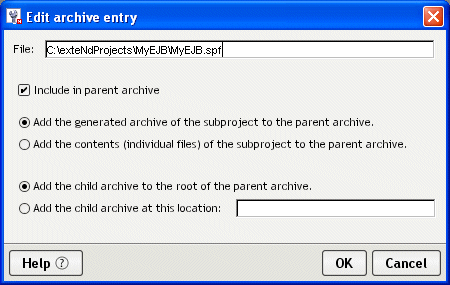
Select Include in parent archive to add the contents of the subproject to the parent archive.
If Include in parent archive is not selected, the subproject will still be built before the parent project, but none of its contents will be included in the parent archive.
If you want to add the generated archive of this project to the parent archive (as opposed to adding all of the generated files), select Add the generated archive of the subproject to the parent archive.
If you want to add the generated files (instead of the generated archive) of this project to the parent archive, select Add the contents (individual files) of the subproject to the parent archive.
The wording of the last two options varies, depending on whether you choose to add the archive or the individual files to the parent archive.
If you selected Add the generated archive of the subproject to the parent archive, set one of the following options to determine how the specified archive will be added to the parent archive:
|
Subproject setting |
Action |
|---|---|
|
Add the child archive to the root of the parent archive |
Select to add the specified archive to the root directory of the parent archive. |
|
Add the child archive at this location |
Select (and enter a location) to add the specified archive to a location other than the root directory of the parent archive. You can also use relative paths or environment variables when locating shared project files or referring to files located outside the project's directory structure.
|
If you selected Add the contents (individual files) of the subproject to the parent archive, set one of the following options to specify how the subproject contents (rather than the subproject's generated archive) will be added:
|
Subproject setting |
Action |
|---|---|
|
Add the files to the root of the parent archive |
Select to add the archive contents to the root directory of the parent archive. |
|
Add the files to the archive with this prefix |
Select and then enter a prefix to add the archive contents to a directory with the specified prefix. You can also use relative paths or environment variables when locating shared project files or referring to files located outside the project's directory structure.
|
Click OK to add the child archive (or files) to the parent archive.
TIP: To see how contents have been added to your project, click the Contents tab of the Project Settings dialog.
For more information about adding project contents, see Modifying project entries.
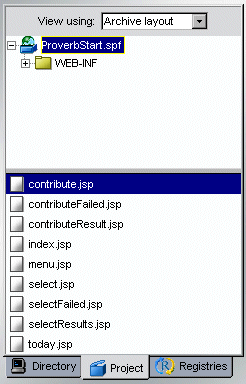
You use the Project tab of the Navigation Pane to view projects. You can view projects in three ways to see how directories and files are organized on the file system and in the archive:
Source layout view The source layout view reflects the organization of the project's files and directories on your hard disk. Subprojects are listed at the top level as folders.
Subprojects added as archives and as contents are both shown using the project name
Subprojects excluded from the parent archive are shown grayed out using the project name
The archive views The archive layout view and archive contents view both reflect the organization of the archive that will result from building the project. The archive layout view presents a development-oriented picture of how the project files and directories will be organized in the resulting archive, while the archive contents view is the closest representation of what will be in the generated archive. The differences between the two views are:
Archive layout shows the project's source files (.java files), even though the archive actually contains compiled files (.class files). Archive contents shows compiled files since they are what is in the archive (double-clicking a .class file opens the corresponding source file in the Java Editor for editing, unless the .java file can't be found, in which case the .class file is opened in the Class Viewer).
Archive layout lists all subprojects, even those subprojects that have been added as contents (as opposed to being added as archives) and those subprojects excluded from the parent archive, to give you an idea of how the projects are organized:
Subprojects added as archives are listed as the archive they generate
Subprojects added as contents are displayed grayed out using the name of the project
Subprojects excluded from the parent archive are shown grayed out, using the name of the archive or the project name, depending on which state would result from reincluding the subproject in the parent archive
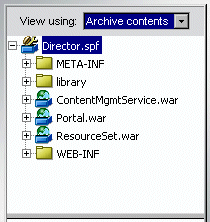
In the following screen, the ResourceSet subproject has been added as an archive, so it displays with its archive name. The Custom subproject has been added to the project as contents, so it is grayed out. The Sandbox subproject has been excluded from the parent archive, so it too is grayed out.
Archive contents lists subprojects as follows:
Subprojects added as archives are displayed using archive names
Subprojects added as contents are represented by the content itself, since that is how they will appear in the parent project's archive
Subprojects that are excluded from the parent archive are not represented at all
The following screen shows the archive contents view of the same project shown above:
Archive contents shows each inner class in a .java file, in addition to the file's primary class.
TIP: You can see a file's complete name and path by positioning the mouse over it in the lower subpane of the Directory or Project tab. These tool tips are particularly useful in an archive view for comparing a file as it exists in the archive (such as WEB-INF/web.xml) to its location on disk (such as C:\dev\MyEAR\web.xml).
Your open project may be your top-level project or it may be a subproject. The exteNd Director development environment allows you to manage the settings of any open project by adding or modifying files, directories, subprojects, paths, classpaths, and so on. You can modify a project by:
To open a project, open the project file (with the .SPF extension). Changes you make to a top-level project file are automatically saved in that file along with any other subprojects that are part of the same top-level project.
You can open multiple projects at a time, as long as they are all part of the same top-level project. For example, you can simultaneously open an EAR, a WAR, an EJB JAR, and an application client provided they are all part of the same top-level EAR.
NOTE: Whenever you add a component or subproject, the project file is automatically saved. The only time you need to explicitly do a save is when you make changes to a source file using one of the editors.
Select the project file (.SPF) and click Open.
In the upper left, the Navigation Pane displays the archive layout of the project. The files are displayed in the lower subpane of the Navigation Pane.
TIP: You can also navigate to the project file in the Directory tab and double-click the file to open it.
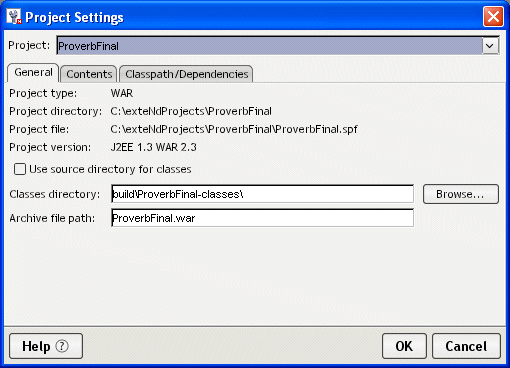
The General tab on the Project Settings dialog lets you view information about the open project and change the location of the source directory that stores the project class files.
To view or modify project settings:
Select the General tab and view or modify any of the options as follows:
You specify how files and directories are organized in the project's source and archive layouts using the Contents tab of the Project Settings dialog.
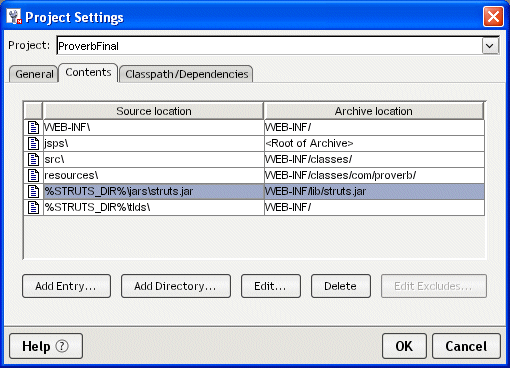
This dialog lets you define files and directories in terms of project entries in a table. Each entry defines the location of a source file or directory in the file system and how it is added to the project archive.
When specifying file and directory locations, you can use environment variables and absolute and relative pathnames.
Environment variables are useful when a development team shares files (such as a single project file or JARs) that are located outside the project's directory structure. A shared project file must be able to refer to files or directories that exist in different locations on different team members' machines. You typically use environment variables for locating files that are not under the project's root directory.
You set environment variables in your operating system. You reference the variables in the exteNd Director development environment by using the following syntax: %varname% or ${varname}. You can use variables:
When editing or adding to a project using the Add to Project dialog
For example, change d:\utilproj\util.spf to %UTIL_PROJECT_DIR%\util.spf or ${UTIL_PROJECT_DIR}\util.spf.
When editing your project's classpath using the Classpath/Dependencies tab of the Project Settings dialog
For example, add %UTIL_PROJECT_DIR%\util.jar or ${3RDPARTYJARS}\helpers.jar to the classpath to include a subproject.
NOTE: You need to restart the development environment before the value of an environment variable (set in your operating system) takes effect.
It may often be easier to use a relative path (instead of an environment variable) to locate any shared project files that are in the project's directory tree. For example, you could specify a src directory to refer to the directory named src under your project's directory.
The project root is the directory on your hard disk that contains the project file, for example C:\MyProj\Proverbs. You can use relative paths when referring to files within the project's directory. For example, to specify up two directory levels: .\..\mydir\file.jar.
By default, any paths you specify for files or directories are set relative to the project's root directory, provided the source directories are nested beneath the root directory. Otherwise, you must specify a hardcoded path. Locations you set in the exteNd Director development environment are stored in the project file.
Because location settings will be shared among subprojects and possibly other developers, you should try to avoid absolute paths. If you need to share a project file and other source files that are not under your project's directory, use environment variables.
You can choose between the current project and any associated subprojects.
On the General tab, view (and if necessary modify) the classes directory and the archive directory.
NOTE: You cannot entirely modify the project type, directory, and file name within the exteNd Director development environment. See Renaming a project.
A project entry can be a file or a directory. As shown below, each project entry is defined by its source location and associated archive location.
|
Setting |
Description or action |
|---|---|
|
Project |
The project to modify. |
|
Source location |
The source location of the selected entry. A full path is listed whenever the source of the entry is not relative to the project root directory. Any files you later add to the source directory will also get included in the project archive. You can also use relative paths or environment variables when locating shared project files or referring to files located outside the project's directory structure.
|
|
Archive location |
The archive location of the contents of the selected entry. The archive location can be the same as or different from the source location. All archive locations are relative to the archive root directory. Any path you specify identifies the directory structure in the archive. For example, specifying src\com\proverb would include those files and directories in the archive with src\com\proverb as the directory structure in the archive. An asterisk (*) indicates that you want to include all files in the specified directory, but not any nested subdirectories. |
|
Add Entry |
Lets you add a file to the project. |
|
Add Directory |
Lets you add a directory (and optionally subdirectories) to the project. |
|
Edit |
Lets you edit the selected entry name or location. |
|
Delete |
Lets you remove the selected project entry. |
|
Edit Excludes |
For information on adding an entry or directory, see Adding source files to a project. For information on removing entries, see Removing files, directories, and subprojects from projects.
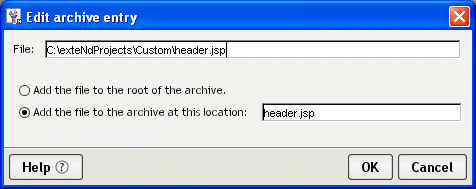
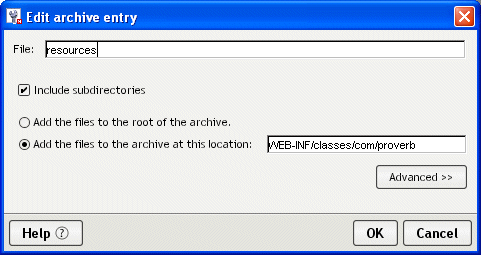
Select the project entry you want to modify by either double-clicking the entry or selecting the entry and clicking Edit.
The Edit archive entry dialog that appears depends on whether you are modifying a file, a directory, or a subproject entry.
The following dialog appears if you selected a file. The settings on this dialog are the same as on the Add to Project dialog. For more information, see Adding to projects.
The following dialog appears if you selected a directory. The settings on this dialog are the same as on the Add to Project dialog. For more information, see Adding to projects.
The following dialog appears if you selected a subproject. The settings on this dialog are the same as on the Add to Project dialog. For more information, see Adding subprojects to a project.
Although it's common practice to add entire directories to a project, you may sometimes have a few files in such directories that don't belong in the project. To handle this situation, you can exclude individual files from any directory you've added to a project. You can also include a file once again if you need it.
On the Project tab of the Navigation Pane, open a directory you've previously added.
Right-click a file you want to exclude, then select Exclude from Project from the popup menu.
Once a file is excluded, it is no longer used in the project. It appears gray (and in parentheses) on the Project tab.
To bring an excluded file back into the project, you can right-click it and select Include in Project from the popup menu.
Alternatively, you can exclude/include files by editing the exclusions list for a directory in the Project Settings dialog:
Select the directory entry whose exclusions list you want to edit, then click the Edit Excludes button.
When the Edit Exclude Definitions dialog displays, you can do the following:
There are two ways to remove items from a project: using the Project Settings dialog or using the Remove From Project popup menu in the Project tab. Removing a project's source files or directories in the exteNd Director development environment does not delete them from your hard disk. It just removes the entry (or rule) that refers to the files or directories.
To remove a file using the Project Settings dialog:
Select the entry or entries you want to remove from your project. Press Shift+Click to select contiguous entries. Press Ctrl+Click to select noncontiguous entries.
Click OK to perform the deletion. Click Cancel to close the dialog without performing the deletion.
If you clicked OK, exteNd Director removes the entry or entries so that they are no longer referred to in the project.
You can also right-click the file or directory you want to remove in the Project tab of the Navigation Pane. Choosing Remove From Project removes the project entry from the Project Settings definition (shown above and also reflected in the SPF file) as follows:
When you remove an explicit file (one that does not refer to any other files contained in any nested directories), exteNd Director simply removes the entry so that it is no longer referred to in the project.
When you remove a directory that was added to a project as part of nested subdirectories, exteNd Director prompts you to confirm that you want to remove the whole tree from the project.
You can remove a subproject by selecting it in the top part of the Navigation Pane (one subproject at a time).
You get a list of the directory trees to be removed. For example, if you select to remove src\a\b\c, you are prompted that this will cause the src directory tree entry to be removed; if you confirm that this is OK, exteNd Director removes the entire tree from the project.
In rare cases, you may need to rename a project (the name preceding .SPF). Although in general you never directly edit a project file, you must do so in this situation.
(Optional) On the Contents tab of the Project Settings dialog, change the classes directory to match the revised project name. This ensures that the new project name will appear as a subdirectory of the build directory.
(Optional) Update the project name in the deployed object and the URL element in the deployment plan.
Step 2 and Step 3 are necessary only if you want to keep all project names consistent. The project will build without them.
The exteNd Director development environment provides the tools you need to compile individual Java source files, build a complete project, and package the components in a J2EE-compatible archive for deployment to a J2EE server. This section describes the procedures for:
Specifying settings for your compiles and builds includes:
By default, the exteNd Director development environment uses the Javac 1.3 compiler. You can use the Build tab of the Preferences dialog to specify a different compiler. You can also specify options that you want sent to the compiler each time a Java file is compiled.
For more information, see Build preferences.
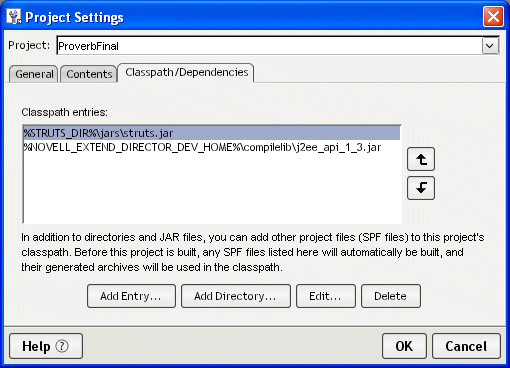
The project classpath defines where to find the components that your source code references. You can use environment variables when editing a project classpath.
For more information, see Using environment variables.
exteNd Director constructs the project classpath using these values:
Parent project classpaths If you have a project that contains subprojects, exteNd Director builds the components and constructs the parent project's classpath as follows:
Builds any referenced projects before it builds the parent project.
The referenced projects are specified in the Contents tab or Classpath/Dependencies tab of the Project Settings dialog.
If the referenced projects build successfully, exteNd Director builds the parent project using the following:
The referenced project's classpaths (which are constructed following the same rules—the contents, the classpath, and any referenced projects)
Suppose you have an EAR project, and the EAR contains a WAR (a subproject), and the WAR contains a utility JAR. exteNd Director constructs the JAR's classpath first, then the WAR's classpath.
To add to a project classpath:
Select the Classpath/Dependencies tab and select a classpath entry.
If adding files, click Browse and navigate to the appropriate directory and select one or more files (archives or project files) and click Open. You can press Ctrl+Click to add multiple noncontiguous files and Shift+Click to add multiple contiguous files.
Instead of browsing to files in the dialog, you can also directly type one or more files to add to the project's classpath. Enclose each entry in quotes and separate the entries with spaces. When typing, you can specify environment variables (see Using environment variables).
If adding a directory, type the directory (specifying environment variables if desired) or click Browse and select the directory.
When you have added, positioned, and edited all required classpath entries, click OK to close the Project Settings dialog.
You can use the items on the Project menu to compile individual Java files, build an entire project, or create a project archive—or you can right-click a file, project, or archive in the Navigation Pane to run the popup menu items. The menu items are:
|
Project menu item |
What it does |
|---|---|
|
Compile |
Compiles the currently open Java file. (Does not perform checking for interdependencies between the currently open file and other files in the project and its subprojects.) NOTE: Compile is not available in the popup menu that appears when you right-click a project file in the Navigation Pane. |
|
Build |
|
|
Rebuild All |
|
|
Build and Archive |
|
|
Rebuild All and Archive |
With a Java file open, select Projects>Compile.
exteNd Director compiles the Java file and writes the compile messages to the Output tab of the Output Pane.
With a project open, select Projects>Build.
exteNd Director writes any build messages to the Output tab of the Output Pane.
With a project open, select Projects>Build and Archive.
exteNd Director writes any build or archive messages to the Output tab of the Output Pane.
You can use a command-line tool (xdbuild) to build projects outside of the exteNd Director development environment.
To build a project from the command line:
Make current the Novell exteNd tools\bin directory (it contains xdbuild).
xdbuild projectFile operation
NOTE: xdbuild displays messages while it processes the project.
For example, the following command builds and creates the archive for the myApp exteNd Director project (if changes had been made since the last time the project was built and archived):
xdbuild c:\myProjects\myApp\myApp.spf build
NOTE: The development environment and xdbuild use Apache Ant to do the build processing. For more information on using Ant—including additional command-line options you can provide with xdbuild and how to use Ant to do your own customized processing—see Using Ant.
You should validate your archive's deployment descriptor before attempting to deploy the archive. Selecting Project>Validate Archive runs Sun's Verifier class.
Validation process When validating, exteNd Director:
Validates the deployment descriptor of the project archive against both the deployment descriptor DTD (specified by the J2EE specification) and the contents of the archive.
Validates the deployment descriptors of any subproject or prebuilt archives specified in the top-level deployment descriptor.
NOTE: Any subproject that is not listed in the parent project's deployment descriptor will not be verified.
Validation output Validate Archive writes information to:
In the Output tab of the Output Pane, you can double-click the line containing the string projectname-chk.txt to open that file in the Text Editor. The projectname-chk.txt file displays:
To validate a project archive:
With the project open, select Project>Validate Archive.
Selecting this menu item builds the archive and (if successful) validates it.
After the process runs, check the Output tab of the Output Pane.
If there are validation errors, double-click the following text in the Output Pane:
Look in file "projectdir\projectname-chk.txt" for detailed results on test assertions.
When you are through noting and fixing the errors, you can try validating the archive again.
Copyright © 2004 Novell, Inc. All rights reserved. Copyright © 1997, 1998, 1999, 2000, 2001, 2002, 2003 SilverStream Software, LLC. All rights reserved. more ...