


This chapter describes the Installation program for Windows platforms.
The chapter includes the following sections:

See the SilverStream Application Server release notes for the latest information on the following:
NOTE For any updated information about installing SilverStream, see the release notes.
Before you install SilverStream, make sure that you have created and configured a database to be used as your SilverMaster database (unless you will use Sybase Adaptive Server Anywhere as your SilverMaster; in this case, the Installation program can create the SilverMaster database). See the appropriate chapter in this guide for your database type.
The installation wizard is self-documenting. You can use the documentation provided by the wizard to respond to the prompts. This section describes the parts of the installation that might require additional information not provided by the wizard.
The release notes contain important information. Please take the time to read these notes carefully before continuing.
You come to a panel similar to the following.
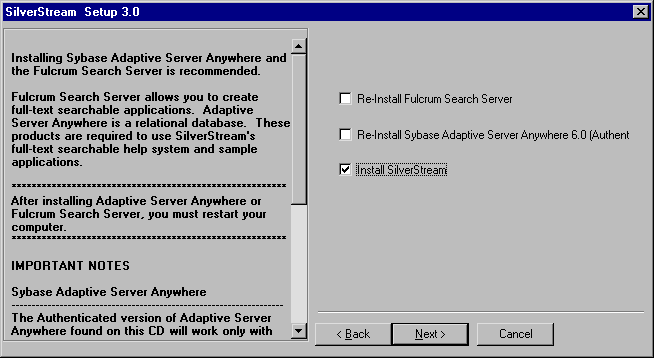
NOTE You won't see the choice for Sybase Adaptive Server Anywhere if you are installing SilverStream Enterprise or Workgroup Edition--the authenticated version of Adaptive Server Anywhere is available only with SilverStream Developer Edition. If you want to use Adaptive Server Anywhere with SilverStream Enterprise or Workgroup Edition, you need to purchase the full DBMS from Sybase.
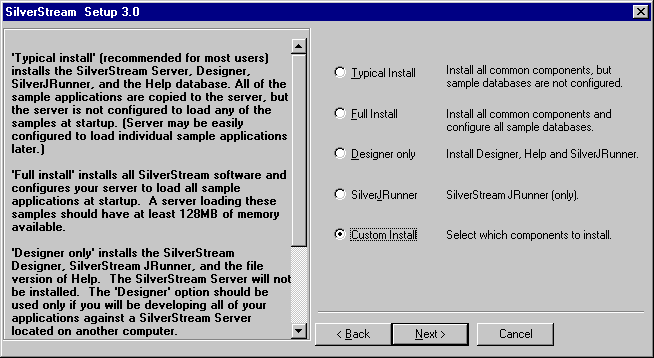
 For information about when to choose each of these types, see
Choosing the installation type.
For information about when to choose each of these types, see
Choosing the installation type.
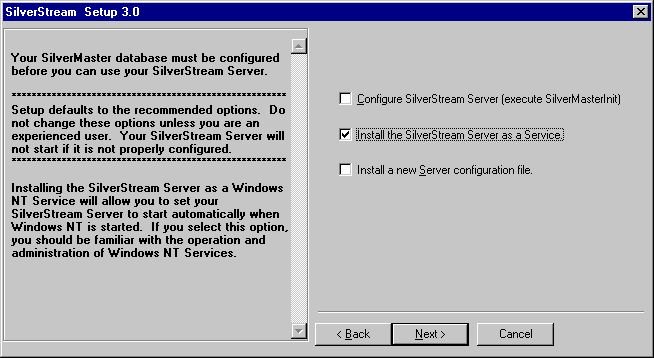
If you are running the Installation program for the first time, choose Next to configure the server and install new server properties. This panel also lets you install the SilverStream Server as a service.
If you select the Install the SilverStream Server as a Service option, see
Installing the SilverStream Server as a service for more information.
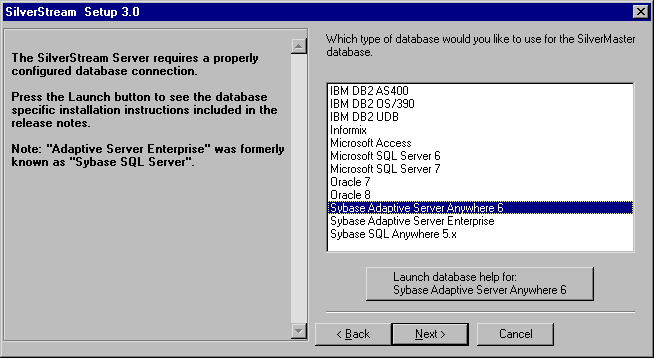
If you select Sybase Adaptive Server Anywhere, you can specify that the SilverStream installation wizard create a new Adaptive Server Anywhere database or use an existing database. For all other database types, you must use an existing database that you have already configured for use as a SilverMaster database. The configuration requirements are described in this guide in the database-specific chapters.
For more information about configuring each of the database types, click the Launch database help for databaseName button for the selected database. The corresponding chapter of this guide is opened.
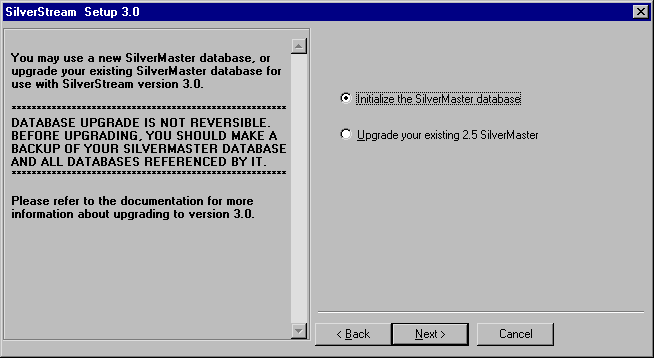
If you choose Initialize the SilverMaster database, the install procedure upgrades the database to Version 3 and also removes any existing database tables and user information.
If you choose Upgrade your existing 2.5 SilverMaster, the install procedure upgrades the database to Version 3, but retains all of the database tables and user information.
Choose the appropriate radio button, then choose Next.
The following table describes the type of information that you will be asked for.
Sybase Adaptive Server Anywhere 6 (when using an existing database) | |
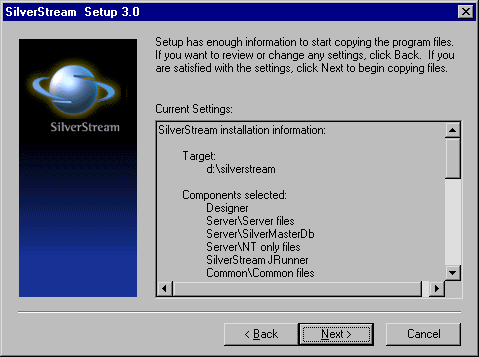
When the installation nears completion, you receive the message "Creating Resources. This will take a few minutes." SilverStream builds the SilverMaster.
For more information, see
Installing Enterprise Data Connectors.
To test your SilverStream Server installation, start the SilverStream Server and the Designer.
The SilverStream Designer and the SilverStream Server are separate executables. You need to start each separately, unless you set up the server to run as an NT service.
For complete information about starting and stopping the SilverStream Server, see the chapter on running the server in the Administrator's Guide.
 To start SilverStream from the Start menu:
Start the SilverStream Server first. The SilverStream Server must be running for you to connect the Designer to it. Your local machine is the default machine for running the server. It is called localhost. By default, the server listens to port 80 on the local machine.
SilverStream Server ... serving at: http://host_name:port
You see a splash screen, then the main SilverStream Designer.
NOTE As part of your testing, it is also good idea to verify that any services that the SilverStream Server depends on are running and set to start automatically when the system reboots.
If you encounter a problem, see the troubleshooting chapter in the Administrator's Guide.
If you need to deploy an external Java client to a user machine, you can use the SilverStream installation program to set up the runtime components required on that machine.
To set up the runtime environment on a user's machine:
This installs the required versions of:
For more information on deploying external Java clients, see the chapter on writing external Java clients in the Programmer's Guide.
SilverStream is written especially for designing applications to run over the Web. Whether your machine is networked or not, the SilverStream Server needs access to the TCP/IP protocol to function properly. If your machine is networked, verify that TCP is configured to run SilverStream properly.
This section describes how to verify that TCP/IP is installed on a computer running on Windows platforms.
If you do not see TCP/IP you must install it. Check with your LAN administrator for the details of TCP/IP in your installation. If TCP/IP is not run at all on your LAN see Installing a TCP/IP connection under Windows NT 4.0.
If you do not see TCP/IP you must install it. Check with your LAN administrator for the details of TCP/IP in your installation. If TCP/IP is not run at all on your LAN see Installing a TCP/IP connection under Windows 95/98 and add the MS Loopback adapter.
Follow these steps to install a TCP/IP connection under Microsoft Windows NT 4.0.
It will install the hosts file and ping.exe along with other support files.
hosts.sam file to hosts, with no file extension. Using Notepad, edit the hosts file by adding an entry for the IP Address/Host Name that you defined previously (for example: 200.200.200.200 SilverHost).
To test this address, go to a DOS prompt and type: ping SilverHost. You should then see responses from the IP Address that you defined. This will be the host name that SilverStream Server will use.
Follow these steps to install a TCP/IP connection under Microsoft Windows 95/98.
It will install the lmhosts.sam file and ping.exe along with other supporting files.
lmhosts.sam file to hosts, with no file extension. Using Notepad, edit the hosts file by adding entry for the IP Address/Host Name that you defined previously (for example, 200.200.200.200 SilverHost). To test this address, go to a DOS prompt and type: ping SilverHost. You should then see responses from the IP Address that you defined. This will be the Host Name that the SilverStream Server will use.
When you are running high-availability servers in a multi-user environment it often makes sense to run servers as Windows NT services. Running both the SilverStream Server and the database server as services on the same machine ensures that both services will restart automatically when the machine reboots. If the databases that the SilverStream Server connects do not reside on the same machine as SilverStream, you should also set these databases to restart automatically on reboot.
Before you install SilverStream as a service, review the recommendations in Guidelines on setting SilverStream to run as a service or daemon. The following procedure assumes that you have already created and configured a database to be used as your SilverMaster database. Database configuration requirements are described in this guide in the database-specific chapters. Using the Installation program, proceed with the following steps.
To set up SilverStream to run as an NT service:
The following two steps assume that both the SilverStream Server and your database server are run on the same machine. If your database server runs on a different machine from the SilverStream Server, make sure you can access it using an outside application before configuring it to run with the SilverStream service.
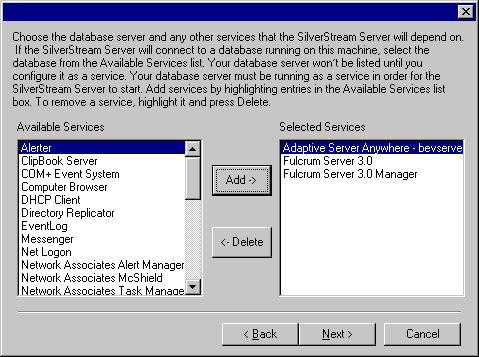
NOTE If you are using Sybase Adaptive Server Anywhere (or SQL Anywhere) and running the SilverStream Server as a service or daemon, you must configure the database as a service, since it must start before the SilverStream Server. By default, these databases are not installed as a service and will not appear in the list of Available Services until configured (as described in Step 4: Run Sybase ASA or SQL Anywhere as a service).
If the SilverStream Server will connect to a database server running on the same machine, select the database from the Available Services list. When run as a service, the SilverStream Server requires that the database also run as a service.
For more information on finishing the installation, see
Installing SilverStream.
NOTE The SilverStream Server uses two startup properties to log information when it is being run as an NT service. For information about generating and storing server output, see the section on SilverStream Server logging when run as a service in the Administrator's Guide.
For more information about the operation and administration of services, see the Windows NT documentation.
NOTE For any Sybase Adaptive Server Anywhere (or an SQL Anywhere) databases that are configured to run as a service, verify that the ODBC Data Source entries match the service configuration. For example, the server name for SilverHelp3 ODBC data source will need to be edited if it does not agree with the service configuration.