This chapter provides information about the following topics:

SilverStream supports two Java menu objects: java.awt.MenuBar and java.awt.PopupMenu. You create both of them programmatically.
Java menus support the following features:
The following sections provide more details about programming the Java menu objects and their related features.
A MenuBar is a horizontal bar that is displayed at the top of a window and consists of one or more drop-down menus (java.awt.Menu objects). When the user selects a Menu from the MenuBar, a drop-down Menu appears containing a vertical list of MenuItems and submenus (cascading menus).
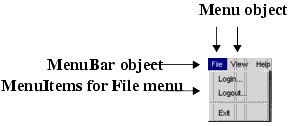
The following figure shows a MenuBar object with two java.awt.Menu objects: File and View.
When the user chooses File from the MenuBar, its MenuItems Login, Logout, and Exit appear.
MenuBars are attached to a Frame window; therefore, you cannot create MenuBars in applets unless the applet pops up an independent window. It is the independent window that provides the Frame object, which contains the MenuBar.
When you create a Menu and add MenuItems to it (using the form's addMenuItem() method), SilverStream adds the Form as an ItemListener or ActionListener for the MenuItem objects.
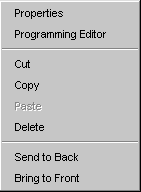
a PopupMenu is a subclass of Menu. Like Menu, it contains MenuItems. Popup menus are displayed independently of a MenuBar. The following figure shows a PopupMenu object that contains eight MenuItems.
Each operating system platform specifies a user action (such as a right click) that is a popup trigger. If you want to associate a popup menu with a control, you can test for the popup trigger in the appropriate mouse event for that control.
A Menu consists of java.awt.MenuItem objects. A menu can be a top-level menu on a MenuBar, a submenu that cascades from another menu, or a popup menu. You typically use Menu objects to group logically related MenuItems so the user can find the items. In addition to MenuItems, Menus can also contain separator bars. Separator bars are also useful for grouping logically related MenuItems.
MenuItems present the actual operation or task to the user. When the user chooses a MenuItem, the menu closes and a java.awt.event.ActionEvent or java.awt.event.ItemEvent fires, depending on the type of MenuItem that the user chooses.
Java provides two kinds of menu items: a MenuItem and a CheckboxMenuItem. CheckboxMenuItems represent a yes/no or on/off option.
A MenuItem can have a shortcut key associated with it. Shortcut keys are based on the keys defined in java.event.KeyEvent. For more information on shortcuts, see Creating text-style MenuItems and shortcut keys.
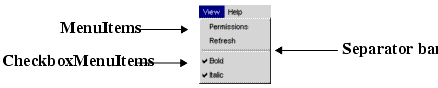
This is an example of a menu that includes text and CheckboxMenuItems and a separator bar:
Java popup menus are available in any deployment environment. Java MenuBars, however, are only available in java.awt.Frame objects. The SilverStream AgfForm class does not extend java.awt.Frame. However, there are two deployment environments where forms run in an java.awt.Frame. They are:
agDialog.showDialog() method) and specify its window type as FORM_FRAME.
NOTE These classes are also available in the Form Designer in test mode. The popup menus behave as you would expect. However, the MenuBar object that you create for your form replaces the Form Designer's MenuBar. (Remember that you can only have one MenuBar per Frame.) When you exit test mode, the normal SilverStream menus return.
You can construct a PopupMenu or MenuBar object and add the desired Menu and MenuItems to it in any appropriate AgfForm event, such as formActivate. However, this might cause the formActivate event code to be quite large. To avoid this, create custom methods that build the menus. You can then call those custom methods in the formActivate event, making the formActivate (or other event) code easier to maintain.
These are the coding steps for creating menubars:
The following sections describe how to do each step. For complete sample code, see the techniques for building menus in Application Techniques.
For information about PopupMenus, see Defining PopupMenus.
To create a MenuBar object, you use the java.awt.MenuBar constructor method. For example, you might create a new MenuBar object called mb as type MenuBar. Here is the code that does that
MenuBar mb = new MenuBar();
You can create only one MenuBar object per Frame.
To create a Menu object, you use the java.awt.Menu constructor method, which takes a String label parameter. The label is the text that the menu displays as its title in the MenuBar. Here is how you create a Menu object called fileMenu. Its title is "File".
Menu fileMenu = new Menu("File");
A Menu can contain a combination of MenuItems, CheckboxMenuItems, and separators.
To create a standard MenuItem and add it to an instantiated Menu object, you call addMenuItem(), a method of AgfForm.
The addMenuItem() method creates a MenuItem, adds it to the specified Menu, sets the label, and creates a shortcut key for the MenuItem. The addMenuItem() method also adds the AgfForm as an ActionListener for the MenuItem. When the user selects a MenuItem, the form's menuItemSelected event fires.
About shortcut keys
A shortcut key specifies a keystroke combination that the user can press at any time within the Menu's parent container. It causes the same behavior as if the user used the mouse to open the menu and select an item. The shortcut key specification corresponds to a raw key code. You can find a listing of the raw key codes in Java documentation for the java.awt.event.KeyEvent. If you don't want a shortcut for the item, specify null for the shortcut.
About separators
You can specify null for the label parameter to add a separator between items on a menu. Note that addMenuItem() ignores the shortcut parameter if the label parameter is null.
Example
This example shows how you might add menu items labeled Login, Logout, a separator, and Exit to a Menu object named fileMenu. The Exit item has a shortcut key of CTRL-F5. The MenuItems appear in the order you add them.
  loginMenuItem = addMenuItem(fileMenu, "Login...", null);
  logoutMenuItem = addMenuItem(fileMenu, "Logout...", null);
  fileMenu.addSeparator();
  exitMenuItem = addMenuItem(fileMenu, "Exit",
     new MenuShortcut(KeyEvent.VK_F5));
Enabling and disabling MenuItems
In some cases, you might want to enable and disable MenuItems based on the current state of your application or the user's selection. You can enable and disable MenuItems using the setEnabled() method.
This example disables the Logout menu item, which was added in the previous example.
logoutMenuItem.setEnabled(false);
This is what the menu looks like when Logout is disabled.
To create a CheckboxMenuItem and add it to an instantiated Menu object, you call addCheckboxMenuItem(), a method of AgfForm.
Like the addMenuItem() method, addCheckboxMenuItem() instantiates a CheckboxMenuItem, adds it to the specified Menu, and registers the AgfForm as an ItemListener for it. The form's menuItemStateChanged() event fires when the CheckboxMenuItem is selected.
This example shows how you might add two CheckboxMenuItems labeled Bold and Italic to a Menu named viewMenu.
  boldCheckBoxItem = addCheckboxMenuItem(viewMenu, "Bold");
  italicCheckBoxItem = addCheckboxMenuItem(viewMenu, "Italic")
You might want to include submenus within a MenuBar or PopupMenu. Java does not have a special class for submenus. Instead, you create another instance of a Menu object and add that object to the parent Menu using the add() method.
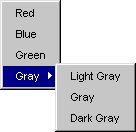
The following example that shows how to add three MenuItems labeled Red, Blue, and Green to a PopupMenu called popup. It also contains a Menu object that provides access to a submenu called submenu. The submenu's label is Gray. It provides access to the MenuItems labeled Light Gray, Gray, and Dark Gray.
  // Create a popup Menu object
  PopupMenu popup = new PopupMenu();
  // Add three items in the order they will appear at runtime
  item = addMenuItem(popup, "Red", null);
  item = addMenuItem(popup, "Blue", null);
  item = addMenuItem(popup, "Green", null);

  // Create a cascading menu
  subMenu = new Menu("Gray");
  // Add three items to it
  item = addMenuItem(subMenu, "Light Gray", null);
  item = addMenuItem(subMenu, "Gray", null);
  item = addMenuItem(subMenu, "Dark Gray", null);

  // Add it to the popup menu as the last item
  popup.add(subMenu);
This is the menu that this code creates.
After you have created Menu objects and added all of the MenuItems to them, the next step is to add the Menu objects to the MenuBar. You use the add() method of java.awt.MenuBar. The following example adds two Menu objects, one called fileMenu and the other called viewMenu, to a MenuBar called mb.
  mb.add(fileMenu);
  mb.add(viewMenu);
Menus appear on the MenuBar in the order that you add them. You can reorder them by changing their physical order in the code.
MenuBars can only be added to a Frame container. As described in About MenuBars, there are some situations where SilverStream forms are contained within a Frame and can therefore have a MenuBar.
To display a MenuBar, you need a reference to the frame in which the form is displayed. To get the Frame, call the getFrame() method of AgfForm. You cannot call getFrame() in the form's formLoaded event because the form doesn't have a Frame yet. Call getFrame() in the formActivate event instead.
Once you have the Frame object, you can add the MenuBar to it using its setMenuBar() method.
This sample code for the formActivate event shows how to obtain the current Frame and assign a MenuBar called mb to it.
  Frame f = getFrame();
  f.setMenuBar(mb);
The AgfForm class provides two events that handle MenuItem selections and CheckboxMenuItem selections: menuItemSelected and menuItemStateChanged, respectively. These events, like all Java events that follow the JDK 1.1 event model, have an event object parameter that you can query for more information about the event occurrence.
The menuItemSelected event fires when the user selects a menu item. In this event, you find what MenuItem the user selected and code the appropriate action.
menuItemSelected has this declaration.
menuItemSelected(MenuItem menuItem, ActionEvent actionEvent)
As you can see, it passes two values: One is the menuItem that the user selected; the other is an instance of the java.awt.ActionEvent. You can use this event object to get the key modifiers that the user might have pressed. java.awt.event.ActionEvent provides these methods:
getActionCommand(), which returns the name of the command associated with this action.
getModifiers(), which returns the modifier keys held down during this action event.
NOTE You can get the action command from either the ActionEvent or the MenuItem.
The menuItemStateChanged event fires when the user checks or unchecks a CheckboxMenuItem. It has this declaration.
menuItemStateChanged(MenuItem menuItem, ItemEvent itemEvent)
It passes two parameters: menuItem is the CheckboxMenuItem that was selected, and itemEvent is an instance of the java.awt.event.ItemEvent.
The java.awt.event.ItemEvent has methods for getting information about the event that occurred. The most useful is the getStateChange() method, which returns the MenuItem's new state: SELECTED or DESELECTED.
This code in the menuItemSelected event checks which item was selected and processes it.
  String command;
  command = menuItem.getActionCommand();
  // File Menu commands
  if (command.equals("Login..."))
  {
     //Do some type of Login processing...
     logoutMenuItem.enable();
     loginMenuItem.disable();
  }
  else if (command.equals("Logout..."))
  { ... }
Creating a PopupMenu is similar to a Menu on a MenuBar, but the way you display the menu is different. These are the steps for defining a PopupMenu:
To create a PopupMenu object, you use the java.awt.PopupMenu constructor. It has no arguments, since a PopupMenu doesn't display a name. This example creates a PopupMenu object called popup.
PopupMenu popup = new PopupMenu();
Unlike MenuBars, a PopupMenu is not rooted to any Frame, so you can create more than one PopupMenu per SilverStream form.
MenuItems on a PopupMenu are the same as for a Menu on a MenuBar. For information, see Adding MenuItems to a Menu.
Unlike MenuBars, which are rooted to a window and require a Frame specification, you can add the PopupMenu directly to the form using add(), a method of Container (an ancestor of the form). Adding the popup menu does not display it; it makes the menu available to be displayed later.
This is an example of adding a PopupMenu called popup to the current form using the this object reference.
this.add(popup);
PopupMenus are not automatically displayed to the user when forms are displayed. You must programmatically display the PopupMenu at the desired time.
Each platform has a user action that is defined as the popup trigger. The operating system notifies the application when the trigger occurs. The application ignores the trigger action unless there is code in the appropriate event.
In the event code, you check whether the user action is the popup trigger. If so, your code displays the menu; if not, your code can take some other action or no action. Typically, you should check for the popup trigger in both the mousePressed and mouseReleased events. If the action occurs, the operating system passes information about the user action to the event in the MouseEvent object.
There are several things you need to do:
isPopupTrigger() is a method of MouseEvent.
isPopupTrigger() is true, display the PopupMenu to the user by calling show(), a method of PopupMenu. With show(), you specify an x, y position that is relative to the control with which the PopupMenu is associated. The control and its parent (for example, the form) must be displayed on the screen for show() to be valid.
This example shows how to display a PopupMenu called popup on a control called label. You should put this code in both the mousePressed and mouseReleased events. Or, create a separate method with this code and call it from both events.
  // If a popup trigger occurs on the label, display popup menu
  if (mouseEvent.isPopupTrigger())
  {
     popup.show(label, mouseEvent.getX(), mouseEvent.getY());
  }
You respond to selections on the PopupMenu in the same way as for Menus on a MenuBar. Write code for the menuItemSelected event for MenuItems or menuItemStateChanged event for CheckboxMenuItems. The code checks which MenuItem was selected and implements the MenuItem's action.
For information, see Responding to menu selections.
You can use the Swing menu objects JMenuBar and JMenu instead of their AWT counterparts, but they are less robust and less thoroughly tested.
When you use JMenuBar, you don't add it to the frame as you do for AWT menus. Instead you add it to the JApplet container inside the frame. The getRootPane() method gets the container.
The form uses the JApplet container is so that it can run in both SilverJRunner and a web browser. In SilverJRunner, this JApplet is placed inside SilverJRunner's JFrame. If you add a JMenuBar to the JFrame, the JMenus won't be visible when they're opened. That's because JMenus are lightweight components, and they'll be hidden by the JApplet, which is a heavyweight component.
This sample code illustrates how to implement a Swing menu.
  // Create the menu bar.
  JMenuBar menuBar = new JMenuBar();

  JMenu menu = new JMenu();
  menu.setLabel("File");
  menuBar.add(menu);

  JMenuItem menuItem = new JMenuItem();
  menuItem.setLabel("Save");
  menu.add(menuItem);

  getRootPane().setJMenuBar(menuBar);
The File Attachment control (AgcFileAttachment) is a databound control that provides a mechanism for storing and manipulating file attachments within a database. The control must be bound to a database field with the contents of the attachment stored in a long varbinary or longvarchar column. The File Attachment control is not visible at runtime.
NOTE File attachments can be used in the SilverStream Designer and SilverJRunner. Because of security restrictions inherent in the Java applet environment, file attachments will not work when run in a browser environment (unless users adjust their browsers' security settings).
There are two primary uses for the AgcFileAttachment control. You can use it to:
NOTE AgcFileAttachment updates the database record directly, bypassing the form's agData object, and using a separate and unrelated transaction.
You bind a file attachment control to a database table at design time by specifying the Database Column property with the Property Inspector.
You use the upload() method to upload a file attachment to the specified field in the database table. It has this declaration.
void upload(File file, boolean delete)
When you call upload(), SilverStream puts the file in the database column that was specified at design time. It is added to the form's current database record. If delete is set to true, SilverStream deletes the local file once the upload is completed.
The download() method displays a dialog box to the user warning the user that a file is about to be written to a local directory and allowing the user to cancel. If the user clicks OK, download() saves the referenced resource in a local file, and then launches the application for that file if the launch parameter is set to true. It has this declaration.
void download(File file, boolean launch)
where file specifies the file and path for the file to download.
launch specifies whether to launch the application associated with the file's extension.
NOTE In Windows, the system launches an application for the file based on the registry entry for the file's extension. If the application is not registered, then Windows prompts the user to create an association for the file.
By default, Java method calls are synchronous; that is, the application waits until the called method returns before continuing processing. For example, when you invoke a triggered business object, the form that starts the business object cannot continue until the business object completes and returns control to the calling form.
In most cases, this is the behavior that you want. However, you might want to allow the user of a form to perform other tasks while waiting for a different process to complete. This can be as simple as allowing the user to press a cancel button to stop the action. This type of processing is called asynchronous processing.
SilverStream provides two options for achieving this result. One provides a real asynchronous processing environment, while the other only simulates it.
You can use the AgcTimer control to perform some action at regular intervals. AgcTimer lets you specify an interval of time (in seconds) at which the timeIntervalExpired event fires. You can then write code in the timeIntervalExpired event to perform some activity.
The primary advantage to this approach is its ease of use. The AgcTimer control is quickly and easily available. It has very little overhead associated with it and can handle many situations where only an approximation of asynchronous processing is required.
The disadvantage is that you cannot guarantee the same behavior for every situation because AgcTimer does not interrupt an activity--if the user is idle, AgcTimer behaves differently than if the user is active. This is because AgcTimer does not operate in a separate thread. To achieve the same behavior, you must run the process in a separate thread. You can accomplish this by implementing the Runnable interface.
For true asynchronous processing in the SilverStream form environment, you must construct your own class that implements the java.lang.Runnable interface and starts one or more threads as needed. You are responsible for creating the separate thread and managing all of the issues associated with threads. To run a process in a separate thread, your class must implement Runnable. You then create a thread object to launch the thread and give that thread a reference to the Runnable object in its constructor. It then calls the run() method on your custom object.
A form can also implement Runnable.
In the Form Designer's Programming Editor, choose File>Java Interfaces. Add the java.lang.Runnable interface in the space provided. Add the code in the run() method available through the General section. In the appropriate form event, you might add the following code.
  Thread t = new Thread(this);
  t.start();
Using threads and the Runnable interface is advanced Java programming. To learn more about asynchronous processing, see the Sun Java documentation.
You can override the way the Form Designer lays out controls, and you or the user can choose the look and feel for a Swing-based form.
By default, SilverStream handles the layout of controls by setting the coordinates of each control. The instantiated form looks very much as you laid it out in the Form Designer. If the form is resized, controls keep their size and position unless you explicitly change them.
If you want to make changes to the arrangement of the controls, you can alter the size or position of controls in the doLayout event, which is fired when the form is resized. You can make adjustments based on the form's new size.
If you want to take advantage of Java's layout managers, you can override SilverStream's arrangement of the controls and handle the layout yourself. For example, you might want certain controls, such as text areas, to be resized when the form is resized, or you might want to create a layout dynamically at runtime.
When you create a form class in the Form Designer, it defines the addAllFormControls() method in your form class. The method adds all the controls you created in the Designer using the absolute coordinates you specified. Code in the form's init() method calls the addControls() method, defined in the ancestor class AgfForm, which calls addAllFormControls().You can't edit addAllFormControls() because SilverStream generates that code.
However, you can override addControls() so that it doesn't call addAllFormControls(). If you override addControls(), it becomes your responsibility to add all controls yourself. You can use the generated list in addAllFormControls() as a reminder of the controls you defined in the Designer.
One reason to override addControls() is to use a layout manager that automatically resizes some controls when the form is resized. When you use this technique, the way you arrange the controls in the Designer has nothing to do with the appearance of the running form. You determine their layout in the code you write. You can also define and add other containers to provide different layout managers for different regions of the form.
In addition, you can bypass addControls() to create your own layout manager at runtime.
 For an example of creating a custom layout that is called at runtime, see Implementing a Nested Layout in Application Techniques.
Swing controls have a UI manager that specifies the visual aspects of the controls. One of the features of Swing is the ability to give your application a consistent look on all platforms or to vary its appearance according to the current system. This is called pluggable look and feel (PLAF). When you use Swing-based controls on your form, instead of AWT-based controls, you can use static methods of the Swing's UIManager class to change the look and feel before or after the form is displayed.
For sample code that gets and sets the look and feel, see the section on specifying a look and feel in Application Techniques.
By default, when you add a control to a form using the Form Designer, SilverStream generates the code that instantiates the control, positions it, sets any properties that you specify (or default values for the properties), and adds it to the form. SilverStream automatically runs the generated code when the form is loaded.
If you are not sure what controls you might need, or you don't know until runtime how many you need, you can program all that yourself. Although this might sound like a lot of extra work, there are times when it becomes a requirement of your application. For example, you might want to create a form to edit data from a data source triggered business object. Your application is flexible so that the user can specify the data source that they want to use; thus, until the user makes this specification, you do not know exactly how many fields the form might require. In your code, you can instantiate the controls that are appropriate for that data source.
However, there are two main disadvantages:
All of the SilverStream form controls have null constructors. You can instantiate any control with new and the class name. For example, you can instantiate the text button control (AgcButtonText) by calling:
new AgcButtonText();
There are two ways you can get events from controls that are instantiated at run time.
Overriding or implementing the listener methods does not require you to create an auxiliary class, but there is some hidden complexity for handling events on controls that do exist at design time. If you choose to do this, you should not code any of that event type at design time. Instead, you should implement the listener interface on your form and manually handle that type of event for all controls both design-time and run-time. For example, if you want to respond to mouseClicked on a runtime instantiated control, then you should not write any code in any of the mouseClicked events at design time. Implement the listener interfaces on the form and then manually code the mouseClicked event for every control (regardless of who will instantiate the control: you or SilverStream).
You can subclass any SilverStream form control to add to or change its functionality. Depending on how you want to use the subclassed controls, there are a several things you must do.
Include the Class's JAR file using the File>Jar File menu option in the Programming Editor. In the form, write the code to instantiate the control, and add it to the correct location on the form.
For an example, see extending a SilverStream form control in Application Techniques.
SilverStream forms support application-defined context-sensitive help. When an user presses the F1 key, the help manager can display help appropriate to the control or dialog that has keyboard focus. You control the granularity of help by specifying help information for individual controls, their containers, or the form. The help manager traverses the container hierarchy and processes the help information that it finds.
You can specify help information in the Form Designer by setting the Help Page property in the Property Inspector. Controls that can take keyboard focus and some containers have a Help Page property.
In addition to specifying help information in the Designer, an application can set the help information for a particular control at runtime using the setHelpInfo() method.
The setHelpInfo() method allows you to change help information dynamically as the user navigates the application. For example, an application can use a List control's valueChanged event to change the help information associated with the control based on its the selected item. This allows the application to provide different context-sensitive help for each item in the list , rather than just for the list control as a whole. Similarly, an application can provide different help for the panes of a tab control by calling setHelpInfo() in the tab's paneChanged event.
The setHelpInfo() and getHelpInfo() methods are part of the AgiHelpInfo interface. Controls built by third parties can support context-sensitive help by implementing this interface.
For default processing, the help information associated with a control is a relative or absolute URL. When the user presses the F1 key, the help manager calls the getHelpInfo() method on the control that has keyboard focus. If the control has help information, the help manager attempts to launch a browser to display this URL target. If the control with keyboard focus does not supply help information, the help manager looks at its parent (container) in the AWT/Swing component hierarchy. A control can fail to supply help information by returning null from getHelpInfo() or, in the case of 3rd-party controls, by not implementing the AgiHelpInfo interface.
As long as it has not found help information, the help manager continues up the hierarchy looking for help information. If it reaches the top of the hierarchy (a Frame) without finding any help information, it does not attempt to launch a browser.
URLs for help pages
The URL for a help page is relative to the SilverStream/Pages directory of the current database.
NOTE A SilverStream page has a page name and can have one or more URL aliases. If the page has an URL alias, you can't refer to the page using the page name. You must use the URL.To select a help page in the Designer when the page has an URL alias, don't use the dialog for selecting pages; instead type the URL yourself.
The following examples illustrate how to specify an HTML page for the help manager.
Pages or servlets in the same database as the form
../../HelpForTextField.html
HelpForTextField.html
Pages or servlets in another database on the same server
../../../database/HelpForTextField.html
otherdatabase:HelpForTextField.html
Pages or servlets on another server
http://server/otherdatabase/HelpPageURL.html
http://server/database/SilverStream/Pages/HelpPageName.html
The help manager also allows containers (typically forms) to handle context-sensitive help requests in a custom manner. While walking up the control hierarchy, the help manager, in addition to looking for help information, also looks for a help processor. A help processor is any control or container that implements the AgiHelpProcessor interface. This interface consists of one method:
boolean processHelp(Object requester, String helpInfo);
The help manager passes the help processor the component with keyboard focus (the requester) and whatever help information it has found so far. The help processor can handle this help request in any way and can interpret the help information appropriately for the application. If it processes the help request, it should return true. If it does not process the help request, it should return false and the help manager continues its search for a help processor.
For example, a particular form might implement the AgiHelpProcessor interface to handle context-sensitive help requests by displaying the help information in a dialog box. The help information associated with each control could be text to display in the dialog box, rather than an URL. Alternatively, the help information could be an index into a custom help system and the help processor could use this index to launch the custom help system.
If the help information is an URL, you have to find out whether the control you are using expects an absolute or relative URL and what the URL should be relative to.
It is important to remember that the help manager can find help information with one component and the processHelp() method for custom processing on a different component. When the help manager finds the processHelp() method, it calls the method whether or not help information has been found.
The following flowchart illustrates how help gets processed. 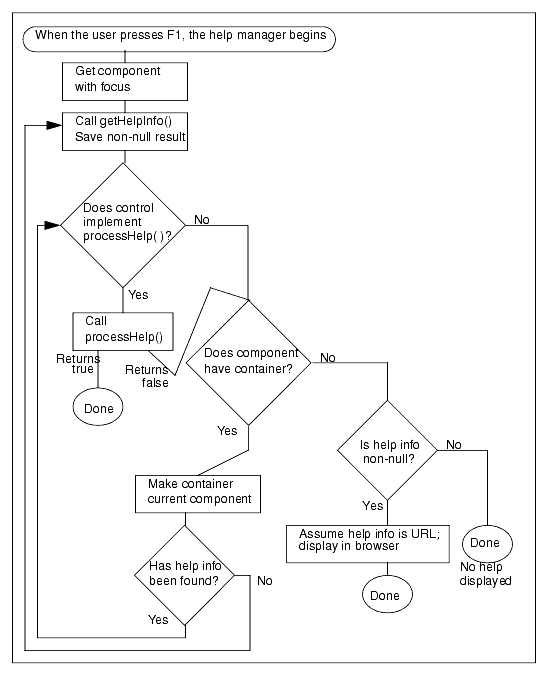
Summary of the process
When the user presses F1, the help manager begins these steps:
getHelpInfo(). It saves the help information, if any, for later use.
processHelp(), even if no help information has been found. If it returns true, the help processing is done.
processHelp() returns false or if the component doesn't implement custom help, the help manager gets the parent component (container). If there is no parent, processing continues with the last step.
getHelpInfo() and saves the help information, if any. The help manager continues looking for an implementation of processHelp() by going back to step 2.
Because you can specify both help information and a help processor, you can mix different kinds of help processing in one component hierarchy. For example, a subform can implement its own help processing, but be used in a containing form that uses the standard help processing. Requesting context-sensitive help in the subform results in that subform processing the help request in its particular way. Help outside the subform works in the default way.
You can also have a subform that has default processing but, when placed on a form with custom processing, displays help using the parent's custom processing. This allows you to implement custom processing at a higher level. However, if this is not what you want--if you want a subform or control to use default processing when its container uses custom processing, you can circumvent the custom processing by implementing processHelp() on the subform. It can mimic default processing by calling agBrowser.showPage() to display the help information URL in the browser.