6.4 Using Contacts Folders
Contacts folders give you a convenient view of address book information. The Frequent Contacts folder is associated with your Frequent Contacts address book. When you create a new address book, as described in Section 6.5.2, Creating a Personal Address Book, the new address book is automatically added as a new Contacts folder. When you create a new Contacts folder, a corresponding personal address book is created automatically.
6.4.1 Creating a Contacts Folder
-
Right-click the Frequent Contacts folder, then click .
-
Type the name for the new Contacts folder, then press Enter.
-
Right-click the new Contacts folder, then click .
On the tab, you can change the name of the Contacts folder and provide a description as needed.
-
Click the tab.
-
Select whether you want to view the Contacts folder by , , or .
Display options vary depending on how you choose to view the Contacts folder:
Sort By: Select the GroupWise field that you want to sort the contacts by, such as or .
Sort Order: Select or .
Summary: Select to summarize contact information under each contact name.
Columns: Select to display all contact information on a single line, organized into columns. Under , select the GroupWise fields that you want to use as column headers.
Show Group Labels: Select if you want contact information organized into expandable/collapsible groups.
Contact Type: Select the types of contacts that you want to display in the Contacts folder (people, groups, resources, or organizations).
Customize Panels: Click to display contacts in one panel and other related information in one or more additional panels. For instructions on setting up panels, see Section 2.4.4, Customizing a Panel.
-
Select display options for the new Contacts folder, then click .
-
Specify a unique name for this set of display options, so that you can select it for other folders, then click .
6.4.2 Managing Contacts
Each contact in a Contacts folder is marked with the  icon. When you double-click a contact, the contact item view displays.
Adding a Contact
When you add a contact to a Contacts folder, it is added to the corresponding address book.
-
In the Folder List, select the Contacts folder where you want to add the contact.
-
Click on the toolbar.

-
In the field, specify the contact’s full name.
-
In the field, specify the name you want to use for the contact.
Information in the field displays in the contact list.
-
(Optional) Specify any other information you want to record about the contact.
Contact: Use this page to specify the contact’s name, multiple email addresses, multiple phone numbers, and multiple instant messaging IDs.
Click the drop-down list to select how you want the name to display in Name Completion. You can select , , , or you can specify any display name you choose. When you want to address an item to this contact, type the display name in an address field (, , ) of the item.
If you fill in the field with a name for which you have created an organization, the organization information is automatically retrieved into the appropriate fields of the new contact.
If you click on the page, a new mail view is opened, addressed to this contact.
If you click , your instant messaging product is opened and a conversation is initiated with this contact. If the button is dimmed, no compatible instant messaging product is installed.
You can specify multiple phone numbers. To select the primary phone number, click
 next to the phone number you want to identify as the primary number, then click .
If you click the photo area in the upper left corner of the tab, you can add or replace a photo for the contact. Browse to and select the photo that you want to represent the contact. GroupWise accepts various types of image files, such as .jpg, .gif, .png, .bmp, and .tif, and then converts the image to .jpg with a maximum width or height of 64 pixels.
Details: Use this page to specify the contact’s profession, department, location, manager, assistant, birthday, anniversary, spouse, children, hobbies, and any Internet addresses associated with the contact.
To specify a birthday and anniversary, select the month, date, and year from the appropriate drop-down lists. To view the birthday or anniversary in a week calendar view, click the icon.
When the check box next to the date is selected, the birthday or anniversary information is displayed on the Summary page and in the column if you have added one to an address book. In addition, selecting the check box adds the birthday or anniversary to your Calendar as a posted All Day Event. If you deselect the check box, the birthday information is available only on the Personal page.
To specify an Internet address for the contact’s office, personal, or free/busy information, specify the address in the appropriate fields. Click a button to launch a browser and go to the Web site.
Address: Use this page to specify the contact’s office, home, and any other addresses. To specify the default mailing address, Select .
Advanced: Use this page to view, add, and edit user-defined fields. All system and user-defined fields display. For more information, see Defining Custom Fields in a Personal Address Book. Click on this page to view or remove security certificates you have received from this contact, change the trust of the certificates, edit certificate properties, and import and export certificates. For more information, see Viewing Received Security Certificates and Changing the Trust.
Notes: Use this page to add information about your interaction with this contact. For example, a salesperson can keep a log of the contact he or she has had with a customer. Notes are also displayed in the tab.
When you create a note on this page, a reminder note is created and placed on the calendar page in the list. Notes are not exported with the address book, but instead are exported with the calendar.
When you create a comment, the comment is created only on the Notes page and is not automatically time stamped.
You can also assign a category for the contact on the Notes page. To specify a category, click the icon, then select the category.
History: Displays all the items you have sent to or received from this contact, unless the items have been archived. You can use Quick Find to create custom searches in the History. For additional information on using Quick Find, see Section 7.0, Finding Items.
-
Click , then click to save your changes.
HINT:You can also add a contact by dragging and dropping an item from someone new into a Contacts folder to create a contact record for that person. In addition, you can add a contact by double-clicking in the white space of an address card list.
Contacts can also be added by right-clicking an email address or name in any GroupWise item and selecting .
Modifying a Contact
You can modify a contact’s information in the Frequent Contacts folder or a personal Contacts folder. In order to modify a contact in the GroupWise address book, you must first copy the contact to the Frequent Contacts folder or another personal Contacts folder.
-
In the Folder List, select the Contacts folder where you want to modify the contact.
-
In the contact list, double-click the contact to modify.
-
Make any needed modifications to the contact.
For information about the contact details you can enter on each tab, see Adding a Contact.
HINT:If you fill in the field on the tab with an existing organization, click the Organization icon
 to retrieve organization information into the contact.
-
Click , then click to save your changes.
Finding a Contact
Use the field in the Item List header of a Contacts folder to search for specific contacts, as described in Section 7.1.2, Finding Contacts.
Organizing Contacts with Categories
As with other items in GroupWise, you can assign categories to your contacts. This can help you organize your contacts by giving contacts an identifying color.
Categories that have been assigned to contacts are shown in the contact folder, as well as the address selector. For more information about the address selector, see Section 6.3.2, Using the Address Selector.
To assign a category to a contact:
-
Click a Contacts folder.
-
Right-click the name of a contact.
-
Click , then click the category that you want to assign to the contact.
For more information about using categories, see Section 2.2, Using Categories to Organize Items.
Sending a Contact
-
Click a Contacts folder.
-
Double-click a contact.
-
Click to open a Mail To window with the contact’s information attached to the message in vCard format.
-
Address and send the message as usual.
The recipient can import the contact into a personal address book as described in Importing Contacts from a vCard.
HINT:You can also attach a contact to an item by dragging and dropping it from a Contacts folder into the Attachments window of a new message.
Changing the Display Name of a Contact
The display name is the name that displays when you begin typing in the (or or ) field of a message. When you begin typing a name, for example “Ar,” Name Completion fills in the rest of the name with a name from the address book, for example “Arthur Ramirez.” However, if there are two people named Arthur Ramirez in the address book, one in Accounting and one in Development, it might be difficult for you to know which name Name Completion has filled in, unless you take the time to look at more properties.
You can change the display name so that it’s easy to know which name Name Completion has filled in. For example, if you only correspond with Arthur Ramirez in Development, and if he goes by Art rather than Arthur, you could change the display name to Art Ramirez.
-
Click a Contacts folder.
-
Double-click a contact.

-
Click the tab.

-
Type a new name in the field (for example, Art Ramirez).
You can also click the drop-down list to select or (for example: Ramirez, Art or Art Ramirez).
-
Click .
The next time you address a message, Name Completion fills in this display name.

Viewing All Correspondence with a Contact
-
Click a Contacts folder.
-
Double-click a contact.
-
Click the tab.
All items you have received from or sent to this contact display.
Also, messages might be displayed here if the user was added as a message contact, as described in Adding a Contact to an Email You Send or Receive.

The column shows where each item is located. Double-click an item to view its contents.
To add or remove columns, right-click the column heading, then click an option. To sort by the information of a column (for example, by date or subject), click the column heading.
You can use Quick Find to quickly find items or to create custom searches. For more information on how to use Quick Find, see Section 7.0, Finding Items.
Viewing a Contact’s Address on a Map
The View Map feature allows you to quickly find the location of one of your contacts. You can use the main address to open a Web browser and search for a map to the contacts location.
-
Click a Contacts folder.
-
Double-click a contact.
-
Click .
-
(Optional) Use the drop-down list to select a specific map location like an office, home, or other address.
Deleting a Contact
You can delete a contact in the Frequent Contacts folder or another personal Contacts folder. You cannot delete a contact from the GroupWise Address Book
-
In the Folder List, select the Contacts folder where you want to delete the contact.
-
In the contact list, right-click the contact, then click .
-
Click to confirm the deletion.
6.4.3 Managing Groups
Organizing Addresses in Groups
A group is a list of users or resources you can send messages to. Use groups to send a message to several users or resources by typing the group name in the , , or fields. There are two types of groups: public and personal.
A public group is a list of users created by the GroupWise administrator, and it is available for use by each GroupWise user. For example, there might be a public group for the Accounting Department. Each employee in Accounting is included in the group. Public groups are listed in the GroupWise Address Book.
A personal group is a group created by you. For example, if you often send an appointment to your work group, you can include each co-worker’s address or name and a meeting place (a resource) in a personal group.
Each group in a Contacts folder is marked with  . When you double-click a group, the group item view displays.
Figure 6-3 Group Item View

Creating and Saving a Personal Group
-
In the Folder List, select the Contacts folder where you want to create the personal group.
-
Click on the toolbar

-
Type a name for the group.
-
(Optional) Type any comments, such as a description for the group.
-
Click to open the Address Selector dialog box and display the address list.
-
Click , , or , then double-click or Ctrl+click and drag the users and resources for your group in the Group panel.
If the users you want to add are in a different address book, click the address book on the drop-down list.
To restrict the list of entries by contacts, groups, or resources, click an option on the
 drop-down list.
-
To add an entry that is not in an existing Contacts folder, click , fill in the information, click , then double-click the entry.
-
Click > to save the group in the Contacts folder.
You can also create and save a personal group from the Address Selector when you are addressing a message or other item:
-
In an item view, click
 on the toolbar.

-
Double-click contacts to add them to the right pane.
If the users you want to add are in a different address book, click the address book on the drop-down list.
To restrict the list of entries to contacts, groups, or resources, click an option on the
drop-down list.
-
To add an entry that is not in an existing address book, click , fill in the information, click , then double-click the entry.
-
Click .
or
If you want to save the group to a different address book than the one that is displayed, click the arrow on the right of , then select the address book.
-
Type a name for the group.
-
Type comments, such as a description of the group.
-
Click twice.
HINT:You can also create a personal group by dragging and dropping an item addressed to multiple users into a Contacts folder to create a group consisting of the recipients of that item.
Adding Contacts to a Group
-
In the Folder List, select the Contacts folder where you want to add contacts to a group.
or
In an item you are composing, click
on the toolbar.
-
Right-click the group, then click .
Groups are marked by the
icon.
-
On the tab, click to open the Address Selector dialog box and display the address list.
Click the
drop-down list to restrict the list to contacts, groups, or resources.
-
To add a contact, click the drop-down list, then click the address book the contact is in.
-
Click the drop-down list, then click the way you want to locate the contact (by first name, last name, or full name).
-
In the field, type the contact you want to add.
The address list scrolls to the nearest match.
-
Double-click the contact in the list so that it is added to the list.
-
Click twice to save the group.
Deleting a Contact from a Group
-
In the Folder List, select the Contacts folder where you want to delete a contact from a group
-
In the contact list, double-click the group.
-
Select the contact to delete, then click .
-
Click .
Addressing Items to a Group
-
In an item view, click
on the toolbar.

-
Select a group, then click , , or .
-
Repeat as necessary.
-
(Optional) To show all the members of the group, right-click the group, then click .
-
(Optional) To see more information about the group, right-click the group, then click .
-
Click to return to the item view.
Viewing Group Information
-
In the Folder List, select the Contacts folder where you want to view group information.
-
Right-click the group, then click .
-
Click the tab.

Deleting a Group from a Contacts Folder
-
In the Folder List, select the Contacts folder where you want to delete the group.
-
Right-click the group, then click .
-
Click to confirm the deletion of the group.
6.4.4 Managing Resources
Resources are items that can be scheduled for meetings or other uses. Resources can include rooms, computer projectors, cars, and more. The GroupWise administrator defines a resource by giving it an identifying name and assigning it to a user. Resources can be included in a busy search, just as users can. Resource IDs are entered in the To box. A user assigned to manage a resource is the owner of that resource.
The owner of a resource is responsible for accepting and declining appointments for the resource. In order to do so, the owner must have full proxy rights to the resource. As a resource owner, you can select to receive notification of appointments for the resource.
Understanding Resources
Each resource in a Contacts folder is marked with  . When you double-click a resource, the resource item view displays.
Figure 6-4 Resource Item View
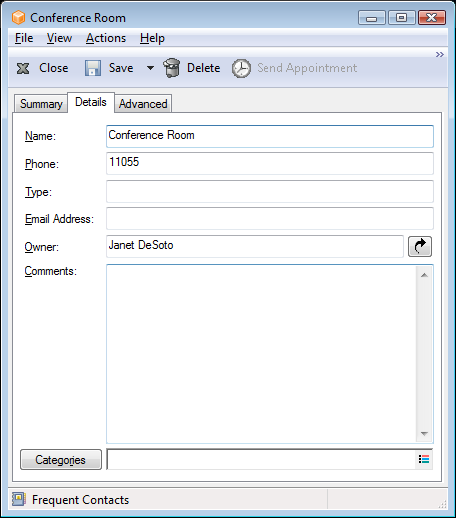
Use this page to specify a name for the resource, a phone number, resource type, email address, owner, and comments about this resource.
In the field, you can specify a contact that is already in your address book, or you can use the arrow button to create a new contact entry.
Adding a Personal Resource
The GroupWise Address Book includes resources defined by your GroupWise administrator. You can add a personal resource to the Frequent Contacts folder or another personal Contacts folder.
-
In the Folder List, select the Contacts folder where you want to add a personal resource.
-
Click on the toolbar.
-
In the field, specify the name for the resource.
-
In the field, specify the phone number of the contact responsible for the resource.
-
In the field, specify the type of resource.
You can specify or . If you specify , the resource description is automatically added to the field in the appointment.
-
In the field, specify the email address of the person to receive notifications about this resource.
-
In the field, specify the owner of the resource.
-
In the field, specify any comments you might have for the resource.
For example, you might want to specify how big a conference room is or what type of equipment is in the room.
-
Click , then click to save your changes.
Modifying a Personal Resource
-
In the Folder List, select the Contacts folder where you want to modify a personal resource.
-
Right-click the resource, then click .
Resources are marked by the
icon.
-
On the tab, modify any information as needed.
-
Click , then click to save your changes.
Accepting and Declining Resource Requests
You can accept or decline requests for a resource only if you are the owner and have been granted Read and Write rights. Personal resources cannot be shared with other users through proxy rights.
-
In the Main Window or Calendar, click > .
or
Click the Folder List header drop-down list (above the Folder List; probably displays Online or Caching to indicate what mode of GroupWise you are running in), then click .
-
Click the resource you own.
If the resource you own isn’t listed in the Proxy pop-up list, click , type the name of the resource you own in the field, then click .
-
Double-click the item you need to accept or decline.
-
Click or on the toolbar.
Receiving Notification for Another User or Resource
-
Click > .
-
Double-click , then click .
-
Select the name of a user for whom you are a proxy, or select the name of the resource you own.
If the user or resource is not listed in the Notification list, type the name, then click . You can select the name from the Address Selector dialog box by clicking
 .
.
-
Make sure and are selected.
You are automatically subscribed to alarms and notification for yourself. If you deselect and for yourself, you no longer receive alarms and notifications. You need to repeat the steps in this topic for your user name.
-
Click .
Notify must be open or minimized in order to receive notification or alarms. For more information, see Section 8.2, Starting Notify.
Creating a Rule for a Resource
If you are the owner of a resource, you have full Proxy rights to that resource, including the ability to create rules for it. The following steps show you how to create a rule that accepts all requests for an available resource. This is an example of one rule that is useful for a resource. You can create other rules that perform different actions. For example, you might create a rule that declines requests for a resource that is already scheduled.
-
Click the icon
 , then click .
-
Click the resource you own.
If the resource you own isn’t listed in the Proxy dialog box, type the name of the resource you own in the field, then click .
-
Click > , then click .
-
Type a name for the rule.
-
Click . Make sure the other item types are deselected.
-
Click the drop-down list, then click .
-
Click , click , type a comment if desired, then click .
Step 6 and Step 7 instruct the rule to accept the appointment for the resource only if the resource is available.
-
Click , then click .
Deleting a Personal Resource
-
In the Folder List, select the Contacts folder where you want to delete the personal resource.
-
Right-click the resource, then click .
Resources are marked by the
icon.
-
Click to confirm the deletion of the resource.
6.4.5 Managing Organizations
Understanding Personal Organizations
Each organization in a Contacts folder is marked with the Organization icon. When you double-click an organization, the organization item view displays.
Figure 6-5 Organization Item View
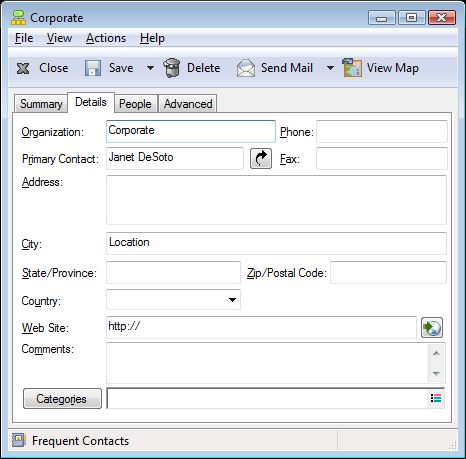
Use this page to specify a name for the organization, a phone and fax number, the primary contact in this organization, the address, Web site, and comments about this organization.
In the field, you can specify a contact that is already in a Contacts folder, or you can use the arrow button to create a new contact entry.
Adding a Personal Organization
The GroupWise Address Book includes organizations defined by your GroupWise administrator. You can add an organization to the Frequent Contacts folder or another personal Contacts folder.
-
In the Folder List, select the Contacts folder where you want to add a personal organization.
-
Click on the toolbar.
-
In the field, specify the name of the organization.
-
(Optional) Specify any other information you want to record for the organization.
-
Click , then click to save your changes.
Modifying a Personal Organization
-
In the Folder List, select the Contacts folder where you want to modify a personal organization.
-
Right-click the organization, then click .
Organizations are marked by the
icon.
-
On the tab, modify any information as needed.
-
Click , then click to save your changes.
Deleting a Personal Organization
-
In the Folder List, select the Contacts folder where you want to delete a personal organization.
-
Right-click the organization, then click .
Organizations are marked by the
icon.
-
Click to confirm the deletion of the organization.
Sending Messages to a Personal Organization
You can simultaneously send email messages to all users in a personal organization.
-
In the Folder List, select the Contacts folder where you want to send an email to a personal organization.
-
Right-click the organization, then click .
Organizations are marked by the
icon.
-
Click .
or
Click the down-arrow next to the button, then click one of the following options:
-