Creating an Application Object

  1. In ConsoleOneTM, right-click the container in which you want to create the Application object > click New > click Object to display the New Object dialog box.

  2. Click App:Application > click OK to display the New Application dialog box.


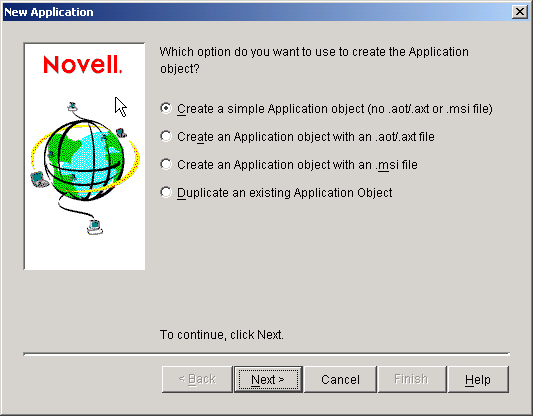
  3. Select the option you want to use to create the Application object:

    Create a Simple Application Object (No .AOT/.AXT File or .MSI File): Lets you enter a path to the application's executable file. After the Application object is created, you can modify additional properties if necessary. Skip to Creating a Simple Application Object.

    Create an Application Object With an .AOT/.AXT File: Lets you specify an .AOT or .AXT file you've created with snAppShot. The .AOT or .AXT file is used to populate the Application object's property fields. Skip to Creating an Application Object With an .AOT/AXT File.

    Create an Application Object With an .MSI File: Lets you specify an .MSI file. The .MSI file is used to populate the Application object's property fields. Skip to Creating an Application Object With an .MSI File.

    Duplicate an Existing Application Object: Lets you make a copy of an existing Application object. Skip to Duplicating an Application Object.


Creating a Simple Application Object

  1. In the New Application dialog box, select Create a Simple Application Object (No .AOT/.AXT File or .MSI File) > click Next.

  2. In the Object Name box, type a name for the Application object.

  3. In the Path to Executable box, enter the path to the location from which the application's executable file will be run. Include the executable file in the path.

    IMPORTANT:  If you plan for users to run the application from the network or the file is already located on the users' workstations, the path should be to the actual executable file on the network or the workstation. If you plan to have Application Launcher/Explorer copy the file to a target directory on the workstation, the path must be to the executable file in the target directory.

  4. Click Finish to create the Application object.

  5. If Application Launcher/Explorer will need to copy files to the workstation, right-click the Application object > click Properties > complete the remaining steps.

    or

    If the application will be run from the network or is already located on the workstation, skip the remain steps and continue with Defining the Application's System Requirements.

  6. Click the Distribution Options tab > click Application Files.

    You need to add the files to the Application Files list in order for Application Launcher/Explorer to copy them to the workstation.

  7. Click Add > click File > fill in the following fields.

    Source File: Select the file you want copied to the workstation (for example, j:\public\notepad\notepad.exe).

    Target File: Enter the full path, including the file name, of where you want the file copied (for example, c:\notepad\notepad.exe).

  8. Click OK to add the file to the list.

  9. Repeat Step 7 and Step 8 for each file to be copied.

  10. When finished adding files, click OK to save the Application object information.

  11. Continue with Defining the Application's System Requirements to define the application's system requirements.


Creating an Application Object With an .AOT/AXT File

  1. In the New Application dialog box, select Create an Application Object With an .AOT/AXT File > click Next.

  2. Enter the path to the .AOT or .AXT file > click Next.

    HINT:  The file should be in the network location you saved it to when creating it with snAppShot.

  3. If necessary, modify the following fields to customize the Application object.

    Object Name: This field defaults to the Application object name that was specified when running snAppShot to create the installation package. You can change the name if you want. If another Application object in the same container has the same name, you need to select a different name. No two objects in the same container can have the same name.

    SOURCE_PATH: This field defaults to the location where the application's installation files (.FIL) files where stored when running snAppShot to create the installation package. You should verify that the path is correct.

    TARGET_PATH: This field defaults to the location where the application was installed when running snAppShot to create the installation package. You should verify that this is the workstation directory where you want the application installed.

  4. Click Next.

  5. Review the Application object settings > click Finish to create the Application object.

  6. Continue with Defining the Application's System Requirements to define the application's system requirements.


Creating an Application Object With an .MSI File

  1. In the New Application dialog box, select Create an Application Object With an .MSI File > click Next.

  2. Enter the path to the .MSI file > click Next.

    HINT:  The file should be in the network location where you installed or copied the application.

  3. If necessary, modify the following fields to customize the Application object.

    Object Name: This field defaults to the Application object name that was specified when running snAppShot to create the installation package. You can change the name if you want. If another Application object in the same container has the same name, you need to select a different name. No two objects in the same container can have the same name.

    SOURCE_PATH: This field defaults to the administrative installation location defined in the .MSI file. You should verify that the path is correct.

  4. Click Next.

  5. Review the Application object settings > click Finish to create the Application object.

  6. Continue with Defining the Application's System Requirements to define the application's system requirements.


Duplicating an Application Object

  1. In the New Application dialog box, select Duplicate an Existing Application Object > click Next.

  2. Browse for and select the Application object you are duplicating > click Next.

  3. Fill in the following fields to customize the new Application object.

    Object Name: Specify a name for the new Application object.

    SOURCE_PATH: Specify the network location where the application's installation files are located.

    TARGET_PATH: Specify the workstation location where you want to install the application.

  4. Click Next.

  5. Review the Application object settings > click Finish to create the Application object.

  6. Continue with Defining the Application's System Requirements to define the application's system requirements.