Assigning the Roles for the Server
In the deployment plan, you must identify the role for each server that you will deploy for Workstation Inventory. During installation, you specify the role for each selected server. The installation program creates an Inventory Service object(servername_ZenInvservice) in NDS for each server. The Inventory Service object follows the convention: servername_This object contains the inventory settings, such as the role of the server, location of the scan directories, and other settings. Although the roles of each server differ, the installation program copies all the Inventory components on each server. At run time, based on the role for the server, the appropriate inventory services are loaded on the server.
The nine different roles of the server include the following:
- Root Server
- Root Server with Workstations
- Intermediate Server
- Intermediate Server with Database
- Intermediate Server with Database & Workstations
- Intermediate Server with Workstations
- Leaf Server
- Leaf Server with Database
- Standalone Server
See Implementing the Inventory Tree (Roles) in Workstation Inventory in Deployment for more information about the roles of the server.
After installation, you can modify the existing roles of the server. See Changing the Role of the Inventory Service Object in Workstation Inventory in Administration for more information.
Specifying the Location of the Scan Directory on the Server
When you install Workstation Inventory, you will be prompted to specify the volume for the scan directory (SCANDIR) on the server. The SCANDIR directory contains the scan data files (.STR files) of the attached workstations. If there is roll up of scan data across servers, the SCANDIR also contains the compressed scan files (.ZIP) that roll up to the highest level server. The Inventory components process the files in the SCANDIR directory.
The installation program creates the SCANDIR directories in the volume you specify on the server. Because the scan data files can grow large with every scanning cycle, depending on the number of workstations that are scanned, you should consider placing it on a volume other than SYS:.
HINT: The SCANDIR directory will contain only .STR files; you should not place any other files in this directory because the files will be deleted by the Inventory components.
The Scan directory is created in server_name\specified_scandir_volume\ZENWORKS\SCANDIR.
After installation, you can modify the location of SCANDIR in the Workstation Inventory Policy. See Configuring the Inventory Policies for Workstations for more information.
Assigning the Site Information for the Database
The deployment plan that you create will identify whether one or more database servers are required. During installation, you must assign unique site information for each database.
When you identify the databases uniquely, you can query an individual database, report information, and view inventory information specific to the database. For example, if there are Inventory databases at different geographical locations, you can query each site database. In the following illustration, the databases have been assigned unique identifications. You can query the database with the site name Sydney or view the collective inventory information of the database at the Root Server with the site name AusInvDB.
IMPORTANT: While installing ZfD, you must specify a unique site ID and site name for each database you install. The site ID must be between 0 to 255. Also, the site name should not contain any underscore characters ( _ ). ZfD does not verify whether the site information is unique.
After you install Workstation Inventory on servers, you must install the inventory files on the workstations. Ensure that the workstations meet the requirements specified in Specific Hardware and Software Requirements for Workstation Inventory. See Obtaining and Installing Novell Clients. Run the Novell Client installation program on the workstation. When you install the Novell Client, the inventory files are installed. If the required Novell Client is already installed, the preferred method for installing the inventory files is to add the Inventory Application object to the Application Launcher and associate the Application object with the managed workstation. The Inventory Application object is created in NDS during installation. Use ConsoleOne to configure the Inventory Application object. The Inventory Application object on Windows 95/98 is ZFD3INV95. On Windows NT/2000, the Inventory Application object is ZFD3INVNT. You can use NAL to execute the Application object. The following procedures are necessary after installation to get the Inventory database (whether you use a Sybase database or adapt the database for use in an existing Oracle database) started on a variety of server types:
On NetWare servers, the MGMTDBS.NCF file in the SYS\SYSTEM directory loads the Inventory database (MGMTDB.DB) maintained in Sybase. To load the database: The database server maintains a log of all database transactions in the MGMTDB.LOG file. If the log file does not exist or if it has been deleted, the database server will not be loaded. The log files increase in size accordingly with the database. Every 50 minutes, all transactions are committed to the database and the log file is truncated. If you have successfully installed the Inventory database (MGMTDB.DB) on a Windows NT/2000 server, the installation program creates the database server as a service (Adaptive Service Anywhere - ZENworks for Desktops 3). At server startup, this service is automatically loaded. On NetWare servers, the MGMTDBO.NCF file in the SYS\SYSTEM directory loads the Inventory database, MGMTDB (db_name) maintained in Oracle. To load the database: To load the Inventory database, MGMTDB (db_name) on a Windows NT/2000 server: The following sections explain how to configure the Inventory database for Oracle; in this setup the Inventory database is not mounted with other Oracle databases.
To mount the Inventory database with other Oracle databases, see Loading the Inventory Database as a Separate Oracle Instance in Workstation Inventory in Administration. You must manually install the Inventory database for Oracle on NetWare servers. Prerequisites for configuring the database include the following:
To configure the database: Extract the INVORACLE8INW.ZIP file from the \ZENWORKS\PRODUCTS\DATABASE\ORACLE directory in the ZENworks for Desktops product CD to any volume other than SYS: on the NetWare server. After extraction, you will see the following list of system files and Database Space files in this directory.
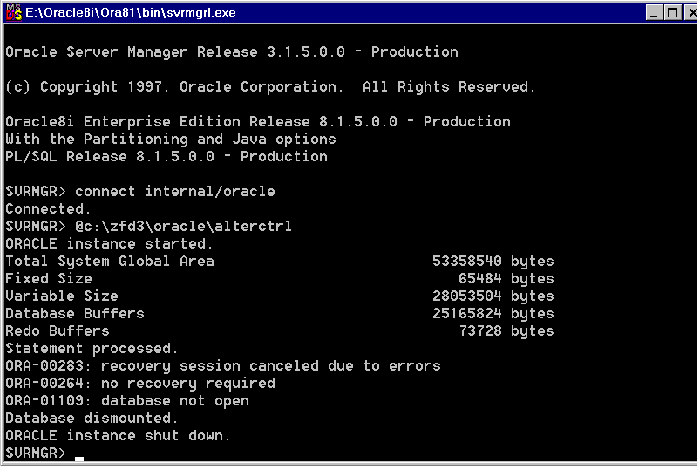
CIM1.ORA, CIM2.ORA, CIM3.ORA, CIM4.ORA, CIM5.ORA, CIM6.ORA, CIM7.ORA, CIM8.ORA, and CIM9.ORA Table spaces that contain the inventory information for ZfD CTL1.ORA Oracle control file INIT.ORA Database startup file LOG1.ORA, LOG2.ORA Online Redo log file RBS1.ORA Rollback segment file containing table space for rollback SYS1.ORA SYS schema file containing the data dictionary TMP1.ORA Temporary table space _DBINT.SQL Contains the Inventory database site name _START.SQL Contains the location of the database startup file ALTERCTRL.SQL Contains the location of table spaces MGMTDBO.NCF ZENworks Inventory database startup file for Oracle on NetWare \TRACE\oracle_log_files Contains the Oracle log files Copy the MGMTDBO.NCF file from volume\ZFD3\ORACLE to the SYS:\SYSTEM directory on the database server. where volume is the volume on which the .ZIP file was extracted. Specify the site details of the database. Copy the _DBINIT.SQL file from volume\ZFD3\ORACLE to the SYS:\SYSTEM directory on the database server. where volume is the volume on which the .ZIP file was extracted. Edit the following lines in the _DBINIT.SQL file to specify the site ID and site name for the database: where, site_ID uniquely identifies the database and 'site_name' provides a description for the database site. If you do not specify the site ID, the default values specified in the file apply. Save the changes you make. Create the Oracle Control file. Edit the ALTERCTRL.SQL file located in volume\ZFD3\ORACLE to specify the path to which you have extracted the .ZIP file. where volume is the volume on which the .ZIP file was extracted. For example, modify the existing DATA:\ZFD3\ORACLE\DATABASE path to ORACLE:\ZFD3\ORACLE\DATABASE in ALTERCTRL.SQL. In this .SQL file, modify the path for these parameters, if required. Save the changes. Edit the INIT.ORA file located in volume\ZFD3\ORACLE\DATABASE to specify the path to which you have extracted the .ZIP file. where volume is the volume on which the .ZIP file was extracted. Modify the path for the following parameters: Save the changes. Load Oracle, enter oraload. Load the Oracle Server Manager, enter svrmgr31. Connect as an administrator. For example, if the administrator's internal name is internal, at the Server Manager prompt, enter connect internal/password_for_administrator. Enter shutdown normal. At the Server Manager prompt, enter @complete_path_of_alterctrl.sql\ALTERCTRL. You should see the following window, which indicates that the database is mounted and loaded.
Exit the Server Manager, enter exit. Copy volume\ZFD3\ORACLE\_START.SQL to SYS:\SYSTEM directory on the database server. where volume is the volume on which the .ZIP file was extracted. Load the Inventory database. At the database server console, enter mgmtdbo. Type the password for the Database Administrator (DBA). Initialize the database. Load the Oracle Server Manager, enter svrmgr31. Connect to the database, at the Server Manager prompt, enter connect mw_dba/novell. At the Server Manager prompt, enter @sys:\system\_dbinit.sql. This command initializes the database. To verify that the initialization was successful, at the Server Manager prompt, enter select getsiteid() from dual; to display the site ID of the database. To display the site name of the database, enter select * from zenworks.site; At the Server Manager prompt, enter disconnect. To exit the Server Manager, enter exit. You must manually install the Inventory database for Oracle on Windows NT/2000 servers. Prerequisites for configuring the database include the following:
To configure the database: Extract the INVORACLE8INT.ZIP file from the \ZENWORKS\PRODUCTS\DATABASE\ORACLE directory located on the ZENworks for Desktops product CD to a drive, which preferably has NTFS. After extraction, you will see the following list of system files and Database Space files in this directory:
CIM1.ORA, CIM2.ORA, CIM3.ORA, CIM4.ORA, CIM5.ORA, CIM6.ORA, CIM7.ORA, CIM8.ORA, and CIM9.ORA Table spaces that contain the inventory information for ZfD CTL1.ORA Oracle control file INIT.ORA Database startup file LOG1.ORA, LOG2.ORA Online Redo log file RBS1.ORA Rollback segment file containing table space for rollback SYS1.ORA SYS schema file containing the data dictionary TMP1.ORA Temporary table space _DBINT.SQL Contains the Inventory database site name _START.SQL Contains the location of the database startup file ALTERCTRL.SQL Contains the location of table spaces MGMTDBO.BAT ZENworks Inventory database startup file for Oracle on Windows NT/2000 \TRACE\oracle_log_files Contains the Oracle log files Specify the site details of the database. Edit the following lines in the _DBINIT.SQL file to specify the site ID and site name for the database. where, site_ID uniquely identifies the database, and 'site_name' provides a description for the database site. If you do not specify a site ID, the default values specified in the file apply. Save the changes you make. Create the Oracle Control file. Edit the ALTERCTRL.SQL located in drive\ZFD3\ORACLE to specify the path strings to which you have extracted the file. where drive is the drive on which the .ZIP file was extracted. For example, modify the existing D:\ZFD3\ORACLE\DATABASE path to C:\ZFD3\ORACLE\DATABASE in ALTERCTRL.SQL. In this .SQL file, modify the path for these parameters, if required. Save the changes. Edit the INIT.ORA located in drive\ZFD3\ORACLE\DATABASE. where drive is the drive on which the .ZIP file was extracted. Modify the path for the following parameters: Save the changes. Ensure that Oracle is loaded on the database server. Load the Oracle Server Manager, click Start from the Windows taskbar > click Run > enter svrmgrl. Connect as an administrator. For example, if the administrator's internal name is internal, at the Server Manager prompt, enter connect internal/password_for_administrator. Enter shutdown normal. At the Server Manager prompt, enter @complete_path_of_alterctrl.sql\ALTERCTRL. You should see the following window, which indicates that the database is mounted and loaded.
Exit the Server Manager, enter exit. Copy drive\ZFD3\ORACLE\_START.SQL to the \ZFD3\ORACLE on the database server. where drive is the drive on which the .ZIP file was extracted. Load the Inventory database, at the database server from the path where the MGMTDBO.BAT is located, enter mgmtdbo. Type the password for the Database Administrator (DBA). Initialize the database. Load the Oracle Server Manager, enter svrmgrl. Connect to the database, at the Server Manager prompt, enter connect mw_dba/novell. At the Server Manager prompt, enter @complete_location_of__dbinit.sql\_dbinit.sql This command initializes the database. To verify that the initialization was successful, at the Server Manager prompt, enter select getsiteid() from dual; to display the site ID of the database. Enter select * from zenworks.site; to display the site name of the database. At the Server Manager prompt, enter disconnect. To exit the Server Manager, enter exit.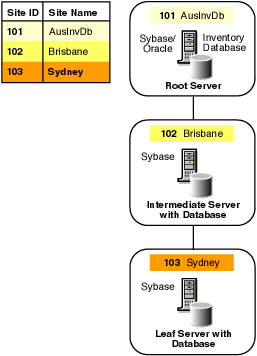
Installing the Inventory Components on Workstations
Loading the Inventory Database on a Server
Loading the Sybase Database on a NetWare Server
Loading the Sybase Database on a Windows NT/2000 Server
Loading the Oracle Database on a NetWare Server
Loading the Oracle Database on a Windows NT/2000 Server
Configuring the Inventory Database for Oracle
Configuring the Inventory Database for Oracle on a NetWare Server
Filenames
Contents Description
siteid:=site_ID;siteName:='site_name';
startup nomount pfile=oracle:\zfd3\oracle\database\INIT.ORAlogfile group 1 'oracle:\zfd3\oracle\database\log1.ora' size 256K,logfile group 2 'oracle:\zfd3\oracle\database\log2.ora' size 256Kdatafile 'oracle:\zfd3\oracle\database\sys1.ora','oracle:\zfd3\oracle\database\rbs1.ora','oracle:\zfd3\oracle\database\cim1.ora','oracle:\zfd3\oracle\database\cim2.ora','oracle:\zfd3\oracle\database\cim3.ora','oracle:\zfd3\oracle\database\cim4.ora','oracle:\zfd3\oracle\database\cim5.ora','oracle:\zfd3\oracle\database\cim6.ora','oracle:\zfd3\oracle\database\cim7.ora','oracle:\zfd3\oracle\database\cim8.ora','oracle:\zfd3\oracle\database\cim9.ora','oracle:\zfd3\oracle\database\tmp1.ora'control_files=location_of_CTLl.ORA\CTL1.ORAbackground_dump_dest=location_of_TRACE_dir\TRACEuser_dump_dest=location_of_TRACE_dir\TRACE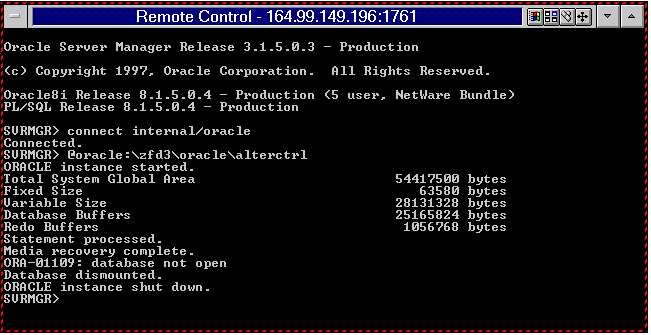
Configuring the Inventory Database for Oracle on a Windows NT/2000 Server
Filenames/Directory
Contents Description
siteid:=site_ID;siteName:='site_name';
startup nomount pfile=c:\zfd3\oracle\database\INIT.ORAlogfile group 1 'c:\zfd3\oracle\database\log1.ora' size 256K,logfile group 2 'c:\zfd3\oracle\database\log2.ora' size 256Kdatafile 'c:\zfd3\oracle\database\sys1.ora','c:\zfd3\oracle\database\rbs1.ora','c:\zfd3\oracle\database\cim1.ora','c:\zfd3\oracle\database\cim2.ora','c:\zfd3\oracle\database\cim3.ora','c:\zfd3\oracle\database\cim4.ora','c:\zfd3\oracle\database\cim5.ora','c:\zfd3\oracle\database\cim6.ora','c:\zfd3\oracle\database\cim7.ora','c:\zfd3\oracle\database\cim8.ora','c:\zfd3\oracle\database\cim9.ora','c:\zfd3\oracle\database\tmp1.ora'control_files=location_of_CTLl.ORA\CTL1.ORAbackground_dump_dest=location_of_TRACE_dir\TRACEuser_dump_dest=location_of_TRACE_dir\TRACE