5.4 Creating and Managing Net Folders
Net Folders are connections to specific directories on OES and Windows servers. You can set up multiple connections for each Net Folder Server that you have previously configured. You can set up each Net Folder to synchronize on a schedule that you specify, independent of the schedule set for the Net Folder Server.
5.4.1 Creating Net Folders
Before you can create a Net Folder as described in this section, you must first create a Net Folder Server as described in Section 5.3, Configuring and Managing Net Folder Servers.
-
Log in to the Filr site as the Filr administrator.
-
Launch a web browser.
-
Specify one of the following URLs, depending on whether or not you are using a secure SSL connection:
http://filr_hostname:8443
https://filr_hostname:8443
Replace filr_hostname with the hostname or fully qualified domain name of the Filr server that you have set up in DNS.
Depending on how you have configured your Filr system, you may not be required to enter the port number in the URL, and if you are using NetIQ Access Manager, the Filr login screen is not used.
-
-
Click the link in the upper right corner of the page, then click the icon
 .
.
-
Under , click .
The Manage Net Folders page is displayed.
-
Click .
The New Net Folder dialog box is displayed.
-
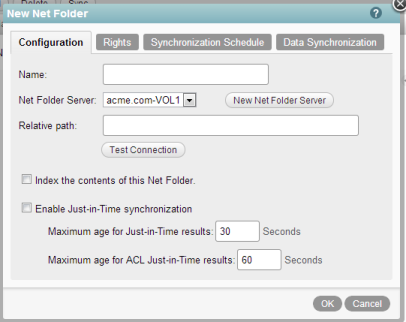
On the tab, specify the following information:
Name: Specify a name for the Net Folder. This is the name that users see when accessing the Net Folder. This can be any name you choose.
Net Folder Server: Select the Net Folder Server that the new Net Folder is associated with.
New Net Folder Server: Click this option if you have not already established a connection to a Net Folder Server, as described in Section 5.3, Configuring and Managing Net Folder Servers.
Relative Path: Specify the relative path to the folder on the Net Folder Server that you want this Net Folder to represent. If this field is left blank, it uses the root of the Net Folder Server.
For example, if the relative path to the folder on your Net Folder Server that you want this Net Folder to represent is \\server_address\vol1\marketing, and \\server_address\vol1 is the server path to your Net Folder Server, you would enter marketing in the field for the Net Folder.
Test connection: Click this option to test the connection to the Net Folder.
Index the contents of this Net Folder: When this option is selected, all content for each file within the Net Folder is indexed, and therefore is searched when performing a search in Filr. Deselect this option if you do not want file content to be indexed. This means that file content is not searched when performing a search in Filr. However, file names and access controls are always indexed at the time of synchronization regardless of this setting.
Indexing is performed as a background process. Depending on the number of files that need to be indexed, it can take several hours or even days before all content is indexed and searchable in the Filr system.
If indexing is turned on, you should monitor the Filr boot partition to ensure that adequate disk space continues to be available. (For information about how to use Ganglia to monitor disk space, see Section 21.1, Monitoring Filr Performance with Ganglia.)
Files must first be synchronized to Filr before the indexing process can begin. For more information about the synchronization process, see Section 5.1.4, Planning the Synchronization Method.
Enable Just-in-Time synchronization: When you enable Just-in-Time synchronization, files are synchronized the moment users access them. Just-in-Time synchronization is one method that you can use to synchronize files from Net Folders to be accessed in Filr.
There are various options for synchronizing files from a Net Folder. Before you decide on a synchronization method for a Net Folder, see Section 5.1.4, Planning the Synchronization Method.
If the Net Folder you are creating contains terabytes of data, the indexing process can be lengthy if this option is selected.
Maximum age for Just-in-Time results (in seconds): When a user clicks a folder or file, if it has been more than x seconds (x being the number that you specify) since the Just-in-Time operation retrieved information about this folder or file, it retrieves the information again. The default is 30 seconds.
Maximum age for ACL Just-in-Time results (in seconds): When a user clicks a folder or file, if it has been more than x seconds (x being the number that you specify) since the Just-in-Time operation retrieved access control information about this folder or file, it retrieves the information again. The default is 60 seconds.
-
Click the tab, then use the field to begin typing the name of a user or group that you want to have access to the files and folders on the Net Folder. Click the name when it appears in the drop-down list.
The Grant Rights dialog box is displayed.
-
In the Grant Rights dialog box, select .
Users are granted the same level of access rights that they currently have on the file system. Users who have rights on the file system do not have access to the same files through Filr until this option is selected for them. If you select this option for users who do not currently have access rights on the file system, these users cannot see files within the Net Folder, but they are able to see the folder names. (This access is obtained via the Net Folder Server Proxy user. For more information about the Net Folder Server proxy user, see Section 5.1.2, Planning the Net Folder Server Proxy User.)
For more information, see Section 5.1.3, Planning Access and Sharing for Net Folders.
-
Select whether you want the users or groups that you specified in Step 6 to be able to share with internal users, external users, and the public, and whether you want to allow them to give users that they share with the ability to re-share items.
Users who receive a share for a Net Folder do not have file system rights to the shared item. This means they can access the shared item only in the Shared with Me area through one of the Filr clients (Web, desktop, or mobile); they cannot access the shared item directly through a mapped drive on the file system nor can they access the shared item from the Net Folders area through one of the Filr clients. This is because the Net Folder proxy user is used to grant the user access to an item through a share. (For more information about the Net Folder proxy user, see Section 5.1.2, Planning the Net Folder Server Proxy User.)
For more information, see Section 5.1.3, Planning Access and Sharing for Net Folders.
-
Click to save your rights changes.
-
(Optional) Click the tab to create a schedule for the Net Folder synchronization. This is the synchronization between Filr and the file system server.
Synchronizations can be scheduled only if you have configured the Net Folder to use Full Synchronization as the synchronization method (as described in Section 5.1.4, Planning the Synchronization Method). When setting the synchronization schedule, be aware that the schedule that you choose can greatly affect system performance.
Before you set a synchronization schedule, review the information in Section 5.1.5, Planning the Synchronization Schedule.
If you already set a synchronization schedule for the Net Folder Server (as described in Section 5.3, Configuring and Managing Net Folder Servers), you can leave this section blank to use the Net Folder Server synchronization schedule. If you do set a synchronization schedule for the Net Folder, this schedule is used for synchronizing the Net Folder, instead of the Net Folder Server synchronization schedule.
To set a synchronization schedule for the Net Folder:
-
Select .
-
Select from the following synchronization options for synchronizing files between the Net Folder and the Filr site:
Every day: Synchronize files every day.
On selected days: Synchronize files only on designated days of the week.
At: Select the time of day to synchronize files.
Repeat every xx hours: Select how frequently the synchronization occurs.
-
-
(Optional) Click the tab to configure whether the Net Folder is synchronized with the Filr desktop application.
Desktop application: If this option is selected, users can access files on the Net Folder via the Filr desktop application. (For more information about the Filr desktop application, see the Filr Desktop Application for Windows Quick Start, or the Filr Desktop Application for Mac Quick Start.)
How Filr is set up to synchronize with Net Folders can affect how quickly files from the Net Folder are available to the Filr desktop application. For specific information, see Usage of the Filr Desktop Application in Section 5.1.4, Planning the Synchronization Method.
-
Click to finish creating the Net Folder.
5.4.2 Managing Net Folders
After Net Folders already exist in your Filr system, you can manage them as described in this section.
Modifying a Net Folder
-
Log in to the Filr site as the Filr administrator.
-
Launch a web browser.
-
Specify one of the following URLs, depending on whether or not you are using a secure SSL connection:
http://filr_hostname:8443
https://filr_hostname:8443
Replace filr_hostname with the hostname or fully qualified domain name of the Filr server that you have set up in DNS.
Depending on how you have configured your Filr system, you may not be required to enter the port number in the URL, and if you are using NetIQ Access Manager, the Filr login screen is not used.
-
-
Click the link in the upper right corner of the page, then click the icon
.
-
Under , click .
The Manage Net Folders page is displayed.
-
Click the name of the Net Folder that you want to modify.
-
Make the desired modifications, then click .
Synchronizing a Net Folder
When you create a Net Folder, you can enable a synchronization schedule, as described in Section 5.4.1, Creating Net Folders.
To manually synchronize the Net Folder:
-
Log in to the Filr site as the Filr administrator.
-
Launch a web browser.
-
Specify one of the following URLs, depending on whether or not you are using a secure SSL connection:
http://filr_hostname:8443
https://filr_hostname:8443
Replace filr_hostname with the hostname or fully qualified domain name of the Filr server that you have set up in DNS.
Depending on how you have configured your Filr system, you may not be required to enter the port number in the URL, and if you are using NetIQ Access Manager, the Filr login screen is not used.
-
-
Click the link in the upper right corner of the page, then click the icon
.
-
Under , click .
The Manage Net Folders page is displayed.
-
Select the Net Folder that you want to manually synchronize, then click .
In a clustered environment, it is a good idea to dedicate a single Filr appliance to handle the load of any manual Net Folder synchronizations. (For information about how to dedicate a Filr appliance, see
Setting Aside a Filr Appliance for Re-Indexing and Net Folder Synchronization in a Clustered Environment
in the Novell Filr 1.0.1 Installation and Configuration Guide.)
Deleting a Net Folder
To delete a Net Folder, and thereby delete access to files from the Net Folder from within Filr:
-
Log in to the Filr site as the Filr administrator.
-
Launch a web browser.
-
Specify one of the following URLs, depending on whether or not you are using a secure SSL connection:
http://filr_hostname:8443
https://filr_hostname:8443
Replace filr_hostname with the hostname or fully qualified domain name of the Filr server that you have set up in DNS.
Depending on how you have configured your Filr system, you may not be required to enter the port number in the URL, and if you are using NetIQ Access Manager, the Filr login screen is not used.
-
-
Click the link in the upper right corner of the page, then click the icon
.
-
Under , click .
The Manage Net Folders page is displayed.
-
Select the Net Folder that you want to delete, then click .