7.3 Registering the Server in the Novell Customer Center
Before you can patch an OES 11 SP3 server with updates from Novell, you must register the server either during installation or later by using the instructions in this section.
If you register through evaluation codes, your server can receive patches for only 60 days, at which time the codes expire.
You need to register each server with the Novell Customer Center only once. After you have registered the server, you can update the server at any time. This includes replacing evaluation codes with purchased codes. You can use the desktop interface (GUI) or the command line to accomplish this task.
This section contains the following information:
7.3.2 Registering the Server in the Novell Customer Center Using the Command Line
To register a new server or to replace evaluation activation codes with standard codes.
-
Log in to the server as root or su to root
-
At the command line, enter
suse_register -a email=email_address -a regcode-sles=SLES_registration_code -a regcode-oes=oes11_registration_code
For example:
suse_register -a email=joe@example.com -a regcode-sles=4adab769abc68 -a regcode-oes=30a74ebb94fa
IMPORTANT:If you are replacing evaluation codes with purchased codes, simply enter the codes. No further action is required.
-
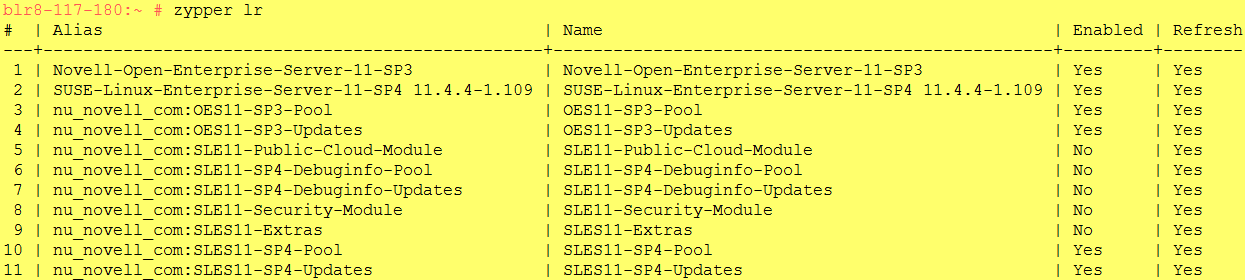
Verify that the server is registered by checking whether you have the service types and catalogs needed for updates:
-
To verify the service type, enter
zypper ls
The results should be similar to the following:

The URIs you see for the ZYPP type differ based on your installation source.
-
To verify the catalogs, enter
zypper lr
The results should be similar to the following:
-
7.3.3 Registering the Server in the Novell Customer Center Using the GUI
-
In the , click > .
-
On the Novell Customer Center Configuration configuration page, select all of the following options, then click .

-
Configure Now: Proceeds with registering this server and the OES product with the Novell Customer Center.
-
Hardware Profile: Sends information to the Novell Customer Center about the hardware that you are installing SLES 11 SP4 and OES 11 SP3 on.
-
Optional Information: Sends optional information to the Novell Customer Center for your registration. For this release, this option doesn’t send any additional information.
-
Registration Code Makes the registration with activation codes mandatory.
-
Regularly Synchronize with the Customer Center: Keeps the installation sources for this server valid. It does not remove any installation sources that were manually added.
After you click , the following message is displayed. Wait until this message disappears and the Manual Interaction Required page displays.

-
-
On the Manual Interaction Required page, note the information that you will be required to specify, then click .
-
On the Novell Customer Center Registration page, specify the required information in the following fields:
-
Email Address: The e-mail address for your Novell Login account.
-
The same e-mail address for your Novell Login account
-
Specify your purchased or 60-day evaluation registration code for the SLES 11 SP4 product.
If you don’t specify a code, the server cannot receive any updates or patches.
-
Specify your purchased or 60-day evaluation registration code for the OES product.
If you don’t specify a code, the server cannot receive any updates or patches.
-
The hostname for the system is specified by default. If you want to change this to a description for the Novell Customer Center, specify a description to identify this server.
-
-
Click .
-
When the message to complete the registration displays, click .
After you click , the following message is displayed with the Manual Interaction Required page. Wait until this message disappears and the Novell Customer Center Configuration Was Successful page displays.
-
When you see the message that the Novell Customer Center was successful, click .
When the registration is successful, the server is registered in the Novell Customer Center and the installation sources for patches are configured on the server.