9.4 Browsing NSS Volumes and Performing Actions on Them
The NCP Server plug-in to Novell Remote Manager appears as “Manage NCP Services” in the left panel. NCP volumes and NSS volumes are listed as NCP Shares.
For detailed information about creating and managing NCP volumes, see the OES 2 SP3: NCP Server for Linux Administration Guide.
For detailed information about creating and managing NSS volumes, see the OES 2 SP3: NSS File System Administration Guide for Linux.
For detailed information about creating and managing Dynamic Storage Technology shadow volume pairs with NSS volumes, see the OES 2 SP3: Dynamic Storage Technology Administration Guide.
9.4.1 Viewing Information about an NSS Volume
-
In Novell Remote Manager, select > Manage Shares.
-
In the right pane, view the list of mounted NSS volumes in the list.
-
Next to the volume name, click the icon (
 ) to go to the volume’s Share Information page.
-
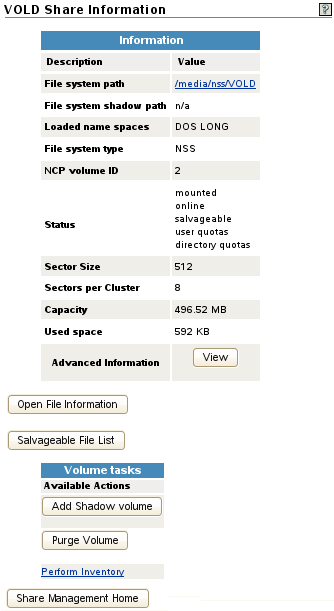
In the table, view the following information about the NSS volume:
-
File system path on Linux, such as /media/nss/VOLD
Click the link to browse the directories and files on the volume.
-
File system shadow path, such as /media/nss/SH_VOLD (A path is displayed only when the specified NSS volume is the primary volume of a Dynamic Storage Technology shadow volume pair.)
Click the link to browse the directories and files on the pair’s secondary volume.
-
Loaded name spaces, such as DOS, LONG, MAC, and UNIX
-
File system type (NSS)
-
NCP volume ID
The NCP volume ID is a value between 0 and 254 that is automatically assigned for standalone volumes, beginning with zero. The SYS volume is by default assigned 0, and _Admin is assigned 1. For shared volumes, the volume ID is specified in the cluster load script for shared volumes. beginning with 254 and down.
-
Status
Identifies whether the volume is mounted/unmounted, online/offline, or in a cluster resource, and lists the NSS volume attributes that are enabled for the volume, such as Salvageable, User Quotas, Directory Quotas, and so on.
-
Sector size
-
Sectors per cluster
-
Capacity
-
Used space
-
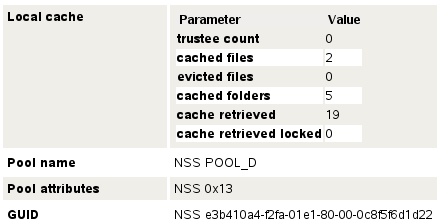
Advanced information (Click to view.)
-
Local cache
-
Trustee count
-
Cached files
-
Evicted files
-
Cached folders
-
Cache retrieved
-
Cache retrieved locked
-
-
Pool name
-
Pool attributes
-
GUID
-
-
Open File Information (Click to view.)
-
Salvageable Files (Click to view.)
-
9.4.2 Viewing the Linux POSIX Details of an NSS Directory and Performing Specific Actions on It
-
Click the link in the navigation frame or click a name link on the Home page.
-
On the Directory list page, browse to the /media/nss/<volume_name> and through the subdirectories to the directory, then click the icon
 to the left of the directory name.
-
On the Directory Information page that is displayed, view the information about the file:
-
Directory owner
-
Group
-
Data modified time
-
Last accessed time
-
Information change time
-
Linux POSIX read/write/execute directory attributes.
IMPORTANT:Do not use these settings for NCP and NSS volumes. Use the NCP view of the volume to set the Novell Trustee Model attributes.
-
-
Perform any of the following tasks:

-
Delete Directory and Its Contents: Click this option to delete the selected directory and the subdirectories and files in it.
-
Rename Directory: Specify the full Linux path to the directory including the new directory name, then click Directory.
-
Create Subdirectory: Specify the name of the new subdirectory, then click .
-
Create Symbolic Link: Specify the name for the symbolic link, then click .
-
9.4.3 Viewing the Linux POSIX Details of a File and Performing Specific Actions on It
-
Click the link in the navigation frame or click a name link on the Home page.
-
On the Directory list page, browse to the /media/nss/<volume_name> and through the subdirectories to the file, then click the icon
 to the left of the file name.
-
On the File Information page that is displayed, view the information about the file:
-
File owner
-
Group
-
Data modified time
-
Last accessed time
-
Information change time
-
Linux POSIX read/write/execute file attributes.
IMPORTANT:Do not use these settings for NCP and NSS volumes. Use the NCP view of the volume to set the Novell Trustee Model attributes.
-
-
Perform any of the following tasks:

-
Edit: The button is available only on simple text files or files with the extensions listed in the /opt/novell/nrm/nrmedit.txt file. If you want to save the file with an ANSI or UTF-8 encoding, select the appropriate option and click .
-
Delete: Click to delete the selected file.
-
Rename: Specify the full Linux path to the file including the new file name, then click .
-
Create Hard Link: Specify the hard link path, then click .
-
Create Symbolic Link: Specify the symbolic link path, then click .
-
9.4.4 Browsing an NSS Volume and Setting Rights and File System Attributes on Directories and Files
-
In Novell Remote Manager, select > Manage Shares.
-
In the right pane, view the list of mounted NSS volumes in the list.
-
Click the volume link to view a folder list and to browse the files on the NSS file system.
Click the arrows in the column headings to sort the list by name, type (file extension), size, or last modified date and time.
-
Use the links above the file list to perform the following actions on the volume:
-
-
-
-
For information, see Section 9.5, Generating Inventories for Directories or NCP Volumes.
-
-
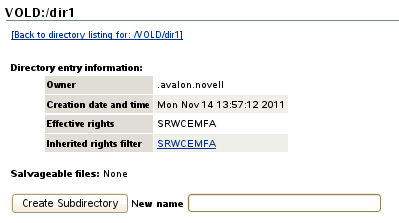
Click a directory’s icon
to view information about the directory. You can also create subdirectories.
Figure 9-4
-
Owner
-
Creation date and time
-
Effective rights (based on the Novell Trustee Model)
-
Inherited rights filter (based on the Novell Trustee Model). You can click the link to modify the rights inheritance filter settings.
-
Salvageable files
-
-
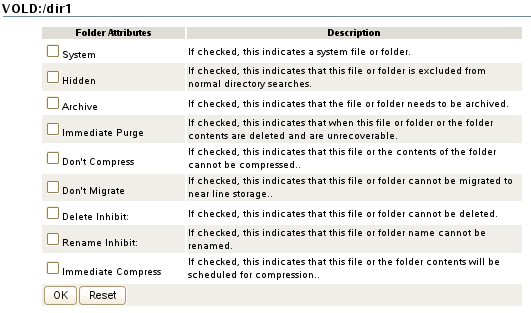
Click a directory’s link to view or modify the NSS file system attributes that are set for the directory. Click to save your changes.
-
System
-
Hidden
-
Archive
-
Immediate purge
-
Do not compress
-
Do not migrate
-
Delete inhibit
-
Rename inhibit
-
Immediate compress
For information about the meaning and usage of NSS file system attributes for directories, see
Understanding Directory and File Attributes for NSS Volumes
in the OES 2 SP3: File Systems Management Guide. -
-
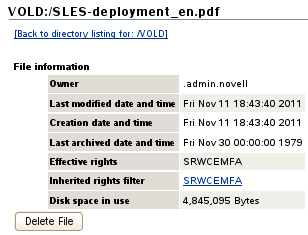
Click a file’s icon
to view the following file information. You can also delete the file from this page by clicking .
-
Owner
-
Last modified date and time
-
Creation date and time
-
Last archived date and time
-
Effective rights (based on the Novell Trustee Model)
-
Inherited rights filter (based on the Novell Trustee Model). You can click the link to modify the rights inheritance filter settings.
-
Disk space in use
-
-
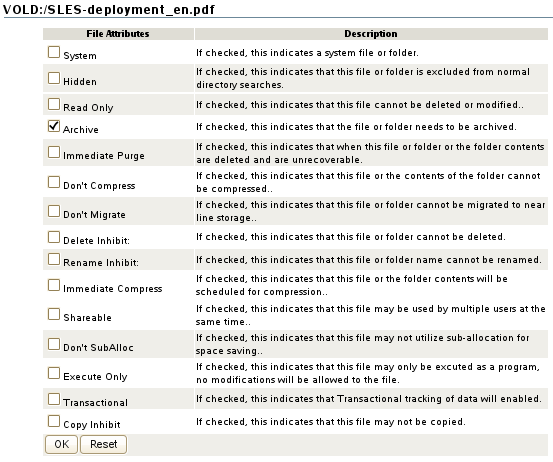
Click a file’s link to view or modify the NSS file system attributes that are set for the file. Click to save your changes.
-
System
-
Hidden
-
Read only
-
Archive
-
Immediate purge
-
Do not compress
-
Do not migrate
-
Delete inhibit
-
Rename inhibit
-
Immediate compress
-
Shareable
-
Do not suballocate
-
Execute only
-
Transactional
-
Copy inhibit
For information about the meaning and usage of NSS file system attributes for directories, see
Understanding Directory and File Attributes for NSS Volumes
in the OES 2 SP3: File Systems Management Guide. -
9.4.5 Salvaging and Purging Deleted Files on an NSS Volume
From an NSS volume’s Share Information page, the option allows you to view a list of deleted files that are available for salvage or purge on the volume. Deleted files are available only for NSS volumes where the Salvage attribute is enabled. For information about the NSS file salvage feature, see Volume Salvage versus File Salvage
in the OES 2 SP3: NSS File System Administration Guide for Linux.
-
In Novell Remote Manager, select > Manage Shares.
-
In the right pane, view the list of mounted NSS volumes in the list.
-
Next to the volume name, click the icon (I) to go to the volume’s Share Information page.
-
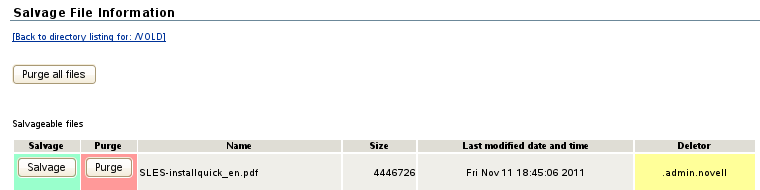
Below the table, click to open the Salvage File Information page.
-
Salvage or purge files in the list:
If the deleted file resided in a directory that has been deleted, you must first salvage the deleted directories in the path. Salvage each lower directory in turn until you have salvaged the deleted directory that contained the file. You can then search for the deleted file in the salvaged directory.
-
The option allows you to purge all deleted files on the selected volume.
-
The option allows you to recover a deleted file.
-
The option allows you to purge a deleted file.
You can also select a deleted directory and use this option to purge the deleted directory and all of the deleted subdirectories and files it contains.
-
9.4.6 Purging a Deleted NSS Volume
For volume salvage, the NSS volumes are automatically retained on deletion. The deleted volume can be salvaged for a period of time that is determined by the server-level Logical Volume Purge Delay setting. Administrators with the Supervisor right can salvage or purge deleted volumes at any time before the purge delay elapses. For information about the NSS volume salvage feature, see Volume Salvage versus File Salvage
in the OES 2 SP3: NSS File System Administration Guide for Linux.
-
In Novell Remote Manager, select > Manage Shares.
-
In the right pane, view the list of mounted NSS volumes in the list.
-
Next to the volume name, click the icon (I) to go to the volume’s Share Information page.
-
Scroll down to the table, and click .
9.4.7 Viewing Open File Information for an NSS Volume
-
In Novell Remote Manager, select > Manage Shares.
-
In the right pane, view the list of mounted NSS volumes in the list.
-
Next to the volume name, click the icon (I) to go to the volume’s Share Information page.
-
Below the table, click to open the Open File Information page.
-
View the following information about files on the NSS volume:
-
Connection
For information, see
Managing Connections for NCP Volumes and NSS Volumes
in the OES 2 SP3: NCP Server for Linux Administration Guide. -
User name
-
Open file list
-