8.5 Creating Indexes
QuickFinder creates two types of indexes:
-
Crawled: Created as QuickFinder follows (or crawls) hypertext links until it reaches a dead end. QuickFinder can crawl one or more Web sites, specific areas of a Web site, or specific URLs, even down to a specific filename.
-
File System: Created as QuickFinder index content on a file server. QuickFinder can index one or more paths on multiple volumes, including Storage Area Network (SAN) storage devices.
There are two forms you can use to create each type of index: the standard form and the advanced form. The Define Crawled Index is the standard form for creating a crawled index, but the Define Crawled Index (Advanced) form offers more options than the standard form, including options that override default virtual search server settings. Both methods are described in the following sections.
8.5.1 Creating a Crawled Index
-
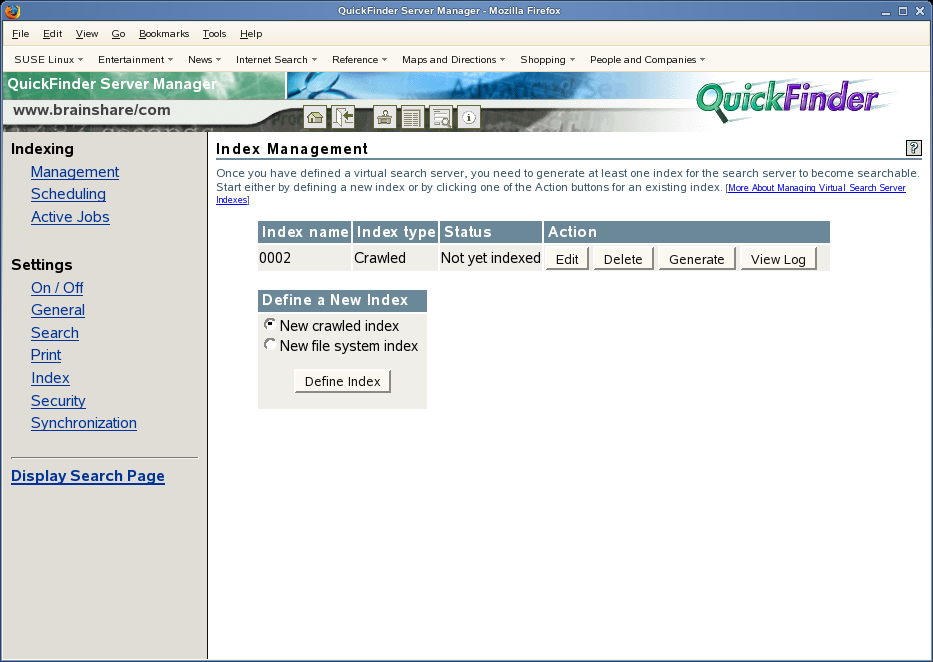
On the Global Settings page of QuickFinder Server Manager, click in the row of the virtual search server that you want to work with.
-
Under , click , then click .
-
In the field, specify a name for your index.
A name can be a word, phrase, or a numeric value. If the virtual search server you are working on contains, or will contain, a large number of indexes, you might want to use a numbering scheme to help you manage multiple indexes more effectively. However, the name you specify here appears on the default search page, so you might want to choose a name that can be understood by users of your search services.
-
Under , specify the URL of the Web site that you want indexed.
You can specify just the URL, such as www.mycompany.com, or you can also append a complete path, down to the file level, such as www.mycompany.com/path/index.html.
-
If desired, add another URL. To add additional URLs, click .
-
Click .
8.5.2 Creating an Advanced Crawled Index
The Define Crawled Index (Advanced) page offers some additional options beyond those available in the standard Define Crawled Index page. Changes made using this page override default virtual search server settings.
-
On the Global Settings page of QuickFinder Server Manager, click in the row of the virtual search server that you want to work with.
-
Under , click , then click .
-
On the Define Crawled Index page, click .
-
In the field, specify a name for your new index.
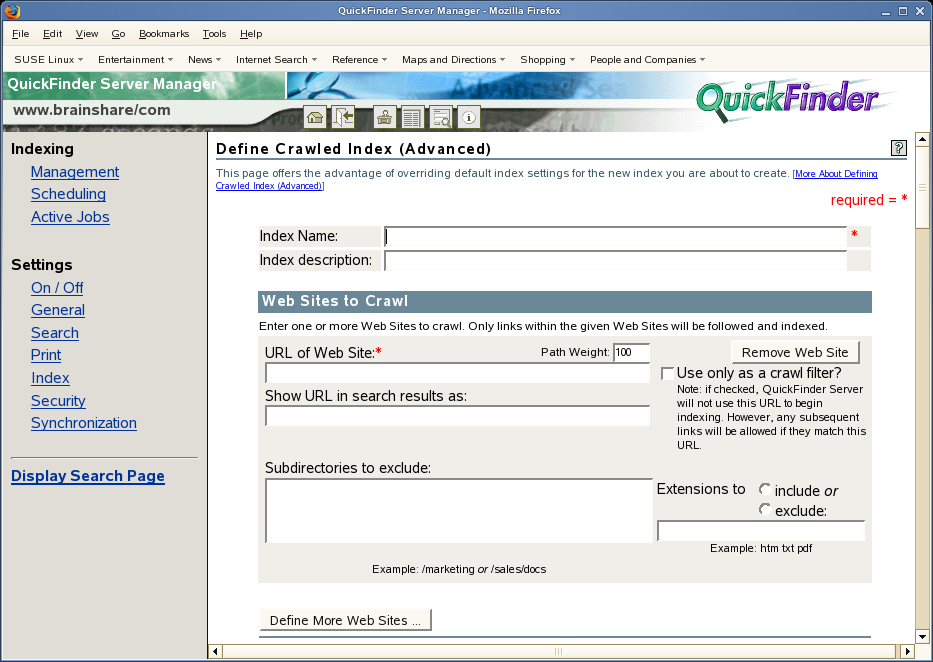
A name can be a word, phrase, or a numeric value. If the virtual search server you are working on contains, or will contain, a large number of indexes, you might want to use a numbering scheme to help you manage multiple indexes more effectively. However, the name you specify here appears on the default search page, so you might want to choose a name that can be understood by users of your search services.
-
In the field, specify an optional description of the index to be created.
-
Under , specify the URL of the Web site to be indexed.
If you specify a filename at the end of the URL, just that file is indexed.
-
(Optional) Use the option to boost or degrade search results based on the path.
A weight of 100 makes the path’s relevance normal. Increasing the weight makes the path more relevant, and lowering the weight makes the path less relevant.
-
(Optional) Select if you don’t want QuickFinder to use the URL you specified in the field to begin indexing.
Any subsequent links found that contain a URL matching the one you specified in the field are followed and subsequently indexed.
-
(Optional) If you want to mask the actual URL displayed in the search results template, specify an alternate URL in the S field.
For example, if you want to index a Web server that is used inside of your company but only allow your customers access to some of the data, you could hide the actual internal URL with the URL of your public Web site.
-
In the text box, specify the directories that you want QuickFinder not to index.
For example, /marketing or /sales/doc.
-
To direct QuickFinder to include or exclude specific file types, click or and then specify the extensions, such as HTM PDF TXT, separating each one with a single space.
-
To add additional URLs, click .
-
To delete a URL, select it and click .
-
In the text box, specify any other URLs that you want indexed (for example, www.mycompany.com/marketing).
This allows you to specify additional areas of information found on other Web sites, but not include all of the content of those sites to your searches.
When QuickFinder encounters links found in the pages of that point to pages specified in , QuickFinder follows those links. All other links that go outside of are not followed.
-
Use the option to determine the maximum number of off-site URLs (those URLs not located within any of the URLs specified in ) that QuickFinder should index.
In the field, list the off-site URLs that you want to exclude from indexing.
-
Use the option to adjust the relevance of individual items within the index.
Adjustment values can range from 1 to 200. Values higher than 100 increase the calculated relevance of the item on the search results page, and values lower than 100 decrease the calculated relevance of the item. The value specified here is combined with other values to determine the final relevance.
-
Under , specify the absolute path to where you want the index files stored in the field.
For example, /var/lib/qfsearch/sites/mysites.
By default, index files are stored at /var/lib/qfsearch/Sites/default/indexes/index_name.
Changes made to override .
-
From the drop-down list, select the amount of information you want included in the index logs.
Option
Description
Disabled
Turns off index logging.
Terse
Lists only the URLs indexed.
Normal
Lists the URLs indexed and the results of the crawl.
Verbose
Lists the URLs indexed, the results of the crawl, and the links that were skipped during the crawl.
New Links
Lists the URLs indexed, the results of the crawl, the links that were skipped, and any new links found during the crawl.
All Links
Lists the URLs indexed, the results of the indexing, the links that were skipped, and all links found during the crawl.
-
From the drop-down list, select the encoding to be used by files being indexed that do not contain an encoding specification.
-
In the field, list any field names that you want to be included on the search results page (for example, author date_created product dc.copyright).
To display the field on the search results pages, add the corresponding $$Variable to the template (for example, $$author $$date_created $$product $$copyright).
-
Use the option to boost or degrade search results based on the item’s index.
A weight of 100 makes the item’s relevance normal. Increasing the weight makes the item more relevant, and lowering the weight makes the item less relevant.
-
In the field, specify the number of jumps (or links) from the starting URL that QuickFinder should crawl.
-
In the field, specify the maximum file size (in bytes) that QuickFinder should index.
Files exceeding this size are not indexed and are not included in search results.
-
In the field, specify a number (in seconds) before QuickFinder automatically skips the indexing of the specified URL.
-
In the field, specify the amount of time (in milliseconds) QuickFinder should delay before attempting to index a URL.
-
To direct QuickFinder to pay attention to the case of filenames and directory names, click next to .
-
To direct QuickFinder to crawl dynamic content (URLs containing the question mark [?]), click next to .
For more information about indexing dynamic content, see Section 8.7, Indexing Dynamic Web Content.
-
Click next to if you want QuickFinder to following instructions found in any Robots meta tags.
For more information, see Using the Robots Meta Tag.
-
Click next to if you want to allow this index to be copied to other servers in a QuickFinder Synchronization cluster.
For more information about QuickFinder Synchronization, see Section 9.0, Synchronizing Data Across Multiple QuickFinder Servers.
-
Click to activate the newly generated index irrespective of the size.
The default option is for the option. If it is set to No, then the newly generated index is compared with the current one. If the size of the new index is small when compared to the existing one, an error message is displayed in the Admin console.
-
If the URLs to be crawled require authentication, use the option to select the methods for providing the correct user credentials.
-
Basic: If you know that the server to be indexed requires basic authentication, select , then specify the username and password in the fields.
For example, if you are indexing www.company1.com and it uses basic authentication, specify the username (user ID) and password in the fields. In this case, the credentials are sent using an HTTP authorization header with every request made to the server of the URL you have specified.
-
Form: If the server to be indexed uses form-based authentication, type the correct user credentials in the box. For example: UserIDField:$$UserID
In form-based authentication, the first time the Web site is indexed, the credentials are sent and a session cookie is returned. Thereafter, QuickFinder uses the session ID in the cookie for authentication and the credentials are no longer sent to the Web site.
If you are indexing more than one URL and each one requires a different set of credentials, we recommend that you create a separate index for each URL.By default, QuickFinder Server sends the form-based credentials by using the HTTP Post protocol. If the Web sites being indexed require the HTTP Get protocol, deselect the check box. When this option is not selected, QuickFinder Server sends the form-based credentials as query parameters to the URLs being indexed.
-
-
(Optional) If the Web sites you are indexing require users to log in at a specific URL (such as login.digitalairlines.com), specify the login URLs in the field.
After the session cookies are returned, QuickFinder sends the appropriate cookies as needed to the Web sites being indexed.
-
Select next to to use the specified Step 31 instead of the search user’s credentials when requesting the specified documents.
-
In the field, specify any additional headers and values you want included with each HTTP request, placing each header on a separate line.
Some Web sites require specific information in HTTP headers when attempts are made to access them. If your Web site uses form-based or cookie-based authentication, you can specify the information here.
-
Click .
After you define an index, you must generate it to make it searchable. See Generating Indexes.
8.5.3 Configuring Rights-Based Search Results for Crawled Indexes
-
On the Global Settings page of QuickFinder Server Manager, click in the row of the virtual search server that you want to work with.
-
Under , select , then click .
-
On the page, click .
-
Under , configure authorization checking by selecting one of the following options:
-
Use Default: Select this option if you want this index to use the default authorization checking setting specified on the Index Settings page of your virtual search server.
-
Off: If you want all users to have access to this index, select this option. No authorization checking is done.
-
by Index: To enable rights checking for this index, specify a file that exists on your server that can be used in verifying user access. By creating a file and setting access rights to it, QuickFinder can verify access to this index based on the rights to the file. Click if a path was specified on the Index Settings page.
NOTE:NCP (eDirectory) rights-based search results option that is supported for remote NCP volumes is not applicable for crawled indexes. In case of NCP-based remote volume indexes, it is possible to restrict search results based on logged in user’s rights to individual files and directories.
-
-
From the drop-down list, select one of the following filters:
-
Use Default: Select this option if you want the current index to use the default setting found on the Index Settings page.
-
Search Engine: When you select this option, users attempting to search the index without logging in do not see any of the unauthorized hits on the search results page. If the user doesn’t have access to any search results, then the system returns a No Results Found message on the search results page.
-
Templates: When you select this option, users attempting to search the index without logging in to the system receive results, but they are then required to provide a username and password before being allowed to see the contents.
-
-
Click .
After you define an index, you must generate it to make it searchable. See Generating Indexes.
8.5.4 Creating a File System Index
-
On the Global Settings page of QuickFinder Server Manager, click in the row of the virtual search server that you want to work with.
-
Under , click , then click .
-
In the field, specify a name for your index.
A name can be a word, phrase, or a numeric value. If the virtual search server you are working on contains, or will contain, a large number of indexes, you might want to use a numbering scheme to help you manage multiple indexes more effectively. However, the name you specify here appears on the default search page, so you might want to choose a name that can be understood by users of your search services.
-
In the field, select if the files to be indexed are on an NCP server, then specify the NCP server name, a valid username, password, and the character set of the server.
NOTE:You must specify the username in the user.ou.o format.
The user must have at least read rights to all the files. If you want to do rights-based searches, the user must have administrator rights to the NCP server.
The option must be set correctly so that the URLs can be properly encoded (according to the server encoding).
This option is useful if you have a local NSS volume on the same machine as your QuickFinder index and you want to create a rights-based search for your users, or if you have a local or remote NCP server (such as a NetWare server, another server with NCP on it, or a local indexing machine) and you want to centralize your indexing.
If you choose this option, make sure that the option in the section contains a complete URL so that your users can access the indexed files from the NCP server. Also, if you are planning on indexing a large number of files (for example, over a million), your system should have at least 2 GB of memory.
-
In the field, specify the absolute path to the folder containing the information that you want indexed (for example, /var/lib/qfsearch/data).
-
In the field, specify the URL that should be used by the search results page to access the individual files (for example, /sales).
You can also specify a file URL containing the UNC path of the server and path. The syntax is file://///server-dns-name/volume/path.
If the filename contains non-ASCII characters, set the return encoding of the Search Result page to match the encoding of the client’s machine. You can set the return encoding on the General Settings page, or the client can set it by specifying the value of the encoding being sent to the search server in the retencoding search parameter. For example, the default English Windows encoding is Windows-1252, and Japanese is Shift-Jis. In order for the page to open, the client must already be authenticated to the server that the path points to.
-
To add additional paths, click .
-
Click .
After you define an index, you must generate it to make it searchable. See Generating Indexes.
8.5.5 Creating an Advanced File System Index
-
On the QuickFinder Server Manager Global Settings page, click in the row of the virtual search server that you want to work with.
-
Under , click , then click .
-
On the Define File System Index page, click .
-
In the field, specify a name for your new index.
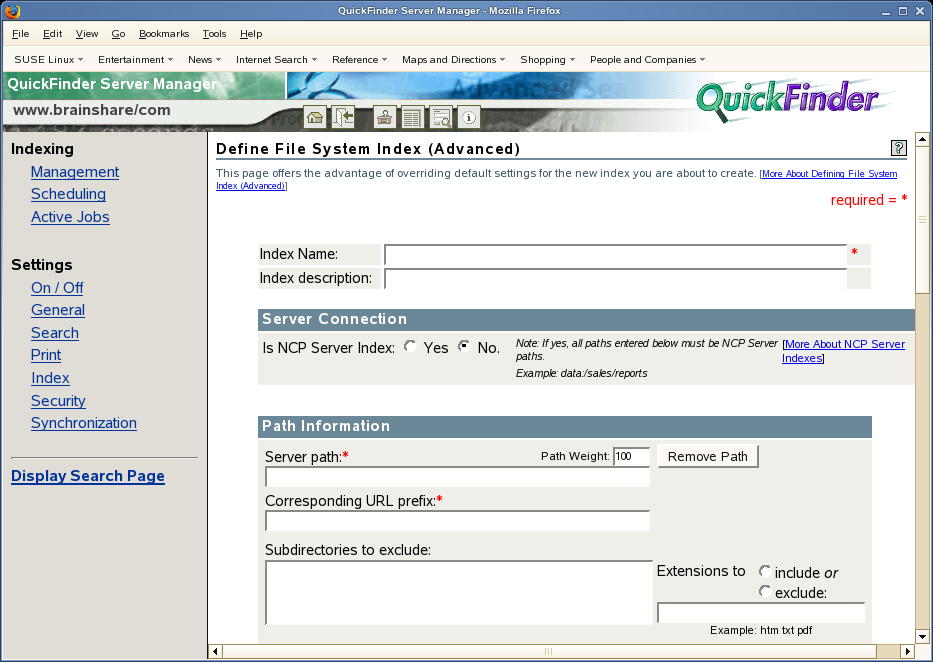
A name can be a word, phrase, or a numeric value. If the virtual search server you are working on contains, or will contain, a large number of indexes, you might want to use a numbering scheme to help you manage multiple indexes more effectively. However, the name you specify here appears on the default search page, so you might want to choose a name that can be understood by users of your search services.
-
In the field, specify an optional description of the index to be created.
-
In the field, select if the files to be indexed are on an NCP server, then specify the NCP server name, a valid username, password, and the character set of the server.
The user must have at least read rights to all the files. If you want to do rights-based searches, the user must have administrator rights to the NCP server.
The option must be set correctly so that the URLs can be properly encoded (according to the server encoding).
This option is useful if you have a local NSS volume on the same machine as your QuickFinder index and you want to create a rights-based search for your users, or if you have a local or remote NCP server (such as a NetWare server, another server with NCP on it, or a local indexing machine) and you want to centralize your indexing.
If you choose this option, make sure that the option in the section contains a complete URL so that your users can access the indexed files from the NCP server. Also, if you are planning on indexing a large number of files (for example, over a million), your system should have at least 2 GB of memory.
-
Under , specify the absolute path to the folder containing the information that you want indexed in the field (for example, /var/lib/qfsearch/data).
-
(Optional) Use the option to boost or degrade search results based on the path.
A weight of 100 makes the path’s relevance normal. Increasing the weight makes the path more relevant, while lowering the weight makes the path less relevant.
-
In the field, specify the URL that should be used by the search results page to access the individual files (for example, /sales).
You can also specify a file URL containing the UNC path of the server and path. The syntax is file://///server-dns-name/volume/path.
If the filename contains non-ASCII characters, set the return encoding of the Search Result page to match the encoding of the client’s machine. You can set the return encoding on the General Settings page, or the client can set it by specifying the value of the encoding being sent to the search server in the retencoding search parameter. For example, the default English Windows encoding is Windows-1252, and Japanese is Shift-Jis. In order for the page to open, the client must already be authenticated to the server that the path points to.
-
To exclude specific subdirectories from being indexed, specify their relative paths in the field.
-
To direct QuickFinder to include or exclude specific file types, click or and then type the extensions, separating each one with a single space, such as HTM PDF TXT.
-
(Optional) To add additional paths, click .
-
(Optional) To delete a path, select it and click .
-
Use the option to adjust the relevance of individual items within the index.
Adjustment values can range from 1 to 200. Values higher than 100 increase the calculated relevance of the item on the search results page, and values lower than 100 decrease the calculated relevance of the item. The value specified here is combined with other values to determine the final relevance.
-
In the field, specify the absolute path to where you want the index files stored.
For example, /var/lib/qfsearch/sites/mysites.
By default, index files are stored at /var/lib/qfsearch/Sites/default/indexes/index_name.
-
From the drop-down list, select the amount of information you want included in the index logs.
Option
Description
Disabled
Turns off index logging.
Terse
Lists only the files indexed.
Normal
Lists the files indexed and the results of the crawl.
Verbose
Lists the files indexed, the results of the crawl, and the links that were skipped during the crawl.
New Links
Lists the files indexed, the results of the crawl, the links that were skipped, and any new links found during the crawl.
All Links
Lists the files indexed, the results of the indexing, the links that were skipped, and all links found during the crawl.
-
From the drop-down list, select the encoding to be used when indexing files that do not contain an encoding specification.
For example, HTML files can specify their encoding with a Content-Type meta tag.
-
In the field, list any field names that you want to be included on the search results page (for example, author date_created product dc.copyright).
To display the field on the search results pages, add the corresponding $$Variable to the template (for example, $$author $$date_created $$product $$copyright).
The field data is stored in the index and causes the index size to increase.
-
Use the option to boost or degrade search results based on the item’s index.
A weight of 100 makes the item’s relevance normal. Increasing the weight makes the item more relevant, and lowering the weight makes the item less relevant.
-
In the field, specify the number of directories from the starting directory QuickFinder should search.
This lets you limit how far (or deep) into a file server QuickFinder should search.
-
In the field, specify the maximum file size (in bytes) that QuickFinder should index.
Files exceeding this size are not indexed and are not included in search results.
-
(Optional) Click next to if you want this index shared with other QuickFinder servers in a QuickFinder Synchronization cluster.
For more information about QuickFinder Synchronization, see Section 9.0, Synchronizing Data Across Multiple QuickFinder Servers.
-
Click to activate the newly generated index irrespective of the size.
The default option is for the option. If it is set to No, then the newly generated index is compared with the current one. If the size of the new index is small when compared to the existing one, an error message is displayed in the Admin console.
-
Click .
After you define an index, you must generate it to make it searchable. See Generating Indexes.
8.5.6 Configuring Rights-Based Search Results for File System Indexes
-
On the QuickFinder Server Manager Global Settings page, click in the row of the virtual search server that you want to work with.
-
Under , select , then click .
-
On the Define File System Index page, click .
-
Under , configure authorization checking by selecting from one of the following options:
-
Use Default: Select this option if you want this index to use the default authorization checking setting specified on the Index Settings page of your virtual search server.
-
Off: If you want all users to have access to this index, select this option. No authorization checking is done.
-
by Index: To enable rights checking for this index, specify a file that exists on your server that can be used in verifying user access. By creating a file and setting access rights to it, QuickFinder can verify access to this index based on the rights to the file. Click if one was specified on the Index Settings page.
-
by Result Item: If checked, QuickFinder verifies the user’s access rights to each hit. This is not recommended for high-traffic servers because checking every hit can slow down server performance.
NOTE:Rights-based search results with works fine only if the NCP volume present on local or remote machine is indexed using NCP channel. To make NCP(eDirectoty) rights-based results option to work, you must set to .
-
-
From the drop-down list, select one of the following filters:
-
Use Default: Select this option if you want the current index to use the default setting found on the Index Settings page.
-
Search Engine: When you select this option, users attempting to search the index without logging in do not see any of the unauthorized hits on the search results page. If the user doesn’t have access to any search results, then the system returns a No Results Found message on the search results page.
-
Templates: When you select this option, users attempting to search the index without logging in to the system receive results, but they are then required to provide a username and password before being allowed to see the contents.
-
-
Click .
After you define an index, you must generate it to make it searchable. See Generating Indexes.
8.5.7 Searching Across Multiple Indexes
QuickFinder can search across multiple indexes within a single virtual search server. However, searching a single index is generally faster than searching across multiple indexes.
Restricting Search Results to Specific Areas
You can restrict search results to specific areas of your file or Web server in the following ways:
-
Using multiple indexes and using the &index=index_name query parameter.
-
Using a single index and restricting results to certain URL paths by using the &filefilter=path query parameter.
-
Using a single index and restricting results to certain values in document fields by including ^fieldname=value with either the query=value or filter=value search parameters.
HINT:Using the last option requires that indexed documents contain summary fields such as meta tags. This option works for almost any file format that contains document summary fields, including HTML, XML, PDF, Word, and WordPerfect.
For information about preventing QuickFinder from indexing specific content, see Excluding Documents from Being Indexed.
8.5.8 Indexing Content on a Password-Protected Web Site
If the Web servers you want to index require authentication, there are two methods for providing the correct user credentials: basic authentication and form-based authentication. Which one you choose depends on how authentication is implemented on the Web sites you index. For example, if you are indexing www.company1.com and it uses basic authentication, specify the username (user ID) and password in the fields. In this case, the credentials are sent using an HTTP authorization header with every request made to the server of the URL you have specified.
However, if www.company1.com uses a form-based authentication method, leave the fields blank and type the correct user credentials in the text box. For example: UserIDField:$$UserID.
In Form-based authentication, the first time the Web site is indexed, the credentials are sent and a session cookie is returned. Thereafter, QuickFinder uses the session ID in the cookie for authentication and the credentials are no longer sent to the Web site.
HINT:If you are indexing more than one URL and each one requires a different set of credentials, we recommend that you create a separate index for each URL.
8.5.9 Indexing Volumes on Remote Servers
For information on indexing volumes on remote servers, see Step 6 in Section 8.5.5, Creating an Advanced File System Index.
8.5.10 Generating Indexes
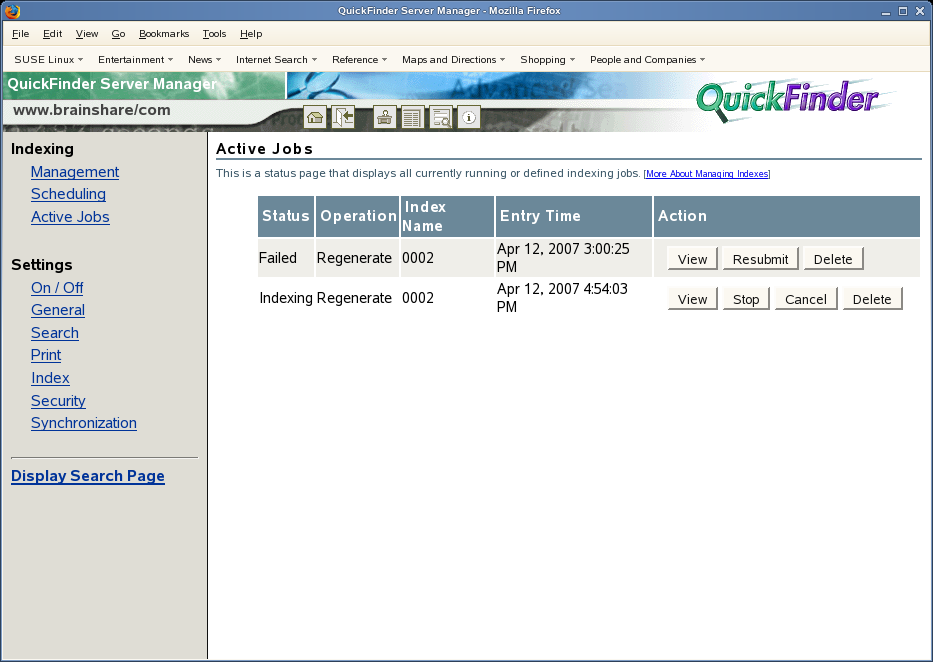
After you define an index, you must generate it before it can be used for searching. Generating an index is the actual process where QuickFinder Server examines file server or Web server content, gathers keywords, titles, and descriptions and then includes them in the index.
Generating an Index
-
On the QuickFinder Server Manager Global Settings page, click in the row of the virtual search server that you want to work with.
-
Click in the column of the index that you want to work with.
The Active Jobs page indicates the status of the current indexing jobs. When there is no current index job, the status page reads No indexing jobs are currently running or defined.
-
To cancel the current indexing jobs, click in the column.
You can direct QuickFinder to automatically update your indexes on specific dates and at specific times by scheduling events. For more information, see Section 8.9, Automating Index and Server Maintenance.
Generating an Index For a Linux-Mounted NSS Volume
To generate an index for a Linux-mounted NSS volume, the wwwrun user or www group must have read access to the NSS volume. To do this, verify that the wwwrun user and the www group are LUM-enabled, then give read access to the NSS volume by running rights and assigning the user or group trustee rights to the volume.
Generating a File System Index
When generating a file system index and specifying a set of filename extensions to index, you could end up indexing files you don’t want.
For example, you index your entire hard drive and look for only HTM and HTML files. There are about 10,000 properly matching files on your file system, but you end up with over 30,000 files in your index. This is because the file system scanner includes files with no filename extensions. In some cases, including files with no extension is better than not including them, but in this case, the index of all the HTML files on your hard drive is not helpful because it contains a large number of non-HTML files.
To avoid this kind of situation, manually modify the QuickFinder Server configuration file:
-
Open the /var/lib/qfsearch/Sites/default/qfind.cfg file.
-
In the <Directory> of an index definition section, add the following entry next to the Include Extension HTM HTML line:
IncludeNoExtension N
This prevents files with no filename extensions from being included .
HINT:QuickFinder Server can only index files that are accessible through local file system calls. If you mount a volume or map a drive to a remote server and the local system sees it as a local drive, QuickFinder Server can index it.