11.16 Deleting Cluster Resources, or Disabling Clustering for a Pool, LVM Volume Group, or Service
You can delete a cluster resource for any of the following reasons:
-
You want to re-create a Cluster Resource object. You want to remove the related objects in eDirectory and get the shared storage ready so that the resource can be re-created cleanly.
To delete a resource and create a new one with the same name, you must wait to create the new one until eDirectory synchronizes all of the objects in the tree related to the deleted resource.
-
You want to disable clustering for the shared storage managed by the resource. Afterwards, you will assign the SAN device to only a single node in the cluster. The storage will be available via the node’s IP address instead of the cluster resource IP address.
-
You want to disable clustering for the shared service. The service will be available via the node’s IP address instead of the cluster resource IP address.
-
You want to delete the shared storage managed by the resource. Afterwards, data is no longer available on any node in the cluster.
We strongly recommend that you delete cluster resource objects only from the master node in the cluster. Ensure that you take the cluster resource offline before you attempt to delete the cluster resource, or before you attempt to delete cluster-enabled shared storage managed by the resource.
WARNING:If you attempt to delete a storage cluster resource without first taking it offline, deletion errors occur, and the data associated with the clustered storage is not recoverable.
All resource configuration must happen from the master node. On the Cluster Options page for iManager, you are automatically connected to the Cluster object, which is associated with the master node. On the > page for iManager, connect to the Cluster object, not to the individual servers. Run NSSMU only on the master node.
Use the following procedure to delete a cluster resource:
-
If the resource is on a non-master node in the cluster, migrate it to the master node.
As the root user, open a terminal console, then enter
cluster migrate <resource_name> <master_node_name>
The master node must be in the resource’s preferred nodes list. To view or modify the list, see Section 11.10, Configuring Preferred Nodes and Node Failover Order for a Resource.
-
If the cluster resource is online, take it offline by using one of the following methods:
-
Enter the following at the command prompt as the root user:
cluster offline <resource_name>Use the cluster status command to verify that the resource has a status of before you continue.
-
In iManager, go to > , then select the cluster. On the Cluster Manager page, select the check box next to the cluster resource, then click .
Refresh the Cluster Manager page to verify that the resource has a status of before you continue.
-
-
In iManager, use the Clusters plug-in to delete the cluster resource.
-
Select > , then select the cluster.
-
Select the tab.
-
Select the check box next to the resource, then click .
This deletes the Cluster Resource object. It does not delete the storage or service represented by the object.
For a pool cluster resource, this also deletes the related NCP virtual server object, Pool object, and Volume object.
For an NCP-enabled LVM cluster resource, this also deletes the related NCP virtual server object and Volume object.
-
When you are prompted to confirm the deletion, click to continue, or click to abort the deletion.
-
In the View Objects in iManager, browse to verify that the Cluster Resource objects and related objects were removed from eDirectory.
If necessary, you can manually delete the objects. In iManager, go to > , select the objects, then click .
-
-
If the deleted resource was a pool cluster resource, use the function to re-create Storage objects for the pool and its volumes.
-
In iManager, select > , then select the master node if you plan to re-create the storage object, or select the node where you want the pool to reside as a locally available pool.
-
Select the pool, then click .
-
Select the pool, then click .
This creates a Pool object in eDirectory with a name format of <server_name>_<pool_name>_POOL.
-
Select > The server should still be selected.
-
Select the volume, then click .
-
Select the volume, then click .
This creates a Volume object in eDirectory with a name format of <server_name>_<volume_name>.
-
Repeat Step 4.d through Step 4.f for each volume in the pool.
-
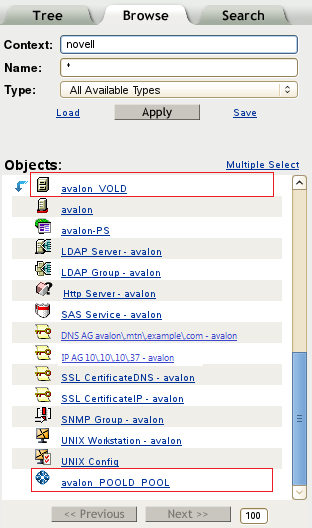
In the View Objects, browse to verify that the Pool object and Volume object were created.
For example, the following View Objects shows the Pool object avalon_POOLD_POOL and the Volume object avalon_VOLD were created for server avalon.
-
-
Do one of the following:
-
Re-create the cluster resource: Use the Clusters plug-in to cluster-enable the storage area.
-
To cluster-enable a pool, see Section 13.5, Cluster-Enabling an Existing NSS Pool and Its Volumes.
-
To cluster-enable a Linux LVM volume group and logical volume, see Section 14.4.2, Creating a Generic File System Cluster Resource for an LVM Volume Group and Section 14.5, Creating a Virtual Server Object for an LVM Volume Group Cluster Resource.
To re-create the cluster resource with the same name, you must wait to create the new one until eDirectory synchronizes all of the objects in the tree related to the deleted resource.
-
-
Use the non-clustered pool: Unshare the devices that contribute space to the pool, then use a third-party SAN management tool to assign the devices to only the desired server.
-
In iManager, go to > , then select the desired server (the one you specified in Step 4).
-
Select the device.
-
Deselect the check box, then click .
Unsharing a device fails if the device contains a cluster-enabled pool or split-brain detector (SBD) partition. This is unlikely to be an issue if you used a dedicated device (or devices) for the pool where you have disabled clustering.
-
Repeat these steps for each device that contributes space to the pool.
-
Use a third-party SAN management tool to assign the devices to only the desired server.
-
Provide the node’s IP address to users.
-
-
Use the non-clustered Linux LVM volume: The LVM volume group uses the entire device. Clustered LVM (cLVM) still recognizes the multiple-node assignments from the SAN.
-
Use a third-party SAN management tool to assign the device to only the desired server.
-
Provide the node’s IP address to users.
-
-
Use the non-clustered service: Modify information for your users so that they access the local node’s IP address instead of a clustered service IP address.
-
Delete the pool or LVM volume group: If you do not want to keep the data, delete the shared storage area.
WARNING:Deleting a pool or a Linux LVM volume group destroys all data on it.
-
For shared NSS pools and volumes, use NSSMU, the Storage plug-in to iManager, or the nlvm delete pool <pool_name> command. Deleting the pool automatically deletes the volumes on it.
-
For Linux LVM volume groups, use NSSMU or the nlvm delete linux volume <volume_name> command. These tools automatically delete the LVM logical volume and logical volume group. If the volume was NCP-enabled, it also deletes the related NCP volume.
-
-