5.5 Windows Client: Using Additional Features

5.5.1 Windows: Context Menu-based Desktop Printing

Provides an option to print from the Windows context menu.

Prerequisites

iPrint Advanced must be installed. For more information, see OES 2018 SP3: iPrint for OES Administration Guide.

iPrint is now available as a context menu option on Windows. To print from the context menu, do the following:

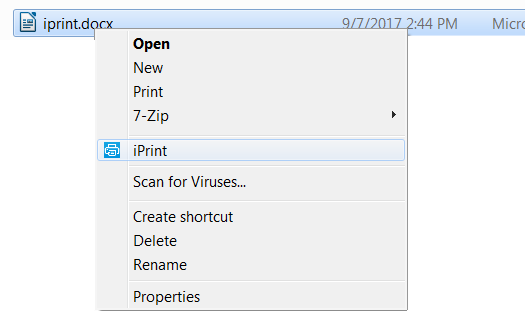
  1. Right-click on a file or files, then select iPrint, an iPrint dialog is displayed.

    You can print without opening the document. For example, if you received a document in an email, and no application is available to view it, you can still print with the context menu option.

  2. Click Select a printer.

    1. The recently used printers are populated in the drop-down menu of Printer. Select a previously used printer or Click Choose printer to select a different printer.

    2. Specify the IP address or hostname of the iPrint for OES server and click Find.

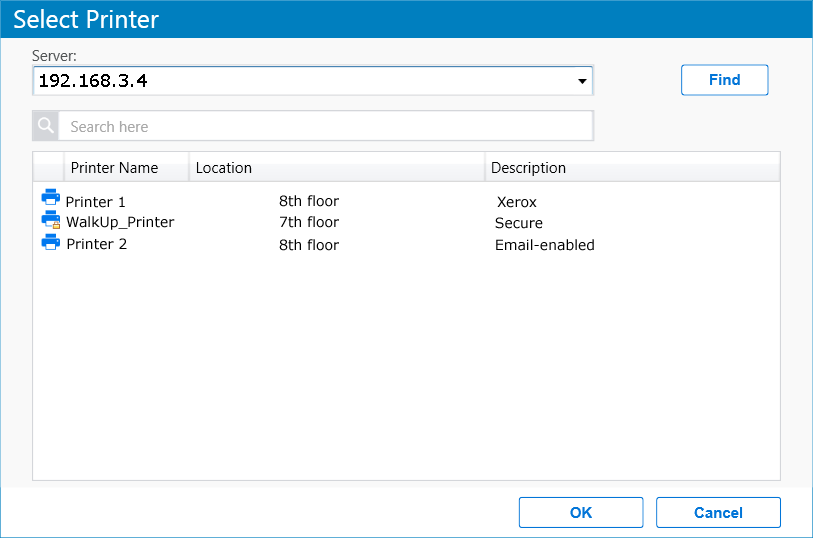
      For secure or a WalkUp printer, you must login to the server. On logging in, printers are displayed through ACLs set for that user. For username, you can login using either the CN of the username or in a LDAP format (comma separated).

  3. Click Print. The documents are successfully printed.

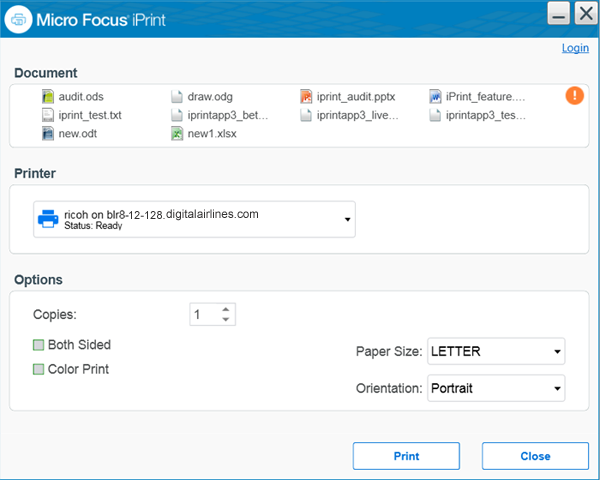
    NOTE:If some file formats are not supported for printing, the file will not be listed for printing. The info icon lists the unsupported files.

    To see the list of supported file formats, see TID 7022058.

5.5.2 Automatically Removing a Printer from the Client Workstation

You can automatically remove the printer from the client workstation if the printer is removed from the server. The client displays a pop-up when the printer is removed from the client.

5.5.3 Auto Redirection of Printer

You can automatically redirect the printer from the client if the printer redirection is set up in the server. The older printer is removed and the new printer is installed on the client.

The client displays a pop-up informing you that your currently installed printer will be automatically uninstalled and a new printer will be installed in its place.

5.5.4 Auto Driver/Profile Update

You can automatically update the client with the latest drivers available on the server, so users do not need to manually update. If you make any changes to the driver in the driver store, the client displays a pop-up describing the changes and the printer is updated with the new driver.

You can enable this option using iManager. For more information on, see Auto Driver/Profile Update.

5.5.5 Updating the iPrint Client

Periodically, users need updates to the Novell iPrint Client. You need to decide how to manage this. You can allow iPrint to automatically update the clients or you can choose to distribute a newer client through a software distribution package that uses and application like Novell’s ZENworks.

See Automatically Updating the iPrint Client for more information.

5.5.6 Using the iPrint Client Icon

On Windows workstations, the iPrint Client adds an icon to the notification area. The iPrint icon lets you receive notification when a job has printed and lets you quickly access iPrint Client settings. Right-clicking the icon displays the following menu options:

iPrint Settings: Opens the iPrint Client Settings page.

Document Status: Lets you check the status and other information for the last 10 documents printed.

Refresh iCM: Displays the iCM configuration settings. If the administrator has modified the iCM settings, then clicking this button immediately applies the setting for the user.

Launch Printer Folder: Opens the Windows printer folder.

Find/Install Printers: (Optional) Opens a browser window to the Menu Link URL specified on the Tray Icon tab.

Close: Removes the iPrint icon from the notification area until the next reboot. To make the icon reappear in your notification area, click Start > Programs > Novell iPrint > iPrint Client Settings > Tray Icon and deselect the Enable the iPrint icon in the system tray. Click OK. Then repeat the process to enable the icon.

To permanently remove the icon, see Managing iPrint’s Tray Icon.

5.5.7 Configuring the iPrint Client Settings

Using a Proxy Server

A proxy server is located between a client and another server that the client is trying to communicate with. Often proxy servers are used in conjunction with a firewall to keep internal addresses private while exposing only the proxy server’s address to external users. If you have users that need to submit print jobs through a proxy server, you can use the iPrint Clients Proxy setting. The Client sends all print-related requests, such as a print job, to the proxy server. The proxy server then redirects the print job to the correct iPrint server.

For example, Juan is a laptop user who has installed and printed to a variety of iPrint printers at the company’s headquarters. While on the road, Juan wants to submit a report to his manager. Rather than sending the report by e-mail or fax, Juan decides to send it to the printer near his manager’s office. When Juan tries to send the report to the printer, he receives an error that the printer cannot be found. He knows that the company uses a firewall and a proxy server. He types the proxy server address in the iPrint Proxy settings, then tries to print the report again. This time the print job is accepted. The print job travels from his laptop to the proxy server. The proxy server redirects the print job to the printer’s Print Manager, where the print job is spooled and forwarded to the printer.

To set the proxy server address for iPrint in iManager:

  1. Click Start > Programs > Novell iPrint > iPrint Client Settings > Proxy.

  2. To use a proxy server, select the check box, then specify the URL for the proxy server.

    To disable using a proxy server, deselect the check box.

  3. Click OK.

Managing Passwords for Remote iPrint Servers

You can manage passwords for print services that you indicated should be remembered by your workstation. The ability to delete passwords is useful if you are connected to a print service that you no longer use.

To manage passwords for print services in iManager:

  1. Click Start > Programs > Novell iPrint > iPrint Client Settings > Passwords.

  2. Select the password you want to remove, then click Clear Password.

Managing iPrint’s Tray Icon

The iPrint icon in the notification area lets you receive notification when a job has printed, and lets you view a list of print jobs that you have submitted.

  1. Click Start > Programs > Novell iPrint > iPrint Client Settings > Tray Icon.

  2. Modify the settings.

For more information about the settings, see Using the iPrint Client Icon.

Managing Print Job Notifications

iPrint can notify you through a pop-up message in the notification area when your document has printed or needs attention.

To turn iPrint notification on or off:

  1. Click Start > Programs > Novell iPrint > iPrint Client Settings > Notifications.

  2. Select or deselect the check box as necessary.

NOTE:If you close the iPrint applet running in the notification area, you do not receive notifications. To restart the applet, see Using the iPrint Client Tray Icon.

Setting Up iPrint on Terminal Servers

You can set up iPrint on a terminal server to allow terminal server clients to install the iPrint Client and print to iPrint printers.

Installing the iPrint Client on a Terminal Server

  1. Log in to the terminal server with Administrator or equivalent rights.

  2. Install the iPrint Client.

    You can download the iPrint Client from the iPrint Printer List or you can copy and execute nipp.exe from the iPrint server in sys:\apache2\htdocs\ippdocs.

NOTE:On terminal servers, the client auto-update does not work. To update the client with a newer release, you must install it manually.

Configuring iPrint for Terminal Server Clients

You can configure iPrint to work in any of the following ways, depending on the rights the terminal server client has.

  • Install user printers only: User printers can only be installed and deleted by the user who installed the printer. User printers are not available to other users on the workstation.

  • Install workstation printers only: Workstation printers can be installed and deleted only by users with sufficient rights. After a workstation printer is installed, all users using the workstation can print to it.

  • Try to install workstation printer first: If the user has insufficient rights to install the printer, the printer is installed as a user printer.

To configure iPrint for terminal server clients:

  1. Log in to the terminal server with Administrator or equivalent rights.

  2. Click Start > Programs > Novell iPrint > iPrint Client Settings.

  3. Click Terminal Server, then select the configuration option you want.

  4. Click OK.

Configuring the iPrint Client to work in a Windows / Active Directory Environments without Client for Open Enterprise Server

This functionality has been added to help you use iPrint on Windows platforms even if you do not have Client for Open Enterprise Server installed. You use the iPrint Client Management utility to work without the Client for Open Enterprise Server and to share your Windows/AD login credentials with the iPrint Client. You can configure the iPrint Client Management (iCM) PSM address by using the iPrint Client tray icon. To view the iPrint Client tray icon’s iCM tab, enter iprntcfg icm at the command line. Then, enter the PSM address (IP/DNS) in the iPrint Client tray icon’s iCM tab and the system will use the DSServer (Directory Service Server) configuration of the PSM server to obtain the details of your iCM profile. If the PSMServer is not set, you can still specify the DSServer by populating the registry entry directly.

You can also set the address of the PSM server by using the iprntcmd -S <IP/DNS> command, in combination with a remote-policy pushing engine like ZENworks.

5.5.8 Implementing iPrint by Using the Command Line

Iprntcmd.exe is a DOS command line utility that lets you install iPrint printers without a web browser and capture LPT ports to iPrint printers. This command is useful when you have legacy applications that require output to an LPT port or when you want to add printers through a login script.

Using iprntcmd.exe to Install iPrint Printers

If you need to install an iPrint printer but cannot use a web browser, you can use the iprntcmd.exe command at a DOS prompt. The iprntcmd.exe command can install, remove, or set a printer as the default printer.

Use the following parameters when executing the iprntcmd command.

Table 5-6 Parameters Used with iprntcmd

Parameters

Description

-a | --addprinter options printer_uri

Installs the specified printer. You can replace options with any or all of the following:

  • no-gui: Does not display the printer installation dialog box when installing a printer.

  • default: Installs the specified printer as the default printer.

  • temp: The installed printer is removed when the workstation is rebooted.

NOTE:These options are available only in the Windows Client.

-c

Clears the password from the cache.

-d | --delprinter printer_uri

Removes the specified printer.

-f | --fetchdriverlocal printer_uri

Pulls drivers from the server and stores them in the local cache directory, such as the c:\ndsp\drvr_cache directory.

-g | --getdefault

Displays the default printer installed on the workstation.

-h | --help

Displays help for the command.

-i | --info printer_uri

Displays the printer information.

-j | --listjobs printer_uri

Lists the print jobs for the specified printer that are on the server in a pending or printing state.

-l | --listlocalprinters

Lists printers installed on the workstation.

-L | --listprintersonserver psm-hostname or psm-address

Lists iPrint printers on the specified Print Manager where psm-hostname or psm-address can be a DNS name or IP address.

-p | --printfile printer-uri file path

Sends a printer-ready file to the specified iPrint printer.

This option is used to test the print path (job flow) from the client workstation to the server and subsequently to the printer. This requires a print-ready file as an input. The printer or the driver does not need to be installed on the client workstation.

-P | --ppdlist

Lists the PPDs installed on this workstation.

-s | --setdefault printer_uri

Sets the specified printer as the default.

-S | --setprimarypsm psm-hostname or psm-address

Sets the PSM address for iCM configuration.

-t | --testpage printer_uri

Prints a test page to the specified printer.

-v | --version server_uri server_user

Displays the server platform and version information, where server_uri is the URI for the server and server_user is a valid user for the server.

-U | --uploaddriver <ids-address> or <ids-hostname> <username> <password> [INF-Filepath <model-name>]

Uploads printer drivers.

IMPORTANT:INF-Filepath and model-name are mandatory only for Windows XP platforms.

-w | --trustedwebsiteforInternetExplorer printer_installation_page_uri

Adds the specified URI of the printer installation page to the trusted site list for Internet Explorer.

The trusted site list allows users to view and add the printers directly from the printer IPP site or printer map page, without running the Internet Explorer browser with administrator privileges on Windows Vista.

For example, http://printing.my_company.com/ipp.

Use quotes around printer-uri if it contains spaces.

Syntax

iprntcmd parameters

Example

To install a printer named ColorPrinter1 and set it as the default printer, you would enter the following command:

iprntcmd -a -s ipp://printing.my_company.com/ipp/ColorPrinter1

5.5.9 Managing Global Actions through Iprint.ini

A configuration file named iprint.ini is located on each server where a Print Manager is running. The iprint.ini file should be synchronized across all servers where iPrint and a Print Manager are running. The iprint.ini file is located in /var/opt/novell/iprint/htdocs/.

The file controls the following tasks:

IMPORTANT:When you apply a support pack, the existing iprint.ini file is saved as iprint.bak and a new iprint.ini is added. If you made changes to the iprint.ini file, you must delete the new iprint.ini file from the support pack and rename iprint.bak to iprint.ini. If you want the new functionality that is included with the latest iprint.ini, you should re-create the settings in iprint.bak in the new iprint.ini.

Automatically Updating the iPrint Client

When a workstation boots up, iPrint checks the default printer to ensure that the workstation is using the latest Novell iPrint Client. If necessary, a newer client is installed. You can use a configuration file to control how this update takes place.

An iprint.ini configuration file is located on each server where iPrint is installed. This file controls whether the user is prompted before the updated client is installed or the updated client is installed without user intervention. When the client is installed without user intervention, the user still sees the installation program.

  1. Using a text editor, edit the iprint.ini configuration file.

    The iprint.ini file is located in var/opt/novell/iprint/htdocs/

  2. Change the AllowAutoUpdate setting for the desired behavior.

  3. Save the file.

IMPORTANT:The iprint.ini file should be synchronized across all servers where iPrint and an Print Manager are running.

Creating a Short Printer Name Profile

By default, the installed printer name on the client follows the full UNC/URL format: \\ipp://dns_name\printer_name. For example, \\ipp://Printing.My_Company.Com\ColorPrinter. These printer names are often too long to fit in an application’s display field for the printer name. You can use a Short Printer Name Profile to replace the UNC server name (or dns_name) for all printers on a Print Manager with any name you want to display. For example, if you want to display just the company name, you could use \\My_Company\ColorPrinter.

NOTE:You should keep the UNC path and printer name to fewer than 32 characters.

The Short Printer Name Profile is available only on Windows Vista and later workstations. When you implement a Short Printer Name Profile, printers that are already installed are not affected. Only newly installed printers after the change use the shortened name. For printers already installed, you must delete and reinstall the printers to implement any changes to their names.

  1. Edit iprint.ini in a text editor.

    The iprint.ini file is located in var/opt/novell/iprint/htdocs/

  2. Change the value of the ShortInstallName parameter to the value you want displayed.

    ShortInstallName=your_name
    

    Replace your_name with the value you want displayed. To reset the parameter to its default setting, use default as the value.

    Use only lower ASCII characters and do not use a slash, quote, space, or comma.

  3. Save the file.

IMPORTANT:The iprint.ini file should be synchronized across all servers where iPrint and a Print Manager are running. The Installed Printer Name Profile affects all printers on a Print Manager.

User Printers

A printer can be installed as a workstation printer or a user printer. The User Printer feature takes advantage of the Microsoft Access Control List ability to restrict users ability to view the printer. Only the user which installed the printer can install, see, use, and delete the printer. Hence, it is the User's Printer, and not the Workstation's Printer. User printers are not available to other users on the workstation.

Enabling User Printers

To enable user printers, edit the iprint.ini file and change the value for AllowUserPrinters = value to one of the following:

Table 5-7 User Printer Settings

Value

Description

0

Follow Windows standards and only let users with sufficient permissions to install the printer to the desktop. This allows all users to see and use this printer. This is considered a global or workstation printer.

1

If the current user does not have permissions to add a workstation printer (option 0), automatically add the printer so that only the current user can install, view, modify, or delete this printer. This is considered a private or user printer.

2

Only add user printers. All users (including Administrators or Power Users) that add a printer can install, view, modify, or delete the printer they installed. All printers are private or user printers.

3

Only add workstation printers. No permissions are required. All users have rights to install, view, modify, or delete iPrint printers even if the Windows workstation has been locked down. Non-iPrint printers are not affected.

The user printer feature is now enabled for users. For workstations above Windows 8.1 and later, an additional option AllowWSACLPrinters = entry must be set in the iprint.ini file for the user printer feature to work. The acronym WSACL within the AllowWSACLPrinters stands for Workstation Access Control List.

Table 5-8 User Printer Settings for Windows 8.1 and above

Value

Description

0

The WSACL printers enables user printing feature on OS Windows 8.1 and later. Windows 2012 R2 with V4 driver support. By, default the setting is disabled.

1

Enable the AllowUserPrinters settings, then enable this setting. For operating systems below Windows 8.1, the User printer feature works in the legacy way.

IMPORTANT:If the printers are created (legacy way) on Windows 8.1 or later workstations, you must delete the printers and install new printers. Enabling AllowUserPrinters settings on those printers will not enable the new User printer functionality.

Example: Three workers—Albert, Juan, and Carla—share the same computer during the day. Albert prints to an accounting printer, Juan prints to a plotter, and Carla prints to a printer in the CEO’s office. The administrator set AllowUserPrinters = 2. Each worker can install the printer he or she needs but cannot see printers installed by the other users.

Deleting User Printers

To delete a User printer, do the following:

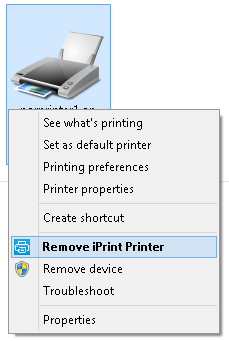
  1. Start > Control Panel > Hardware and Sound > Devices and Printers.

  2. Select the User printer that you want to delete and right-click:

    • Remove iPrint Printer: Click this option to delete User printers created on workstations Windows 8.1 and above. This option is available with iPrint client 6.07 and later.

    • Remove device: Click this option to delete User printers created on workstations below Windows 8.1.

Enabling and Disabling iPrint Client Management

You can use the iprint.ini file to enable and disable iPrint Client Management (iCM). Use the iCMEnabled value in the following ways:

  • iCMEnabled = 1

    iCM is fully enabled. iCM attributes are identified from the full tree hierarchy.

  • iCMEnabled = 0

    iCM is disabled.

    IMPORTANT:Using this command disables all iCM configurations created in the Client for Open Enterprise Server.

Applying iCM

A new option Refresh iCM is introduced to apply the iCM changes made by the administrator.

Figure 5-1 Refresh iCM
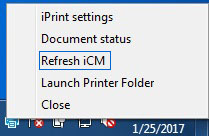
The user clicks Refresh iCM to immediately apply the iCM settings modified by the administrator. A window is displayed with results of settings that were modified.

When an user click Refresh iCM and if no window is displayed, then the user has to logout and relogin to the workstation to apply the changes.

Setting the Default Attributes Container for iPrint Client Management

You can use the iprint.ini file to set the default container that iCM should read values from. To configure this scope, use the following command:

  • iCMScope = DEFAULT

    Using this command stops the system from reading iCM attributes beyond the container you specify. The iCM attributes are read on the full tree hierarchy. The iCM attributes are considered within the specified tree hierarchy.

    For example, you can use the OU=UNIT,O=COMPANY command to set the iCMScope to the Organizational Unit in the OU from the base of the tree. The user should be present within the specified container for iCM function to work.

    NOTE:Setting the attribute in this way does not work above the specified container.