6.13 Workers Overview
The Worker is how Retain connects to your messaging system.
Worker is an overloaded term in Retain. It can refer to the agent software that needs to be installed onto a server or it can refer to the web object in the Retain server console that provides the bootstrap information needed for the agent to connect to Retain.

You will need to set up at least one Retain Worker. The Retain Worker does the actual work of collecting the data from a message system and delivering it to the Retain Server. The Retain Worker component is normally installed local to each GroupWise mail server, or any Exchange server from which you wish to collect data.
Although a Worker may be installed on a machine running Retain Server, this is normally not recommended or sufficient, except for very small (100 or fewer users) systems or for evaluation purposes.
Ideally, the worker you choose to dredge mail from a desired server is local to the server itself. Using a worker on Server A to pull data from a mailbox server on Server B is possible, but it will use up network bandwidth and will be slower than simply pulling data locally. For this reason, Retain was designed to allow you as many workers as you need, on Linux or Windows.
6.13.1 Worker Configuration
From the Retain home page, click Workers. You will see this screen:

Create a New Worker
This creates a Worker Web Object, which provides the bootstrap for the Worker Agent to connect to Retain and messaging system.
-
Click “Add Worker”.
-
Put the name of the worker in the “Worker” text field. Example: Local Worker 0. If using multiple workers on different servers give them unique names that will tell you where the worker agents are installed.
-
Configure the worker, see below.
-
Press “Save Changes”.
-
Download the bootstrap file. Default: RetainWorker2.cfg.
-
Browse to the Worker console.
-
Upload the bootstrap.
Configuration Options
Set the worker configuration options to meet your system and retention needs.
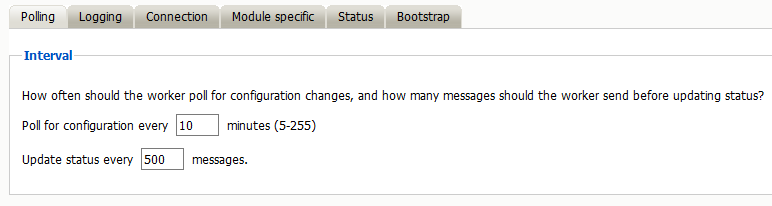
Polling Tab
Check the Connections Tab to be sure the Retain Server IP address settings are correct. This tells the Worker where the Retain Server is located. (Server Host Name or IP address must be correct; this should be populated automatically, but double check for accuracy.) The Server Connection setting must be able to resolve to the Retain Server if placed in a browser address bar.
The default polling interval is 10 minutes and the update interval is 500 messages, shown on the Status tab.
Logging tab
This tab allows you to control logging. The logs are an important troubleshooting tool as it contains a record of what the Worker does.
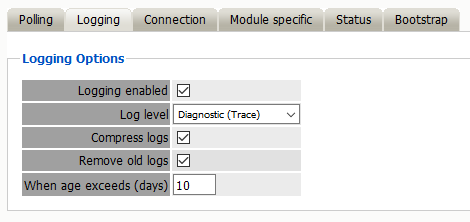
Logging is enabled by default.
There are four logging levels:
-
Diagnostic (Trace): Maximum logging level. Default logging level.
-
Verbose (Debug)
-
Normal (Info)
-
Error Only: Minimum logging level.
Logs are compressed at midnight, by default.
Old logs are removed at midnight after 10 days, by default.
Connection Tab
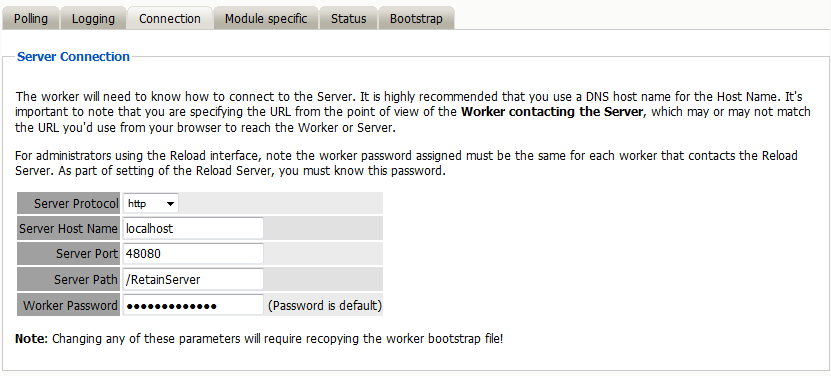
The Connection tab holds very important contact information for the worker’s connection to the Retain Server and the Post Office. Make sure that the Retain Server connection address is correct, or the Retain Worker will not be able to talk to the server.
Double check all these settings to ensure that you will have the best performance and connection for your system.
NOTE:It is vitally important that the connection information is correct before you save the worker. On a single server system, it is easy enough – it’s the same server. However, in an enterprise setting where you might be using different components on different servers, it is extremely important that each component knows how to connect to the Retain Server.
If you do not set this correctly, the Retain Worker will not be able to contact the Retain Server and it will not run jobs. The bootstrap would have to be replaced.
Module Specific Tab
The Module Specific tab contains information specific to individually configured modules, this tab may appear different depending on which modules are configured on your system.
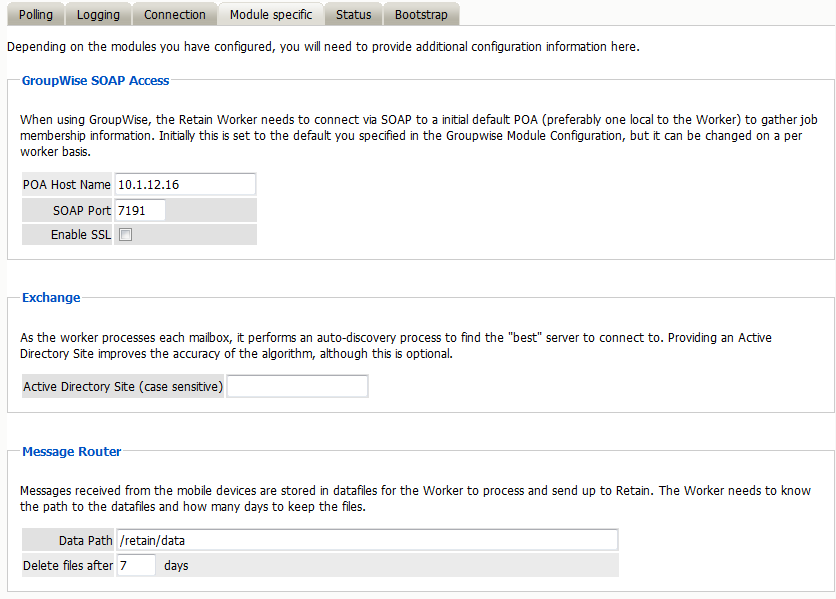
GroupWise SOAP Access Section
With GroupWise you may specify the particular Post Office Agent the Worker connects to. This is especially useful if you have multiple post offices to archive from. Set the POA Host Name to the post office the Worker is archiving from.
This allows Retain to support a multiple post offices, and mixed SSL and non-SSL GroupWise environments.
For example, if you have a mixed GroupWise 2014R2 and 18 system, with the 2014R2 POA not using SSL and the 18 POA requiring SSL. You would install two Worker Agents, set up two Workers objects in the RetainServer interface with the Module specific setting set to SSL disabled for the 2014R2 POA and for the 18 POA with SSL enabled, then two Jobs archiving each post office separately.
Exchange Section
With Exchange, you may optionally specify a specific Active Directory Site the worker is located in. That allows Retain to find the “closest” Exchange Server that is appropriate for the user to be archived.
The settings specified here are tied only to the specific worker configured, and does not affect the rest of the system, different worker may point to different Active Directory Sites. In general, this setting may be ignored unless required. If required, input the appropriate information.
Message Router Section
Message Router. The message router settings must be set on the message router worker to reflect where the data path is for the Message Router. This path must be specified from the worker’s point of view. If the worker is not local to the router, then the path must be fully accessible to the worker; direct file access is required. You may specify how long to keep files in this location. Default is shown.
NOTE:If REST is being utilized, do not configure the Message Router section. The Message Router will default to REST if this is not configured.
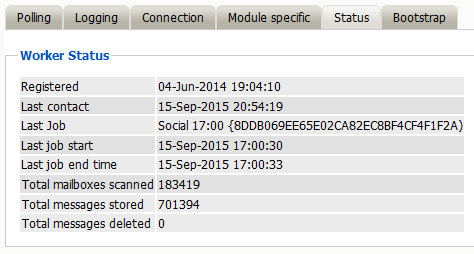
Status Tab
After the worker has been saved, two additional tabs become visible for settings on the worker. You MUST save changes on a newly created worker before the ‘Bootstrap’ tab is available to be used. Before the bootstrap has been uploaded the Status will be empty.
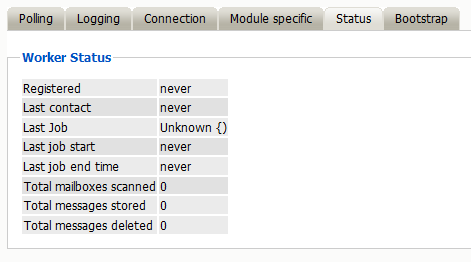
The status tab for the new worker will not hold any pertinent information until a job has been run or the worker has registered to the server and is in communication. Once a job has been completed, information will be displayed on the general status of the selected Worker.
Check this page after the worker has completed connecting to the Server for information and jobs. After a job has been run, or is running, more pertinent information, such as total mailboxes scanned and messages stored, will be displayed.
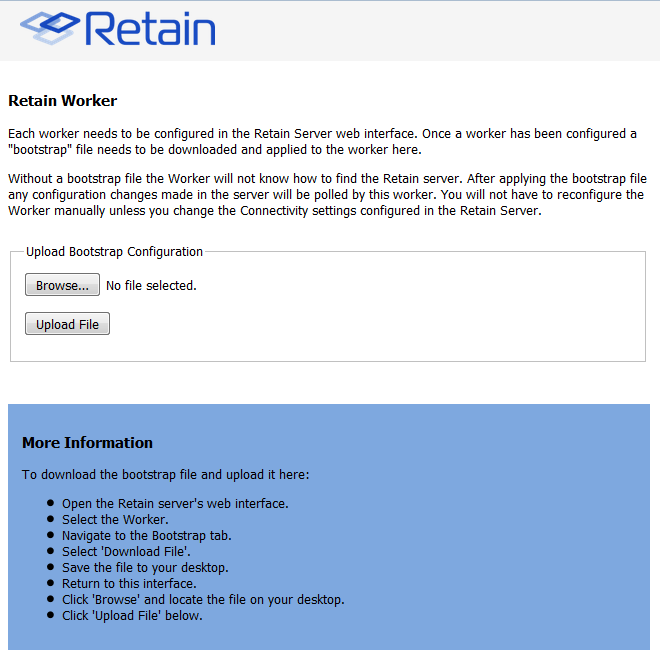
Bootstrap Tab
After you have checked and set your settings, click “Save Changes” before browsing to another page to finish creating and to save your worker.
After you have saved the changes, the Bootstrap tab appears (see below). Click “Download File” to save the configuration to a local workstation.

6.13.2 Uploading a Worker Bootstrap to the Worker Console
After creating the bootstrap file in the Retain Server Console you will need to upload it tot he Worker Agent Console so it can connect to the Retain Server.
-
Save the bootstrap file to your hard drive in a place where you can find it. Click “Save”.
-
Open a new browser window and type:
http://<retain worker address>/RetainWorker
The upload screen appears when a worker has not been initialized.
-
Upload the bootstrap file.
-
Click “Browse” to find the file you just downloaded, and select it.
-
Click “Open”.
-
Click “Upload File”.
-
If the upload went well, you will see this screen:

After you click the “Continue” button, you will be returned to the login page.
-
Login as Admin.
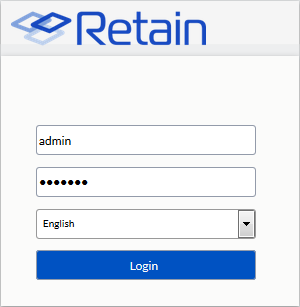
On all subsequent logins, you should be shown the configuration page first.
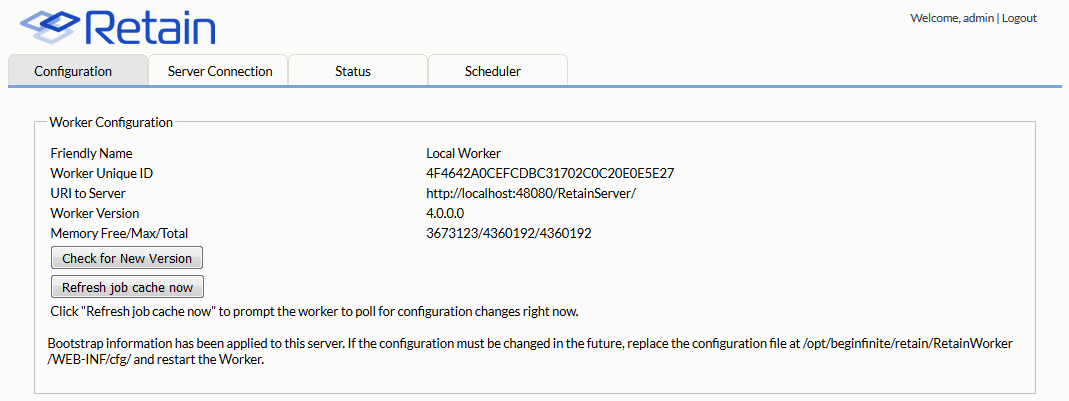
You should be able to see your configuration on the screen, as shown. The “Check for New Version” button checks for updates. The “Refresh job cache now” button tells the worker to poll the server for configuration changes and new jobs. After this button is selected, the Worker page will refresh automatically after the Retain Server has been polled. It takes just a few seconds.
-
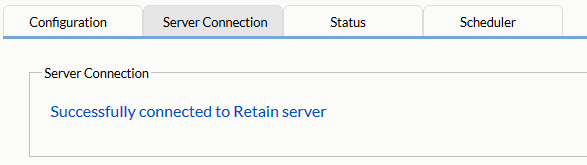
Verify the Retain Server connection success by selecting the Server Connection tab.
-
Go back to the Retain Server.
-
Click “Workers”.
-
Click on the worker you just created. and go to the Status tab.
You should now see the Registered and Last Contact data filled in: