8.7 Setting Up LDAP Contextless Login and LDAP Treeless Login
LDAP Contextless Login facilitates the merging of several trees in to one global tree. Without LDAP Contextless Login, users must change their context information in the Novell Login dialog box when changes take place in the tree structure. This can result in increased IT costs to manage and support the changes. LDAP Contextless Login makes it easier for users to work in the new global tree because it is unnecessary for the users to manage or know about changes to their organization’s name or its placement in the hierarchy. Because users no longer need to enter their context to authenticate, the context can be changed on the back end as many times as necessary without the users knowing and without the costs associated with managing and supporting these changes.
The Lightweight Directory Access Protocol (LDAP) is an Internet communications protocol that lets client applications access directory information. It is based on the X.500 Directory Access Protocol (DAP) but is less complex than a traditional client and can be used with any other directory service that follows the X.500 standard. Lightweight Directory Access Protocol (LDAP) Services for Novell eDirectory is a server application that lets LDAP clients access information stored in eDirectory.
If your network has LDAP Services for Novell eDirectory set up on your eDirectory tree and you are running Novell eDirectory 8.5 or later, users who are logging in to the network from Windows can log in to the network without entering their context in the Novell Login dialog box. To log in, users need to know only their username, password, and the name of the tree that is running LDAP Services. Optionally, you can also have users log in to the network without specifying the eDirectory tree name.
User objects can be located in the tree by username or e-mail address. You can also enable wildcard searches. If wildcard searches bring up multiple usernames, the user is prompted to select his or her username.
Generally, when a user connects to the network using LDAP, the connection is made through an LDAP client. Now, the Novell Client Login acts as an LDAP client and connects to the network. All LDAP clients bind (connect) to Novell eDirectory as one of the following types of users:
-
[Public] User (Anonymous Bind)
-
Proxy User (Proxy User Anonymous Bind)
-
NDS or eDirectory User (NDS User Bind)
NOTE:The NDS User Bind is not used by LDAP Contextless Login.
The type of bind and the rights assigned to the corresponding User object determine the content that the LDAP client can access. LDAP clients access a directory by building a request and sending it to the directory. When an LDAP client sends a request through LDAP Services for eDirectory, eDirectory completes the request for only those attributes that the LDAP client has the appropriate access rights to. There are additional restrictions that can be set to further secure connections.
This documentation assumes that you are familiar with LDAP. It contains links to information about LDAP and eDirectory; it is not meant to replace or supersede the documentation about LDAP running on eDirectory. If you are unfamiliar with LDAP, you should familiarize yourself with LDAP and how it operates in your network.
For more information on LDAP for Novell eDirectory, see Understanding How LDAP Works with eDirectory
in the Novell eDirectory 8.8 Administration Guide.
Before users can log in to the network without their context or tree information, you must complete the following steps:
-
Set up Novell LDAP Services for eDirectory.
-
Do one of the following:
-
If you are installing Novell Client software on a few workstations, install the software and then configure the Novell Client property pages so that the LDAP port number and SSL settings in the client properties match the settings on your LDAP server. See Setting Up LDAP Contextless Login on One Workstation.
-
If you are installing Novell Client software on multiple workstations, preconfigure the LDAP contextless login property pages prior to installing the Client software so that the LDAP port number and SSL settings in the Client properties match the settings on your LDAP server (see Setting Up LDAP Contextless Login on Multiple Workstations). Then install the Client software.
-
-
Inform users about contextless login.
If you experience problems with LDAP Contextless Login, check the Server and Group object configurations. Most problems occur in the access rights given to the Proxy User. You can use any LDAP browser available from the Internet to check the access rights. Browse to the user and verify that you can read the inetOrgPerson property and other properties you are searching for, such as CN and MAIL. If these cannot be seen through the LDAP browser by logging in anonymously, contextless login cannot perform the proper searches to resolve the User object’s context in the tree.
8.7.1 Setting Up Novell LDAP Services for eDirectory
Before users can take advantage of LDAP Contextless Login, the network must be running Novell LDAP Services for eDirectory 8.5 or later and you must complete the following steps:
-
Install and configure the LDAP Services for eDirectory on the LDAP server.
See
Understanding LDAP Services for Novell eDirectory
andConfiguring LDAP Services for Novell eDirectory
in the Novell eDirectory 8.8 Administration Guide. -
Do one of the following:
-
Grant the Read right to the Public Object. See Connecting As a [Public] User.
-
Create a Proxy User Object that has the correct rights. See Connecting As a Proxy User.
-
Connecting As a [Public] User
An anonymous bind is a connection that does not contain a username or password. If an LDAP client without a name and password binds to LDAP Services for eDirectory and the service is not configured to use a Proxy User, the user is authenticated to eDirectory as user [Public].
User [Public] is a nonauthenticated eDirectory user. By default, user [Public] is assigned the Browse right to the objects in the eDirectory tree. The default Browse right for user [Public] allows users to browse eDirectory objects but blocks user access to the majority of object attributes.
The default [Public] rights are typically too limited for most LDAP clients. Although you can change the [Public] rights, changing them gives these rights to all users. Because of this, we recommend that you use the Proxy User Anonymous Bind. For more information, see Connecting As a Proxy User.
To give user [Public] access to object attributes, you must do the following in iManager:
-
Make user [Public] a trustee of the appropriate container or containers.
-
Grant the Read right to user [Public].
Without the Read right, user [Public] cannot search containers for the User object information.
You can grant the Read right to the specific attributes that LDAP Contextless Login searches for User objects or you can grant rights to all attributes. For example, you can grant rights only to the e-mail address or telephone number; when LDAP Contextless Login searches the tree as user [Public], it searches only these attributes.
Connecting As a Proxy User
A Proxy User Anonymous Bind is an anonymous connection linked to an eDirectory username. If an LDAP client binds to LDAP for eDirectory anonymously, and the protocol is configured to use a Proxy User, the user is authenticated to eDirectory as the Proxy User. The name is then configured in both LDAP Services for eDirectory and in eDirectory.
The key concepts of Proxy User Anonymous Binds are as follows:
-
All LDAP client access through anonymous binds is assigned through the Proxy User object.
-
The Proxy User must have a null password and must not have any password restrictions (such as password change intervals). Do not force the password to expire or allow the Proxy User to change passwords.
-
You can limit the locations that the Proxy User can log in from by setting address restrictions for the Proxy User object.
-
The Proxy User object must be created in eDirectory and assigned rights to the eDirectory objects you want to publish. The default user rights provide Read access to a limited set of objects and attributes. Assign the Proxy User Read and Search rights to all objects and attributes in each subtree where access is needed.
-
The Proxy User object must be enabled on the General page of the LDAP Group object that configures LDAP Services for eDirectory. Because of this, there is only one Proxy User object for all servers in an LDAP group.
-
You can grant a Proxy User object rights to All Properties (default) or Selected Properties. In order for contextless login or treeless login to work, the Read right must be granted so that LDAP can search the container or tree for the User object. Typically, you assign the Proxy user rights to the root of the tree so that LDAP can view the attributes of the User objects throughout the tree. However, you might want to restrict access by assigning the Read right only to individual Organizational Units that you want LDAP to search.
For more information, see Configuring LDAP Objects
in the Novell eDirectory 8.8 Administration Guide.
NOTE:LDAP Contextless Login requires clear text passwords to be enabled for LDAP. This does not affect the eDirectory password required during Login. They remain encrypted.
To give the Proxy User rights to only selected properties on eDirectory 8.7 or later, complete the following steps:
NOTE:LDAP Contextless Login works with eDirectory 8.5 or later. However, these steps apply specifically to eDirectory 8.7. If you are using a compatible version other than eDirectory 8.7, check the documentation that corresponds to your version for steps.
-
Launch iManager by entering the following in the field of a network browser:
http://server_IP_address/iManager.html
-
Log in using your username and password.
You have access only to those features you have rights to. To have full access to all Novell iManager features, you must log in as Supervisor/Administrator of the tree.
-
Make sure you are in the Roles and Tasks view by clicking
 on the top button bar, then select in the navigation panel on the left.
-
Specify the top container the Proxy User is to have rights over or click the button to browse to the container in question, then click .
-
On the Modify Trustees page, click .
-
Browse to and click the Proxy User’s object, then click .
-
On the Modify Trustees page, click for the Proxy User.
-
Select the and options, then click .
-
Click , then select the option.
-
Select an inheritable right for the Proxy User, such as mailstop (in the lowercase section of the list) or Title, then click .
To add additional inheritable rights, repeat Step 9 and Step 10.
-
Click .
To implement proxy user anonymous binds on eDirectory 8.7 or later, you must create the Proxy User object in eDirectory and assign the appropriate rights to that user. Assign the Proxy User Read and Browse rights to all objects and attributes in each subtree where access is needed. You also need to enable the Proxy User in LDAP Services for eDirectory by specifying the same proxy username.
-
Launch iManager by entering the following in the Address field of a network browser:
http://server_IP_address/iManager.html
-
Log in using your username and password.
You have access only to those features you have rights to. To have full access to all Novell iManager features, you must log in as Supervisor/Administrator of the tree.
-
Make sure you are in the Roles and Tasks view by clicking
on the top button bar, then select in the navigation panel on the left.
-
On the LDAP Options page, click the name of an LDAP Group object to configure.
-
In the Authentication Options area, type the name and context of an eDirectory User object in the field.
-
Click .
8.7.2 Setting Up LDAP Contextless Login on One Workstation
After you have set up the LDAP Group object and assigned the correct rights to the User object that is associated with the proxy username, you need to set up LDAP Contextless Login on the workstations.
If you want to install on a few workstations, complete these steps. If you want to install on many workstations, see Setting Up LDAP Contextless Login on Multiple Workstations.
-
At the user’s workstation, right-click the Red N icon (
 ) in the notification area of the taskbar, then click .
-
Click the tab.

-
Do one of the following:
-
To enable treeless login, select . The is automatically selected for you because you must set up contextless login to enable treeless login.
-
To enable only LDAP contextless login, select .
-
-
In the field, specify the name of an eDirectory tree running LDAP services, then click .
-
In the field, specify the IP address or DNS names of the server running LDAP services, then click .
Order is important for speed and efficiency because servers are queried for their tree until one is found that matches the tree specified by the user.
-
(Conditional) If this is the first time this server has been added to the list, check the server properties on the LDAP Server Properties page that appears to make sure that the timeout settings and data encryption settings are correct.
If you are using Secure Socket Layer (SSL) to establish a secure connection, you must specify the path and name of the certificate on the workstation. You should also check to make sure that the correct port number is specified.
-
(Conditional) If there are additional servers running LDAP, repeat Step 5 and Step 6 for each server.
-
(Optional) Start searching for users in a certain context.
-
Select .
-
Select the tree, then click .
-
Do one of the following:
-
To enable a search in the specified context and any containers in that context, select .
-
To enable a search in the specified context only, select .
-
-
Type the distinguished context delimited by commas (standard LDAP format), then click Add.
For example: OU=TOKYO,O=DIGITALAIRLINE
HINT:The LDAP property page does not ensure that this context is correct. If users have problems logging in, check that you typed this information correctly.
-
(Optional) Add multiple contexts to be searched by repeating Step 8.d for each context.
The servers and contexts are searched in order. You can set the order they are searched by selecting a server or context, then clicking or to move its position in the search list.
-
-
Click .
-
(Optional) Specify additional eDirectory trees to use by repeating Step 4 through Step 9 for each tree.
-
(Optional) Set the optional search and display parameters that LDAP Contextless login uses to search the eDirectory tree for users by clicking .
For example, because users do not need to specify their context, you might want to disable the Display Context parameter so that the context is not displayed during login.
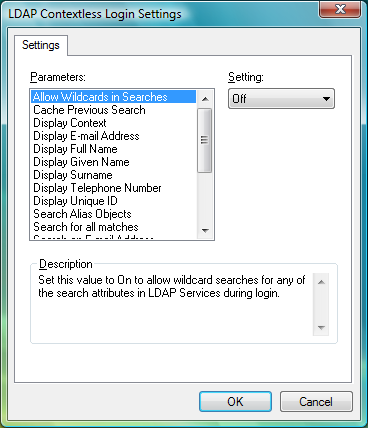
Select the parameter you want, then use the drop-down menu to turn the parameter On or Off. A short description of each parameter is available in the field when you select the parameter.
IMPORTANT:If you set the parameter to On, any wildcard searches you perform will conflict with this cache. For example, if you search for “mabels” and A.N is resolved as the context and then you search for “mabels” in a B.N context, mabels.B.N would never be resolved (even with wildcards) because mabels.A.N was resolved and cached first. You could clear the cache and allow mabels.B.N to resolve, but then mabels.A.N would not resolve.
The and parameters cannot be used together. If the parameter is On, the parameter is not used (even if you turn it On).
-
Click to make the changes and close the property page.
8.7.3 Setting Up LDAP Contextless Login on Multiple Workstations
As with all property page settings, you can set these properties for multiple workstations both before and after installation. For more information, see Section 4.1, Setting Properties During Installation and Section 4.3, Setting Properties on Multiple Workstations after Installation.
8.7.4 Logging In Using LDAP Contextless Login
When users log in to the network using LDAP Contextless Login, they must specify the necessary information based on the options you specified in the LDAP Contextless Login Settings dialog box, the password, and the name of the tree running LDAP Services for eDirectory. The context information is added automatically to the Novell Login dialog box when the username is found.
If you choose to allow wildcard searches, users can perform a wildcard search and the LDAP database lists all possible users that meet the wildcard search criteria.
The Novell Client login dialog, on the tab shown in the or section, will display status text to confirm whether the eDirectory tree name currently entered in the field does or does not qualify as a tree for which LDAP Contextless Login will be attempted, based on the current LDAP Contextless Login configuration. This status text is only shown when the LDAP Contextless Login feature of the Novell Client has been enabled, either in a treeless or tree-specific mode.
8.7.5 LDAP Contextless Login Differences in the Novell Client for Windows
The LDAP Contextless Login feature in the Novell Client for Windows includes the following limitations for those familiar with the Novell Client 4.x for Windows XP/2003.
-
When invoking from the Novell credential provider (the login dialog box seen at boot time and when logging out of Windows), the LDAP Contextless Login lookup cannot be triggered when viewing the tab. If LDAP Contextless Login is enabled, a lookup is performed after the user attempts to log in to eDirectory from the credential provider.
This is different from the LDAP Contextless Login behavior when running LOGINW32.EXE or selecting the option from the Red N menu on the desktop. In those instances, you can see the effect of the LDAP Contextless Login lookup prior to actually proceeding with the eDirectory login.
-
The options to search by attributes other than username (for example, phone number or e-mail address) have been disabled for the Novell Client for Windows release.