4.2 Developing a Detailed Design
After you have held all of the necessary workshops, you must create a design document to detail your findings and what you have agreed upon.
The following sections contain information that should be addressed and documented in detail. These sections cover areas that Novell recommends as best practice when deploying ZENworks Configuration Management across the infrastructure.
4.2.1 Device Folder and Group Structures
Using ZENworks Control Center, you can manage devices by performing tasks directly on individual device objects. However, this approach is not very efficient unless you have only a few devices to manage. To optimize management of a large number of devices, ZENworks Configuration Management lets you organize devices into folders and groups. You can then perform tasks on a folder or group to manage its devices.
You can create folders and groups at any time. However, the best practice is to create folders and groups before you register devices in your Management Zone. This allows you to use registration keys and rules to automatically add devices to the appropriate folders and groups when the devices register. Membership for dynamic groups is automatically updated based on the defined schedule.
The following information should be considered when designing folder structure and groups for a Management Zone:
-
Do you need to implement site administrators and sub-administrators who have limited rights to the system or only to part of the Management Zone? For example, you might need a site administrator who is only responsible for a specific location.
-
Do you need Help Desk users who are allowed to assign bundles and perform some remote management tasks, but not allowed to create or modify items such as bundles and polices?
-
Do you need site-specific settings, such as inventory schedules or system variables?
-
Do you need department-specific configuration, such as system variables to set working directories or host IDs?
The following graphic is an example of a company that is organized by country. Further organizational folders can be included under each of these country folders. You can be as granular as you want, and this is encouraged to implement specific levels of management.
4.2.2 User Sources
User-based management requires an authoritative source of user information to govern access privileges, permissions, and configurations. The new architecture allows you link to multiple user directories for this information, including your choice of Active Directory, eDirectory, or both.
Linking system management with authoritative user directories ensures that new hires, terminations, internal moves, and other business changes immediately result in the appropriate provisioning, deprovisioning, reconfiguration, and other system management changes. Other systems typically require you to synchronize or copy Active Directory or eDirectory information to your management database, which increases the change management burden by requiring installation of additional software on the authoritative servers. If synchronization happens once a week, for example, users can wait for several days for the directory to be synchronized—or perhaps have several days when they can access resources they should not be able to use.
In ZENworks Configuration Management, all communication with authoritative sources is read-only, through LDAP. There is no need to extend schemas, so you avoid a potentially big change management issue. Also, there is no need to install new software or make any other changes to the user directories you currently use. Nor is there a need to install an intermediary identity management system between ZENworks Configuration Management and authoritative sources.
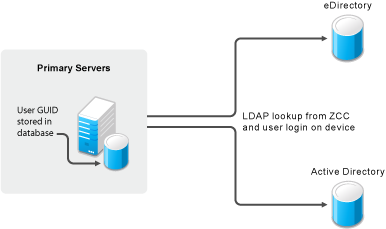
Primary servers can link directly to any number of authoritative sources, of any type, and user groups can span authoritative sources. This architecture allows simple management of resources through user, user group, and container assignments, without the limitation of a single authoritative source or the need to install and manage additional infrastructure to mediate between authoritative sources and ZENworks Configuration Management.
The following graphic illustrates how Primary Servers link to various user sources:
Figure 4-1 Primary Server and User Sources
As a best practice, you should set up your user sources prior to any deployment activities (discovery of devices and deployment of the ZENworks Adaptive Agent). You must understand your directory services infrastructure first, and the systems you will be referencing from your ZENworks Primary Servers. In addition, if your deployment is a migration from an existing ZENworks infrastructure (for example, ZENworks 7 Desktop Management), you must have your user sources defined prior to running any of the migration steps. If you do not do this, you will not be able to migrate user-based associations (including associations to user groups).
You can connect to Novell eDirectory and Microsoft Active Directory for your user sources. After you connect to either of these LDAP directories, you define the containers within the directory that you want exposed. Or, you could reference the top-level containers of the user source as the source or the containers that contain users. This limits access within the directory to only those containers that include users.
Both methods have some advantages and disadvantages that are mostly related to administration. There is no difference in assigning bundles or policies.
Selecting top-level containers ensures that all users in subcontainers and all containers added to the structure are maintained automatically and can be used for assignments without changes within ZENworks Configuration Management.
In addition, it is not possible to add subcontainers if the parent container is already in list. If you want to change the structure, you need to delete the parent container and you lose all assignments.
Because of this, we recommend that you use only containers where users reside. This means adding multiple sublevel folders from an eDirectory or Active Directory rather than only one.
4.2.3 Role-Based Administrative Accounts
The roles feature allows you to specify rights that can be assigned as roles for ZENworks administrators. You can create a specialized role, then assign administrators to that role to allow or deny them the ZENworks Control Center rights that you specify for that role. For example, you could create a Help Desk role with the ZENworks Control Center rights that you want help desk operators to have. You can also create individual administrative accounts and assign these to managers of the system.
Common roles in most installations of ZENworks Configuration Management include the following:
-
Help Desk: The Help Desk role should include common tasks, such as remote control, remote view, and so forth, and be bound to specific boundaries (device folders), especially where there are multiple sites and administration is not centralized.
-
Application Management: The Application Management role should include tasks and functions for creating bundle content in specific folders and restricting it to folder boundaries. Some administrators require more rights than others, so multiple roles could be created.
-
Backup Administrator: The Backup Administrator role is used if the default administrator account can no longer be used.
-
Individual Administrator Accounts: It is also a best practice to create different levels of administrator accounts and assign these separately to individuals. Do not give the administrator credentials (the default Administrator account set up during the initial installation) to everyone.
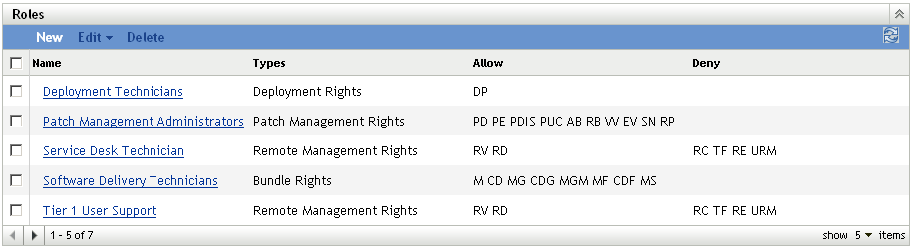
The following graphic is an example of the kinds of roles you should consider when implementing ZENworks Configuration Management:
Figure 4-2 Roles Section in ZENworks Control Center
4.2.4 Configuration Settings for the Management Zone
The Management Zone Settings panel lets you manage the global configuration settings for your Management Zone. These global configuration settings are inherited by other objects (devices, users, and folders) within your Management Zone and remain in effect unless they are overridden at the folder or object level.
You should configure the global settings to accommodate the largest possible number of objects, and then use the override option on any objects you want to configure differently. For example, you should use the setting to define the schedule that you want the majority of devices to use, and then override the schedule on individual devices or device folders if those devices require a different schedule. This is the best practice for almost all Management Zone configuration settings.
This section highlights configuration settings that you should consider setting at the global level, then adjust as needed at the folder or object level. Not all settings are covered in this section because they might not be relevant in your given situation, or they might differ greatly to what we would minimally recommend. For more information, see Management Zone Settings
in the ZENworks 10 Configuration Management System Administration Reference.
The following sections contain more information:
Content Blackout Schedule
You should define a Management Zone setting only if you are sure that you want to use this setting for all devices. In normal environments, you should not use a common blackout schedule for all devices.
A content blackout schedule is needed only for special devices, such as device in the finance department or production PCs that are used for controlling production processes.
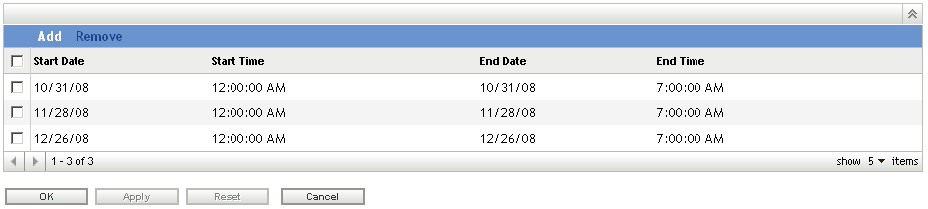
The following graphic shows a corporate (global) blackout schedule of the last Friday of every month, from 12:00 a.m. until 7:00 a.m. In this case, no content is sent to managed devices during this time.
Figure 4-3 Blackout Schedule in ZENworks Control Center
For more information, see Management Zone Settings
in the ZENworks 10 Configuration Management System Administration Reference.
ZENworks Explorer Configuration
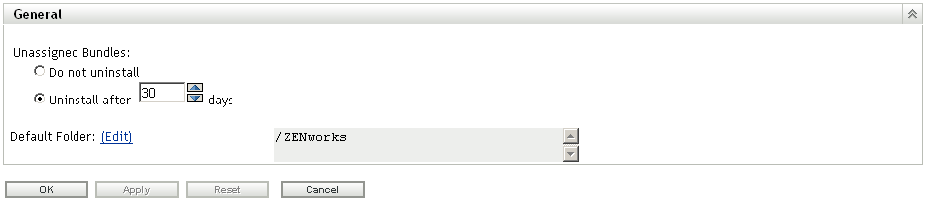
This setting defines the uninstall feature. If your customer does not need to uninstall applications, disable this feature in your Management Zone.
Figure 4-4 General Section in ZENworks Control Center
For more information, see Content Settings
in the ZENworks 10 Configuration Management System Administration Reference.
System Variables
System variables are used to define paths, names, and other items in your system. In addition to the predefined variables, Novell recommends using variables in bundles. This makes it much simpler to create, manage, and deliver applications moving forward. You need to standardize on this early and stay with your standard.
Common variables are SOURCE_PATH or TARGET_PATH
-
Define variables for your Management Zone.
-
Define variables for your folders if you need different or additional settings.
-
Define variables in your bundles only if the above settings do not fit your needs.
The following is an example of system variables that are set at the Management Zone level. These can then be used in bundles for distribution. Because these are set at the Management Zone level, it is assumed that these variables are resolvable on any device registered in the Management Zone.
Figure 4-5 System Variables in ZENworks Control Center

For more information, see Content
in the ZENworks 10 Configuration Management System Administration Reference.
Content Replication Schedule
The content replication schedule defines how often a Primary Server that has assigned content checks the database for updates (new content or deleted content).
Novell recommends changing the default value (5 Minutes) to at least 30 minutes to protect the system from heavy loads that could lead to utilization issues. This gives you enough time to ensure that content is always up-to-date across all your systems in the Management Zone.
Figure 4-6 Content Replication Schedule in ZENworks Control Center

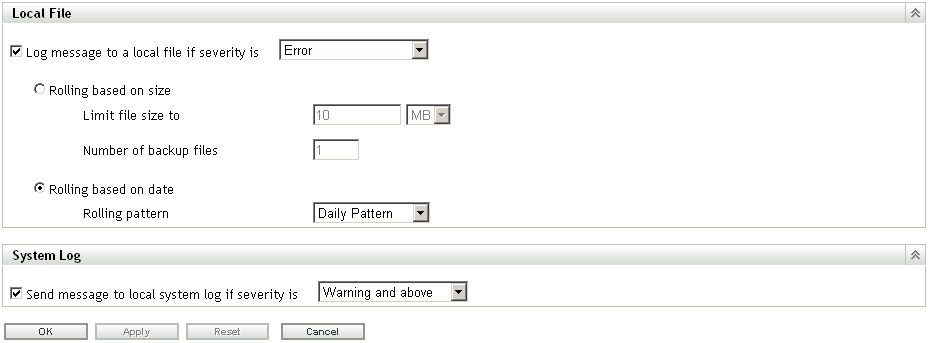
Local Device Logging
Use a severity setting of for log messages. If you set the severity to , you might end up collecting more data than you really need. If you understand the errors you are encountering, this is more than enough for troubleshooting your infrastructure.
This settings page allows you to set the rollup schedule for a specific time or date. We recommend that you create a new log file every day to ensure accurate information for troubleshooting purposes.
Figure 4-7 Log Settings in ZENworks Control Center
For more information, see Device Management Settings
in the ZENworks 10 Configuration Management System Administration Reference.
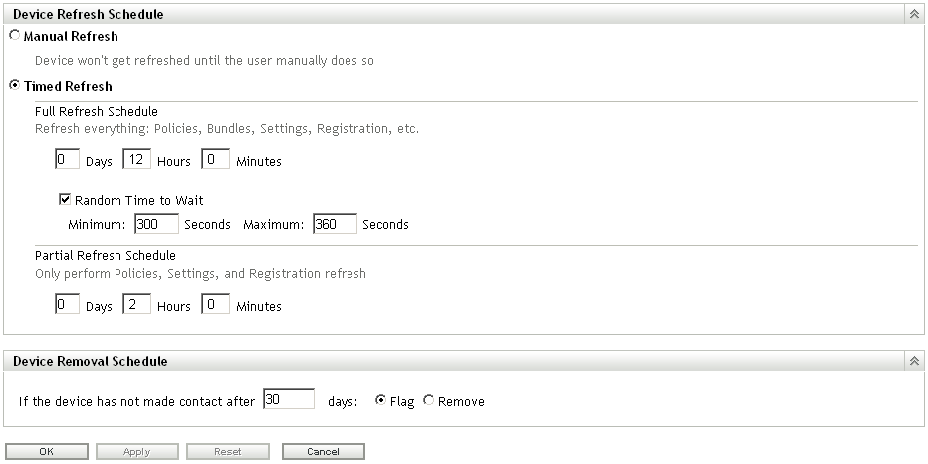
Device Refresh Schedule
Use the default schedule as a starting point. Discuss the schedules with your customer and adjust according to their needs. This information should have been collected during the assessment phase of your project. Remember, shorter refresh schedules means more frequent ZENworks Configuration Management traffic on the network. This could cause issues with over-utilization of available bandwidth. Make sure you involve the network management team when you decide on this setting.
Short refresh times for a large number of devices can also cause extensive server load, which might cause distribution failures or failures at the server side (uploading inventory and so forth).
Use random refresh rates to future prevent server overload during peak periods. This setting can be instrumental in increasing the scalability of the infrastructure components. Remember, the tests Novell performs in the SuperLab are designed to test the breaking point of the components. In the real world, thousands of devices should not regularly contact a server in the Management Zone.
Figure 4-8 Device Refresh Schedule in ZENworks Control Center
For more information, see Device Management Settings
in the ZENworks 10 Configuration Management System Administration Reference.
Device Removal Schedule
This setting needs to be discussed in detail with the customer during the assessment and design phases to ensure that you are removing devices that should be removed. You want to avoid removing devices that have been inactive for a certain number of days because the inactivity might result from circumstances such as maternity leave or a leave of absence. The customer should be able to give you the details on how long these situations should last, and what is acceptable. After you have this information, you can configure the schedule appropriately.
Take the following into consideration when setting up the schedule:
-
How do we maintain actual reporting data? Do you need very accurate data?
-
How long are the devices off-line (average time)? Possible cases are vacation, illness, maternity leave, extended leave of absence, and so forth.
-
Do you need statistics on removed devices?
If devices are to be flagged for removal and not actually removed from the Management Zone, these devices can be easily found by specifying the Device State as when searching for devices.
If you are required to report on all devices, even if they are not active on the network, managed devices can be “retired” instead of removed. When a managed device is retired, its identity and inventory information is retained but all policy and bundle assignments are removed. A retired device is in a holding state until you unretire or delete the device from the Management Zone.
For more information on retiring devices, see Retiring or Unretiring Devices
in the ZENworks 10 Configuration Management Discovery, Deployment, and Retirement Reference.
For more information, see Device Management Settings
in the ZENworks 10 Configuration Management System Administration Reference.
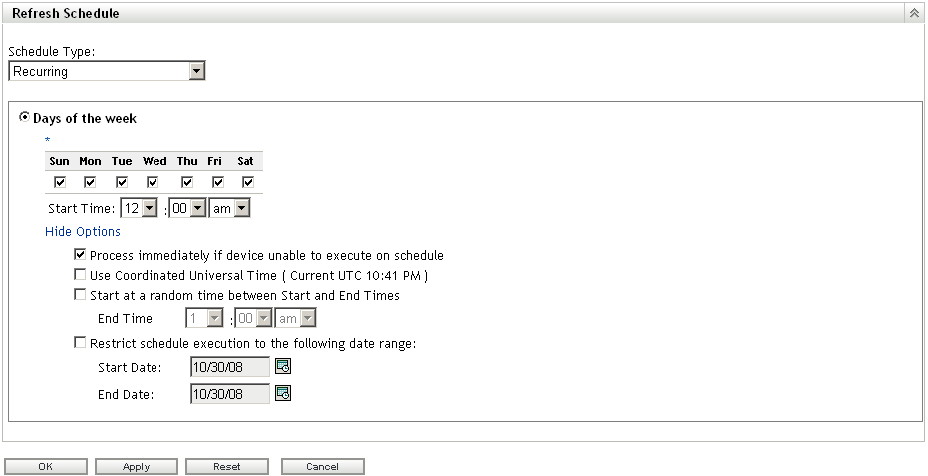
Dynamic Groups Refresh Schedule
Novell recommends the use of dynamic groups wherever possible. The membership of these groups is recalculated on a regular basis to get the expected (and accurate) results.
For your initial configuration, Novell recommends a daily refresh schedule (). This ensures that the membership lists of the dynamic groups accurately represent what you have registered in the system.
Figure 4-9 Refresh Schedule in ZENworks Control Center
For more information, see Device Management Settings
in the ZENworks 10 Configuration Management System Administration Reference.
Closest Server Rules
Understanding and configuring Closest Server Rules is essential to a successful ZENworks Configuration Management infrastructure. Closest Server Rules are used to inform devices which Primary Servers and Satellite Devices to contact and in which order. This should take into account placement of ZENworks Primary Servers and Satellite devices. These rules might change as the design changes, so ensure that the requirements are tracked.
General rules to follow include:
-
If you have servers on different subnets, define a rule for each subnet.
-
If you have devices in different domains or sub-domains, set up a rule for each domain and sub-domain.
-
Define the Closest Server Rules by using the OR logic, so fewer rules are required.
-
The Closest Server Rules are processed sequentially, so the list order is very important. A simple calculation of should determine the best list order.
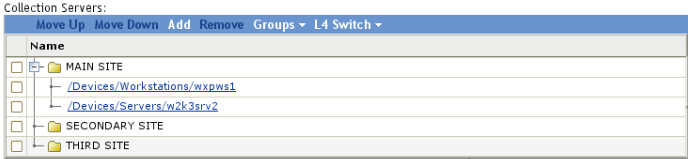
Figure 4-10 Closest Server Rules in ZENworks Control Center
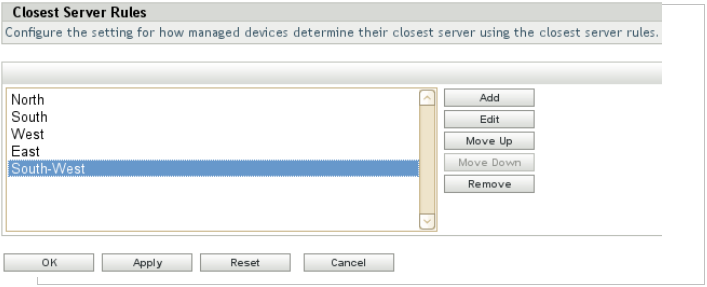
Within each rule, there is a Server list for each function that a ZENworks Primary server performs for the agent (Collection, Configuration, and Content). Each server list is ordered and the devices use this order for failover in case of high server utilization or a server-down scenario.
To balance the load, we recommend using Closest Server Groups. A Server Group is a list of Primary servers and Satellite devices that can be accessed in a random order. By randomizing server access, it is possible to balance the number of requests sent to each ZCM Server listed in the group.
Figure 4-11 Closest Server Groups
If load balancing and fault tolerance is a fundamental requirement of the infrastructure, the best way to achieve it is though a Layer 4 (L4) switch. An L4 switch can front either Primary Servers or Satellite devices, or both, in order to guarantee results when directing traffic to the devices behind the switch. Most importantly, it ensures that services are always available to the end user community. If you use an L4 switch, ensure that it is properly configured. If the switch is not properly configured, the traffic is not properly directed, and there might be issues with connections, responses, and so forth.
The Layer 4 switch is configured in the Closest Server Rules in a similar way to the Closest Server Groups. When prompted, specify the Layer 4 definition name, which must be either the DNS name or IP address of the Layer 4 virtual device.
Keep in mind the following considerations:
-
The Layer 4 switch definition is displayed in each of the listings, no matter where it is created, with the selected servers listed under each instance of the Layer 4 switch.
-
Servers can be members of multiple groups and L4 switch definitions.
-
Servers that are members of an L4 switch definition or group are no longer listed at the top level of the server listing.
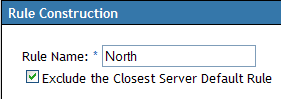
If there are no matching Closest Server Rules for a given device, the managed device falls back to the default Closest Server Rule. This rule is an ordered list of all the ZENworks Configuration Management Primary and Satellite devices installed in the Management Zone. The list must be ordered so that all the ZENworks Configuration Management Primary Servers are at the top and all the ZENworks Configuration Management Satellite devices are at the bottom.
You might want to exclude the default Closest Server Rule for the following reasons:
-
Agent refresh speed: When a device is refreshed, the applicable ZENworks Configuration Management Primary and Satellite device list for a device is calculated, serialized, and sent via the SOAP service. Excluding the default Closest Server Rule optimizes the response from the server, which also shortens the time required to complete a refresh.
-
Satellite devices: Devices at one site should not attempt to access a Satellite device or Primary Server at another location. Excluding the default Closest Server Rule ensures that a device only connects to Satellite server if it is in the Closest Server rule for that subnet. If a Satellite device is temporarily unavailable, this ensures that content is not pulled across a WAN connection by local devices.
-
Server roles: If a Primary server is dedicated to a particular task, such as reporting, excluding the default Closest Server Rule ensures that devices do not attempt to use this server for other services.
Figure 4-12 Excluding Server Rules
If there are duplicate addressing schemes within the environment, such as if two remote sites both use NAT (Network Address Translation) and the internal IP address scheme for both networks is 192.168.0.0, it is not possible for a Closest Server Rule to differentiate between the two subnets. The solution is to configure Closest Server Rules for each of these subnets at the folder level and override the Management Zone settings. This is successful only if the ZENworks folder structure ensures that the device objects for the two subnets are in separate folders.
Figure 4-13 Effective Closest Server Rules
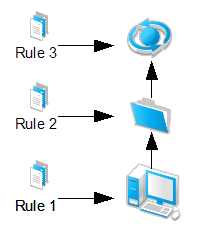
Closest Server Rules can be configured at three levels: Management Zone, Folder and Device. The rules are evaluated on the device first. If no matching rule is found, the device's folder is evaluated. If there is no match on the device or the folder, the Management Zone rules are evaluated. Finally, if the Management Zone Closest Server Rules are not applicable, the default Closest Server Rules are used. For the diagram above, the order of evaluation is Rule1, Rule2, Rule3 .
For more information, see Infrastructure Management Settings
in the ZENworks 10 Configuration Management System Administration Reference.
Client Retries
At every client refresh, all Primary Servers and Satellite devices are marked as Unknown. When a particular module requires a service, the Connection Manager (based on the Closest Server Rules) makes a call to the first Primary Server or Satellite device hosting this service. If a Primary Server or Satellite device is down or is not contactable, it is immediately marked as Bad. If it is in a Busy state, it returns a busy error and the client waits and retries again.
There are three settings that control how many times and for how long a managed device should wait before marking a Primary Server or Satellite device as Bad and then moving to the next Primary Server or Satellite device in the closest server rule. These three client settings are available in ZENworks Control Center, under > > .
Figure 4-14 Client Retry Settings

-
Times to Retry Requests to a Busy Server: The maximum number of retries a device attempts to contact a Busy Primary Server or Satellite device.
-
Initial retry request wait: The initial wait time between each of the above retries. All subsequent waits increment by 1 second. This means that the first wait time is 10 seconds, the second wait time is 11 seconds, then 12 seconds, 13 seconds and so on, up to the amount in the setting.
-
Maximum retry request wait: The maximum time the device waits between retries.This overrides the incremental time to wait in the setting.
If a Primary Server or Satellite device is contactable but busy, a client waits for the initial wait period, retries, increments the wait interval by the value specified, then retries again. This process continues until the number maximum retries has been reached or until the connection load on the server goes down. The default settings in ZENworks Configuration Management are 20 retries, an initial wait time of 10, and a maximum wait time of 20. This means that a device waits a maximum of 345 seconds before marking a busy Primary Server or Satellite device as Bad. All the HTTP or HTTPS calls are sequential, so if the closest server rules are correctly configured, the wait should be very short. Connecting to a different Primary Server or Satellite device might not be the best option because it might be overloaded or across a low-bandwidth, high-latency connection.
These settings should be based on the placement of Primary Servers and Satellite devices within the environment. If there are many Primary Servers in a location connected to the clients by high-bandwidth, low-latency links, these settings can be lowered. If there are fewer Primary Servers and clients connecting over low-bandwidth, high-latency links, or to a Satellite device across a WAN, these settings can be increased to “wait out” the busy period. These settings can be overridden on the device or folder level.
During Novell testing, retries were set at 60/30/60. A server was never marked as Bad, and all content was delivered. No degradation of performance at the client was observed when the retries were set high.
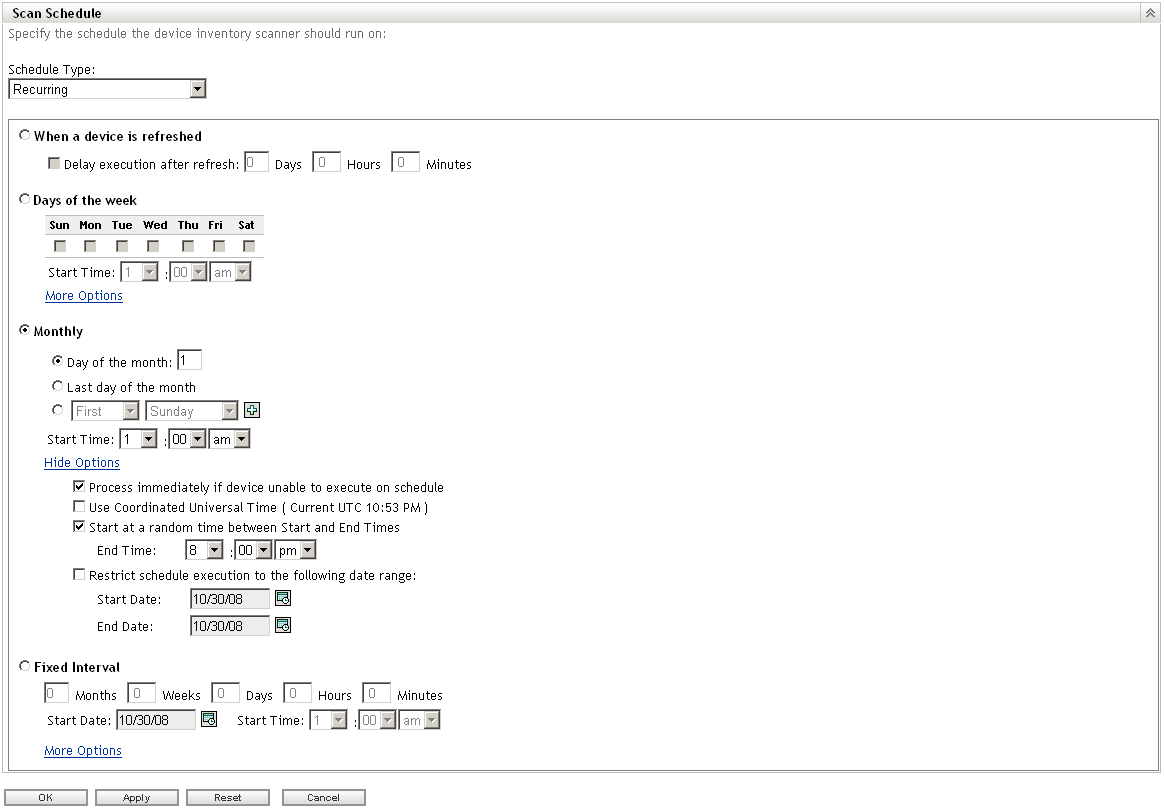
Inventory Schedules
Inventory scan frequency depends on how often the hardware and software in the environment changes, and how accurate the information needs to be. Under normal circumstances, it should be adequate to collect inventory data on a weekly, biweekly, or monthly basis, but this might not be sufficient for all deployments. Be aware of the workload placed on the ZENworks Primary Servers. Every inventory scan a device does must be processed by the ZENworks Primary Server and stored in the ZENworks database. Ensure that the schedule does not unnecessarily scan thousands of devices on a daily basis, but if this is necessary, closely monitor the load and performance of both the Primary and database servers. Inventory schedules can be set at the Management Zone folder, and device level. We recommend that you configure inventory schedules on a folder basis to ensure that the load is spread through a given time period. If you must immediately update the inventory of a device, a scan-now request can be sent to the device via ZENworks Control Center.
For a weekly scan, select a day that is most likely to capture the largest number of devices connected to the network. To capture all workers, consider doing a scan on every fifth day so that all days are eventually targeted.
For restricted scan times, use the random wait time carefully. If a scan window of 9:00–17:00 is configured with the option, devices that disconnect during this period might not be scanned. This can cause many to consistently miss their scans. The option instructs any device that missed the schedule to scan when it next connects to ZENworks. This is useful for ensuring that devices perform an inventory when they are offline during their assigned inventory schedule.
Use a schedule that best fits the environment and avoiding restricting the scan times severely. A very small “scan potential” window can lead to many devices not performing regular inventory scans.
If some devices are always on, consider starting the scan schedule before or after normal office hours, so these devices can be processed when there is low utilization.
We recommend using a combination of inventory reporting and the advanced device search function to compare last scan dates with last contact dates, so you can ensure that devices are being scanned according to their schedules.
Figure 4-15 Scan Schedule in ZENworks Control Center
For more information, see Inventory Settings
in the ZENworks 10 Configuration Management System Administration Reference.
4.2.5 Device Discovery
When it comes to device discovery, you need to perform your discoveries and deployments in stages. Use the recommendations in this section for discovery and deployment in order to avoid massive amounts of discovery traffic on the LAN/WAN.
Some ideas to consider when performing device discovery include:
-
Discover assets subnet by subnet.
-
Discover assets building by building.
-
Discover assets site by site.
-
Import devices from Active Directory or eDirectory by using LDAP discovery tasks
-
Import devices from a spreadsheet (CSV) if they are well documented and the list is available for you to use.
-
Use the ZENworks Migration Wizard to migrate your devices from eDirectory and target them for deployment to avoid discovery of the initial assets that are already part of an existing ZENworks system.
-
Use pilot groups.
These tips help you discover assets and roll out the ZENworks Adaptive Agent in a very manageable way, which avoids failures for deployment and installation.
Table 4-1 lists the duration and CPU usage for a discovery task performed by using the MAC Address technology. This information helps you configure the discovery settings in an efficient way.
Table 4-1 Duration and CPU Usage for a Discovery Task
There are several things you can do to increase the speed of IP Discovery tasks.
-
Increase the from 5 to 20. This allows more addresses to be scanned simultaneously.
-
Select only the discovery technologies that are required. We recommend enabling only the discovery technologies that are configured within the environment. If SSH, NMAP, or SNMP is not available or is not configured in the environment do not enable it. Every discovery technology that is scanned for an IP address adds time to the discovery task. As a rule of thumb, start with only WinAPI and the ZENworks discovery technologies enabled for the Management Zone. You can override discovery technologies in the Discovery task, which means that specific discovery technologies can be directed at certain subnets.
-
Configure only the necessary authentication credentials. The more authentication credentials that are configured, the longer each scan takes.
-
Disable the MAC Address discovery technology. Any device with a MAC Address is discovered via this technology. The devices show up in the discovered list with an Unknown operating system, which causes the deployable device list to be inaccurate.
All discoveries are performed from the tab in ZENworks Control Center.
Agent State
A Discovery task returns Management Zone information on devices with a ZENworks Configuration Management Agent installed. The discovered devices can be viewed from the ZENworks Control Center > Devices > Discovered tab. It is possible to see which devices are registered with another Management Zone and which agents are currently unregistered.
The name of a managed device residing within the same Management Zone as the Primary server is displayed in green and the name of the managed device residing in a different management zone is displayed in the yellow.
Schedule
A discovery only returns device information if the device is turned on and contactable. A discovery task should be run regularly on different days and times to ensure the entire environment is captured.
For more information, see Device Discovery
in the ZENworks 10 Configuration Management Discovery, Deployment, and Retirement Reference.
4.2.6 Adaptive Agent Deployment
Novell ZENworks Configuration Management provides a variety of methods you can use to install the ZENworks Adaptive Agent to devices:
-
Use ZENworks Control Center to deploy the agent from the ZENworks Server to the device.
-
At the device, use a Web browser to download and install the Agent from the ZENworks Server.
-
Include the Agent in an image and apply the image to the device.
-
Use a login script, Windows group policy, or ZENworks 7 Application object to install the Agent.
Because ZENworks Configuration Management is usually implemented in larger environments, we recommend deploying the ZENworks Adaptive Agent automatically; you should not manually install the Agent.
The following sections contain more information:
Default Deployment Packages
The best option for accessing the default deployment packages is through ZENworks Control Center:
-
From the page in ZENworks Control Center, click in the left frame.
-
Download the default package that you require.
We recommend using one of the following deployment methods:
-
Use the task from ZENworks Control Center, after discovering or importing devices.
-
Use your existing software distribution tool to deploy the agent.
-
Include the ZENworks Adaptive Agent in a new image.
For all methods you must have registration keys in place as described in Section 4.2.7, Registration Rules and Keys.
For more information, see the ZENworks 10 Configuration Management Discovery, Deployment, and Retirement Reference.
Custom Deployment Packages
During the ZENworks Configuration Management installation, default ZENworks Adaptive Agent deployment packages are created. These packages are tied to the ZENworks Primary Server and contain the URI from this server to register devices. There are no registration keys configured and the registration process use default rules to register devices.
It is best practice to always use custom deployment packages when pushing the ZENworks Adaptive Agent to your discovered or imported devices. You should avoid the use of the default Agent deployment packages that are created because these include only default parameters that likely do not meet the needs of the customer.
You must be familiar with these concepts before testing begins.
4.2.7 Registration Rules and Keys
When you deploy the ZENworks Adaptive Agent to a device, the device is registered in the Management Zone and becomes a managed device. As part of the registration, you can specify the device’s ZENworks name and the folder and groups to which you want the device added.
By default, when a device’s host name is used as its ZENworks name, it is added to the /Servers or /Workstations folder, and it is not given membership in any groups. You can manually move devices to other folders and add them to groups, but this can be a burdensome task if you have a large number of devices or if you are consistently adding new devices. The best way to manage a large number of devices is to have them automatically added to the correct folders and groups during registration.
To add devices to folders and groups during registration, you can use registration keys, registration rules, or both. Both registration keys and registration rules let you assign folder and group memberships to a device. However, there are differences between keys and rules that you should be aware of before choosing whether you want to use one or both methods for registration.
The following sections contain more information:
Registration Rules
If you don’t want to enter a registration key during deployment, or if you want devices to be automatically added to different folders and groups based on predefined criteria (for example, operating system type, CPU, or IP address), you can use registration rules.
ZENworks Configuration Management includes a default registration rule for servers and another one for workstations. If a device registers without a key, the default registration rules are applied to determine the folder and group assignments. The two default rules cause all servers to be added to the /Servers folder and all workstations to the /Workstations folder.
The two default rules are designed to ensure that no server or workstation registration fails. Therefore, you cannot delete or modify these two default rules. You can, however, define additional rules that enable you to filter devices as they register and add them to different folders and groups. If you’ve established folders for devices with similar configuration settings and groups for devices with similar assignments, newly registered devices automatically receive the appropriate configuration settings and assignments.
For more information, see Registration Rules
in the ZENworks 10 Configuration Management Administration Quick Start.
Registration Keys
A registration key is an alphanumeric string that you manually define or randomly generate. During deployment of the ZENworks Adaptive Agent on a device, the registration key must be provided. When the device connects to a ZENworks Server for the first time, the device is added to the folder and groups defined within the key.
You can create one or more registration keys to ensure that devices are placed in the desired folders and groups. For example, you might want to ensure that all of the Sales department’s workstations are added to the /Workstations/Sales folder but are divided into three different groups (SalesTeam1, SalesTeam2, or SalesTeam3) depending on their team assignments. You could create three different registration keys and configure each one to add the Sales workstations to the /Workstations/Sales folder and the appropriate team group. As long as each workstation uses the correct registration key, it is added to the appropriate folder and group.
For more information, see Registration Keys
in the ZENworks 10 Configuration Management Administration Quick Start.
Recommendations Regarding Registration
Based on your final folder and groups design, we recommend that you create registration keys for each folder you have created or defined.
The following graphic illustrates using registration keys to place devices in folders.
Figure 4-16 Registration Section in ZENworks Control Center
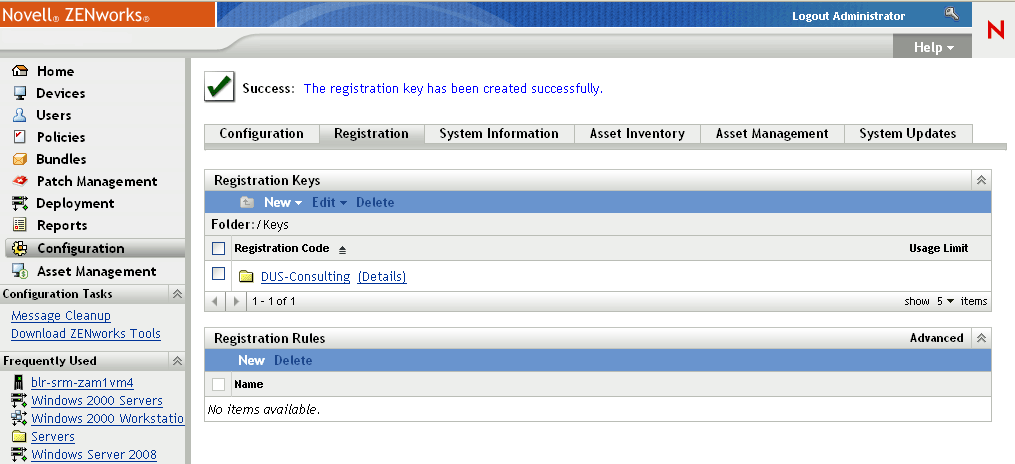
New York City: Registers to folder New York City below USA.
France: Registers to folder Paris below France.
In combination with dynamic groups that are based on departments, it is possible to manage device registration very easily. You use these keys in your deployment packages to auto-register all devices in your Management Zone.
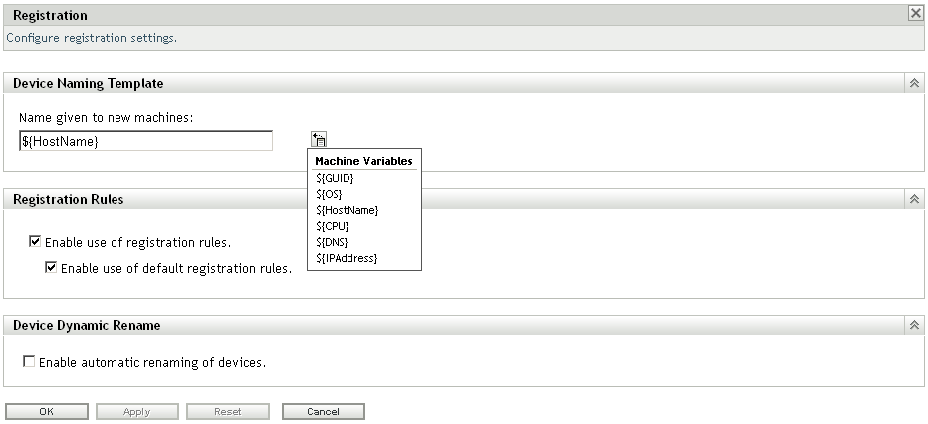
Registration
You should enable dynamic device renaming, which is disabled by default.
This feature provides a very flexible way to handle some desktop management processes such as renaming or re-installation. During the ZENworks Configuration Management framework-based installation process, the device name changes to a randomly generated name, but if this feature is place and you have a working imaging partition, all references are automatically maintained by the ZENworks Adaptive Agent registration process.
This prevents having duplicated device entries and GUIDs in the database.
Figure 4-17 Registration in ZENworks Control Center
For more information, see Device Management Settings
in the ZENworks 10 Configuration Management System Administration Reference.
4.2.8 Remote Management
All guidelines for Remote Management are concerned with the configuration settings for performance and security.
Security
To prevent unauthorized access to the managed device, the Remote Management service on the managed device uses the following modes of access:
Rights-Based Remote Management Authentication
In rights-based authentication, rights are assigned to the remote operator to launch a remote session on the managed device. By default, ZENworks administrators have rights to perform remote operations on all the managed devices regardless of whether the local user or the ZENworks user is logged in to the device.
The remote operator does not need any exclusive rights to perform a remote session on the managed device if no user has logged in to the managed device or if a user has logged in to the managed device but not in to ZENworks. However, the remote operator needs exclusive Remote Management rights to perform the remote operation on the managed device when a ZENworks user has logged in to the device. We strongly recommend using the rights-based authentication because it is safe and secure.
Password-Based Remote Management Authentication
In password-based authentication, the remote operator is prompted to enter a password to launch the remote session on the managed device. There are two types of password authentication schemes:
-
ZENworks Password: This scheme is based on the Secure Remote Password (SRP) protocol (version 6a). The maximum length of a ZENworks password is 255 characters.
-
VNC Password: This is the traditional VNC password authentication scheme. The maximum length of a VNC password is 8 characters. This password scheme is inherently weak and is provided only for interoperability with the open source components.
If you use password-based authentication, we strongly recommend using the ZENworks Password scheme because it is safer and more secure than the VNC Password scheme. Ensure that any passwords used are of an adequate length and complexity.
The password schemes operate in the following modes:
-
Session Mode: A password set in this mode is valid only for the current session. The user on the managed device must set the password at the start of the remote session and communicate the password to the remote operator through out-of-band means. If you use password-based authentication, we strongly recommend that you use this mode of authentication because the password is valid only for the current session and is not saved on the managed device.
-
Persistent Mode: In this mode, the password can be set by the administrator through the Remote Management policy or by the managed device user through the ZENworks icon if the option is selected in the security settings of the Remote Management policy.
If the password is set by both a remote control policy and the user, the password set by the user takes precedence over the password configured in the policy.
Performance
The performance features are enabled by default in the Remote Management policy or configuration page. They can be disabled, but we do not recommend doing this.
For more information, see Device Management Settings
in the ZENworks 10 Configuration Management System Administration Reference.
4.2.9 Inventory
ZENworks Configuration Management contains a powerful feature for collection and reporting on software and hardware inventory in the environment. The configuration of the inventory collection should be managed before deployment to ensure that the devices are collecting only relevant information.
Inventory collection settings are split into three main sections. Each section is configured independently of the others.
-
Scan Now: If a device is manually forced to perform an inventory scan.
-
First Scan: The first time the agent is installed and a scan happens. Controlled by the configuration setting in ZENworks Control Center. This setting should complement the build process of the devices.
-
Recurring Scan: Controlled by the Inventory Scan Schedule. See Inventory Schedules for further information.
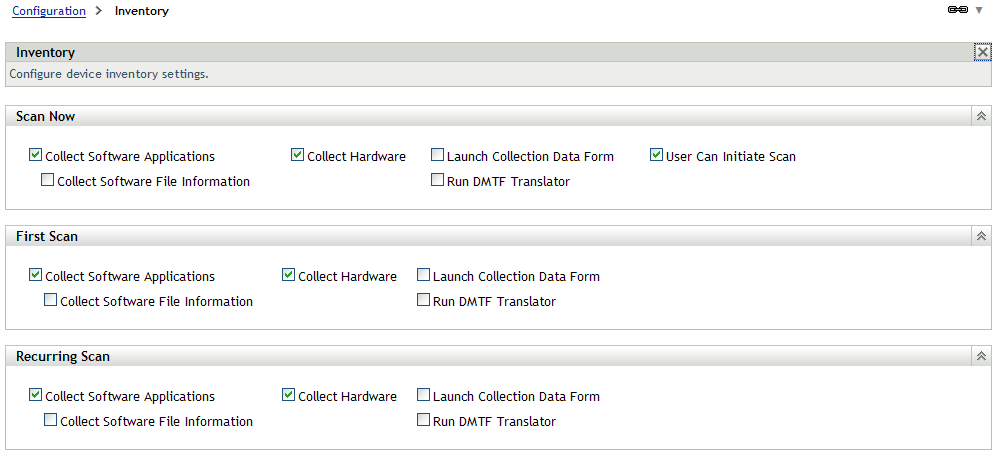
Software File Information
Select the option only if you must identify software products that aren’t recognized by the ZENworks Knowledgebase. This option forces a very granular collection of inventory information, which has performance impacts throughout the ZENworks infrastructure. If you must create local software products based on software file information, we recommend that you override inventory settings only on the individual target devices.
Figure 4-18 Inventory Scan Settings
For more information, see Creating Local Software Products
in the ZENworks 10 Configuration Management Asset Inventory Reference
Collection Data Form Schedules
The collection data form is used to collect demographic information for a device or user. The information can be collected on several schedules or events, or it can be collected manually. You can also use the , , or options. This information can be very useful when attempting to identify where devices are located and who is using them.
Select a schedule that best fits your requirements. Collecting this information on a monthly basis should be a good choice. Ensure that you run a new collection after a change, such as a move or user change.
Use the auto-fill function to avoid user input. System variables and registry settings can be used to silently collect the demographic data. These variables or settings can be delivered through the install process or through bundles. Administrator-defined fields should be created to collect additional information.
For more information, see Scanning Demographic Data
in the ZENworks 10 Configuration Management Asset Inventory Reference
4.2.10 Application Management
You are not required to organize bundles into different folders, but we recommend that you use a minimal folder structure to divide applications and images. If bundles are organized logically and granularly, it becomes very easy to create special administrative accounts that only have limited rights to a given folder or set of folders.
Recommendations for Organizing Bundles
Every organization is different and has different requirements for organizing content. The important thing to keep in mind is that you should always organize your content according to how your organization views it. If you do not organize the content and simply put everything into the default folder, it becomes unmanageable within a very short time.
Keeping this in mind, some best practices for organizing your bundle objects include:
-
Creating a folder for application bundles.
-
Creating a folder for imaging bundles.
The ZPM folder is an auto-generated folder that contains all patch-service related bundles. Although the bundles in this folder can be changed and additional ones created, we recommend that you do not change the folder and the bundles within it.
We recommend that you create folders under the base Bundles folder to group imaging and application bundles together. The following list provides examples of the types of folders that can be created:
-
Create a folder for software vendors:
-
Microsoft (Office, Internet Explorer, MediaPlayer)
-
Adobe (Reader, Photoshop)
-
SAP (Basis, HR)
-
Novell
-
-
Create a folder for special applications:
-
CAD
-
Database applications
-
Software development
-
-
Create a folder for tools:
-
Windows tools (WinZip, WinRAR, UltraEdit, and so forth)
-
-
Create a folder for base images.
-
Create a folder for add-on images.
Categorizing application and imaging bundles into separate folders also allows for administrator roles to be created so you can limit the bundles that an administrator can edit or assign to devices.
Figure 4-19 Bundle Folders in ZENworks Control Center
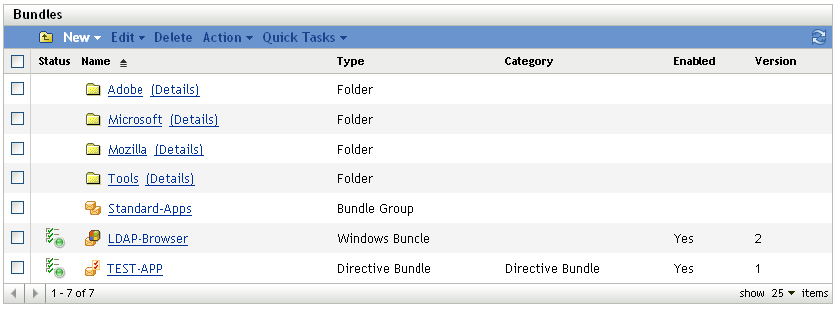
The important thing is to arrange your content with your company organization in mind. This might be different with each company or site. This information should be gathered during the design phase of the project and detailed in the design document.
For more information, see Managing Folders
in the ZENworks 10 Configuration Management Software Distribution Reference.
Bundle Groups
In addition to using folders, it is a good idea to create bundle groups for some applications to make assignments easier. Each group contains a set of bundles that belong together. These groups can be organized for special functions or tasks.
The following are some examples of how you might want to leverage bundle groups to keep things simple:
-
APPS-Base: Contains all applications needed by all users.
-
Finance-Applications: Contains bundles needed to work with finance applications.
-
Help Desk-Tools: Contains bundles that are related to the Help Desk.
The following is a graphical representation of how you might want to leverage bundle groups:
For more information, see Managing Bundle Groups
in the ZENworks 10 Configuration Management Software Distribution Reference.
Assigning Bundles
A major feature in ZENworks Configuration Management is the ability to inherit assignments from multiple places within the system. With this feature, it is very easy to assign a bundle or bundle group to many devices in seconds. You do not need to assign bundles to each device, which saves time and money.
Based on your folder and group design, we recommend that you use folder or group assignments instead of direct assignments. Use these indirect assignments wherever possible to increase speed and reduce administration effort. If you utilize folders and groups for as many of your assignments as possible, you can deliver updates to hundreds of devices when you need to get them there, even immediately.
Best practices on how to leverage folders and groups include:
-
If you have a set of bundles that are required for all devices in a site, use the site folder to assign these bundles or bundle groups.
-
If you have special bundles that are used in one or more departments, assign these bundles only to the department folders.
-
If you have bundles that are used by several devices in different folders, set up groups for assignments.
-
Only use direct assignments if a single device or a small number of devices need special assignments.
For more information, see Managing Bundles
in the ZENworks 10 Configuration Management Software Distribution Reference.
Importing and Exporting Bundles
Novell best practice dictates that a new application or change to an existing application in the environment should use a testing phase that does not affect the production network. We recommend that a development zone (DEV-ZONE) be created with its own ZENworks Configuration Management structure that mirrors the production network. After an application has been approved for production deployment, it should then be moved from the DEV-ZONE to the production zone (PROD-ZONE). Currently there is no way to export MSI files from the Content Repository, so we recommend that all source files are retained; otherwise, there will be no source to be imported into production (see TID 7002543 on the Novell Support page).
To export bundles:
-
From the DEV-ZONE ZCM server, export the bundle to a specific export directory by using the following command:
zman bundle-export-to-file /bundle_path/bundle_name bundle_filename.xml
If the application has no dependencies and is not a Windows MSI bundle, a single bundle_filename.xml is created. If there are dependencies or MSI content to be imported into the Content Repository, two files will be created: bundle_filename.xml and bundle_filename_ActionContentInfo.xml.
For example, you can export the officeXP bundle to officeXP.xml by using the zman bundle-export-to-file officeXP officeXP.xml command. The officeXP.xml and officeXP_ActionContentInfo.xml files are created.
-
Copy all files related to the application MSI (not all MSI files are self-contained) to the same application export directory. It is possible to place the application MSI is a separate folder; however, the following section of the bundle_filename_ActionContentInfo.xml file needs to be modified to specify the content location:
includeAllFilesinSubFolders="false">E:\files\ApplicationX.msi</ContentFilePath>
-
Copy the entire directory by whatever method of communication is approved from the DEV-ZONE server to the PROD-ZONE server.
-
Create the bundle on the PROD-ZONE ZCM server by using the following command:
zman bundle-create new_bundle_name bundle_xml_filename.xml bundlefolder --actioninfo bundle_name_ActionContentInfo.xml (using /bundlefolder/bundlename results in an error because of invalid characters).
For example, use the following command to create a bundle called ApplicationX:
zman bundle-create OfficeXP officeXP.xml “/Bundles/Microsoft Applications” --actioninfo officeXP_ActionContentInfo.xml
Application Delivery Mechanism
There are a number of different methods to deliver content to your managed devices with ZENworks Configuration Management.
Tomcat via HTTPS
Benefits:
-
ZENworks Configuration Management controls the distribution of content to the various Satellite devices and Primary Servers that exist within the Management Zone.
-
Data is encrypted within Tomcat, so anyone with file access to the server will not be able to access applications.
-
HTTP is used to deliver content, rather than SSL, so there is no overhead to re-encrypt the content for transmission.
-
Access to data is based upon the relationships defined within ZENworks Configuration Management. If you are not a target device or user of ZENworks Configuration Management, you have no access to application, image, or policy data.
-
This is a firewall-friendly solution. It is very easy to allow DMZ access to content for remote, Internet-based devices, without cumbersome configuration changes on routers, switches, and firewalls.
Drawbacks:
-
The ZENworks Configuration Management server becomes less scalable because it is serving more HTTP requests from managed devices.
-
It can take some time before an application has finished encrypting and injecting its data into the Web server.
NetWare
You can use the Novell Client (Client32) and existing mapped network drives or directly via UNC to provision application data to your managed devices.
Benefits:
-
Uses the existing infrastructure.
-
Less overhead is required on the ZENworks Server.
Drawbacks:
-
ZENworks Configuration Management has no control over the distribution of the application content. The distribution must be managed outside of ZENworks Configuration Management with products such as ZENworks Server Management.
-
ZENworks Configuration Management has no control over who has access to the data.
-
Application content is not encrypted and can potentially be installed by anyone with access to the server.
-
This is not a firewall-friendly solution. Access from outside the firewall requires VPN access in order to deliver applications.
Microsoft
You can use Microsoft DFS shares, Active Directory servers, or file and print servers.
Benefits:
-
Uses existing infrastructure servers.
-
Less overhead is required on the ZENworks Server.
-
Uses existing domain credentials of devices and users to control access to the files you are provisioning to managed devices.
Drawbacks:
-
ZENworks Configuration Management has no control over the distribution of the application content. The distribution must be managed outside of ZENworks Configuration Management with products such as ZENworks Server Management or Microsoft DFS.
-
ZENworks Configuration Management has no control over who has access to the data.
-
Application content is not encrypted and can potentially be installed by anyone with access to the server.
-
This is not a firewall-friendly solution. Access from outside the firewall requires VPN access in order to deliver applications.
Other Network Shares (NetStorage)
It is also possible to use NetStorage devices for content hosting and delivery of application content to your managed devices.
Benefits:
-
Uses existing infrastructure.
-
Less overhead is required on the ZENworks Server.
Drawbacks:
-
ZENworks Configuration Management has no control over the distribution of the application content. The distribution must be managed outside of ZENworks Configuration Management.
-
ZENworks Configuration Management has no control over who has access to the data.
-
Application content is not encrypted and can potentially be installed by anyone with access to the server.
-
This is not a firewall friendly solution. Access from outside the firewall requires VPN access in order to deliver applications.
Recommendation for the Delivery Mechanism
Novell recommends using the ZENworks Configuration Management internal delivery mechanism (HTTP) for bundles and policies. Although it might be easier to use other delivery methods you will lose most of the benefits within ZENworks Configuration Management. Some of these benefits include:
-
Content replication capabilities
-
Rights to the content store
-
Data encryption and security wrapped around content
4.2.11 Policy Management
In general, it is not a good idea to have thousands of different policies in place to fulfill all requirements. In desktop management, there are usually sets of policies for certain groups, such as normal users, administrative users, and special user groups, such as software developers.
However, you might also want to organize policies in more than one folder to restrict access and administration to specific groups or users.
Some policies definitely need to be restricted to a set number of people within the organization (such as remote management policies), so you need to consider this best practice recommendation carefully.
However, it is a good idea to organize different sets of policies in different folders. In addition, we recommend that you use policy groups to put different policies together in a single package and then assign these policy groups to devices or users, (policy groups are loosely synonymous to policy packages in previous versions of ZENworks Desktop Management).
To make sure that every device receives the required and effective settings, we recommend that you define the order in which policies are applied. There are four options you can use here, and you need to understand your policy requirements before you make these decisions:
-
Apply device policies first, user policies last (user-assigned policy wins)
-
Apply user policies first, device policies last (device-assigned policy wins)
-
Use only device policies
-
Use only user policies
All policies are applied in the following order: folder, group, then device or user.
The following graphic shows the effective policies on a given device:
Figure 4-20 Assigned Policies Page in ZENworks Control Center
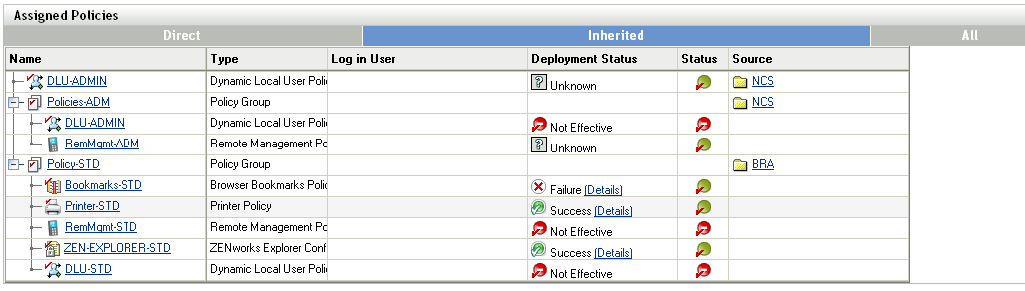
In the above example, there is a policy group assigned to a folder BRA. This group contains all policy settings (Policy-STD) that are required for all users in BRA. Additionally there is policy group assigned to the NCS folder (below BRA). Finally, there is a direct policy assignment to the NCS folder that modifies the DLU settings only.
The following sections contain more information:
Recommendations for Managing Policies
Organizing policies into folders and policy groups makes it easier to manage the assignment process to devices and users. When managing policies, you should consider the following items:
When managing policies, you should:
-
Define user and device categories during the assessment phase, such as Standard-user, Administrative-user, Management-user, Help Desk-device, and so forth.
-
Define required policies and sets that can be used for policy groups.
-
Define the order in which policies are applied.
-
Assign policy groups to folders as needed.
-
Use folder or group assignments wherever possible.
Advantages to Assigning Group Policies through ZENworks Configuration Management
With ZENworks Configuration Management, you can use plural group policies, meaning you can layer multiple group policies on top of each other, applying what is referred to as effective policies at the endpoint level. Using ZENworks Configuration Management to do this allows you to handle roaming users effectively, making policies available to end users no matter where they are logging in from. Most organizations use group policies to manage the look and feel of the user's desktop experience. There are two choices when it comes to using Group Policies in your environment:
-
Import your policy files into ZENworks Configuration Management and replicate them across your infrastructure.
-
Deliver your policies though Microsoft Active Directory.
4.2.12 Imaging
We highly recommend that you adopt a methodology for creating and delivering Universal Images to your endpoints. A universal image is a single image of Windows XP, Windows Vista, or Windows 7 that can be deployed to multiple hardware types. After you have established the Universal Images, you can deliver core applications and line-of-business applications as add-on images during the imaging process. This method can be further extended to also provide hardware-specific drivers during the imaging process. Tools such as ENGL's Imaging Toolkit for ZENworks Configuration Management can be used to make the process of creating a Universal Image very easy to manage.
For more information, see the ZENworks 10 Configuration Management Preboot Services and Imaging Reference.
4.2.13 Configuring a Layer 4 Switch
ZENworks Configuration Management supports achieving load balancing and fault tolerance for your infrastructure services though using a Layer 4 (L4) switch. An L4 Switch can front either Primary Servers, Satellite devices, or both. This allows the organization to achieve guaranteed results when directing traffic to the devices behind the switch. Most importantly, this allows organizations to ensure that services are always available to their end user community.
NOTE:User Sources are not supported with an L4 Switch in place. For detailed information, see TID 7004684 at the Novell Support.
L4 switches are expensive and not affordable for many smaller organizations. Smaller organizations often turn to other forms of load balancing and fault tolerance solutions that are readily available to them. These include solutions such as DNS Round Robin, Microsoft Load Balancing Services, and other open source solutions on the market.
When you do use an L4 switch, you need to ensure that it is properly configured. If the switch is not configured properly, the traffic is not directed properly and there might be issues with connections, responses, and so forth.
The following sections explain the general requirements for properly configuring an L4 switch to be used in front of ZENworks Primary Servers and Satellite devices:
Foundry Networks ServerIronXL Configuration
The following example shows the configuration requirements for a Foundry Networks ServerIronXL switch that was used for testing purposes in the Novell SuperLab. Other vendor products are similar when it comes to configuration and the parameters used. Refer to vendor documentation for further details.
ServerIron#sh run
Current configuration:
!
ver 07.3.03T12
no global-stp
global-protocol-vlan
!
server predictor round-robin
server sticky-age 2
server source-nat
server source-ip 151.155.184.107 255.255.252.0 151.155.187.254
!
server real r-ps-1 151.155.184.109
   source-nat
   port http
   port http keepalive
   port http url "HEAD /"
   port http status_code 100 499
   port ssl
   port ssl keepalive
!
server real r-ps-2 151.155.184.110
   source-nat
   port ssl
   port ssl keepalive
   port http
   port http keepalive
   port http url "HEAD /"
   port http status_code 100 499
!
server virtual ps-v1 151.155.184.108
   port ssl sticky
   port http sticky
   track-group http 443
   bind ssl r-ps-1 ssl r-ps-2 ssl
   bind http r-ps-1 http r-ps-2 http
!
vlan 1 name DEFAULT-VLAN by port
   no spanning-tree
!
boot sys fl sec
ip address 151.155.184.107 255.255.252.0
ip default-gateway 151.155.187.254
snmp-server community ..... rw
!
end
Summary of Configuration Settings
server source-ip: The IP address given to the L4 device.
server real r-ps-1: The IP address of server1. This server will be selected in Step 1.
server real r-ps-2: The IP address of server2. This server will be selected in Step 1.
server virtual ps-v1: The virtual IP address used to configure the L4 device in ZENworks Control Center. See Step 3.
Configuring the Closest Server Default Rule
In addition to setting up and configuring the L4 switch, you need to also configure the Closest Server Default Rule. For more information, see Setting Up Closest Server Rules
in the ZENworks 10 Configuration Management System Administration Reference.
Configuring an L4 Switch Definition from Selected Servers
-
In one of the role section listings, select the check boxes for one or more servers.
-
Click > .
-
Specify an L4 switch definition name, then click .
The L4 switch definition name must be either the DNS name or IP address of the L4 virtual server.
-
Click to make the change effective.
Additional Details
-
The created L4 switch definition is displayed in each of the listings, no matter where it is created, with the selected servers listed under each instance of the L4 switch definition.
-
Servers can be members of multiple groups and L4 switch definitions.
-
Servers that are members of an L4 switch definition or group are no longer listed at the top level of the server listing.
4.2.14 ZENworks Systems Update
The System Updates feature allows you to obtain updates to the Novell ZENworks 10 Configuration Management software on a timely basis, and also allows you to schedule automatic downloads of the updates.
Software updates are provided periodically and you can choose whether to deploy each update after viewing its content. After you have updated your zone and baselined it to version 10.3, it is recommended that you delete all other previous updates from the System Update page in ZENworks Control Center. The System Updates page must contains only updates for your existing version, and those regarding updating to a newer version of the product. Even if the system is baselined at 10.3, the Primary Servers calculate which Managed Devices need the updates listed, including older updates.
For more information, see Introduction to ZENworks System Updates
in the ZENworks 10 Configuration Management System Administration Reference.
4.2.15 Content Management
The “content” in this guide is data that has been uploaded to the ZENworks zone for distribution to a managed endpoint. After the content is uploaded, it is encrypted and distributed to other Primary Servers and Satellite Content Servers in the zone. The ZENworks content repository is accessed by managed devices by using HTTP, a firewall-friendly protocol, allowing content to be provisioned to devices in any location, even outside of the corporate firewall.
A few examples of content include Windows Bundles, Patch Remediation data in ZENworks Patch Management, and ZENworks System Update content. After the content resides centrally on the Primary Servers of the zone, the next stage is to define which content belongs at which Satellite location and how to send the content to that location.
Defining the What in Content Management
An important improvement in Content Management is the ability to define content replication at the bundle-folder level. This ability provides several advantages over previous releases of ZENworks Configuration Management because it allows groups of applications or patches to be sent to sites with a few mouse clicks.
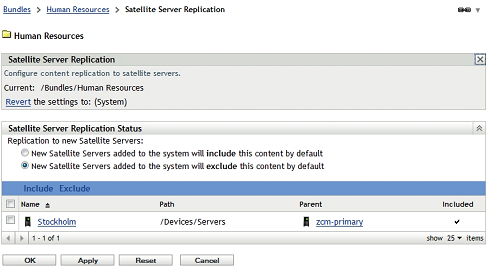
To define the Satellite devices to which the content located in the folder should be replicated, click the hyperlink of any bundle folder and click the tab. If bundles are subsequently created in the folder, the content synchronization rules of the bundle folder are automatically applied.
In the following screen shot, all bundles in the bundle folder are sent to the remote office. A bundle created in the bundle folder is automatically marked as for the Stockholm location.
Figure 4-21 Satellite Server Replication
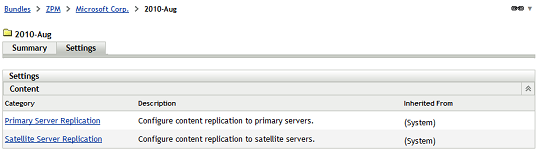
The technique of configuring content synchronization at the bundle-folder level is particularly useful when dealing with patches. As patches are stored in bundle folders organized by vendor, and then by month or year of release, groups of related patches can be sent to a given site in one operation. For example, automatically synchronizing all Microsoft patches for the previous month is extremely easy because this can be accomplished by configuring the relevant ZENworks Patch Management bundle folder, as displayed in the following screen shot:
Figure 4-22 Bundle Folder Settings
Organizing Bundles
Before considering content management, you should organize bundles into separate folders for ease of administration. Bundles can be grouped into folders by function, such as “Productivity Applications,” “Collaboration Applications,” or by business function, such as “Finance Applications” and “Human Resources Applications.” Introducing content control at the bundle-folder level means that the decision of how to organize bundles can also take into account the locations that the applications will be accessed from. For example, if a particular remote location has specific application needs unique to that site, consider creating a bundle folder for that location, thus allowing the content settings to be configured once for the core applications for that site.
If bundles are to be presented to users in the Windows menu, the default folder structure is a mirror of your bundle folder structure. For example, if the Novell Pulse Login bundle is associated with a user or device and instructed to be included in the menu, the Start Menu displays > > .
Figure 4-23 Organizing Bundles
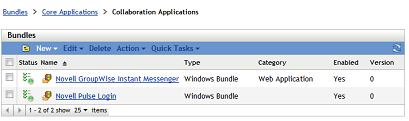
This behavior can be overwritten in each bundle object, allowing the administrator to define for each bundle what the Windows Start menu structure should look like. This process can be cumbersome for each bundle; therefore you must consider the balance needs of content replication, ease of administration, and end-user presentation to decide about the folder structure for your bundle objects.
Defining the How in Content Management
ZENworks 10 Configuration Management SP3 introduces power mechanisms for granular control over what content should be hosted at specific locations. When you distribute content to Satellite locations, the concept of creating a window of opportunity for synchronization becomes very important. A window of opportunity involves the definition of window of time and the amount of bandwidth available to transfer a particular piece of content. In the previous versions of ZENworks Configuration Management, all content was treated the same way; however, in ZENworks 10 Configuration Management SP3, several content types are exposed in the ZENworks Control Center.
Table 4-2 ZENworks 10 Configuration Management SP3 Content Types
After you have defined what content should be available, the next stage is to define how and when it gets to the defined locations. For each content type, the administrator can specify the window of opportunity for synchronization, the recurrence period, and the bandwidth to be consumed during these operations. Administrators can now ensure that other services at remote sites are not affected by content delivery. If the window of opportunity and throttled bandwidth rate is not sufficient to completely synchronize all content, the process resumes from where it stopped when the window of opportunity opens again.
The following screen shot shows that Critical Security Patches have the opportunity to synchronize every 4 hours for up to 2 hours, consuming only 300 KB/s during the transfer.
Figure 4-24 Content Type Replication Settings
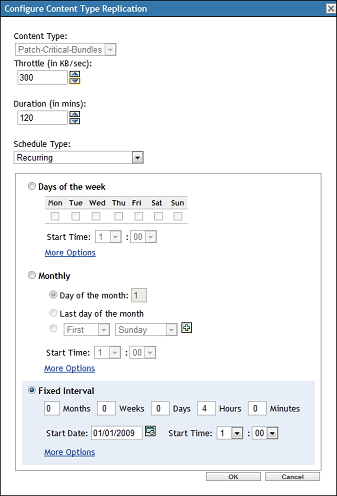
In this scenario, the customer wants to ensure that critical security patches are available promptly but still wants to protect bandwidth at the same time. If the content to be synchronized takes only 10 minutes to complete, the window of opportunity closes after 10 minutes. If the transfer takes more than 2 hours, the remainder of the content is synchronized 2 hours later when the next window of opportunity opens, because of the 4-hour interval.
Critical Information Required To Determine Content Synchronization Settings
Before defining the content rules for a given location, you must collect the following information:
-
The customer's content priority.
For example, what should be available as soon as possible and what content can wait until after hours or perhaps weekend transfers.
-
The network bandwidth available from the data center to each site and network utilization at each site. In some cases, a site might have a large data pipe but it might be subject to high utilization because of other applications and services that are running.
The following screen shot shows that each content type can be configured with its own window of opportunity so that it can accommodate any customer requirement.
Figure 4-25 Content Type Configuration
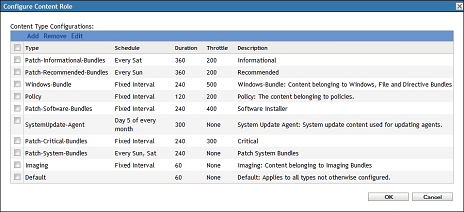
ZENworks Configuration Management offers the administrator significant flexibility in managing content synchronization, ensuring that content is always available at only the relevant locations, but more importantly that ZENworks does not consume all the bandwidth during this process.
4.2.16 Offline Content Replication and Management
ZENworks Configuration Management allows you to easily promote any managed device to a Satellite device with the roles of content repository, inventory and status collection point, imaging server, or an authentication point for local Active Directory or eDirectory instances. These roles are defined centrally in ZENworks Control Center and are applied automatically when the device next checks in.
Consider a situation where you need to launch a new site for management that is behind a very slow or saturated link. ZENworks can easily automate the delivery of content and throttle bandwidth to get the data needed to that location without adversely affecting other services hosted at that location. However, if the location needs GBs of application content, this process might take days or even weeks if small windows of opportunity and low-bandwidth throttles have been configured. If network providers charge customers on the basis of network utilization, sending large amount of content across WAN links should be avoided. ZENworks 10 Configuration Management SP3 provides the ability to export the content required by a Satellite device. Subsequently, the content can be transferred to a site through removable media, and imported into the content repository of the local Satellite. The process can save the customer unnecessary bandwidth consumption along with the associated time and financial costs.
The process for offline content synchronization is as follows:
-
Promote a managed device to be a Satellite device.
-
Assign the content role to the Satellite device.
-
Set the content synchronization schedule to none.
-
Specify the content that is needed at the location.
-
Export the content by using the zman command line utility with the Satellite Server Export Content option.
C:\>mkdir \content
C:\>cd content
C:\content>zman ssec "Devices/Workstations/EMEA/novell-f7d8d036" c:\content
The command looks up the content that is marked as include for a given Satellite that is currently not available, and exports the content to the defined location. If this is a new site, Step 3 and Step 4 ensure that this is all of the required content to launch the site.
-
Copy the content to a removable media and send it to the remote location.
-
After the data is available at the remote site, import it by using the zac command line utility with the Content Import option.
C:\>zac cic c:\tools\content -l:c:\content.log
Importing 125 items for content type Default...
Imported 125 items.
Successfully imported content (125 items).
-
After the content has been successfully imported, configure the content schedule and bandwidth throttling as is required for the site.
After this process is complete, setting the content synchronization schedule instructs ZENworks to ensure all subsequent delta changes are automatically synchronized.
4.2.17 Satellite Authentication Role
Each Satellite Server in a ZENworks zone can be configured with one or more roles for managed devices.
Table 4-3 Satellite Roles
As shown in Table 4-3, Satellite Roles, a majority of roles can be hosted by a Satellite device. The ZENworks Authentication role was previously restricted to ZENworks Primary Servers; however, the role has been available on Satellite devices from ZENworks 10 Configuration Management SP3 or later. Configuring the Authentication role on a Satellite device allows for additional connections to be made to an eDirectory or Active Directory user source through a device that is local to the devices at a given location. For example, a customer using eDirectory will most likely create partitions dedicated to the resources for a given site and store a replica of the partition on a local server.
If a remote site has a local Directory server with LDAP enabled, a Satellite device can be configured with the Authentication role so that the authentication process can occur locally on the LAN. The authentication process is as follows:
-
The user authenticates to eDirectory or Active Directory as part of the Windows logon process.
-
The credentials are intercepted and passed on to a ZENworks server hosting the Authentication role.
-
The Authentication Server searches for the user in the user source via LDAP(S). This information is used to determine what policy and bundles should be applied for users, based on their location in the directory and their group memberships.
The process of configuring local Satellite authentication is as follows:
-
Define an additional connection to the user source.
-
Assign the User Source Connection to the Satellite device.
The following screen shot shows an example of a Satellite Authentication role configured to connect to a local user source.
Figure 4-26 Configuring the Authentication Role for a Satellite
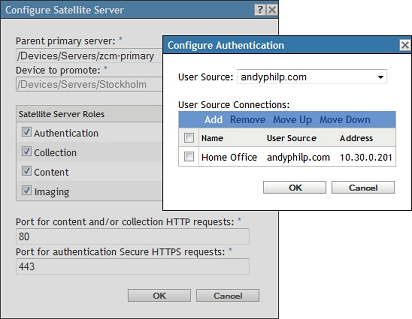
User Authentication Load-Balancing
The creation of additional user source connections that can be applied to Primary Servers or Satellite devices offers additional load-balancing capabilities for the authentication process. ZENworks provides authentication load balancing at two levels:
-
Closest Server rules define the Authentication Server to which a managed device sends its credentials. Typically, there are multiple Authentication servers in a zone; therefore, the authentication process can spread across those servers through Closest Server rules.
-
User Source Connections instruct Primary Servers and Satellites of additional servers that can be used to perform the LDAP(S) user lookups. If there are multiple eDirectory or Active Directory servers in a given location, the authentication load can also be balanced across multiple LDAP servers.
When you make decisions on infrastructure placement to support ZENworks services, ensure that the load is spread across the ZENworks servers first and the customer's Directory servers second.