To prepare a lab workstation to provision Active Directory users, complete the following sections:
The computer where you will install Remote Loader and the driver must be running the following software:
You'll need to provide a number of system-specific details when you install and configure Novell Nsure Resources for Active Directory and Exchange 2000. Some of these details can be collected before you complete the following procedures, and others will be defined during the process.
Create a user with Admin privileges to be exclusively used by the driver to authenticate into Active Directory. Doing this keeps DirXML Admin account isolated from changes to other Admin accounts.
-
Click Start > Programs > Administrative Tools > Active Directory Users and Computers.
-
From Active Directory Users and Computers, select the container where you want to add the user, then click Create a New User.
-
Enter the Fullname, which is the AD object name, and enter the User logon name, which is the AD authentication name.
Figure 22
Creating an Active Directory User for the Driver
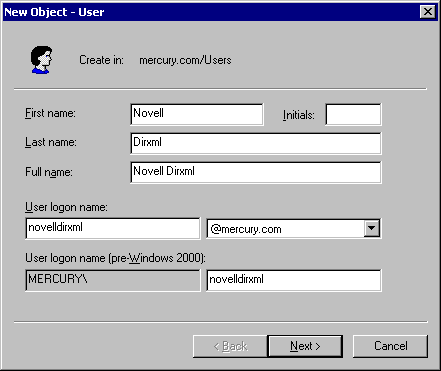
Record the logon name plus the domain in the table under Collecting Configuration Information . For example, record novelldirxml@mercury.com. This information will be required later during driver parameter configuration.
-
Click Next, then set the password for the new user. Mark Password Never Expires so that a password policy won't disable the driver unexpectedly.
Record the password in the table under Collecting Configuration Information . This information will be required later during driver parameter configuration.
-
Click Next, review the summary, then click Finish.
-
In the Tree view, select Builtin > Administrator's properties > Members > Add.
-
Select the full name of the user you created > Add > OK > OK.
-
Close the Active Directory Users and Computers window.
-
In the Administrative Tools window, select Domain Controller Security Policy.
-
In Tree View, expand Security Settings > Local Policies > User Rights Assignment.
-
Select Log On As a Service > Security > Add > Browse.
-
Select the user you created > Add > OK > OK > OK.
-
Close the Domain Controller Security Policy.
-
Reboot the system.
-
Continue with the following section, Collecting Default Exchange Information .
You will be prompted for Exchange information during driver parameter configuration. To gather this information:
If you are running another DirXML Remote Loader service on this computer, such as the Remote Loader for the Exchange driver, stop that service before starting this procedure. Restart the service after completing this Remote Loader installation.
-
Insert the Novell Nsure Resources CD and click Next at the Welcome page.
-
At the License page, click I Accept.
-
At the Components dialog box, select DirXML Remote Loader Service, then click Next.
-
Accept the default installation path for the Remote Loader, then click Next.
-
Mark the following items, then click Next.
- DirXML Remote Loader Service
- DirXML Driver for Active Directory with Exchange 2000
-
Review the Product Summary, then click Finish to install Remote Loader files.
-
When prompted, create a shortcut.
-
Run the DirXML Remote Loader Configuration Wizard from your desktop.
-
At the Welcome page, click Next.
-
Keep the default Command Port number, then click Next.
-
Keep the default Configuration File Name, then click Next.
-
In the DirXML Driver dialog, mark Native, then click Next.
-
In the Connection to DirXML dialog, leave the default Port settings, ensure that Use SSL is unchecked.
-
Record the port number in the table under Collecting Configuration Information , then click Next. This information will be required later during driver configuration.
-
Set Trace Level to 3, so that you'll get minimal tracking data for troubleshooting, specify a location and filename for trace file, then click Next.
NOTE: If you are running multiple Remote Loader sessions on a single computer, you should create separate trace files.
-
Mark Install the Remote Loader Instance as a Service, then click Next.
-
Set Remote Loader and Driver Object passwords.
We recommend keeping remote passwords and driver passwords the same across systems and change it later when you go to production. Record the passwords in the table under Collecting Configuration Information . This information will be required later during driver parameter configuration.
-
Review the summary, then click Finish.
-
When prompted, start the service.
The Active Directory/Exchange 2000 system is prepared to provision resources to employees. Complete preparation of other participating systems and then proceed to Configuring DirXML Drivers .

