Setting Up the Internet Agent
Complete the following tasks to set up the Internet Agent:
- Installing the Internet Agent
- Assigning a Postmaster
- Starting the Internet Agent
- Testing the Internet Agent
Installing the Internet Agent
As you install the Internet Agent, you are prompted to supply configuration information. Use the GroupWise Internet Agent Installation Worksheet to understand the prompts and to record your installation and configuration information.
- Installing the Internet Agent Software on NetWare or Windows
- Installing the Internet Agent Software on Linux
Installing the Internet Agent Software on NetWare or Windows
The Internet Agent Installation program does the following:
- Installs Internet Agent files to the local server and to the domain directory.
- Tests the server you are installing to for correct Internet configuration.
- Creates the Internet Agent object in Novell eDirectory.
- Configures startup files for the Internet Agent.
To install the Internet Agent:
-
Make sure the server from which you will perform the installation has the Novell ClientTM installed.
The Internet Agent Installation program creates GroupWise objects in eDirectory. The Novell Client is required to access eDirectory. If necessary, you can download the Novell Client from the Novell Product Downloads site.
-
Make sure you have the appropriate file system and eDirectory access rights.
-
If you are installing the NetWare Internet Agent, on the Windows workstation from which you will install the Internet Agent to the NetWare server, make sure you have the following file system and eDirectory access rights:
- You must be attached to the NetWare server where you will install the Internet Agent files. By default, the Internet Agent Installation program copies files to the sys:\system directory. You can specify a different directory if desired. Make sure you have rights to whichever directory you plan to install the files to.
- You must be attached to the server where the domain directory resides. The Internet Agent Installation program creates domain subdirectories and copies Internet Agent files to the subdirectories. This requires full file system rights to the domain directory.
- You must be logged in to eDirectory with Admin-equivalent rights to the eDirectory tree where the GroupWise Domain object resides. The Internet Agent Installation program creates an Internet Agent object under the Domain object.
-
If you are installing the Windows Internet Agent, on the Windows server where you will install the Internet Agent, make sure you have the following file system and eDirectory access rights:
- You must be logged into the Windows server through a Windows user account that provides full local system access. The Internet Agent Installation program creates local directories and copies Internet Agent files to the directories.
- You must be logged in to the server where the domain directory resides. The Internet Agent Installation program creates domain subdirectories and copies Internet Agent files to the subdirectories. This requires full file system rights to the domain directory.
- You must be logged in to eDirectory with Admin-equivalent rights to the eDirectory tree where the GroupWise Domain object resides. The Internet Agent Installation program creates an Internet Agent object under the Domain object.
-
-
Insert the GroupWise 6.5 Administrator CD into the CD drive.
or
If you have already copied the Internet Agent files to the GroupWise software distribution directory, you can run the Internet Agent Installation program from that directory.
-
Click Start, click Run, type the path or browse to install.exe, then click OK.
CD Path: d:\internet\gwia\install.exe
Directory Path: z:\grpwise\software\internet\gwia\install.exe
-
Follow the prompts, using the information from the GroupWise Internet Agent Installation Worksheet.
-
Continue with Assigning a Postmaster .
Installing the Internet Agent Software on Linux
As you install the Internet Agent, you are prompted to supply configuration information. Use the GroupWise Internet Agent Installation Worksheet to understand the prompts and to record your installation and configuration information.
Installing the Internet Agent
-
Make sure you have set up a basic GroupWise test system, described in Installing a Basic GroupWise System.
-
Make sure that LDAP is running on your eDirectory server and that it is configured to accept login from the Internet Agent Installation program (worksheet item 8).
The Installation Advisor requires eDirectory access in order to create the Internet Agent object in eDirectory. The Installation Advisor uses LDAP to gain the required access.
-
Open a new terminal window, then enter the following command:
xhost + localhost
If you cannot execute this command because the X Window System is not running on the Linux server, see Installing the GroupWise Agents Using the Text-Based Installation Advisor, which describes the process for the POA and the MTA.
-
In the same window, become root by entering su and the root password.
-
Change to the root of GroupWise 6.5 for Linux Administrator CD.
-
Enter ./install.
-
Select the language in which you want to run the Installation Advisor and install the Internet Agent software, then click OK.
-
In the Installation Advisor, click Install Products > GroupWise Internet Agent > Install GroupWise Internet Agent.
The GroupWise Internet Agent executable (gwia) is installed to the /opt/novell/groupwise/agents/bin directory.
-
When the installation is complete, click OK.
-
Continue with Configuring the Internet Agent.
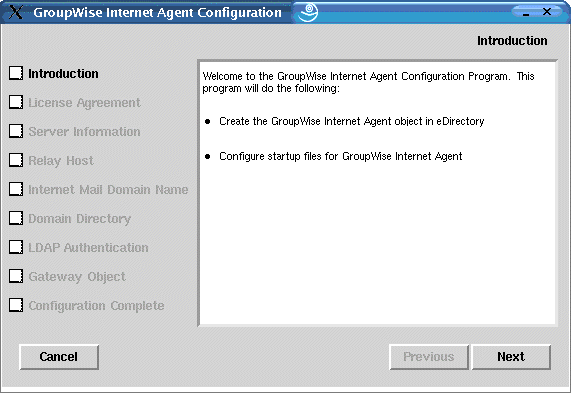
Configuring the Internet Agent
-
After the Internet Agent files have been installed, click Configure Internet Agent.
The Internet Agent installation and configuration steps are separate so that you can install updated agent software without needing to repeat the agent configuration steps.
-
Review the Introduction, then click Next.
-
Accept the License Agreement, then click Next.
-
Specify the fully qualified DNS hostname of the Linux server where you are installing the Internet Agent, then click Next.
-
Select how you want the Internet Agent to handle outbound mail (worksheet item 4), then click Next.
-
Specify the hostname portion of your Internet mail domain name (worksheet item 7), then click Next.
If you do not know your Internet Main domain name yet, select Enter from ConsoleOne so that you can provide this information later.
-
Browse to and select the domain directory of the domain where you are installing the Internet Agent (worksheet item 5), then click Next.
-
Fill in the LDAP information (worksheet item 8), then click Next.
-
Fill in the Internet Agent object information (worksheet items 5 and 6), then click Next.
On the Configuration Complete page, Launch Internet Agent on System Startup is selected by default.
-
If you do not want the Internet Agent to start automatically when the server restarts, deselect Launch Internet Agent on System Startup.
-
Click Exit to complete the configuration.
-
Continue with Assigning a Postmaster .
Assigning a Postmaster
The Internet requires each site to assign at least one user to be the Postmaster. The Postmaster is assigned to be the recipient of messages addressed to postmaster@host.
To assign a Postmaster:
-
In ConsoleOne, right-click the Internet Agent object, click Properties, click the GroupWise tab, then click the Gateway Administrators page.
-
On the Gateway Administrators page, click Add, select a GroupWise user to be the Postmaster, then click OK.
-
Select the user from the list, then click Postmaster.
-
Click OK to save the information.
-
Continue with Starting the Internet Agent.
The Internet Agent can also be configured to send problem messages to the Postmaster. For instructions, see "Determining What to Do with Undeliverable Messages" in "Internet Agent" in the GroupWise 6.5 Administration Guide.
Starting the Internet Agent
After you've installed the Internet Agent and configured a Postmaster, you can start the Internet Agent.
- Starting the Internet Agent on NetWare
- Starting the Internet Agent on Linux
- Starting the Internet Agent on Windows
Starting the Internet Agent on NetWare
During installation, the Internet Agent Installation program copied the gwia.ncf startup file to the sys:\system directory (unless you specified a different directory). You use this file to load the Internet Agent.
If you chose to have the Internet Agent Installation program add the gwia.ncf command to your autoexec.ncf, the Internet Agent loads when you start the file server.
To manually start the Internet Agent:
-
At the NetWare server console, enter gwia to run the gwia.ncf file.
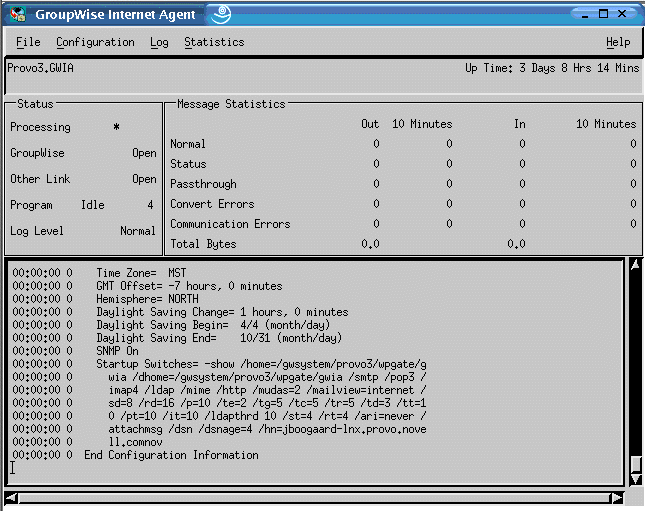
After you have started the Internet Agent, verify that the program is running. You can monitor the program at the Internet Agent server console that displays on the NetWare server console. Press F10-Options, then press F9-Stats. If you see an error message in the Statistics window, the program has not loaded properly.
If you need to stop the Internet Agent, press F7-Exit at the Internet Agent console or enter unload gwia at the NetWare server console.
-
If you enabled the Internet Agent Web console, use the following URL in a Web browser to log into the Internet Agent Web console:
http://internet_agent_network_address:http_port
For example:
http://172.16.5.18:9850
-
Continue with Testing the Internet Agent.
Starting the Internet Agent on Linux
Complete the following tasks to set up the Linux Internet Agent. These tasks are designed to help you get the Internet Agent up and running as quickly as possible and to help you manage the Internet Agent in the future.
- Starting the Linux Internet Agent with a User Interface
- Starting the Linux Internet Agent as a Daemon
- Monitoring the Linux Internet Agent from Your Web Browser
- Starting the Linux Internet Agent on System Startup
- Stopping the Linux Internet Agent
Starting the Linux Internet Agent with a User Interface
-
If Sendmail, Postfix, or any other SMTP daemon is enabled on your Linux server, disable it before starting the Internet Agent.
-
If you want to use the Internet Agent for POP3 and IMAP4 mail, make sure no POP3 or IMAP4 daemons are running on your Linux server.
-
Make sure you are logged in as root.
-
Make sure that the MTA for the domain is running.
-
Change to the /opt/novell/groupwise/agents/bin directory.
-
Enter the following command to start the Internet Agent:
./gwia --show @../share/gwia.cfg &
The --show switch starts the Internet Agent with an agent console interface similar to that provided for the NetWare and Windows Internet Agent. This user interface requires that the X Window System and OpenMotif be running on the Linux server.
The @ startup switch points to the Internet Agent configuration file and is required to start the Internet Agent.
The ampersand (&) causes the Internet Agent to run in the background, so that the terminal window you started it in is again available for use.
The status messages displayed on the Internet Agent console are also written to the Internet Agent log file (mmddlog.nnn) in the /var/log/novell/groupwise/domain.gwia directory. The log file name includes the month and day when it was created, along with an incrementing extension to accommodate multiple log files on the same day.
Starting the Linux Internet Agent as a Daemon
-
Make sure you are logged in as root.
-
Change to the /etc/init.d directory.
-
To start the Internet Agent, enter the following command:
./grpwise-ia start
-
To confirm that the Internet Agent has started, enter the following command:
ps -eaf | grep gwia
This lists all of the Internet Agent process IDs.
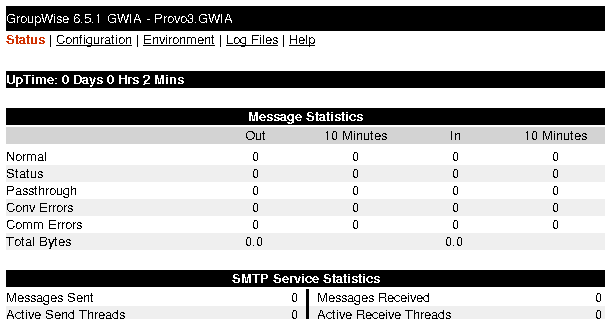
Monitoring the Linux Internet Agent from Your Web Browser
Before you can monitor the Linux Internet Agent from your Web browser, you must configure its HTTP port and, if desired, provide a username and password to prevent unauthorized access.
-
In ConsoleOne, right-click the WebAccess Agent object, then click Properties.
-
Click GroupWise > Network Address to display the Network Address page.
-
In the HTTP Port field, enter a port number. We recommend that you use port 9850 if it is not already in use on the Internet Agent's server.
By default, any user who knows the Internet Agent's IP address (or hostname) and the HTTP port number can access the Web console. If you want to restrict Web console access, you can assign a username and password.
-
Click the GroupWise tab, then click Optional Gateway Settings to display the Optional Gateway Settings page.
-
In the HTTP User Name field, enter an arbitrary username (for example, gwia).
-
Click Set Password to assign a password (for example, monitor).
-
Click OK to save your changes.
-
To monitor the Internet Agent from your Web browser, view the Internet Agent Web console by supplying the IP address and port number of the Internet Agent. For example:
http://172.16.5.18:9850
Starting the Linux Internet Agent on System Startup
If you selected Launch Internet Agent on System Startup in the Internet Agent Installation program, the Internet Agent Installation program configured your system so that the Internet Agent would start automatically each time you restart your server. The Internet Agent Installation Program always creates a grpwise-ia startup script in /etc/init.d for starting the Internet Agent. To enable automatic startup, the Internet Agent Installation program also creates symbolic links named S99grpwise-ia in the rc3.d and rc5.d directories so that the Internet Agent can load on startup into runlevel 3 or 5, depending on the configuration of your Linux system.
When the grpwise-ia script runs and starts the Internet Agent, it reads the Internet Agent configuration file (gwia.cfg) in /opt/novell/groupwise/agents/share to check for configuration information provided by startup switches. Because the --show switch cannot be used in the configuration file, the Internet Agent never runs with an agent console interface when started automatically when the server restarts.
Stopping the Linux Internet Agent
When you use the --show startup switch to start the Internet Agent, you can stop it from the agent console.
When you start the Internet Agent with the grpwise-ia script, you can also use the script to stop it.
-
Make sure you are logged in as root.
-
Change to the /etc/init.d directory.
-
To stop the Internet Agent, enter the following command:
./grpwise-ia stop
-
To confirm that the Internet Agent has stopped, enter the following command:
ps -eaf | grep gwia
The only gwia process ID you should see listed is the one for the grep command
When you start the Internet Agent manually (without using the grpwise-ia script), use the standard Linux kill command to stop it.
-
Make sure you are logged in as root.
-
Determine the process ID (PID) of the Internet Agent:
ps -eaf | grep gwia
The PIDs for all gwia processes are listed.
-
Kill the first gwia process in the list:
It might take a few seconds for all gwia processes to terminate.
-
Repeat the ps command to verify that the Internet Agent has stopped.
Starting the Internet Agent on Windows
-
If the domain directory is not on the Internet Agent's server, make sure you are logged in at the server through the user accounts (both Windows and eDirectory) that provide the Internet Agent with access to the domain directory.
-
If the Internet Agent isn't installed as a Windows service, click the Start menu > Programs > GroupWise Internet Agent > GroupWise Internet Agent.
or
If the Internet Agent is installed as a Windows service, open the Services window (from the Control Panel or Administrative Tools), right-click the GWIA service, then click Start.
If you need to stop the Internet Agent and it is running as an application in its own window, click File > Exit. If it is running as a Windows service, open the Services window, right-click the GWIA service, then click Stop.
-
If you enabled the Internet Agent Web console, use the following URL to log into the Web console:
http://internet_agent_network_address:http_port
For example:
http://172.16.5.18:9850
-
Continue with Testing the Internet Agent.
Testing the Internet Agent
After you've started the Internet Agent, you should send a message to ensure that the system is working properly.
To send a message:
-
Open a new mail message in your GroupWise client.
-
In the To field, enter your Internet address using the following syntax:
internet_agent:"user@host"
where internet_agent is the Internet Agent's name. For example:
gwia:"rcollins@novell.com"
-
Send the message and check your mailbox to verify that you receive it.
-
Continue with What's Next.