13.2 Creating GroupWise Accounts for eDirectory Users
Depending on your needs, you can choose from the following methods to create GroupWise accounts for eDirectory users:
-
Creating a Single GroupWise Account: You can create a GroupWise account for a single eDirectory user by editing the GroupWise information on his or her User object. This method lets you create the GroupWise account on any post office, select the GroupWise user ID, and configure optional GroupWise information. It provides the most flexibility in creating a user’s GroupWise account.
-
Creating Multiple GroupWise Accounts: You can create GroupWise accounts for multiple eDirectory users by editing the membership information on a Post Office object. This method allows you to quickly add multiple users to the same post office at one time. However, you cannot select the user’s GroupWise user ID; instead, the user’s eDirectory username is automatically used as his or her GroupWise user ID. In addition, to configure other optional GroupWise information for a user, you need to modify each User object.
-
Using a Template to Create GroupWise Accounts: You can create a template to apply to new eDirectory User objects you create. The template can be configured to automatically assign the user to a post office.
-
Creating GroupWise Accounts by Importing Users: You can import information from ASCII-delimited text files.
13.2.1 Creating a Single GroupWise Account
To create a GroupWise account for an eDirectory user:
-
In ConsoleOne, right-click the User object, then click .
-
Click > to display the Account page.
-
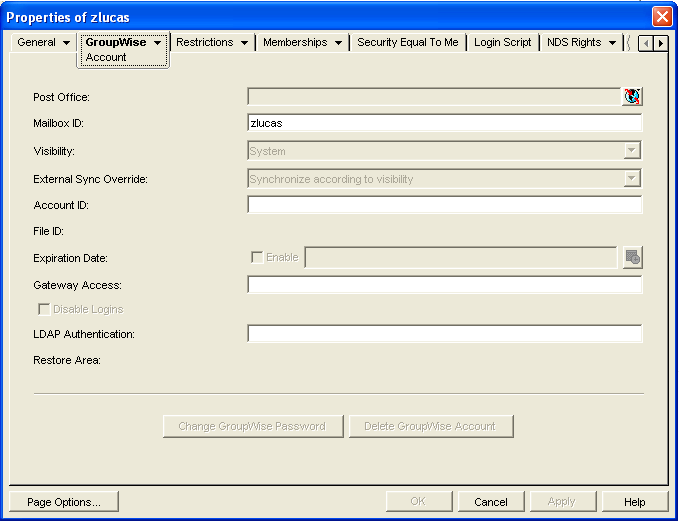
Fill in the following fields:
Post Office: Select the post office where you want the user’s mailbox created.
Mailbox ID: The mailbox ID (also referred to as the GroupWise user ID or username) defaults to the eDirectory username. You can change it if necessary.
Do not use any of the following invalid characters in the mailbox ID:
-
Click to create the account.
You must create the account by clicking (or ) before you can modify any of the other fields, including the GroupWise password.
-
If desired, modify any of the following optional fields:
Visibility: Select the level at which you want the user to be visible in the Address Book. System enables the user to be visible to all users in your GroupWise system. Domain enables the user to be visible to all users in the same domain as the user. Post Office enables the user to be visible to all users on the same post office as the user. Setting the visibility level to means that no users can see the user in the Address Book. However, even if the user is not displayed in the Address Book, other users can send messages to the user by typing the user’s ID (mailbox ID) in a message’s To field.
External Sync Override: This option applies only if your GroupWise system links to and synchronizes with an external system, as described in
Connecting to GroupWise 5.x, 6.x, and 7.x Systems
in the GroupWise 7 Multi-System Administration Guide.Select the setting if you want the user information to be provided to the other system only if the user’s visibility is set to System.
Select the setting if you always want the user information provided to the other system regardless of the user’s visibility level.
Select the setting if you never want the user information provided to the other system.
Account ID: This option applies only if you have a GroupWise gateway that supports accounting. For more information about gateway accounting, see your GroupWise gateway documentation.
File ID: This three-letter ID is randomly generated and is non-editable. It is used for various internal purposes within the GroupWise system, including ensuring that files associated with the user have unique names.
Expiration Date: If you want the user’s GroupWise account to no longer work after a certain date, specify the expiration date. This date applies to the user’s GroupWise account only; it is independent of the eDirectory account expiration date (User object > > ). For more information, see Section 14.10.2, Expiring a GroupWise Account.
Gateway Access: This option applies only if you have GroupWise gateways that support access restrictions. For more information, see your GroupWise gateway documentation.
Disable Logins: Select this option to prevent the user from accessing his or her GroupWise mailbox. For more information, see Section 14.9, Disabling and Enabling GroupWise Accounts.
LDAP Authentication: This option applies only if you are using LDAP to authenticate users to GroupWise, as described in Section 36.3.4, Providing LDAP Authentication for GroupWise Users, and if the LDAP server is not a Novell LDAP server. If this is the case, specify the user’s LDAP authentication ID.
Restore Area: This field applies only if you are using the GroupWise backup and restore features. If so, this field indicates the location where the user’s mailbox is being backed up. For details, see Section 32.0, Restoring GroupWise Databases from Backup.
Change GroupWise Password: Click this option to assign a password to the user’s GroupWise account or change the current password. The user is prompted for this password each time he or she logs in to GroupWise.
To be able to skip this option by setting a default password, see Section 13.1, Establishing a Default Password for All New GroupWise Accounts.
Delete GroupWise Account: Click this option to delete the user’s GroupWise account. This includes the user’s mailbox and all items in the mailbox. The user’s eDirectory account is not affected. For more information, see Section 14.10, Removing GroupWise Accounts
-
Click to save the changes.
-
Click > > to display the user’s current eDirectory information.
This information appears in the GroupWise Address Book, as described in Section 6.0, GroupWise Address Book. If you keep private information in the Description field of the User object, you can prevent this information from appearing the GroupWise Address Book. See Section 6.1.5, Preventing the User Description Field from Displaying in the Address Book.
-
Make sure that the user’s eDirectory information is current, then click OK.
13.2.2 Creating Multiple GroupWise Accounts
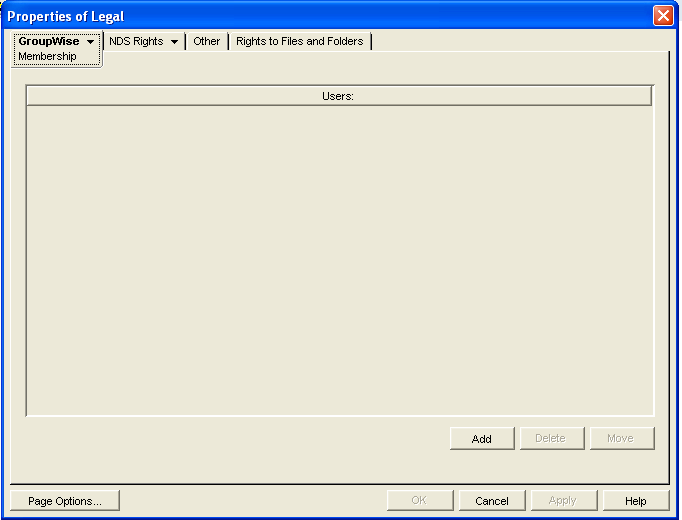
If you have multiple eDirectory users who will have GroupWise accounts on the same post office, you can use the Post Office object’s Membership page to quickly add the users and create their accounts. Each user’s GroupWise user ID will be the same as his or her eDirectory username.
To create GroupWise accounts for multiple eDirectory users:
-
In ConsoleOne, right-click the Post Office object, then click .
-
Click > to display the Membership page.
-
Click , select the eDirectory user you want to add to the post office, then click to add the user to the post office’s membership list.
By default, the user’s eDirectory username is used as the GroupWise ID.
A GroupWise user ID cannot contain any of the following invalid characters:
-
Repeat Step 3 to create additional GroupWise accounts in the post office.

-
When finished, click to save the changes.
13.2.3 Using a Template to Create GroupWise Accounts
If you frequently create new users, you might want to create Template objects with the necessary GroupWise properties. This makes creating a new eDirectory user with GroupWise access a one-step process. However, you cannot use a Template object to give GroupWise properties to existing eDirectory users.
The steps to create a template with GroupWise properties include assigning the post office and setting up directory rights. Because a user can have membership in only one post office, a different template should be created for each existing post office. Further, for each post office, a template can be created for different categories of users, such as secretarial, accounting, administrative, human resources, development, sales, and manufacturing.
After one template has been created with eDirectory properties and post office directory rights, you can use it to quickly create templates for subsequent post offices.
Creating a Template
-
In ConsoleOne, right-click the Organizational Unit object where you want to create the Template object, then click > to display the New Object dialog box.
Templates should be placed in the same organizational unit where they will be used because the browser first lists any templates in the current context. The template also inherits rights from the container the template is created in, further simplifying its setup.
-
In the Class list, select , then click to display the New Template dialog box.
-
Specify a name that describes the purpose for which the template will be used.
-
If you want to base the template on another Template or User object, select , then browse to and select the desired Template or User object.
-
Select .
-
Click to display the properties pages for the Template object.
-
Click > .
-
Fill in the following fields:
Post Office: Select the post office the user will be assigned to.
Visibility: Select the level at which the user will be visible in the Address Book. enables the user to be visible to all users in your GroupWise system. enables the user to be visible to all users in the same domain as the user. enables the user to be visible to all users on the same post office as the user. Setting the visibility level to means that no users can see the user in the Address Book. However, even if the user is not displayed in the Address Book, other users can send messages to the user by typing the user’s ID (mailbox ID) in a message’s To field.
Account ID: This field supports accounting for GroupWise gateways. For more information about gateway accounting, see your gateway documentation.
Expiration Date: Use this to set a date when the user’s account will expire. The user cannot access the account after that date. For more information, see Section 14.10.2, Expiring a GroupWise Account.
Gateway Access: This is used to grant or restrict access to some GroupWise gateways. See your GroupWise gateway documentation to determine if this field applies.
-
Modify information on any of the other tabs to configure the template, then click to save the template changes.
Creating a User Account from a Template
-
In ConsoleOne, right-click the container where you want to create a new eDirectory user, then click > .
-
Specify a Name, Surname, and Unique ID (all three are required).
-
Select , then browse to and select the template you want applied to this user.
-
Modify any of the other options you want.
-
Click to create the user’s eDirectory and GroupWise accounts.
13.2.4 Creating GroupWise Accounts by Importing Users
You can use the GroupWise Import utility to quickly create multiple GroupWise users. The Import utility reads an ASCII-delimited text file created by the GroupWise Export utility or by a third-party export, and creates Novell eDirectory and GroupWise objects with attributes from the file. The Import utility supports most eDirectory classes (including extensions) and GroupWise classes. You can specify the delimiters, eDirectory contexts, and file field positions to use during import.
IMPORTANT:The Import/Export utility is not included on the GroupWise CDs. You can download the Import/Export utility from TID 2960897 in the Novell Support Knowledgebase. To install the Import/Export utility, follow the instructions provided with the download. After you have installed the Import/Export utility, the Import and Export menu items appear under > in ConsoleOne.
NOTE:The Import/Export utility is not available for use on Linux.
Using the Import Utility
In order to import objects into GroupWise, the following conditions must be met:
-
You must create an ASCII-delimited text file by using the GroupWise Export utility or another export utility.
-
The destination context for each eDirectory object must already exist. The GroupWise Import utility supports creating organizational units. If a large portion of a tree needs to be reconstructed to support the objects, you can import organizational units before importing the objects.
To import objects into GroupWise:
-
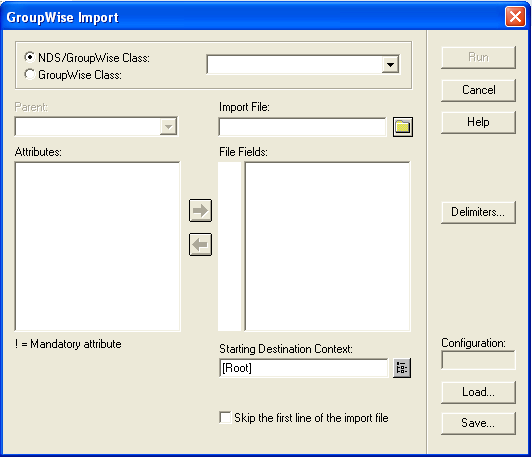
In ConsoleOne, select the eDirectory tree to which the objects will be imported, then click > > to display the GroupWise Import dialog box.
-
If you have previously defined and saved a configuration file, click to fill in the fields from the configuration files, then click to perform the import.
or
Fill in the fields in the Import Dialog box.
NDS/GroupWise Class: Select this option to import objects belonging to an eDirectory class or to a GroupWise-related eDirectory class. Choose the class from the list.
GroupWise Class: Select this option to import objects belonging to a GroupWise class not represented in eDirectory. Choose , , > , or from the list
Parent: If you are importing objects that belong to a GroupWise-related eDirectory class or a GroupWise-only class, the parent attribute is required unless:
-
The class is the eDirectory User class, in which case the object can be optionally associated with GroupWise by specifying a value here.
-
The value is in the import file and is explicitly imported by your positioning the NGW: Post Office attribute in the list box, explained below. In this case, if the value obtained from the file is blank, the field value, if any, is used.
Import File: Specify the full path and file name of the ASCII text file.
Attributes / File Fields: This list displays the attributes of the selected class. Move the attributes to correspond to the fields in the ASCII text file to the list.
Some attributes are marked with an exclamation point (!), indicating that a value for that attribute must exist for a successful import. The import also requires a value for either the object name or distinguished name.
Starting Destination Context: Specify the destination eDirectory context for the objects to be imported. If or is selected as an import field, the value in this field is ignored because both and specify the destination context.
An imported object’s position in the tree can be constructed in a flexible manner using the , , , and class attribute fields and the t field. The following combinations are valid:
Skip the First Line of the Import File: This directs the import to skip the first line if it contains the attribute names.
Delimiters: Accept the defaults shown or change the delimiters to match those used by the export file. For more information, see Delimiters.
-
-
For convenience, save the configuration for later use. See Loading or Saving a Configuration File.
-
Click to perform the import.
An import.log file is created in the same directory as the import file and contains a list of the imported objects.
Loading or Saving a Configuration File
An import or export configuration can be saved and loaded, saving you the trouble of manually filling in the fields for multiple imports or exports. A configuration saved from an export can be loaded for an import, helping ensure that the file field positions, for example, correspond for both the import and export.
Delimiters
Delimiters are used in ASCII text files to separate items that represent fields and records in imported or exported data.
Default delimiters are associated with each delimiter type. A delimiter can be set to , but if so, and the export encounters a condition requiring a delimiter, the export reports an error.
-
Between Fields: This delimiter is placed between each field.
-
Around Each Field: Use this delimiter to indicate the beginning and end of each field.
-
After Each Record: This delimiter is placed at the end of each record.
-
Between Values (Multi-Value Fields): Use this delimiter to separate the values in a multi-valued field. For example, an attribute such as Group Membership can have one or more values. Each Group Membership value is delimited by the multi-value field delimiter.
-
Between Elements (Multi-Element Values): Use this delimiter to separate the elements of a multi-element value. For example, an attribute having the syntax of SYN_OBJECT_ACL has three elements: the protected attribute name, the subject name, and the privileges.
-
Before Literal Characters: When you import an ASCII file created by a third-party export program, precede each literal character that is also a delimiter with the delimiter. If you use the delimiter, you do not need to precede literal characters within the field with the delimiter.
Using the Export Utility
The GroupWise Export utility reads eDirectory and GroupWise object information from GroupWise databases and creates an ASCII-delimited text file containing the object attributes. The Export utility supports most eDirectory classes (including extensions) and GroupWise classes. You can specify the delimiters, eDirectory contexts, and file field positions during export.
IMPORTANT:The Export utility is not included on the GroupWise CDs. You can download the Import/Export utility from TID 2960897 in the Novell Support Knowledgebase. To install the Import/Export utility, follow the instructions provided with the download. The Import/Export utility is not available for use on Linux.
To export objects from GroupWise:
-
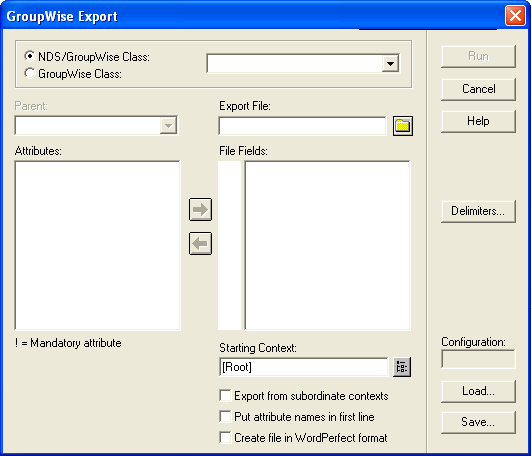
In ConsoleOne, select the eDirectory tree that contains the GroupWise objects you want to export, click > > to display the GroupWise Export dialog box.
-
If you have previously defined and saved a configuration, click to fill in the fields from the configuration file, then click to perform the export.
or
Fill in the fields in the Export dialog box.
NDS/GroupWise Class: Select this option to export objects belonging to an eDirectory class or to a GroupWise-related eDirectory class. Choose the class from the list.
GroupWise Class: Select this option to export objects belonging to a GroupWise class not represented in eDirectory. Choose , , , , or from the list.
Parent: If you are exporting objects that belong to a GroupWise-related eDirectory class or a GroupWise-only class, and that class has a parent attribute, post office, or domain, this field allows you to export objects having only the parent attribute value you specify. The object selection process is still subject to the values in , explained below, and the check box.
Export File: Specify the full path and file name of the ASCII text file.
Attributes / File Fields: This list displays the attributes of the selected class. Move the attributes to correspond to the fields in the ASCII text file to the list.
Some attributes are marked with an exclamation point (!), indicating that a value for that attribute must exist.
Starting Context: Specify the eDirectory context from which to begin the export. If the list box is selected, objects belonging to contexts subordinate to the context specified here is also exported.
Export from Subordinate Contexts: Select this option to cause objects in subordinate contexts to be exported. If this box is left deselected, only those objects in the immediate context are exported.
Put Attribute Names in First Line: Select this option to direct the export to put the attribute names as a comment in the first line of the export file.
Create the File in WordPerfect Office Notebook Format: If you use this option, you might also want to select to permit WordPerfect* to display the attribute names for each merge field.
Delimiters: Accept the defaults shown or change the delimiters. For more information, see Delimiters.
-
Click to perform the export.