2.3 Using Folders to Organize Your Mailbox
Use folders to store and organize your items. For example, you can group all items related to a particular task or subject together.
By default, the items in your mailbox are deleted and archived only when you choose to do so. However, your GroupWise administrator can change this functionality to delete or archive your messages after a given amount of time. To ensure that your items are not deleted, you can archive them manually. For information on how to archive GroupWise items, see Section 16.3, Archiving E-Mail.
2.3.1 Understanding Folder Lists
All folders are subfolders of your Home folder. Click + and - to expand and collapse folders in a Folder List. You can choose to display any of three different kinds of Folder Lists:
Full Folder List
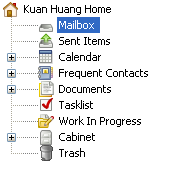
The Full Folder List displays all the folders that you have. The default Full Folder List looks like this:
Figure 2-3 Folder List
For information about the individual folders you might have in your Folder List, see Section 2.3.1, Understanding Folder Lists.
Next to any folder (except for shared folders), the number of unread items is shown in square brackets. Next to the Sent Items folder, the number in square brackets shows how many items are pending to be sent from Caching or Remote mode.
You can organize items in your folders by moving or linking them. When you move an item into a folder, it is taken from one location and placed in another. When you link an item to a folder, the item still exists in its original folder and it also appears in the new folder. When you change a linked item, it is also changed in the other folders. If an item is linked to multiple folders and you delete the original item, the copies in your other folders remain.
You can define a different set of properties for each folder in your Mailbox. For example, you can sort the items in one folder by date, and sort the items in another folder by company.
Simple Folder List
The Simple Folder List is a context-sensitive folder list. It displays the folders that are relative to the folder you are currently in. The following are context-sensitive Simple Folder Lists:
-
Calendar: Displays a list of all calendars. From here you can select to display the contents of a calendar in the main calendar. In addition, you can change the color of a calendar.
-
Contacts: Displays a list of all personal address books. By default, the main Contacts folder is the Frequent Contacts address book.
-
Documents: Displays a list of your document libraries. By default, the main Documents folder is your default document library.
-
NNTP: Displays a list of subscribed groups within the newsgroup.
-
GroupWise Feeds: Displays a list of the RSS feeds you have subscribed to.
-
Favorites: Displayed whenever you are not in the Calendar folder, Contacts folder, Documents folder, or any NNTP folders or RSS feeds. The Favorites Simple Folder List allows you to copy folders into the folder list for quicker access.
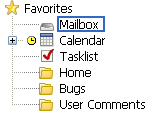
Favorites Folder List
The Favorites Folder List allows you to add your most commonly used folders to the Simple Folder List for quick access. This is helpful when you drag and drop items to your folder list.
Figure 2-4 Simple Folder List
2.3.2 Displaying Folder Lists
Arranging Your Folder Lists
-
Click the Folder List drop-down arrow
 .
.
-
Select one or more Folder Lists: , , or .
-
If you selected more than one type of Folder List, click the Folder List drop-down arrow again, then click .
-
Move the Folder Lists into the order you want them to display, then click .
-
Size the Folder Lists as needed.
Building Your Favorites Folder List
There are two ways to add folders to the Favorites Folder List:
-
Right-click a folder anywhere in your Mailbox, then select .
-
Select multiple folders to add to your Favorites Folder List.
To conveniently select multiple folders:
-
Right-click your Favorites Folder, then click .
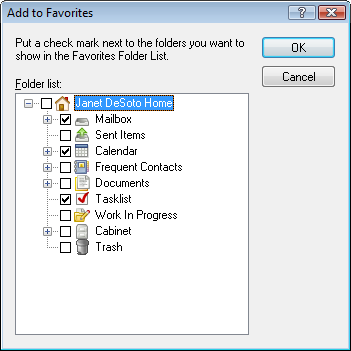
-
Select the folders to add or remove.
-
Click .
Reorganizing Your Folders
-
Click > .

From the Folders dialog box you can create, delete, rename, and move folders.
Alphabetizing a Folder List
-
Right-click your folder.
-
Click .
Closing the Folder List
You can also close your Folder List to leave more room for other views, such as the Calendar, in the Main Window. This is convenient when you access your folders through the Nav Bar. To hide or show the Folder List, click.
If you are not displaying your Folder List and you drag and drop an item to where the folder location is, the Folder List pops out so you can drag and drop the item to the Folder List.
2.3.3 Working with Folders
Creating a New Folder
-
Right-click in the Folder List
-
Select
-
Type a name for New Folder
If you create a folder, then decide you want it in a different position, drag the folder to a new position in the Folder List.
Creating a Specific Folder
-
In the Folder List, click > > .
-
Select folder type from list of options, then click .
-
Type the name and description for the new folder.
-
Click , , , or to position the folder where you want it in the Folder List, then click .
-
Specify the display settings for the folder, then click .
Moving a Folder
-
Drag and drop the folder to the desired location in your folder structure.
See also Reorganizing Your Folders.
Renaming a Folder
-
In the Folder List, right-click the folder, then click .
-
Type a new name for the folder.
You cannot rename the Calendar, Documents, Mailbox, Sent Items, Tasklist, Contacts, Cabinet, Work In Progress, or Trash folders.
Deleting a Folder
-
Right-click the folder you want to delete, then click .
-
Click to confirm the deletion.
You cannot delete the Calendar, Documents, Mailbox, Sent Items, Tasklist, Contacts, Cabinet, Work In Progress, or Trash folders. You can delete the Junk Mail folder only if Junk Mail Handling has been disabled.
To delete a folder that is shared with you, right-click the folder, click , then click .
Deleting Multiple Subfolders at Once
You can delete multiple folders contained within another folder.
-
Open the folder containing the subfolders.
-
In the item list, select the subfolders you want to delete.
-
Right-click the selected folders, then click .
-
Select whether to delete only the items contained in the folders, or the items and the folders, then click .
2.3.4 Managing Item Lists in Folders
Enabling Group Labels for a Folder
Group Labels organize a list of items based on the type of items displayed. For example, in your Mailbox folder, Group Labels separate items based on the received date of the items.
-
Right-click a folder, then click .
-
Click the tab.
-
Select .
-
Click .
To collapse or expand Group Labels, click the + or - sign next to the label.
Enabling Message Previews for a Folder
A message preview shows two lines of the message. You cannot configure the number of lines displayed.
-
Right-click a folder, then click .
-
Click the tab.
-
Select .
-
Click .
Using Columns
The Item List in a folder is divided into columns. Each column displays information about the items in the list. For example, different columns display the subject of items, the date they were sent, and so forth. You can customize the column display for each folder.
Moving a Column
Drag a column to a new position in the column header.
HINT:You can also right-click a column heading, click , click a column name in the box, then click or .
Resizing a Column
Drag the edge of the column heading to make the column wider or narrower.
Adding a Column
-
Right-click the column header.
-
Click a column you want to add.
or
Click .
-
In the list, select one or more columns, then click .
-
Use and to position the new columns relative to the existing columns.
-
Click .
-
Sorting by a Column
-
Click the folder containing the items you want to sort.
-
Click > > .

-
Click the item property you want to sort by in the list box.
-
Click to sort from A to Z.
or
Click to sort from Z to A.
-
Click .
You can also sort the Item List by clicking a column heading. To reverse the sort order, click the column heading a second time.
Removing a Column
Drag the column heading off the column header bar.
Moving or Linking an Item to Another Folder
When you move an item into a folder, it is taken from one location and placed in another. When you link an item to a folder, the item still exists in its original folder and it also appears in the new folder. When you change a linked item, it is also changed in the other folders.
-
Drag an item from the Item List to the folder you want.
Press Alt while you drag the item to remove it from all folders it was previously linked to and place it in only that folder.
Press Ctrl while you drag the item to link it to that folder.
You can also click an item, click > , select the folders you want to move or link the item to, then click or . Select to remove the item from all folders it was previously linked to and place it in the selected folder.
If the item you move is a folder, and a folder with the same name already exists in the new location, a dialog box opens so you can change the name of the folder you are moving.
If you delete the original item, the copies in your other folders remain.
Changing the Item Read Options
You can select to have the folder display either the first unread item or the last item read. However, if the folder contains a large number of items, it could take a while for the contents of the folder to display.
To select the default read option for the folder:
-
Right-click the folder to modify.
-
Click .
-
On the tab, select .
If you deselect , the folder displays the last item read.
-
Click .
2.3.5 Customizing Folder Display Settings
Display settings determine how GroupWise displays the information in a particular folder. For example, the Home folder has a default display setting that includes the Folder List and panels. These settings are saved in the GroupWise database so they follow you from machine to machine. You can select from a list of default preconfigured display settings or customize your own display settings.
Understanding Basic Folder Display Settings
You can view the items in your Mailbox different ways, depending on how you want the information organized.
-
Right-click the folder you want to change the display settings for, then click .
-
Click the tab, then click .
-
Select the display setting from the drop-down list.
You can select from the following settings:
-
Click twice.
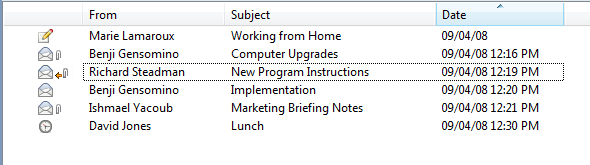
Details
Details displays a list of your items and information about them organized in columns, including , , , , , , , , and many other categories. Details is the default Mailbox view if you have not changed your Mailbox properties. For information about adding or rearranging columns, see Using Columns.
Figure 2-5 Details View
Discussion Threads
Discussion Threads shows the e-mail discussion of an original item and all its replies grouped in hierarchical order. By default, only items that are received are displayed in a discussion thread.
Figure 2-6 Discussion Threads View
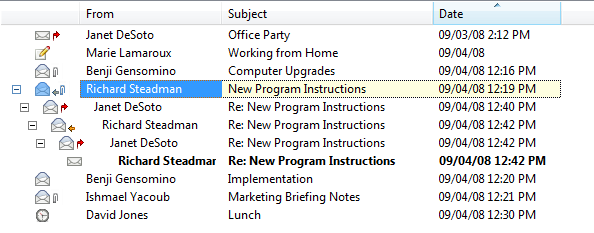
By default, only items that are in the folder are displayed in a discussion thread. You can add other types of items to the folder to be viewed in the discussion thread. For example, sent items can be added to the folder to complete the discussion thread.
To display sent items in a discussion thread:
-
Right-click the folder that is displaying discussion threads, then click .
-
Click the tab, then click .
-
Select under .
-
Click twice, then specify a name for the display setting.
-
Click .
Panels
A panel displays a customized view of information in GroupWise. For example, the default Home view includes an Unread Messages panel, which displays a list of items you have not read. The Tasklist panel is another default panel on the Home view. The Tasklist panel displays items that are in your Tasklist folder.
As Calendar
The As Calendar view displays all scheduled items that are saved in a particular folder. This is useful if you organize all your appointments and other items for a specific project in one folder.
As Tasklist
The As Tasklist view displays a Tasklist area at the top of your Item List, where you can create a Tasklist from items in your Item List. Each item that is dragged to the Tasklist area displays with a check box so that you can mark it completed. You can assign due dates, priorities, and more to Tasklist items. Any items you move to the Tasklist area also display in the Tasklist folder in the Folder List.
For more information about creating a Tasklist, see Section 5.3.1, Assigning a Task.
Changing or Deleting Folder Display Settings
You can control the name that appears in the drop-down list, the source of the items in the folder, the column display, and the order in which items sort in the folder. The display settings are set at the folder level. If you want to use the same display settings for multiple folders, save the display settings, then use that display setting for the other folders.
-
Right-click any folder in the Folder List, then click .
-
Click the tab.
-
Click the display setting you want to modify in the drop-down list.
-
Make any changes to the display settings in the dialog box.
-
Click , change the display settings name as required, then click .
-
To delete a folder display setting, click the display setting, then click .
-
Click .
Saving Your Display Settings
After you have customized your display settings the way you like them, you can save those display settings for future use. The display settings are saved in the GroupWise database so they follow you from machine to machine.
-
Click > > .
Selecting Saved Display Settings for a Folder
You can select from a variety of default display settings from previously saved display settings.
-
Right-click the folder to change the display settings for, then click .
-
Click the tab.
-
In the drop-down list, select the name of the display setting.
-
(Optional) Type a description of the folder.
-
Set the remaining settings as desired.
-
Click .
Sending a Display Setting
You can send a display setting as an attachment to e-mail recipients. If the recipient is a GroupWise user, he or she can then import the setting and select it from a list of available display settings. This is helpful, for example, when you want your entire company to have the same layout for the Home folder.
The display settings are sent as an attachment with the file format of .gws.
-
Select the folder that you want to send the display settings for.
-
Click > >
An e-mail message appears with the settings as an attachment.
-
In the box, type a username, then press Enter. Repeat for additional users. If necessary, type usernames in the and boxes.
or
To select usernames from a list, click on the toolbar, double-click each user, then click .
-
To change the From name (to another account or proxy), click then click a name.
-
Type a subject.
-
Type a message.
You can specify many options, such as making this message a high priority, requesting a reply from the recipients, and more, by clicking the tab.
-
Click on the toolbar.
Importing a Display Setting
You can import a GroupWise display setting from another GroupWise system, even if you are not on the same system. This is helpful, for example, when you want your entire company to have the same layout for the Home folder.
You must have a message that contains an attachment with the file format of .gws.
-
In a message that contains a GroupWise display settings attachment, right-click the attachment in the attachment window.
-
Click .
The display setting is added to your list of available display settings. For information on how to select a display setting, see Selecting Saved Display Settings for a Folder.
2.3.6 Understanding Find Results Folders
A Find Results folder is a folder that displays the results of a query. When the folder is opened, GroupWise examines the search criteria defined for the folder, searches for everything specified, then displays everything it finds in the Item List. You can act on items in a Find Results folder the same way you act on items in any folder, such as opening, forwarding, printing, copying, moving, or deleting them. The original item remains stored in the folder where the search found it and is also acted on. This means that if you move or delete an item from a Find Results folder, the item is deleted from the Item List, and from the original location.
You can see the folder where each item originated if you open a Find Results folder and look at the columns of information displayed in the Item List. The Folder column lists where each item is actually stored.
You can create your own Find Results folders and define the search criteria you want, such as all items from a particular address or all items with a certain word in the Subject line.
Creating a Find Results Folder
-
In the Folder List, click > > .
-
Click .
-
To create a Find Results folder with your own search criteria, click , then click .
or
To create a Find Results folder based on Find By Example, click , then click .
or
If you want to use a predefined Find Results folder as a template for creating a custom folder, click , select the predefined folder you want to base your folder on (for example, Sent Items), select , then click .
-
Type the name and the description for your folder.
-
Click , , , or to position the folder where you want it in the Folder List, then click .
-
Specify the search criteria, find by example criteria, or information for items you want to find.
-
If you don’t want the folder to update results each time you open it, deselect .
-
Click .
-
Specify any display settings you want for this folder, then click .
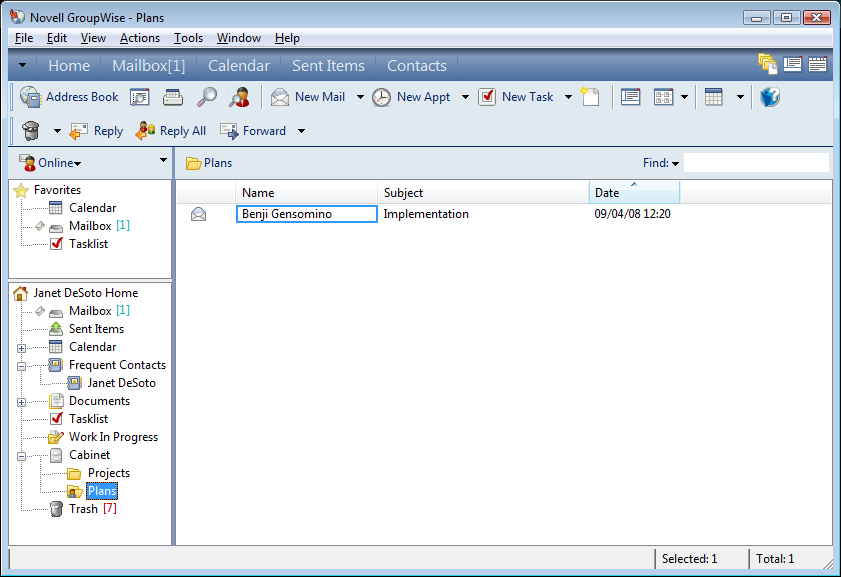
2.3.7 Using Shared Folders
Understanding Shared Folders
A shared folder is like any other folder in your Cabinet, except other people have access to it and it appears in their Cabinets. You can create shared folders or share existing personal folders in your Cabinet. You choose whom to share the folder with, and what rights to grant each user. Then, users can post messages to the shared folder, drag existing items into the folder, and create discussion threads. You cannot share system folders, which include the Calendar, Documents, Mailbox, Sent Items, Tasklist, Contacts, Cabinet, Work In Progress, Junk Mail, and Trash folders.
Figure 2-7 Shared Folder View
If you place a document in a shared folder, people with rights to the shared folder don’t automatically have rights to edit the document. Before they can edit the document, you must give them Edit rights on the tab.
You can share personal folders with other users. Recipients of the shared folder receive a notification explaining that you have shared the folder with them. They can then accept the folder or decline the folder.
In Remote and Caching modes, changes in shared folders are updated whenever you connect to the master GroupWise system.
Sharing an Existing Folder with Other Users
-
In the Folder List, right-click the folder you want to share, then click .
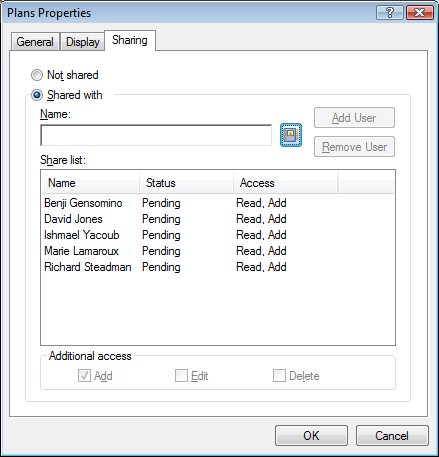
-
Click .
-
In the field, start typing the name of a user, or click the button to select the user from the dialog box.
-
When the user’s name appears in the field, click to move the user into the.
-
Click the user’s name in the .
-
Select the access options you want for the user.
-
Repeat Step 3 through Step 6 for each user you want to share the folder with.
-
Click .
If you want the folder to have a specific function, you can create a new display setting. For example, if the folder is for shared discussions, you should create a setting that views items by reply thread and contains both sent and received items. Right-click the folder, click , then click .
Creating a Shared Folder
-
In the Folder List, click > > .
-
Select , then click .
-
Type a name and description for the new folder.
-
Click , , , or to position the folder where you want it in the Folder List, then click .
-
In the field, start typing the name of the user.
-
When the user’s name appears in the field, click to move the user into the List.
-
Click the user’s name in the List.
-
Select the access options you want for the user.
-
Repeat Step 5 through Step 8 for each user you want to share the folder with.
-
Click .
-
Specify the display settings you want for the folder.
-
When you’re done, click .
For more information about shared folders, see Using Shared Folders.
Accepting Shared Folders
-
Click the Shared Folder Notification in your Mailbox.
A screen appears, showing the name of the folder you have been granted rights to and the type of rights you have been given.
-
Click.
-
The name of the folder is filled in by default. Make any desired changes to the name.
-
Use the Up, Down, Left, and buttons to select the folder’s location.
-
Click .
Posting an Item to a Shared Folder
-
Click the shared folder in your Folder List to open it.
-
Click > > .
If you want to post a different type of item, such as a task, click > , then click an item type.
-
Type a subject.
-
Type your message.
-
Click to attach files.
-
Click on the toolbar.
To reply to an existing item in a shared folder, open the item, click , select a reply option, then click . See Replying to an E-Mail in a Shared Folder for more information.
Viewing Discussion Threads in a Shared Folder
-
In a shared folder, click > > .
-
To expand or collapse a discussion thread, click the and next to the original discussion item.
-
To scroll through different discussions, press Ctrl+Left-arrow or Ctrl+Right-arrow.