4.2 Using the Provisioning Request Definition Editor
The provisioning request definition editor allows you to create provisioning request definitions that bind corporate resources or roles to a workflow. The provisioning request definition editor includes the following tools:
-
Overview tab: Used to define the basic characteristics of the provisioning request.
-
Workflow tab: Used to define the associated workflow by configuring activities and flow paths.
-
Form tab: Used to define the request and approval forms that the user interacts with in the tabs.
-
Signature Declarations tab: Used to define the Digital Signature declarations.
For provisioning request definitions that are not based on roles, you can use a provisioning request template to create your definitions. The templates model some common workflow design patterns. However, if you want complete control over the behavior of your workflows, you can create your own custom provisioning request definitions.
-
Section 4.2.2, Starting the Provisioning Request Definition Editor
-
Section 4.2.3, Creating a Provisioning Request Definition Using a Template
-
Section 4.2.4, Creating a Custom Provisioning Request Definition
-
Section 4.2.5, Creating a Roles Based Provisioning Request Definition
-
Section 4.2.6, Using the Overview Tab to Modify Basic Settings
4.2.1 Creating a Provisioning Request Definition
This section describes how to create both provisioning requests that are based on roles and provisioning requests that are not based on roles by using the following methods:
-
From a template (not supported for roles based provisioning request definitions).
-
From a copy of an existing provisioning request definition.
-
As a custom provisioning request definition.
When possible, you should use a template or a copy of an existing definition because it saves you time, and allows you to make targeted changes to an existing provisioning request definition. However, if no existing provisioning request definition resembles new work that you want to do, you can create a custom provisioning request.
The following table describes the steps for defining a provisioning request.
Table 4-1 Basic Steps for Defining a Provisioning Request
|
Task |
Action |
For More Information |
|---|---|---|
|
1 |
Create a provisioning request definition. |
Depending on what you want to create, see: |
|
2 |
Create the request and approval forms. HINT:Creating the forms before the workflow, simplifies the process of mapping the form fields to the application data. |
See Section 5.0, Creating Forms for a Provisioning Request Definition |
|
3 |
Create the workflow diagram by adding activities to the workflow diagram and connecting them with flow paths. |
See Section 6.0, Creating the Workflow for a Provisioning Request Definition |
|
4 |
Configure the activities and flow paths by specifying the properties, data item mappings, and e-mail notification settings for the activities. Then define the semantics for the flow paths. |
4.2.2 Starting the Provisioning Request Definition Editor
-
Open the Provisioning view and double-click the node.
Designer displays the provisioning request definitions tree containing nodes for the default provisioning definition request definition categories of and .
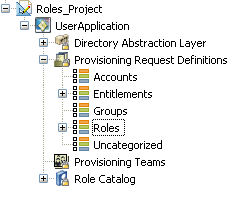
These default categories are defined by the directory abstraction layer Provisioning Category list. For information on managing categories, see Section 3.3, Working with Lists.
The installed templates are available in the Entitlements node, and the default role provisioning request definitions are available in the Roles node.
-
Use the Provisioning view pane to navigate the provisioning request definition categories. The right-mouse menu is available from the top-level node or when you select an existing provisioning request definition. You cannot create a provisioning request definition by selecting a category node.
-
Double-click a provisioning request definition to open it in the editor in the right pane.
Provisioning request definitions are stored locally in the Provisioning\AppConfig\ RequestDefs directory within your workspace.
4.2.3 Creating a Provisioning Request Definition Using a Template
-
Launch the Create A New PRD wizard in one of these ways:
-
From the Provisioning view, right-click the node and choose .
-
From the Provisioning view, click a User Application or provisioning request container, then select .
-
Select .
-
Choose , then click .
The first page of the is displayed.

-
-
Fill in the fields as follows:
-
Click . The next page of the wizard is displayed.
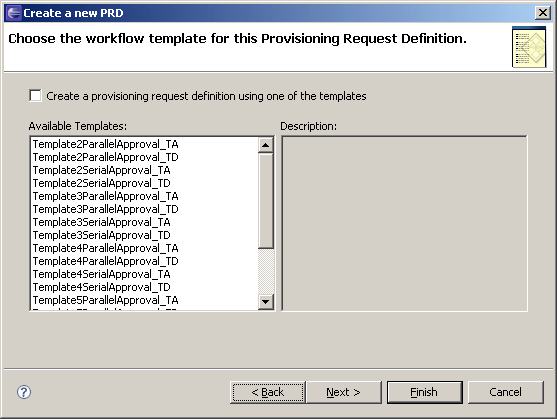
-
Select , then select the desired template (for example, TemplateSingleApproval_TA) from the list, then click .
You use the next panel of the wizard to specify the provisioning request definition’s category and trustees (the users, groups, or containers) who can access the provisioning request definition after it is deployed.
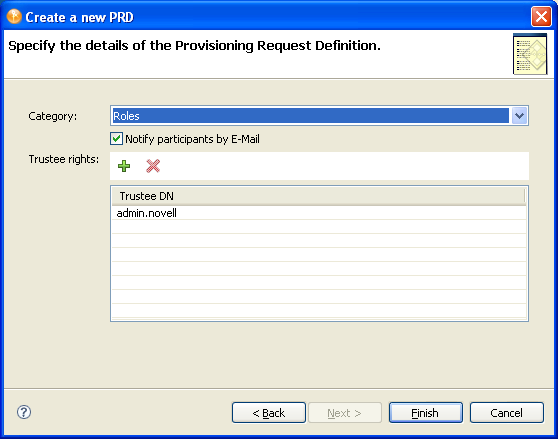
-
Select a category from the list.
-
Select if you want approvers to be notified by e-mail about pending approval tasks, and also want initiators to be notified by e-mail of workflow completion. If is not selected, users must look at the tab in the User Application for notifications about tasks.
-
Click the plus (+) icon to add a trustee.
Designer displays a panel that allows you to browse the Identity Vault to select a trustee. You can select a user, group, or container. If you cannot connect to the Identity Vault, you can type trustee DNs directly in the field.
-
Select the trustee, then click .
Designer returns you to the previous panel. If desired, add additional trustees by repeating the previous step.
-
When you have finished adding trustees, click .
Designer displays the Provisioning Request Definition Details panel on the tab (see Section 4.2.6, Using the Overview Tab to Modify Basic Settings).
-
Click the tab. The Workflow view is displayed.
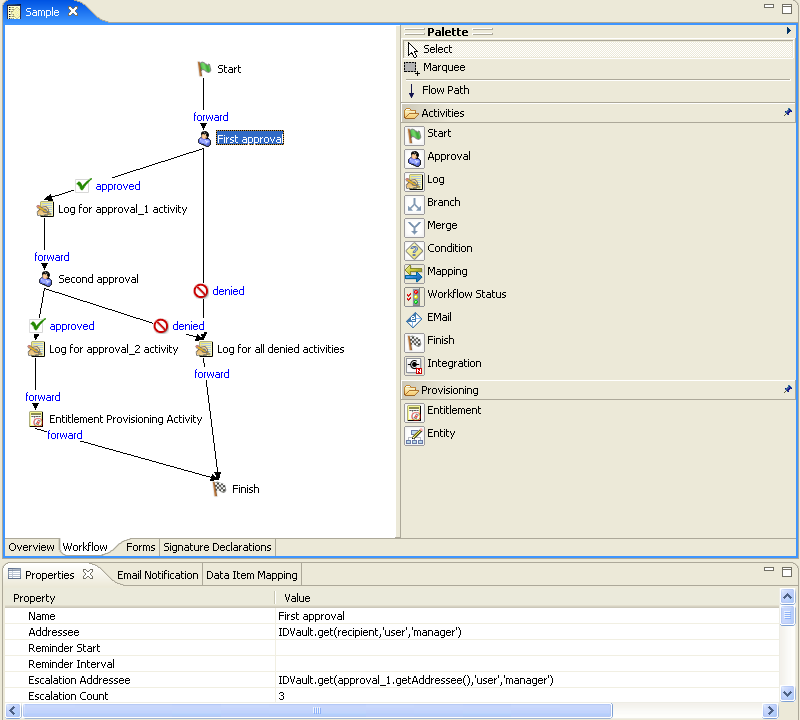
The provisioning request definition template includes some default values that you must customize for your environment. For example, the Entitlement Provisioning Activity contains placeholder values for several data item mapping properties. You need to replace the placeholder values with the actual values for your provisioning request.
-
Click the Entitlement Provisioning activity, then click the tab.
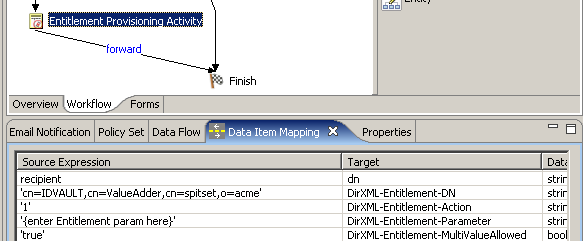
-
Double-click in the field to display the target field, then click the button that appears in the field to display the ECMA expression builder.
See Section 9.0, Working with ECMA Expressions for information about the ECMA expression builder.
-
Use the ECMA expression builder to replace the placeholder expression with an expression that specifies the entitlement that you want to provision with this provisioning request.
-
Replace the placeholder expression in the field for the .
-
Click the tab and customize the forms for the provisioning request to meet your needs.
See Section 5.0, Creating Forms for a Provisioning Request Definition.The template includes predefined request and approval forms. You might want to add additional forms, or add or remove form controls.
-
Click the tab and customize the properties of the workflow to your needs.
See Section 6.0, Creating the Workflow for a Provisioning Request Definition and Section 7.0, Workflow Activity Reference.
For more information about the preconfigured templates, see the following:
About the Installed Templates
Identity Manager ships with a set of preconfigured provisioning request definitions and workflows. You can use these as templates for building your own provisioning system. To set up your system, you define new objects based on the installed templates and customize these objects to suit the needs of your organization.
The installed templates let you determine the number of approval steps required for the request to be fulfilled. You can configure a provisioning request to require from zero to five approval steps.
You can also specify whether you want to support sequential or parallel processing, and whether you want to approve or deny the request in the event that the workflow times out during the course of processing.
The following table lists the templates included with Identity Manager.
Table 4-2 Preconfigured Provisioning Request Definitions and Workflows
About the Installed Templates and Flow Strategy
By default, provisioning request definition templates use the flow strategy. The templates assume the recipient is a user DN. If you change the flow strategy, you must modify the template. If you change the flow strategy to:
-
: Remove the recipient reference from the request form.
-
: Remove the recipient from the request form and add logic to determine the addressee for the approval activity. The templates assume the recipient is a user DN, so you must determine if the recipient is a user or group DN. You can use the IDVault isGroup(String dn) method to determine if the DN is a group. If the recipient is a group DN, you must provide logic for assigning the approval activity addressee.
4.2.4 Creating a Custom Provisioning Request Definition
If no existing provisioning request definition resembles the new work that you want to do, then you need to build a custom provisioning request definition.You can still save time and effort by re-using forms from other workflows.
NOTE:The procedure in this section does not use roles. To create a custom roles based provisioning request definition, see Section 4.2.5, Creating a Roles Based Provisioning Request Definition
-
Create the basic information for a new provisioning request definition (see Section 4.2.3, Creating a Provisioning Request Definition Using a Template). In step Step 4, do not select , and do not select a template. When you are finished, the tab for the new provisioning request is displayed.
-
Create the forms for the provisioning request definition. Defining forms before you create the workflow topology ensures that data bindings can be set up automatically for each activity when you create activities.
To create the forms, see Section 5.3, Creating Forms.
-
Click the tab and create the workflow topology.
You create the topology of a workflow by creating and linking activities into the desired workflow pattern, and by assigning rules to the flowpaths between activities. For information about creating a workflow topology, see Section 6.0, Creating the Workflow for a Provisioning Request Definition.
-
Specify the details (properties, data item mappings, e-mail notification) for each workflow activity.
To specify workflow activity details, see Section 7.0, Workflow Activity Reference.
-
Configure the flowpaths between workflow activities.
To configure flowpaths, see Section 6.4, Configuring Flow Paths.
4.2.5 Creating a Roles Based Provisioning Request Definition
Designer supplies two Roles Based provisioning request definitions which you should use as a basis for your custom roles based provisioning request definitions. They are:
-
Role Approval
-
SoD Conflict Approval
To create a copy and customize its contents:
-
From the Provisioning view, open in the node.
-
Select one of the roles-based provisioning request definition (depending on which type of approval you want to create), right-mouse, then select
-
: Choose this for role requests.
-
: Choose this for SoD conflict approval requests.
Designer displays the Wizard.
-
-
Fill in the fields as follows:
-
Click . Designer displays the following dialog box.
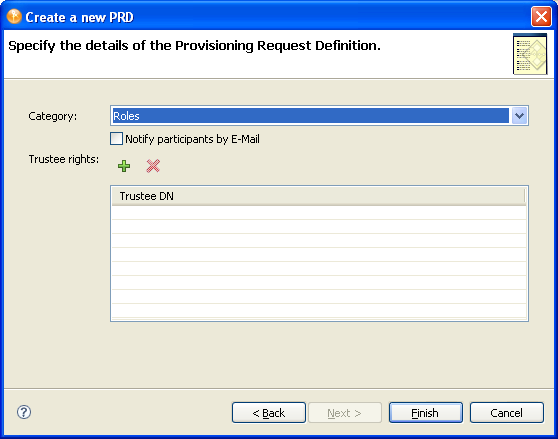
-
Specify for the category.
-
Select if you want approvers to be notified by e-mail about pending approval tasks, and also want initiators to be notified by e-mail of workflow completion. If is not selected, users must look at the tab in the User Application for notifications about tasks.
-
(Optional) Click the plus (+) icon to add a trustee.
Designer displays a panel that allows you to browse the Identity Vault to select a trustee. You can select an individual trustee or a group.If you cannot connect to the Identity Vault, you can type trustee DNs directly in the field.
-
(Optional) Select the trustee, then click .
Designer returns you to the previous panel. Add additional trustees by repeating the previous step.
-
Click .
Designer displays the Provisioning Request Definition Details panel on the tab (see Section 4.2.6, Using the Overview Tab to Modify Basic Settings).
For more details on defining the associated workflow, see Section 6.6, Guidelines for Creating Roles Based Workflows.
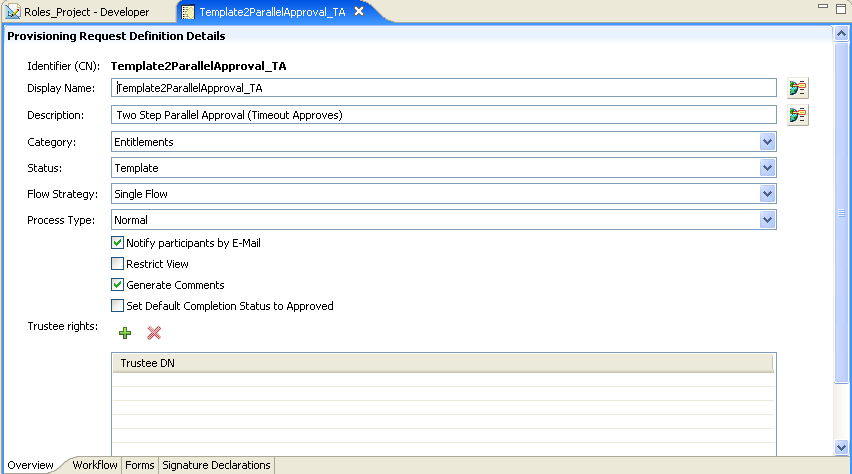
4.2.6 Using the Overview Tab to Modify Basic Settings
You use the tab to define the basic information about the provisioning request definition (for example, the name of the provisioning request definition, the category to which it belongs, and who can access it).
Figure 4-1 Overview Tab

The following table describes each property that you can configure on the tab.
Table 4-3 Overview Properties
|
Field |
Description |
|---|---|
|
|
Displays the CN (common name) of the provisioning request definition. The CN cannot be changed. |
|
|
Specifies the display name of the provisioning request definition. This is the name that is displayed to the user in Designer and Identity Manager. |
|
|
Specifies the description of the provisioning request definition. |
|
|
Specifies the category to which the provisioning request definition belongs from the list of Provisioning Categories defined in the directory abstraction layer. The Provisioning view displays the provisioning request definitions by categories. |
|
|
Specifies the status of the provisioning request definition: Active: Select this option to make the provisioning request definition available for use in the User Application. Inactive: Select this option to make the provisioning request definition temporarily unavailable for use in the User Application. You can use this option when you want keep the roles of the person who develops the provisioning request definition separate from the person who activates the provisioning request definition. For example, a developer could be responsible for marking the provisioning request definition as Inactive, and an administrator could be responsible for changing the status to Active. Template: Select this option if you want to use this provisioning request definition as the basis for other provisioning request definitions. Templates are not available for use in the User Application. Retired: Select this option to mark the provisioning request definition as permanently unavailable for use in the User Application (you can still change the status of the provisioning request definition at any time). This status provides a way of keeping a historical record of a provisioning request definition that is no longer in use. |
|
|
Specifies the flow strategy for the provisioning request definition: Single Flow: This strategy allows one workflow with one recipient. Flow per member: This strategy allows the recipient to be a group DN. If you select this strategy, the User Application starts a workflow instance for each member of the group, and each workflow can be approved or denied separately. For example, assume there is a provisioning request definition for the recipient Human Resources. The Human Resource group has the members ablake and kchester. The User Application passes the Human Resources DN to the provisioning start. The provisioning interface starts two workflow instances, one for ablake and one for kchester. Single Flow Provision Members: This strategy allows the recipient to be a group DN. If you select this strategy, the User Application starts a single workflow for the group. The workflow spawns multiple provisioning steps (one for each member) within the single workflow. The workflow is approved or denied to the group as a whole, not for each individual member. |
|
|
Specifies the type of provisioning request definition. Values are: Normal: Used for typical workflow definitions that are not related to roles. Role Based Access Control: Specify this type if the workflow is used for roles approvals. When this is set, the workflow is available to the Roles Configuration editor and the SoD Editor. It ensures that the NrfRequest object data item is available in the data item mapping. Role Based Access Control Separation of Duties: Specify this type if the workflow is used for separation of duties constraints exceptions approvals. WARNING:If you change the process type from or to , you must also remove any ECMA expressions related to the NrfRequest object. ECMA expressions related to the NrfRequest object are only valid in role based workflows. Including these expressions in non-roles related workflows cause runtime errors in the User Application. |
|
|
Specifies whether approvers are notified by e-mail about pending approval tasks, and whether initiators are notified by e-mail of workflow completion. If is not selected, then users must look at the tab in the User Application for notifications about tasks. For information about selecting an e-mail template and customizing e-mail template parameters, see Section 7.11, Finish Activity. |
|
|
Specifies that the list of tasks that can be viewed by the user in My Requests in the User Application is restricted to tasks initiated by the user. The default behavior (that is, is not selected) is that the user can see any requests that the user initiated or for which the user is the recipient. |
|
|
Specifies that the workflow engine should generate comments as the workflow progresses. These comments can be displayed by clicking the following:
|
|
|
Specifies that the default completion status of the provisioning request is approved if selected, or denied if not selected. This feature can be useful for provisioning requests that do not contain a provisioning activity (an Entitlement or Entity). The value of this parameter can be overridden by explicitly setting the completion status by using a Provisioning activity or Workflow Status activity. |
|
|
Specifies the users and groups that can use the provisioning request definition. |
You can set these access the properties available on the Overview panel for one or more provisioning request definitions.
-
With the Provisioning view open, select one or more provisioning request definitions, right-click, then select . The following window displays.

-
Modify a property for all of the selected provisioning request definitions by changing the value for that property.
If one of the properties does not contain a value, the corresponding field is blank. If you modify that field, then the value you specify is applied to all of the selected provisioning request definitions.
-
For Trustees, delete, add, or merge the values for the selected provisioning request definitions.
A merge adds all of the trustees in the selected provisioning request definitions to all of the selected provisioning request definitions.
-
Click to save your changes.