3.2 Customizing eDirectory Access for Users
During installation of your Messenger system and agents, you chose between direct access and LDAP access to eDirectory, as described in Installing a Novell Messenger System
in the Novell Messenger 2.1 Installation Guide.
Figure 3-2 Directory Access Page in the Messenger Installation Program

The access method chosen during installation applies initially to how the Messenger agents access eDirectory to obtain their configuration information. If you want to change this method, see Changing the eDirectory Access Method for Starting the Messaging Agent
With no further configuration, the Messaging Agent also accesses eDirectory on behalf of users by using the access method chosen during installation. The Messaging Agent accesses eDirectory for users whenever they:
-
Start the Messenger client and authenticate to the Messenger system
-
Search for users to add to their contact lists
-
Display user information about contacts in their contact lists
-
Save Messenger client settings
The following tasks help you customize eDirectory access for Messenger users:
3.2.1 Providing LDAP Access to eDirectory for Messenger Users
To customize LDAP access for Messenger users, you create an LDAP profile where you provide information about the LDAP servers that are available in your system. You need only one LDAP profile for your Messenger system, no matter how many LDAP servers you have.
If you have already configured your default scope profile, as explained in Editing the Default Scope Profile to Include Additional eDirectory Users, you can continue to use the default scope information, while providing additional LDAP configuration information in the LDAP profile. However, the LDAP profile allows you to provide scope information in a more detailed, LDAP-specific manner. As you set up the LDAP profile, you can decide which source of scope information you want to use for your Messenger system.
To set up an LDAP profile, complete the following tasks:
Creating an LDAP Profile
-
In ConsoleOne, browse to and expand the Messenger Service object.
-
Right-click the object, then click > .

-
Select , then click .

-
Specify a descriptive name for the LDAP Profile object, select , then click .
-
Continue with Configuring the LDAP Profile.
Configuring the LDAP Profile
The LDAP profile has a tab, where you identify the scope, query settings, and LDAP user information.
Figure 3-3 LDAP Profile General Page
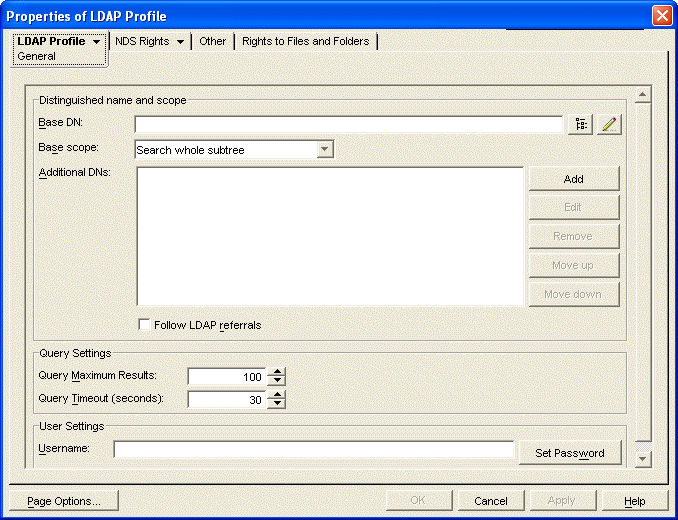
-
On the tab, fill in the following fields if you want to use the LDAP profile, rather than a scope profile, to define the scope of your Messenger system:
Base DN: Browse to and select the container object in eDirectory where the majority of User objects are located. Your selection is displayed in the field as the distinguished name (DN) of the container object. For example, OU=users,O=corporate.
Base scope: Select the scope you want searched for User objects:
-
Search whole subtreee
-
Search base DN and one level below
-
Only search base DN
Searching only the base DN provides the fastest results. Searching the whole subtree provides the most thorough search. The base scope you select depends on where User objects are located in your eDirectory tree.
Additional DNs: If your eDirectory tree includes User objects that are located outside of the base DN, list other DNs as needed. The additional DNs are searched in the order listed.
Follow LDAP referrals: Select this option if you want to take advantage of the LDAP referral feature. The eDirectory replica that an LDAP server accesses might or might not contain all the contexts that exist in the eDirectory tree. If the LDAP server does not find any results in the contexts available in its eDirectory replica, it can refer the query to another LDAP server that accesses a different eDirectory replica, where additional contexts might be available for searching and where results might be obtained.
Selecting this option might add to the search time but might produce better results. Do not select this feature if you do not want the Messaging agent to be referred to possibly unknown LDAP servers.
IMPORTANT:If you previously associated a scope profile with your Messenger system, you must remove it in order for the scope information provided in these fields to take effect. Right-click the Messenger Service object, then click . On the tab, clear the contents of the field, then click to save the change. Also check for and remove any scope profiles associated with policies or individual users that you want to use the LDAP profile.
-
-
On the tab, fill in the following fields to control how you want information returned when users search for other Messenger users to add to their contact lists in the Messenger client:
Query Maximum Results: Specify the maximum number of users you want returned to the Messenger client when users search for other users to add to their contact lists. The default is 100.
Query Timeout: Specify in seconds the maximum amount of time you want a search for Messenger users to take. If no users are found within the allotted time, the Messenger user receives no results from the search. The default is 30 seconds.
-
On the tab, fill in the following fields to provide LDAP server login information if you want the Messaging Agent to log in differently on behalf of Messenger users than it does when logging in to obtain its configuration information:
Username: Specify the LDAP username that the Messaging Agent can use to access the LDAP server (for example, CN=Admin,OU=Users,O=Corporate). The Messaging Agent needs to log in with Read, Write, and Browse rights to all User objects. This user must be added as a trustee to the eDirectory Tree object (or to the top organizational container that holds your Messenger system and users). Steps for this are provided later in this procedure.
Set Password: Click , type the password for the LDAP username twice for verification, then click .
-
Click to save the general LDAP settings.
-
Click > to display the Connections page.

-
Fill in the following fields to configure how the Messaging Agent connects to LDAP servers:
Default Connections: Specify the minimum number of connections that the Messaging Agent can establish with each LDAP server on startup and maintain even when the connections are idle. The default is 10.
Do not set the default number of connections greater than the number of client/server threads defined for the Messaging Agent on the Performance page of the Messaging Agent object. This results in open connections that could never be serviced by the Messaging Agent.
Idle connections occupy memory, but using an existing connection is faster than creating a new connection. The default number of connections is always kept open, even if they are idle.
Idle Timeout: Specify in seconds how long a connection between the Messaging Agent and an LDAP server should remain open if it is idle and there are more than the minimum number of connections open. The default is 30 seconds. Increase the idle timeout to maintain more open connections. Decrease the idle timeout to conserve memory.
Maximum Connections: Specify the maximum number of connections that can exist between the Messaging Agent and each LDAP server. The default is 30.
Below the fields, the defines which LDAP servers you want the Messaging Agent to be able to connect to.
Connections List: The LDAP servers that you add to the connections list form a pool of LDAP servers. When the Messenger client tries to connect to the Messenger system, if the first LDAP server it contacts isn’t responding, the Messenger client automatically tries another LDAP server in the pool until it is able to connect.
-
Click to provide information about an LDAP server.

-
Fill in the following fields:
IP Address or DNS Hostname: Specify the IP address or DNS hostname of the LDAP server.
Port: Specify the port number on which the LDAP server listens for service requests. The typical port number for non-SSL connections is 389. The typical port number for SSL connections is 636.
Preference: Assign the LDAP server a preference (or priority) of 0, 1, or 2. The Messaging Agent attempts to contact all priority 0 LDAP servers before contacting priority 1 LDAP servers and all priority 1 LDAP servers before any priority 2 LDAP servers.
IMPORTANT:For best performance, do not define more than one priority 0 LDAP server.
SSL Enabled: Select if the LDAP server uses SSL encryption.
Root Certificate: Specify the full path to the root certificate on the LDAP server. Typically, the root certificate is named rootcert.der. On a NetWare server, it is located in sys:\public. On a Windows server, it is exported to a user-specified location after installation of eDirectory for Windows.
If you do not specify a root certificate, your LDAP server must be configured to accept clear text passwords in order for you to enable SSL encryption without a root certificate.
-
Click to save the information for the LDAP server.
-
Repeat Step 7 through Step 9 for each LDAP server that you want to use to provide eDirectory access.
When you specify multiple LDAP servers, they form a pool of available LDAP servers that the Messaging Agent contacts in a round-robin fashion. This provides very reliable eDirectory access for Messenger users.
-
Click to save the LDAP profile.
-
Continue with Assigning the LDAP Profile to Your Messenger System.
Corresponding Startup Switches: You can also use the /dirquerymaxresults, /dirdefaultconnections, /diridletimeout, and /dirmaxconnections startup switches in the Messaging Agent startup file to configure how the Messaging Agent interacts with LDAP servers. In addition, if you have multiple LDAP servers, you can use the /dirpoolresettime startup switch to specify the number of minutes between the time when the Messaging Agent receives an error response from a pooled LDAP server and the time when that LDAP server is reinstated into the pool of available LDAP servers. You can use the /ldapuser and /ldappwd startup switches to override the information provided for the /user and /password startup switches during installation.
Assigning the LDAP Profile to Your Messenger System
The LDAP profile is not in effect until you have selected it on the General page of the Messenger system object.
-
Right-click the Messenger Service object, then click .

-
In the field, browse to and select the LDAP profile you just created.
-
If you provided scope information for the LDAP profile in Step 1 in Configuring the LDAP Profile, make sure that the Scope Profile field is empty.
Also check for and remove any scope profiles associated with policies or individual users that you want to use the LDAP profile.
-
Click to save the LDAP profile information for your Messenger system.
-
Continue with Assigning Required Rights for eDirectory Access
Assigning Required Rights for eDirectory Access
If the user you specified in Step 3 in Configuring the LDAP Profile does not have adequate rights, the Messaging Agent cannot access eDirectory successfully. Without sufficient rights to the Messenger Service object, the Messaging Agent cannot access its configuration information on the Messaging Agent object in eDirectory. Without sufficient rights to User objects, the Messaging Agent cannot access users' contact lists, Messenger client settings, and other user-specific information.
Assigning Trustee Rights to Access Agent Objects
-
Right-click the Messenger Service object, then click .
-
Click > .
-
Click .
-
Browse to and select the user you specified in Step 3 in Configuring the LDAP Profile.

-
Set the following trustee rights:
-
Select , select , then select .
-
Select , select , , and , then select .
-
Click to add the user, with the assigned trustee rights, to the list of trustees.
-
-
Click to save the updated list of trustees for the Messenger Service object.
-
Continue with Assigning Trustee Rights to Access User Objects
Assigning Trustee Rights to Access User Objects
-
Right-click the eDirectory Tree object (or the top organizational container that holds User objects), then click .
-
On the Trustees of This Object page, click .
-
Browse to and select the user you specified in Step 3 in Configuring the LDAP Profile.
![Trustee Rights dialog box for the [Root] object](../graphics/usr_trusteerightsuser_a.gif "Trustee Rights dialog box for the [Root] object")
-
Set the following trustee rights:
-
Select , select , then select .
-
Select , select and , then select .
-
Click , select , then select one of the following properties:
-
nnmBlocking
-
nnmBlockingAllowList
-
nnmBlockingDenyList
-
nnmClientSettings
-
nnmContactList
-
nnmCustomStatusList
-
nnmLastLogin
Properties that start with lowercase letters sort after all properties that start with uppercase letters.
-
-
Click to add the selected property to the property list.
-
For the selected property, assign , , and rights, then select .
-
Repeat Step 4.c through Step 4.e for each Messenger property.
-
Click to add the user, with the assigned trustee rights, to the list of trustees.
-
-
Click to save the updated list of trustees for User objects.
-
Stop and then start the Messenger agents to put the LDAP profile into effect.
3.2.2 Providing Full Name Indexing
When users search for a contact, the Messenger client uses the eDirectory indexes of User object attributes in order to find users. By default, the eDirectory Full Name attribute is not indexed. As a result, when users perform a name search, results are returned more slowly because all User objects in the scope must be checked. Therefore, you should configure eDirectory on the Messenger server so that it indexes the Full Name attribute.
This procedure requires the eDirectory snap-in to ConsoleOne, which can be obtained from the Novell Product Downloads site.
-
In ConsoleOne, browse to and right-click the Server object that represents your NetWare, Linux, or Windows server, then click .
-
Click to list the eDirectory attributes that are currently indexed.

-
Click to add a new attribute to the list.

-
Fill in the following fields:
Index Name: Specify a descriptive name for the attribute, such as Full Name.
Attribute: Select .
Rule: Select .
This matches the entire value or the just first part of the value of an attribute. For example, value matching could be used to find entries with a Full Name that is equal to “Jensen” as well as entries that begin with “Jen.”
-
Click to add the Full Name attribute to the list.
-
Click again to activate the index for the Full Name attribute.
3.2.3 Selecting Bind or Compare eDirectory Access for Users
When the Messenger agents authenticate to eDirectory on behalf of Messenger users (using either direct access or LDAP access), they use either a bind or compare operation. By default, a compare operation is used.
With a compare, the Messaging Agent provides the user's password to eDirectory or the LDAP server. When responding to a compare request, eDirectory or the LDAP server compares the password provided by the Messaging Agent with the user's password in eDirectory, and returns the results of the comparison.
You can configure the Messaging Agent to use a bind operation instead of a compare. With a bind, the Messaging Agent essentially logs in to eDirectory or the LDAP server. When responding to a bind request, eDirectory and most LDAP servers enforce password policies such as grace logins and intruder lockout, if such policies have been implemented.
Using a compare can provide faster access than a bind; there is typically less overhead involved because password policies are not being enforced.
If you want Messenger users to authenticate by using a bind rather than a compare:
-
Edit the Messaging Agent startup file (strtup.ma).
On NetWare and Windows, the startup file is located in the Messenger Agent installation directory. You can edit the startup file from the Messaging Agent console. See Controlling the Messaging Agent from the Messaging Agent Console.
On Linux, the startup file is located in /etc/opt/novell/messenger.
-
Remove the comment character (;) from the /diruserauthbind switch.
-
Save the startup file.
-
Stop and then start the Messaging Agent so that it reads its updated startup file and uses a bind operation when authenticating to eDirectory on behalf of Messenger users.
3.2.4 Forcing Direct eDirectory Access for Users
You can configure the Messaging Agent to use direct access to eDirectory on behalf of Messenger users even if you have configured the Messaging Agent to use LDAP access when retrieving its configuration information, as described in Using LDAP Access for the Messaging Agent.
If you want Messenger users to use direct access to eDirectory:
-
Edit the Messaging Agent startup file (strtup.ma).
On NetWare and Windows, the startup file is located in the Messenger Agent installation directory. You can edit the startup file from the Messaging Agent console. See Controlling the Messaging Agent from the Messaging Agent Console.
On Linux, the startup file is located in /etc/opt/novell/messenger.
-
Remove the comment character (;) from the /diruserforcedirect switch.
-
Save the startup file.
-
Stop and then start the Messaging Agent so that it reads its updated startup file and uses direct access when authenticating to eDirectory on behalf of Messenger users.
3.2.5 Customizing Authentication and Searches by eDirectory Attribute
By default, when Messenger users search by user ID, the Messaging Agent searches on the CN (common name) eDirectory attribute. The CN attribute corresponds to the name of User objects in the eDirectory tree. Typically, User objects are named based on users' names, such as SJones or SophieJones. If your eDirectory tree uses the CN attribute for something less helpful in the Messenger client (for example, employee numbers), you can use the /diruseralias startup switch in the Messaging Agent startup file to configure the Messaging Agent to search on a different attribute besides CN. For example, you might want the Messaging Agent to search based on the Internet EMail Address. You can use any eDirectory attribute of type STRING.
To change the eDirectory attribute that the Messaging Agent searches on:
-
Edit the Messaging Agent startup file (strtup.ma)
On NetWare and Windows, the startup file is located in the Messenger Agent installation directory. You can edit the startup file from the Messaging Agent console. See Controlling the Messaging Agent from the Messaging Agent Console.
On Linux, the startup file is located in /etc/opt/novell/messenger.
-
Remove the comment character (;) from the /diruseralias switch.
-
Provide the eDirectory attribute in quotation marks:
Example: /diruseralias-"Internet EMail Address"
-
Save the startup file.
-
Stop and then start the Messaging Agent so that it reads its updated startup file and searches on the specified eDirectory attribute instead of CN.
When you restart the Messaging Agent, Messenger users need to log in again in order to see the results of this change.